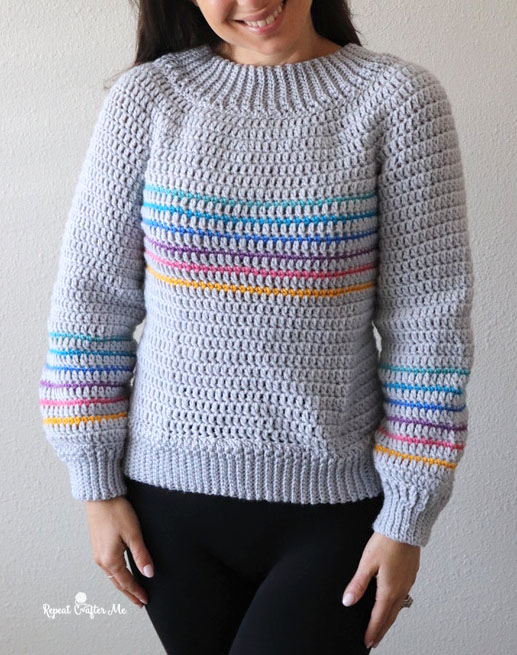
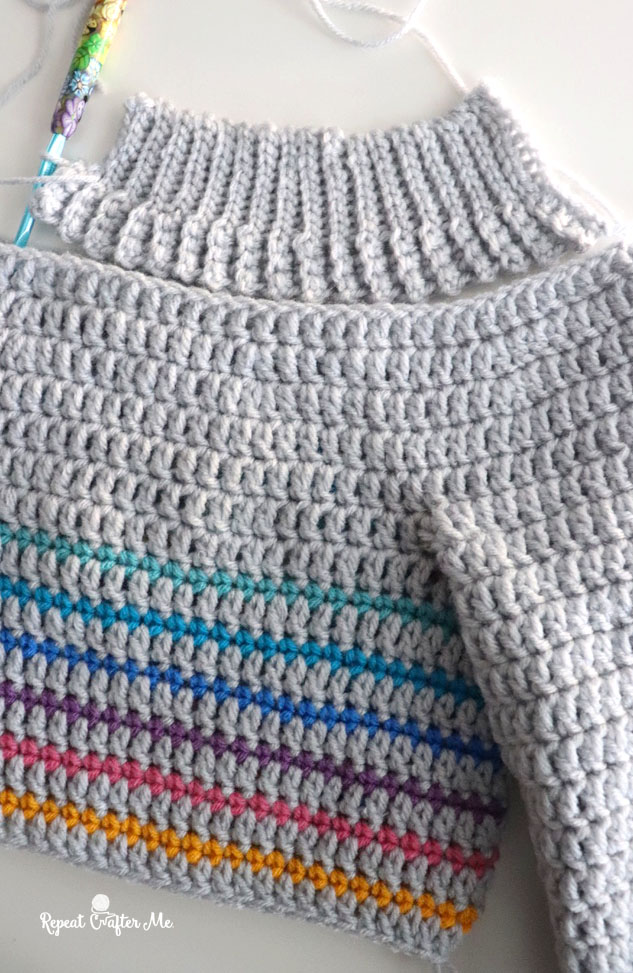
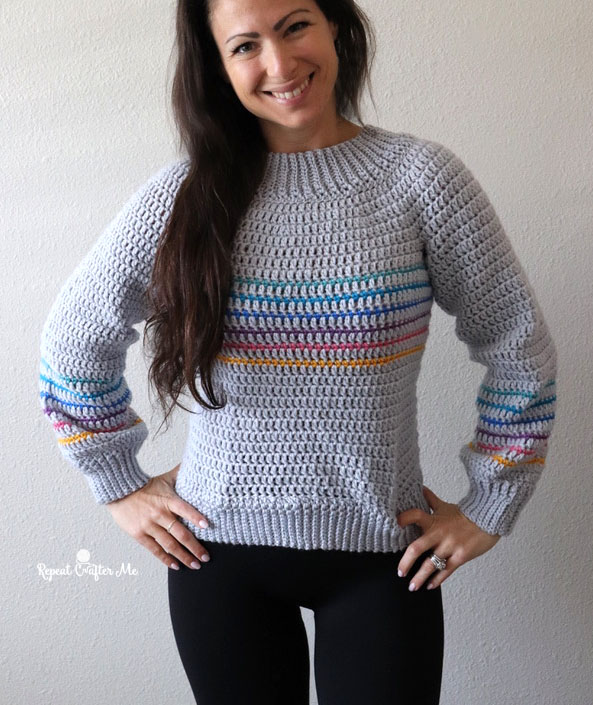
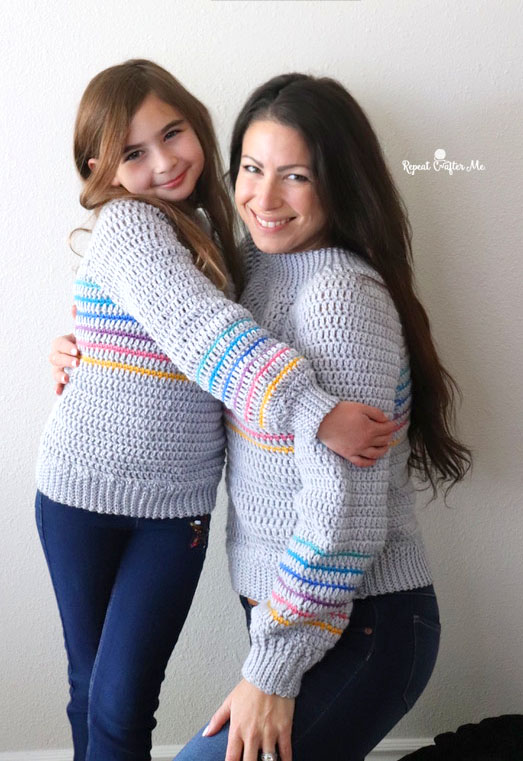
One of my big goals for this year is to design and crochet more wearables! I am starting off with this Skinny Stripe Sweater that works from a very basic pattern of SC and DC stitches. The body works in one piece from the top down and then you will crochet the arms. Add in some colorful stripes or leave one color! Up to you! There is lots of ways to customize this simple crochet sweater.
This post/pattern is currently a WORK IN PROGRESS. I am basing the first sweater off of my body size (XS) and experimenting as I go. I am also adding ribbing around the wrists, neckline, and bottom edge but this is totally optional. You could add on some length just by crocheting additional rounds of DC stitches. Below you find size Extra-Small, Medium, Large, Extra-Large. Kids Size and Size Small is coming soon!
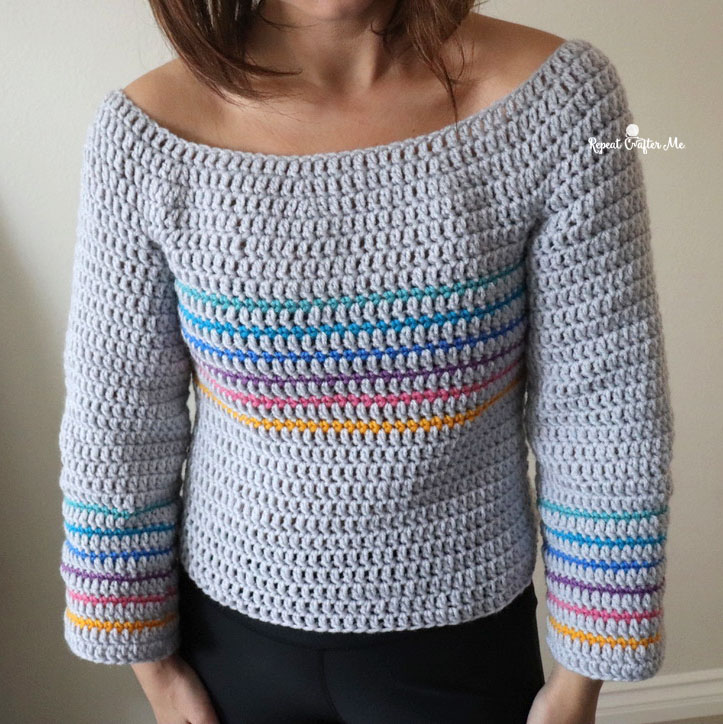
I purposely started this sweater with a big boat neckline so you can easily slip this sweater on and off.
I want to get some feedback from a pattern tester regarding other sizes so stay tuned for an updated pattern post as I continue to work on this project!
In full disclosure, I also had to order more gray yarn so I could finish my sweater and work on a smaller size for Zoe! Bear with me while I wait for my yarn to arrive and continue to work on this pattern. You may see me post other projects in the meantime but you can always come back to this post for updates as I have them ready.
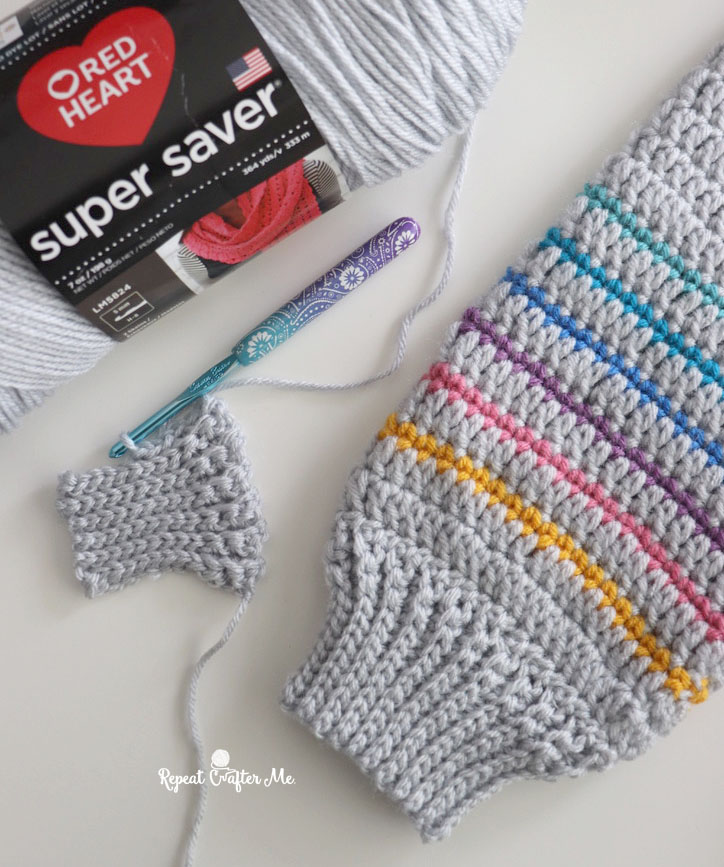
Materials:
– Red Heart Super Saver Yarn in Light Gray (3 skeins), and less than one skein of Aqua, Peacock, Royal Blue, Medium Purple, Pink, and Saffron
Shop all yarn colors HERE on Yarnspirations.com.
1.5 skeins of gray for Kids Size
3 Skeins of gray for size X-Small and Medium
4 skeins of gray for size L and XL
Red Heart with Love would also be a good option for this sweater if you want it super soft!
– Size H Crochet Hook
– Tapestry Needle
The kids size pattern was made to fit my 7yo daughter Zoe who is a little bit on the small side for her age. So I think this could fit anywhere from a 5-8yo but you can always go down or up a hook size and add more/less rounds to the body/arms to make it longer or shorter.
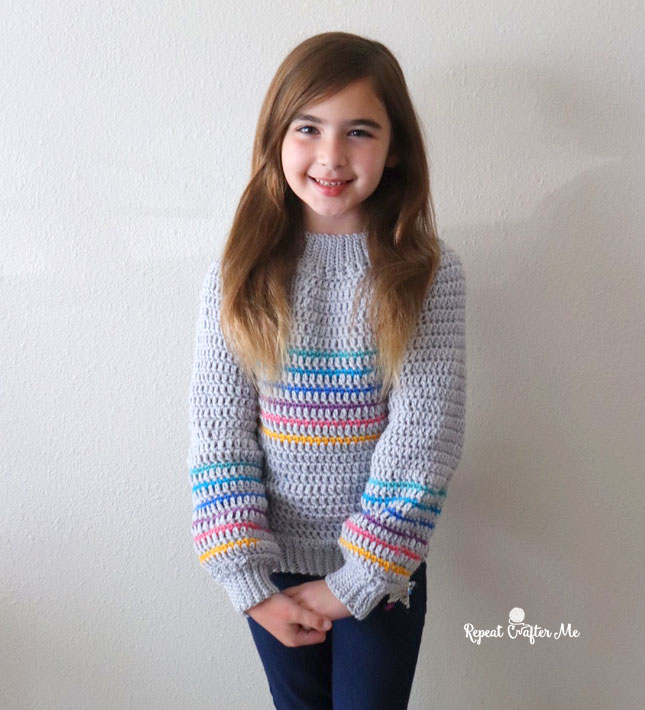
Skinny Stripe Sweater Pattern – KID SIZE (approx ages 5-8)
About 18 inches long and 13 inches wide along waist. You can always make it longer or shorter by adding more/less rounds on the body and arms.
starting with gray yarn
chain 80, join to first chain (be sure not to twist your chain), chain 2 and DC in each stitch around, join, chain 2 (chain 2 does not count as DC) (80 DC)
Round 2: 2 DC in first stitch, DC in next 9 stitches, repeat around, DC in last 4 stitches, join, chain 2 (88 DC)
Round 3: 2 DC in first stitch, DC in next 10 stitches, repeat around, DC in last 4 stitches, join, chain 2 (96 DC)Round 4: DC in each stitch around, join, chain 2 (96 DC)
Round 5: DC in the first 20, chain 10 and skip 18 stitches (first armhole), DC in next 30, chain 10 and skip 18 stitches (second armhole), DC in last 10 stitches, join to first DC, chain 2
Round 6: DC in each stitch around including the 10 chains in each armhole (do not fasten off) (80 DC)
Round 7: join in turquoise yarn and chain 1, SC in each stitch around (80 SC)
Round 8: carry up gray yarn, join in and chain 2 (you can fasten off and re-attach yarn if this is too confusing). DC in each stitch around (80 DC)
Round 9: join in light blue yarn and chain 1, SC in each stitch around (80 SC)
Round 10: join in gray yarn and chain 2, DC in each stitch around (80 DC)
Round 11: join in dark blue yarn and chain 1, SC in each stitch around (80 SC)
Round 12: join in gray yarn and chain 2, DC in each stitch around (80 DC)
Round 13: join in purple yarn and chain 1, SC in each stitch around (80 SC)
Round 14: join in gray yarn and chain 2, DC in each stitch around (80 DC)
Round 15: join in pink yarn and chain 1, SC in each stitch around (80 SC)
Round 16: join in gray yarn and chain 2, DC in each stitch around (80 DC)
Round 17: join in yellow yarn and chain 1, SC in each stitch around (80 SC)
Round 18-28: DC in each stitch around, join, chain 2 (80 DC)
fasten off and weave in ends
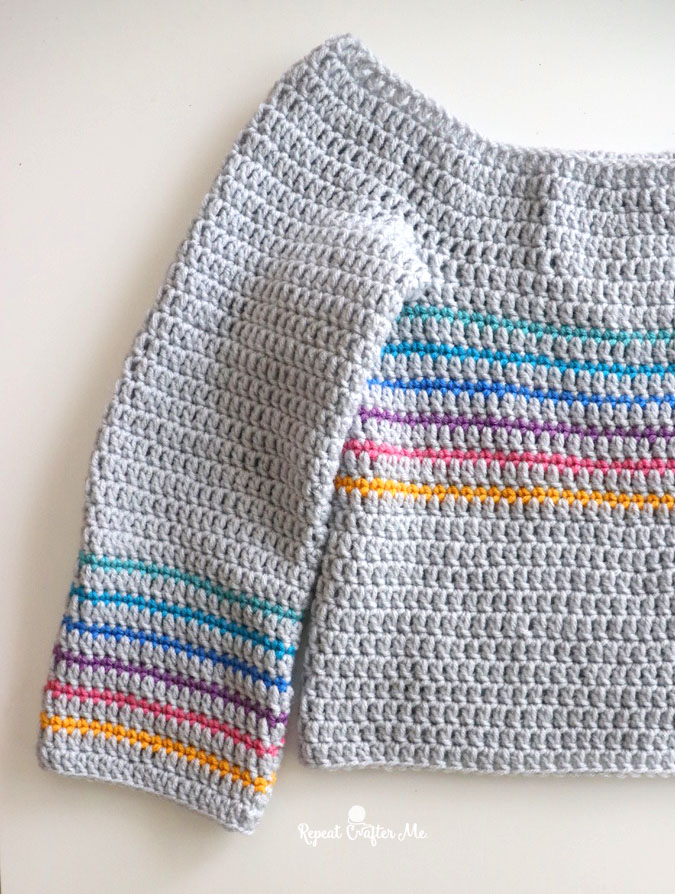
Now let’s add the arms!
Follow the pattern below for both arms.
Join in gray yarn along any space in arm hole. chain 2 and DC in each stitch around for a total of 35 DC, join, chain 2
Round 2-15: DC in each stitch around, join, chain 2
Round 16: SC in each stitch around in turquoise
Round 17: DC in each stitch around in gray
Round 18: SC in each stitch around in light blue
Round 19: DC in each stitch around in gray
Round 20: SC in each stitch around in dark blue
Round 21: DC in each stitch around in gray
Round 22: SC in each stitch around in purple
Round 23: DC in each stitch around in gray
Round 24: SC in each stitch around in pink
Round 25: DC in each stitch around in gray
Round 26: SC in each stitch around in yellow
Round 27: DC in each stitch around, join,
fasten off and weave in ends
Ribbing:
Chain 10, Slip stitch in second chain from hook and in next 7, SC in last 2, chain 1, turn
Row 2-35 (for arms) Row 2-80 (for neck) Row 2-190 (for bottom edge): in back loops only, SC in the SC stitches from previous row, slip stitch in the slip stitches from previous row, chain 1, turn
Fasten off and stitch ribbing pieces onto sweater with tapestry needle.
Skinny Stripe Sweater Pattern – SIZE XS
(this could fit a tween/teen/older child)
starting with gray yarn
chain 100, join to first chain (be sure not to twist your chain), chain 2 and DC in each stitch around, join, chain 2 (chain 2 does not count as DC) (100 DC)
Round 2: 2 DC in first stitch, DC in next 9 stitches, repeat around, join, chain 2 (110 DC)
Round 3: 2 DC in first stitch, DC in next 10 stitches, repeat around, join,
chain 2 (120 DC)
Note: This is where you could continue to increase to make the sweater bigger (next round would be 2 DC in first, DC in next 11, etc)
Round 4-5: DC in each stitch around, join, chain 2 (120 DC)
Round 6: DC in the first 35, chain 10 and skip 25 stitches (first armhole), DC in next 35, chain 10 and skip 25 stitches (second armhole), join to first DC, chain 2
Round 7: DC in each stitch around including the 10 chains in each armhole (do not fasten off) (90 DC)
Round 8: join in turquoise yarn and chain 1, SC in each stitch around (90 SC)
Round 9: carry up gray yarn, join in and chain 2 (you can fasten off and re-attach yarn if this is too confusing). DC in each stitch around (90 DC)
Round 10: join in light blue yarn and chain 1, SC in each stitch around (90 SC)
Round 11: join in gray yarn and chain 2, DC in each stitch around (90 DC)
Round 12: join in dark blue yarn and chain 1, SC in each stitch around (90 SC)
Round 13: join in gray yarn and chain 2, DC in each stitch around (90 DC)
Round 14: join in purple yarn and chain 1, SC in each stitch around (90 SC)
Round 15: join in gray yarn and chain 2, DC in each stitch around (90 DC)
Round 16: join in pink yarn and chain 1, SC in each stitch around (90 SC)
Round 17: join in gray yarn and chain 2, DC in each stitch around (90 DC)
Round 18: join in yellow yarn and chain 1, SC in each stitch around (90 SC)
Round 19-30 (or longer): DC in each stitch around, join, chain 2 (90 DC)
Fasten off and weave in ends or continue by making a row of SC along the edge if you aren’t going to add ribbing.
Now let’s add the arms! Follow the pattern below for both arms.
Join in gray yarn along any space in arm hole. chain 2 and DC in each stitch around for a total of 40 DC, join, chain 2
Round 2-18: DC in each stitch around, join, chain 2
Round 19: SC in each stitch around in turquoise
Round 20: DC in each stitch around in gray
Round 21: SC in each stitch around in light blue
Round 22: DC in each stitch around in gray
Round 23: SC in each stitch around in dark blue
Round 24: DC in each stitch around in gray
Round 25: SC in each stitch around in purple
Round 26: DC in each stitch around in gray
Round 27: SC in each stitch around in pink
Round 28: DC in each stitch around in gray
Round 29: SC in each stitch around in yellow
Round 30-31 (or longer): DC in each stitch around, join, chain 2
fasten off and weave in ends or add a round of SC along the edge if you aren’t going to add ribbing.
SC along the the top edge or add ribbing.
Ribbing:
Chain 13, Slip stitch in second chain from hook and in next 8, SC in last 3, chain 1, turn
Row 2-40 (for arms) Row 2-100 (for neck) Row 2-180 (for bottom edge): in back loops only, SC in the SC stitches from previous row, slip stitch in the slip stitches from previous row, chain 1, turn
Fasten off and stitch ribbing pieces onto sweater with tapestry needle.
NOTE: I am attaching the previously published SIZE MEDIUM by fellow crocheter Erin IN THIS FREE PDF Document! The patterns below are increases based off of my original pattern and are more consistent. Erin’s pattern is extremely helpful and works out beautifully! Feel free to use her version as well!
UPDATE 2-17-21
Big THANK YOU to Ashley who pattern tested the bigger sizes! She is my virtual assistant and also a very talented crochet/knit designer herself! You can check out her website and pattern store HERE (www.AshleyDylan.com)
Skinny Stripe Sweater Pattern – Size MEDIUM
starting with gray yarn
chain 104, join to first chain (be sure not to twist your chain), chain 2 and DC in each stitch around, join, chain 2 (chain 2 does not count as DC) (104 DC)
Round 2: 2 DC in first stitch, DC in next 9 stitches, repeat around, DC in last 4 stitches, join, chain 2 (114 DC)
Round 3: 2 DC in first stitch, DC in next 10 stitches, repeat around, DC in last 4 stitches, join, chain 2 (124 DC)Round 4-7: DC in each stitch around, join, chain 2 (124 DC)
Round 8: DC in the first 37, chain 16 and skip 25 stitches (first armhole), DC in next 37, chain 16 and skip 25 stitches (second armhole), join to first DC, chain 2
Round 9: DC in each stitch around including the 16 chains in each armhole (do not fasten off) (106 DC)
Round 10: join in turquoise yarn and chain 1, SC in each stitch around (106 SC)
Round 11: carry up gray yarn, join in and chain 2 (you can fasten off and re-attach yarn if this is too confusing). DC in each stitch around (106 DC)
Round 12: join in light blue yarn and chain 1, SC in each stitch around (106 SC)
Round 13: join in gray yarn and chain 2, DC in each stitch around (106 DC)
Round 14: join in dark blue yarn and chain 1, SC in each stitch around (106 SC)
Round 15: join in gray yarn and chain 2, DC in each stitch around (106 DC)
Round 16: join in purple yarn and chain 1, SC in each stitch around (106 SC)
Round 17: join in gray yarn and chain 2, DC in each stitch around (106 DC)
Round 18: join in pink yarn and chain 1, SC in each stitch around (106 SC)
Round 19: join in gray yarn and chain 2, DC in each stitch around (106 DC)
Round 20: join in yellow yarn and chain 1, SC in each stitch around (106 SC)
Round 21-37: DC in each stitch around, join, chain 2 (106 DC)
fasten off and weave in ends or add a round of SC along the edge if you aren’t going to add ribbing.
SC along the the top edge or add ribbing.
Ribbing:
Chain 13, Slip stitch in second chain from hook and in next 8, SC in last 3, chain 1, turn
Row 2-47 (for arms) Row 2-110 (for neck) Row 2-212 (for bottom edge): in back loops only, SC in the SC stitches from previous row, slip stitch in the slip stitches from previous row, chain 1, turn
Fasten off and stitch ribbing pieces onto sweater with tapestry needle.
Skinny Stripes Sweater Pattern – Size LARGE
starting with gray yarn
chain 110, join to first chain (be sure not to twist your chain), chain 2 and DC in each stitch around, join, chain 2 (chain 2 does not count as DC) (110 DC)
Round 2: 2 DC in first stitch, DC in next 9 stitches, repeat around, join, chain 2 (121 DC)
Round 3: 2 DC in first stitch, DC in next 10 stitches, repeat around, join, chain 2 (132 DC)
Round 4-9: DC in each stitch around, join, chain 2 (132 DC)
Round 10: DC in the first 41, chain 18 and skip 25 stitches (first armhole), DC in next 41, chain 18 and skip 25 stitches (second armhole), join to first DC, chain 2
Round 11: DC in each stitch around including the 18 chains in each armhole (do not fasten off) (114 DC)
Round 12: join in turquoise yarn and chain 1, SC in each stitch around (114 SC)
Round 13: carry up gray yarn, join in and chain 2 (you can fasten off and re-attach yarn if this is too confusing). DC in each stitch around (114 DC)
Round 14: join in light blue yarn and chain 1, SC in each stitch around (114 SC)
Round 15: join in gray yarn and chain 2, DC in each stitch around (114 DC)
Round 16: join in dark blue yarn and chain 1, SC in each stitch around (114 SC)
Round 17: join in gray yarn and chain 2, DC in each stitch around (114 DC)
Round 18: join in purple yarn and chain 1, SC in each stitch around (114 SC)
Round 19: join in gray yarn and chain 2, DC in each stitch around (114 DC)
Round 20: join in pink yarn and chain 1, SC in each stitch around (114 SC)
Round 21: join in gray yarn and chain 2, DC in each stitch around (114 DC)
Round 22: join in yellow yarn and chain 1, SC in each stitch around (114 SC)
Round 23-38: DC in each stitch around, join, chain 2 (114 DC)
Fasten off and weave in ends or continue by making a row of SC along the edge if you aren’t going to add ribbing.
Now let’s add the arms! Follow the pattern below for both arms.
Join in gray yarn along any space in arm hole. chain 2 and DC in each stitch around for a total of 47 DC, join, chain 2
Round 2-20: DC in each stitch around, join, chain 2
Round 21: SC in each stitch around in turquoise
Round 22: DC in each stitch around in gray
Round 23: SC in each stitch around in light blue
Round 24: DC in each stitch around in gray
Round 25: SC in each stitch around in dark blue
Round 26: DC in each stitch around in gray
Round 27: SC in each stitch around in purple
Round 28: DC in each stitch around in gray
Round 29: SC in each stitch around in pink
Round 30: DC in each stitch around in gray
Round 31: SC in each stitch around in yellow
Round 32-33: DC in each stitch around, join, chain 2
fasten off and weave in ends or add a round of SC along the edge if you aren’t going to add ribbing.
SC along the the top edge or add ribbing.
Ribbing:
Chain 13, Slip stitch in second chain from hook and in next 8, SC in last 3, chain 1, turn
Row 2-47 (for arms) Row 2-110 (for neck) Row 2-224 (for bottom edge): in back loops only, SC in the SC stitches from previous row, slip stitch in the slip stitches from previous row, chain 1, turn
Fasten off and stitch ribbing pieces onto sweater with tapestry needle.
Skinny Stripes Sweater Pattern – Size EXTRA LARGE
starting with gray yarn
chain 113, join to first chain (be sure not to twist your chain), chain 2 and DC in each stitch around, join, chain 2 (chain 2 does not count as DC) (113 DC)
Round 2: 2 DC in first stitch, DC in next 9 stitches, repeat around, DC in last 3 stitches, join, chain 2 (124 DC)
Round 3: 2 DC in first stitch, DC in next 10 stitches, repeat around, join, chain 2 (135 DC)
Round 4-11: DC in each stitch around, join, chain 2 (135 DC)
Round 12: DC in the first 42, chain 22 and skip 25 stitches (first armhole), DC in next 43, chain 22 and skip 25 stitches (second armhole), join to first DC, chain 2
Round 13: DC in each stitch around including the 22 chains in each armhole (do not fasten off) (123 DC)
Round 14: join in turquoise yarn and chain 1, SC in each stitch around (123 SC)
Round 15: carry up gray yarn, join in and chain 2 (you can fasten off and re-attach yarn if this is too confusing). DC in each stitch around (123 DC)
Round 16: join in light blue yarn and chain 1, SC in each stitch around (123 SC)
Round 17: join in gray yarn and chain 2, DC in each stitch around (123 DC)
Round 18: join in dark blue yarn and chain 1, SC in each stitch around (123 SC)
Round 19: join in gray yarn and chain 2, DC in each stitch around (123 DC)
Round 20: join in purple yarn and chain 1, SC in each stitch around (123 SC)
Round 21: join in gray yarn and chain 2, DC in each stitch around (123 DC)
Round 22: join in pink yarn and chain 1, SC in each stitch around (123 SC)
Round 23: join in gray yarn and chain 2, DC in each stitch around (123 DC)
Round 24: join in yellow yarn and chain 1, SC in each stitch around (123 SC)
Round 25-44: DC in each stitch around, join, chain 2 (123 DC)
Fasten off and weave in ends or continue by making a row of SC along the edge if you aren’t going to add ribbing.
Now let’s add the arms! Follow the pattern below for both arms.
Join in gray yarn along any space in arm hole. chain 2 and DC in each stitch around for a total of 51 DC, join, chain 2
Round 2-22: DC in each stitch around, join, chain 2
Round 23: SC in each stitch around in turquoise
Round 24: DC in each stitch around in gray
Round 25: SC in each stitch around in light blue
Round 26: DC in each stitch around in gray
Round 27: SC in each stitch around in dark blue
Round 28: DC in each stitch around in gray
Round 29: SC in each stitch around in purple
Round 30: DC in each stitch around in gray
Round 31: SC in each stitch around in pink
Round 32: DC in each stitch around in gray
Round 33: SC in each stitch around in yellow
Round 34-35: DC in each stitch around, join, chain 2
fasten off and weave in ends or add a round of SC along the edge if you aren’t going to add ribbing.
SC along the the top edge or add ribbing.
Ribbing:
Chain 13, Slip stitch in second chain from hook and in next 8, SC in last 3, chain 1, turn
Row 2-51 (for arms) Row 2-113 (for neck) Row 2-246 (for bottom edge): in back loops only, SC in the SC stitches from previous row, slip stitch in the slip stitches from previous row, chain 1, turn
Fasten off and stitch ribbing pieces onto sweater with tapestry needle.
If you make this sweater and have suggestions regarding sizing please email me at [email protected]. It really is best to try the sweater on as you go to make sure length and width is correct.
Enjoy sweater weather!

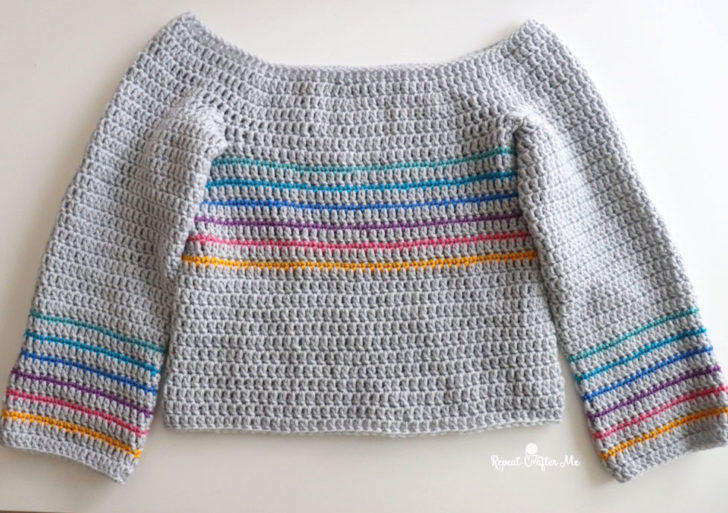
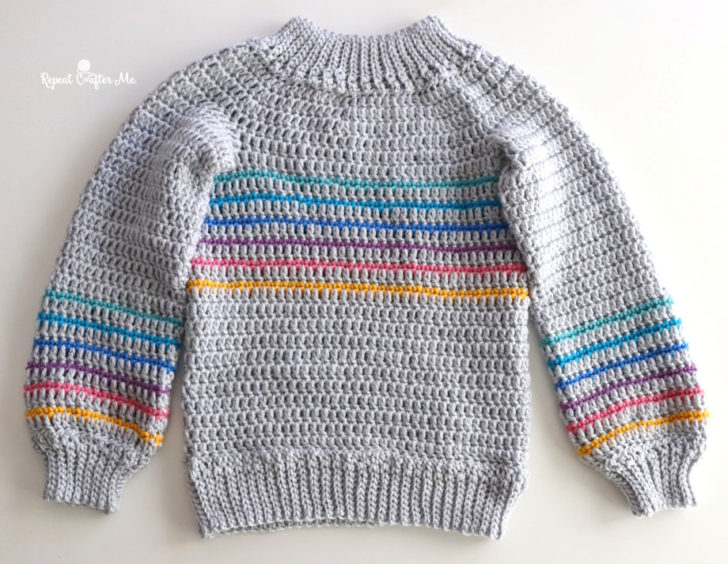
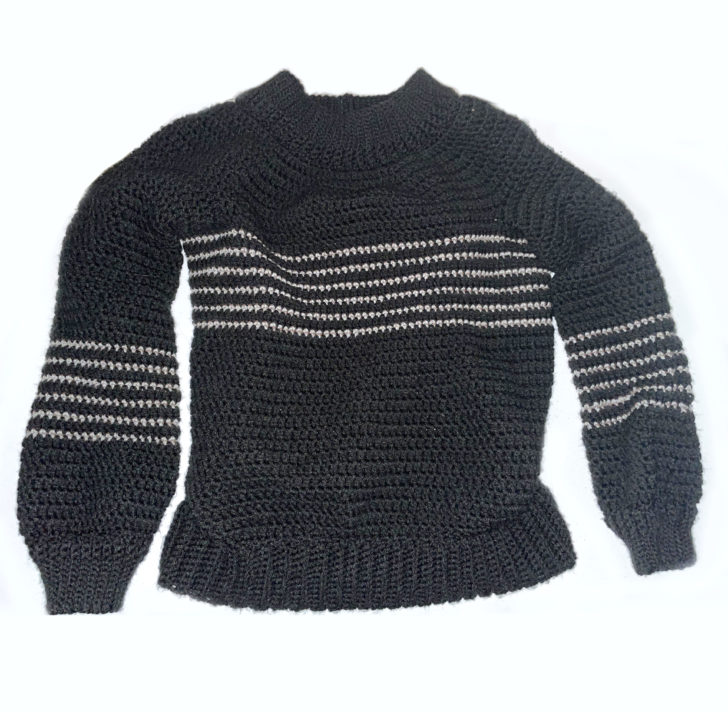
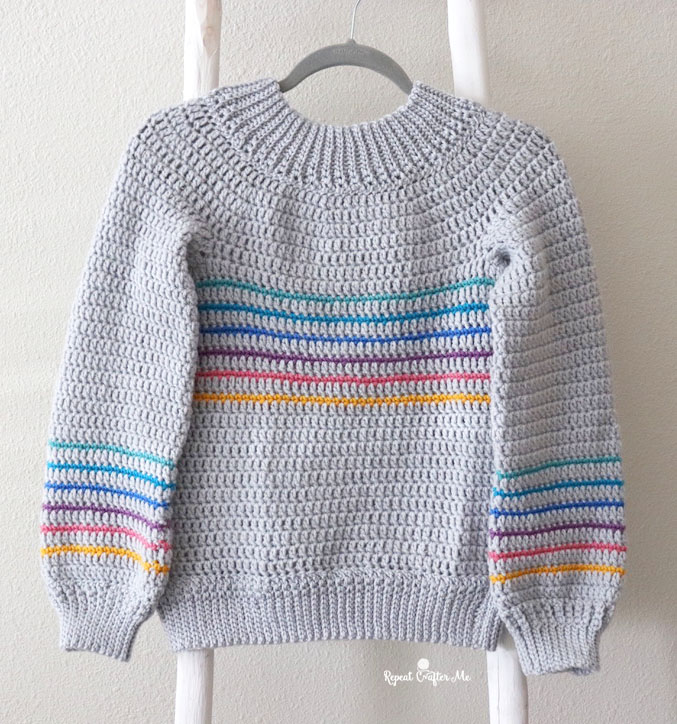
The pictures above are the sweater without the ribbing. Below is my finished sweater with the ribbing! Which do you like better? I think I like the finished look of the ribbing on the edges but it did take a lot of extra time.
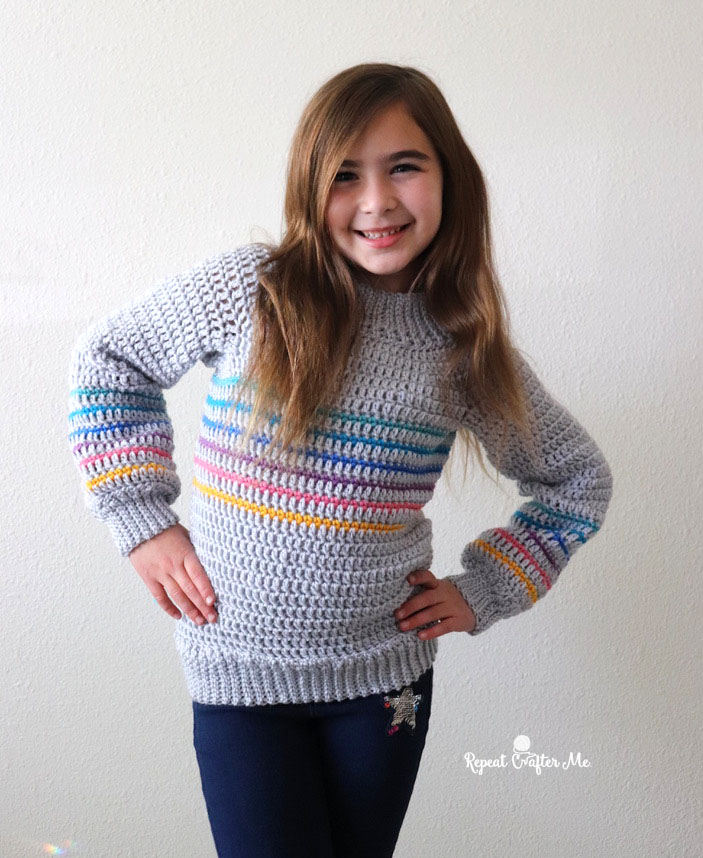
Twinsies! Love our Mother/Daughter matching sweaters!

 Starbucks Stitch Markers and Bottled Beverages
 Crochet Christmas Tree Pixel Square
 Crochet Santa Pixel Square
 Crochet Daisy Rug with Clover Amour Large Hooks and Giveaway!
I would need to make a xlarge. How would I increase .
Looks fabulous, I expected the rib for the neck edge to be 100 rows to match the starting chain, not sure if it’s a typo.
Wow! I think you created a really nice sweater! Thank you!!
I plan to attempt to create one for my daughter (size Lg) and one for my granddaughter (size 24 mos). Wish me luck with the size adjustments
Lynn
This looks so cute on you! Can’t wait to make this. Will you make adjustments for different sizes? Im definitely not an xs 🙂
looks gorgeous!
Really cute sweater! I love the neckline. Could you please post the body measurements? That would give me an idea how many stitches I need to add for my size. Thanks!
I really appreciate this wonderful post that you have provided for us. I feel strongly that love and read more on this topic. I have spent a lot of my spare time reading your content. Thank you a lot.
Thanks for sharing.I found a lot of interesting information here. A really very thankful and hopeful that you will write many more posts like this one.
What a sweet sweater! It looks great on you!
I should express that I like this article so a ton and moreover using it in regular. I believe you would continue sharing better than average article here.
I like this sweater a lot and would love to make it. The neckline is perfect for me so I hope it will be available for some of us larger chested ladies – like a size Med or large. Would love to make one for my daughter who has a really large chest, lol!!! Can’t wait for the larger size patterns!! Thank you so much for sharing!!!
Love it! ❤️ I made it immediately & although I’m not really an XS (more like a M) it fits! I did the ribbing a little differently but I followed the rest of the pattern exactly. Thank you for another great pattern! Wish I could include a picture so you could see how cute it turned out. Thanks again & Happy New Year
I love this sweater especially with the ribbing in Erin’s pics. I trust in your designs and think this could be a nice first sweater pattern to try. I’ll wait for XL size.
کریستال چیست ؟
معنی کریستال :
کریستال به ماده ای که ذرات تشکیل دهنده آن بصورت منظم در سه جهت قرار گرفته باشند می گویند.
در بین مردم شیشه سرب دار را به اسم کریستال می شناسند.
کریستال در واقع شیشه ای است که در آن اکسید سرب اضافه شده است و بجای کلسیم قرار گرفته است .
I really like your post because this post is very helpful to me and it gives me a new perspective GOM Player Plus crack
The Ten Plagues live from Egypt – Watchman Reports
Device Doctor Pro Crack
Best Attractive Model Female in Jalandhar. All things considered, there are various men who have diverse sexual wants however Amritsar escorts. their life partner either doesn’t feel or won’t be happy with supporting them to fulfill it. This is the time when a Call Girls in Jalandharwould enter and help you learn here. These delightful young ladies have been educated in how to satisfy each customer’s wants.
Someone is necessarily helping in creating critical articles I can name.
This is the first time you visit your site and so far? I was amazed at the analysis you did to create this amazing current edition.
Fantastic Process!
I love this sweater! It’s a relatively simple pattern that looks stunning, especially with the long neckline- though I also like the turtleneck. It’s perfect for winter when worn on top of a shirt and under a coat! Thank you, Sarah, for sharing this wonderful pattern!
Oh wow!
I look forward to trying to make one for me.
Thank you for sharing
I am not sure what size range I fall into for this sweater. Can you add the finished garment measurements?
I was looking for the measurements as well. I have absolutely no clue which size to make.
Have you thought about adding plus sizes? I’d love to make these for my daughter and me but not sure I could “size up” correctly on my own.
You might want to edit out some of the previous *spam* comments…….which super saver color are you calling “peacock”?….Thanks….
I love them both. But I like the ribbing you added. I hope to make me one. And my grandaughter Zoey who is 7 also. How sweet. Thank you for sharing your patterns. I plan to make the Halloween masks too. Love them. And I did make the Bunny cup tonight. I love it. So easy. Going to make afew colored one. For Zoey my granddaughter.
Hi, for making the large size, in row 11, it says 114 stitches, but if I do 41 + 18 + 41 + 18 that’s 118, right?
Aerocity escort service has truly demonstrated a sense of pleasure and high level power-pack entertainment in the most fulfilling manner. It has been a matter of pride for all to draw out immense sense of enjoyment that would appear to be more satisfying and entertaining
It was a great informative post. Proceed many Useful and enlightening links. Loved your writings also. Concept of this subject was well discussed.
I definitely agree with this article and I Just want say that is extremely pleasant and very informative blog. I will make certain to be reading your blog more.
I love it! I have a 3 yrd old so i adjusted the pattern a little smaller, left off the sleeves for now so she can fit for longer and extended it into a sweater dress. She did the sweatest little happy dance when I put it on her. Wish I could share a picture. I’m starting now on one for me. 😀
I made this as a sweater dress for my 3 rd old and it’s lovely. I want to make a size medium for me now, but I don’t see the arms in the Medium pattern. Are they the same as for the small size then.? Thanks!
Welcome to Tara Raajput agency, Gurgaon’s most trusted and dependable private service for history 4 times.
Mumbai call girls have a wide variety of services. From escorting to arranging for private dinners, Andheri call girls are ready to fulfill your sexual fantasies with ease. Andheri call girls have an excellent reputation in the area and are able to help you meet your needs. They are always available for an evening out. So, you can be assured that you will be satisfied with their service.
Andheri call girls have an excellent reputation in the area and are able to help you meet your needs. They are always available for an evening out. So, you can be assured that you will be satisfied with their service.
sweet shirt realy i love this
This is a beautiful feminine pattern. Would you have instructions for a size small?
the best dating service in your city and your location
I made the kids size for my 5 year old. Everything fits perfectly EXCEPT the ribbing on the neckline. If you hold it up it looks just fine. But when he puts it on, the collar stands straight up like a turtle neck, but looks like some kind of vampire cape collar. Followed the pattern and I am by no means a beginner at crochet. Very confused as to why it lays flat in your pictures but stands straight up on my completed work.
By completing PM Viksit Bharat Rozgar Yojana registration online, youth can unlock employment opportunities, financial incentives, and skill development programs.
A bright striped sweater always looks stylish and cozy, especially when knitted by hand—they exude soul. But I once ordered a similar ready-made version online, and the quality was far from my expectations. Fortunately, I was able to quickly sort it out through https://stylewe.pissedconsumer.com/customer-service.html , which offers a collection of real stories and support contacts. This experience taught me: sometimes it’s better to knit something yourself, and even if you trust a store to buy it, it’s important to know where to turn if you have any problems.
Crochet Skinny Stripe Sweater is a lightweight handmade sweater made with crochet techniques featuring narrow stripe patterns for a fitted, stylish look.