
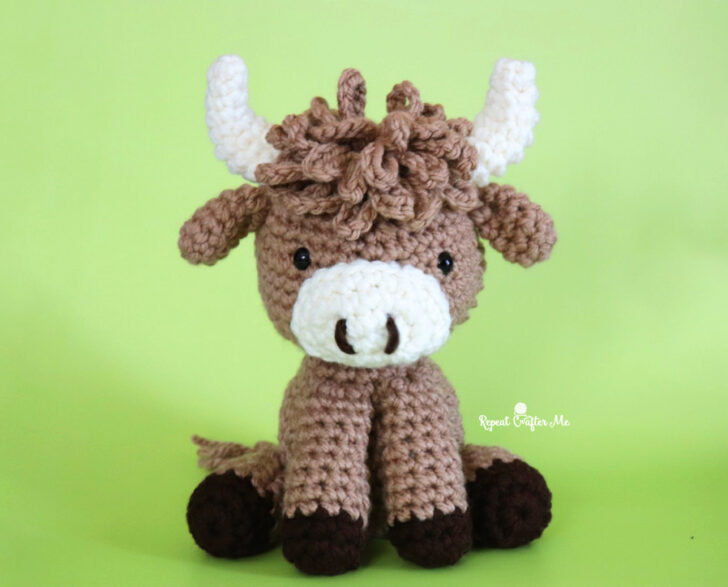
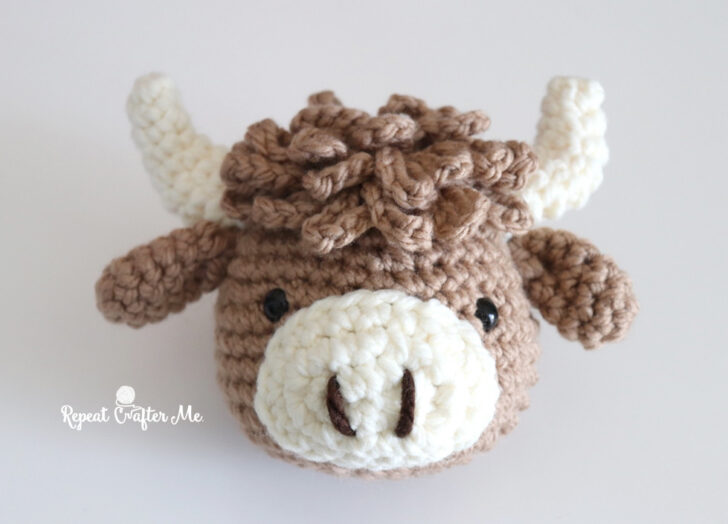
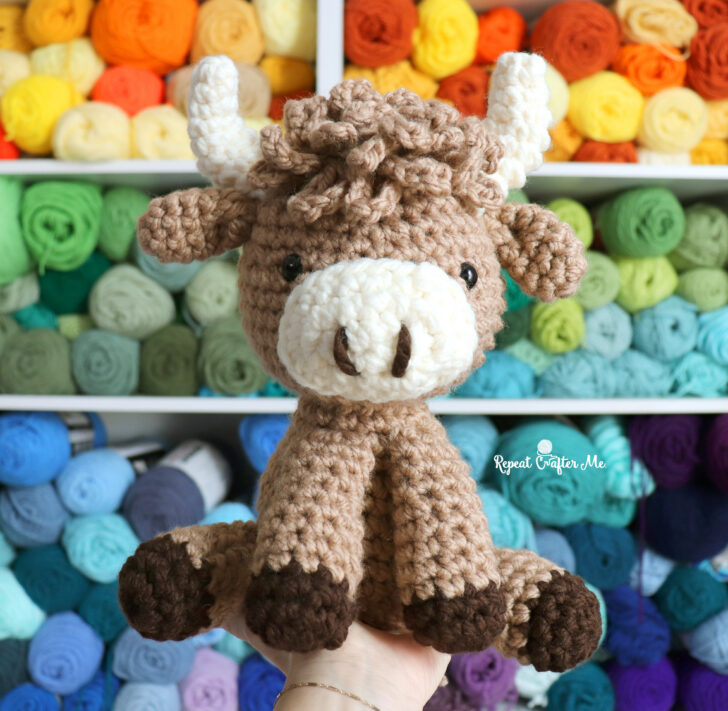
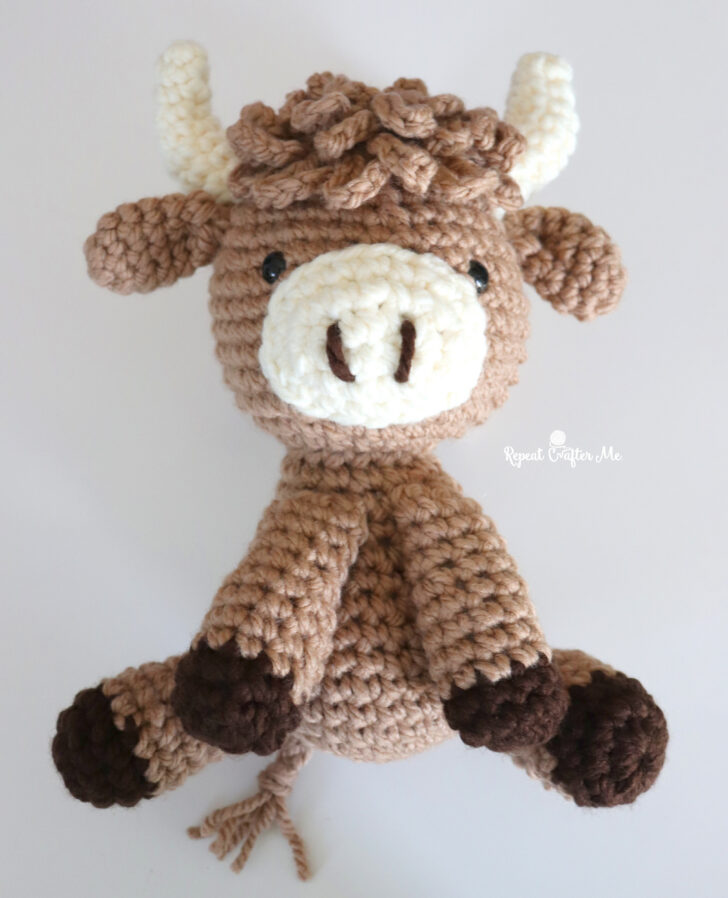
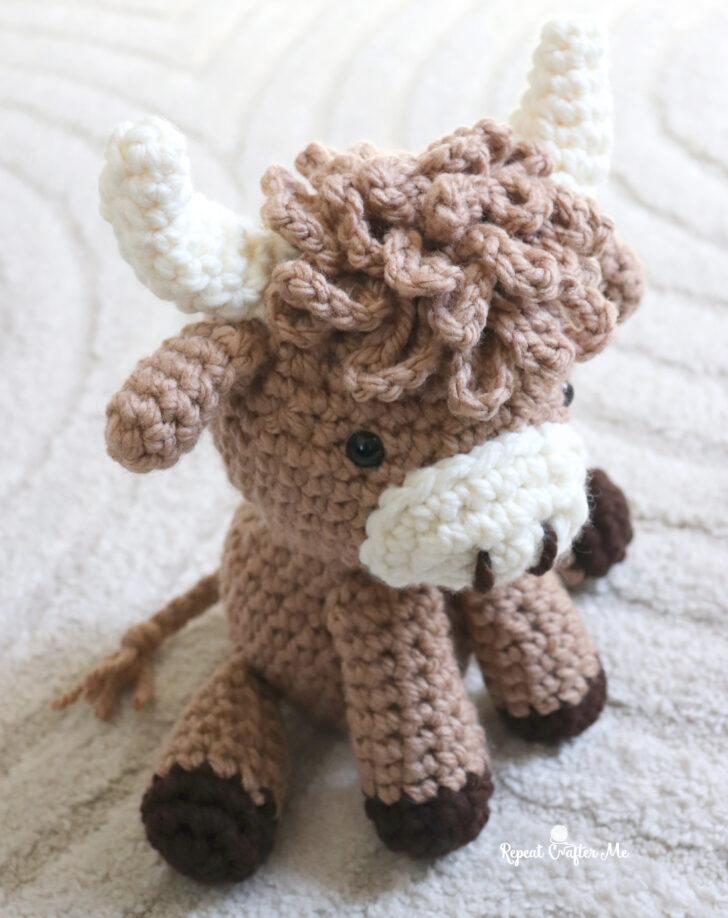
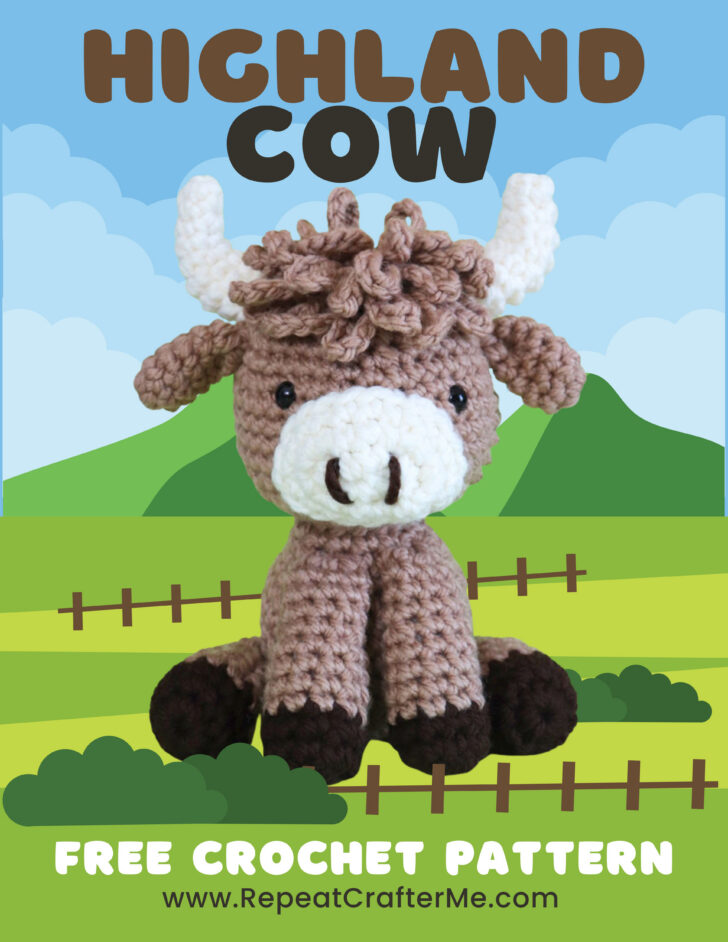
The fluff. The horns. The HAIR.
I couldn’t resist making a Highland Cow and this one might be my new favorite! There’s just something about that shaggy top and those sweet little faces that makes them extra lovable. Plus, this chunky yarn gives it the perfect structure while still keeping that soft, cuddly feel.
Materials:
-Bernat Softee Chunky Yarn in colors Soft Taupe (2 skeins – light brown for main body, ears, hair, etc), Dark Taupe (dark brown for hooves and nostrils), and Natural (off white/cream color for snout and horns)
>>> Shop yarn HERE on Yarnspirations.com <<<
OR >>> Shop yarn HERE on Amazon.com <<<
– Size H Crochet Hook
– Polyfil Fiber Stuffing
– Two black Safety Eyes ( I recommend 15mm)
– Tapestry Needle
UPDATE: Bernat Softee Chunky is currently SOLD OUT. I would suggest Red Heart Super Easy as a replacement! It’s also a #6 Bulky weight with a similar texture. Color Ginger (light brown), Bark (dark brown), and Aran (cream). I actually think I might like these shades of brown slightly better for our highland cow!
>>> Shop Red Heart Super Easy Yarn HERE on Yarnspirations.com <<<
Note: This is a super bulky yarn that is typically paired with a size L crochet hook. For this project, I intentionally sized down to a H hook to create tighter stitches. This helps give the cow more structure and prevents the polyfil from showing through.
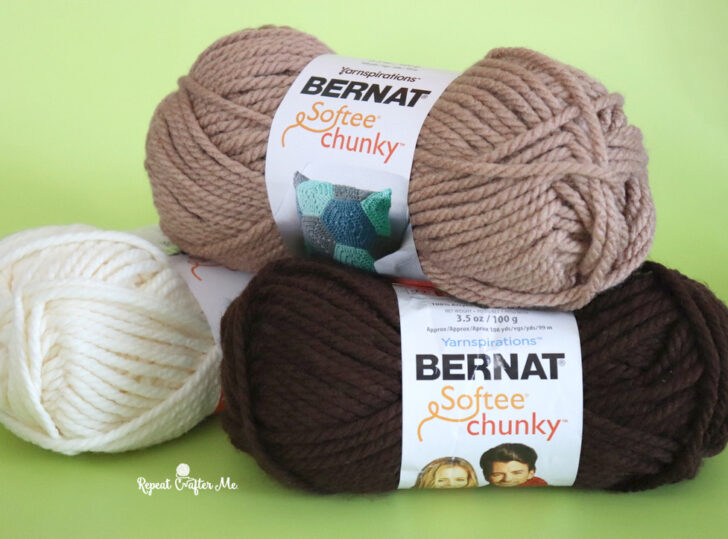
Bernat Softee Chunky turned out to be the perfect yarn for this design! The thickness and texture work especially well for smaller pieces like the ears and horns—no stuffing needed, yet they still hold their shape beautifully. Feel free to play around with the colors to make it your own. You could swap in dark brown for the body or even use it for the horns instead of cream.
Finished Size: Approximately 10 inches tall and 8 inches wide (at the widest point of the legs).
And a little behind-the-scenes moment… I had a bit of an oops and realized my memory card wasn’t in the camera while photographing most of this pattern. I’ll be working on a full video tutorial soon to walk you through the steps and show you exactly how to assemble this cutie cow!
Head:
with light brown yarn
Magic Ring, chain 1 and make 10 SC in ring, join chain 1
Round 2: 2 SC in each stitch around, join, chain 1
Round 3: SC in each stitch around, join, chain 1 (20 SC)
Round 4: 2 SC in first, SC in next, repeat around, join, chain 1 (30 SC)
Round 5: 2 SC in first, SC in next two, repat around, join, chain 1 (40 SC)
Round 6-10: SC in each stitch around, join, chain 1 (40 SC)
Round 11: SC Decrease, SC in next 6, repeat around, join, chain 1 (35 SC)
Round 12: SC in each stitch around, join, chain 1 (35 SC)
Round 13: SC Decrease, SC in next 5, repeat around, join, chain 1
Round 14: SC Decrease, SC in next 4, repeat around, join, chain 1
Pause here to work on the snout. You will need to add in safety eyes and stitch on Snout before completing the head and closing it up. Start stuffing with polyfil
Round 15: SC Decrease, SC in next 3, repeat around, join, chain 1
Round 16: SC Decrease, SC in next 2, repeat around, join, chain 1
Round 17: SC Decrease, SC in next, repeat around join, chain 1
Round 18: Finish stuffing with polyfil, SC Decraese until closed.
Snout:
with cream color yarn
Chain 6, SC in second chain from hook and next 3, 4 SC in last, now working on other side of chain, SC in next 3, 4 SC in last, join, chain 1
Round 2: SC in first 5, 2 SC in next two, SC in next 6, SC in last two, join, chain 1
Round 3: SC in each stitch around, join, fasten off leaving long tail.
with strand of dark brown yarn and tapestry needle, add two nostrils to front of snout.
Stitch snout onto head approximately between rounds 5 and 10. Stuff lightly with polyfil before you finish the last stitches.
Add two black 15mm safety eyes just slightly above either side of the snout. About Round 10-11 of head.
Ears: Make 2
Magic Ring, chain 1 and make 6 SC in ring, join chain 1
Round 2: 2 SC in first, SC in next two, repeat around, join, chain 1 (8 SC)
Round 3-5: SC in each stitch around, join, chain 1 (8 SC)
Round 6: SC decrease, SC in next 2, repeat around, fasten off
No need to stuff. Pinch bottom of ear closed and stitch onto either side of head about 1 row above eyes.
Horns: Make 2
with cream color yarn
Magic Ring, chain 1 and make 4 SC in ring, join chain 1
Round 2: SC in each stitch around, join, chain 1 (4 SC)
Round 3: 2 SC in first, SC in next, repeat around, join, chain 1 (6 SC)
Round 4: SC in each stitch around, join, chain 1 (6 SC)
Round 5: 2 SC in first, SC in next 2, repeat around, join, chain 1 (8 SC)
Round 6-8: SC in each stitch around, join, chain 1 (8 SC)
Fasten off leaving long tail.
Attach horns to the top sides of the head (right above ears), angled slightly outward.
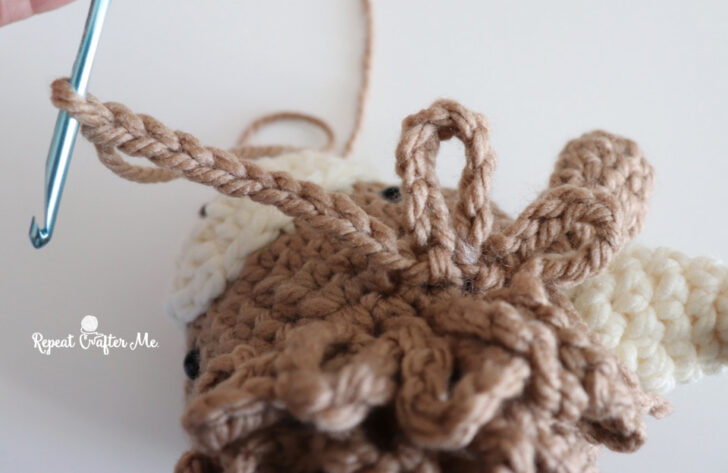
Add the Shaggy Hair:
Did you know the fringe/bangs at the top of the highland cow acts as a natural shield, protecting their eyes from harsh wind, rain and snow?
I created chain loops to act as the fun wild hair on top of the head. You can add this AFTER you have closed up the top of the head and already added on the ears and horns.
Using light brown yarn, join anywhere on the top center of the head.
Chain 10, slip stitch back into the same stitch.
Repeat this process in surrounding stitches, working outward in a circular pattern until you get that full, messy Highland cow look.
(More loops = more fluff! Don’t be afraid to go wild here.)
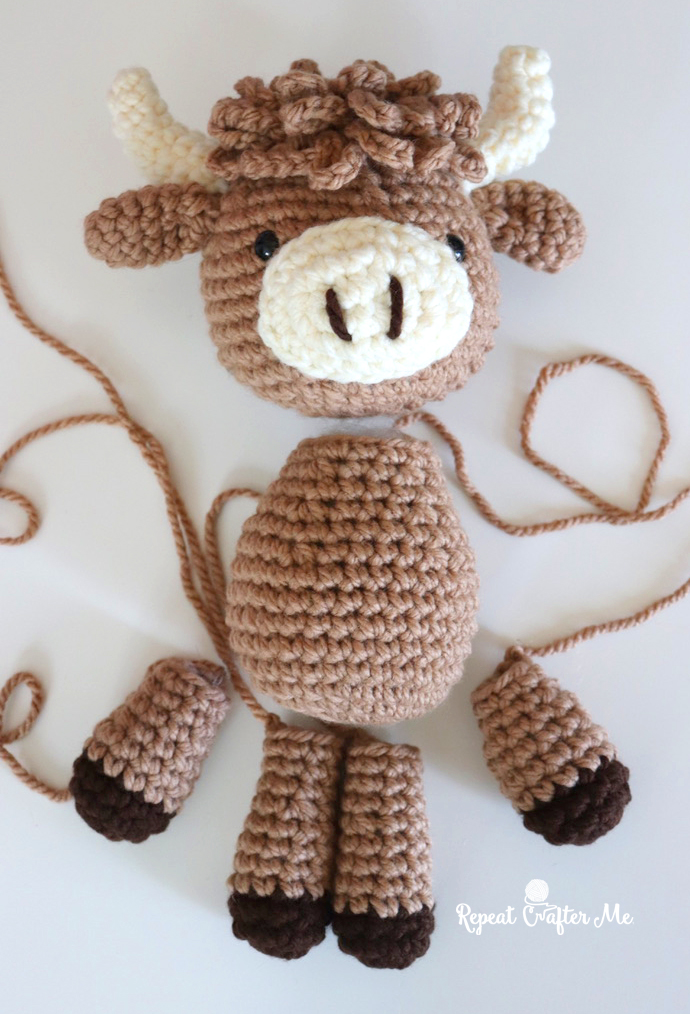
Body:
with light brown yarn
Magic Ring, chain 1 and make 10 SC in ring, join to first SC, chain 1
Round 2: 2 SC in each stitch around, join, chain 1 (20 SC)
Round 3: SC in each stitch around, join, chain 1 (20 SC)
Round 4: 2 SC in first stitch, SC in next, repeat around, join, chain 1 (30 SC)
Round 5-9: SC in each stitch around, join, chain 1 (30 SC)
Round 10: SC decrease, SC in next 4, repeat around, join, chain 1 (25 SC)
Round 11: SC in each stitch around, join, chain 1 (25 SC)
Round 12: SC decrease, SC in next 3, repeat around, join, chain 1 (20 SC)
Round 13: SC in each stitch around, join, chain 1 (20 SC)
Round 14: SC decrease, SC in next 2, repeat around, join, chain 1 (15 SC)
Round 15: SC in each stitch around, join, chain1 (15 SC)
Stuff with polyfil and leave top open.
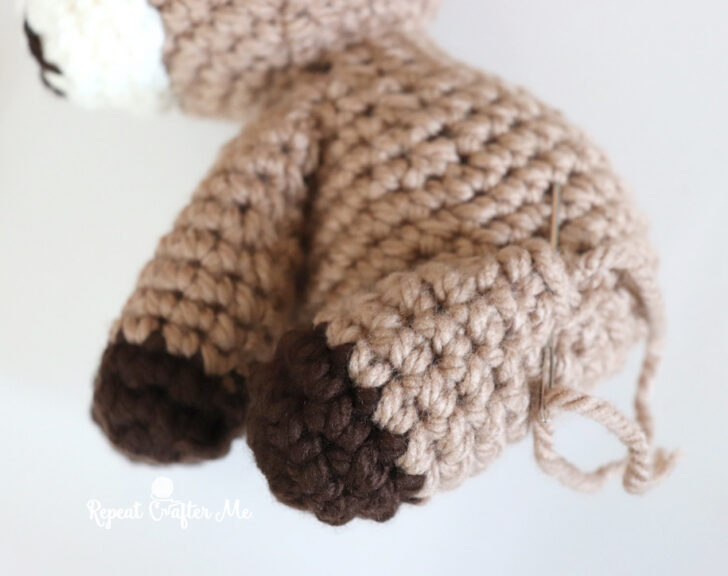
Front Legs: Make 2
starting with dark brown yarn
Magic Ring, chain 1 and make 10 SC in ring, join, chain 1
Round 2-3: SC in each stitch around, join, chain 1 (10 SC)
join in light brown yarn, chain 1
Round 4-7: SC in each stitch around, join, chain 1 (10 SC)
Round 8: SC Decrease, SC in next 3, repeat around, join, chain 1 (8 SC)
Round 9-11: SC in each stitch around, join, chain 1
Fasten off after round 11 leaving long tail.
Stuff legs and pinch opening flat. Set aside for assembly.
Back Legs: Make 2
starting with dark brown
Magic Ring, chain 1 and make 10 SC in ring, join, chain 1
Round 2: 2 SC in first, SC in next 4, repeat around, join chain 1 (12 SC)
Round 3: SC in each stitch around, (12 SC)
Join in light brown yarn and chain 1
Round 4-5: SC in each stitch around, join, chain 1 (12 SC)
Round 6: SC Decrease, SC in next 4, repeat around, join, chain 1 (10 SC)
Round 7: SC in each stitch around, join, chain 1 (10 SC)
Round 8: SC Decrease, SC in next 3, repeat around, join, chain 1 (8 SC)
Round 9: SC in each stitch around, fasten off leaving long tail (8 SC)
Stuff with polyfil and pinch opening closed. Set aside for assembly.

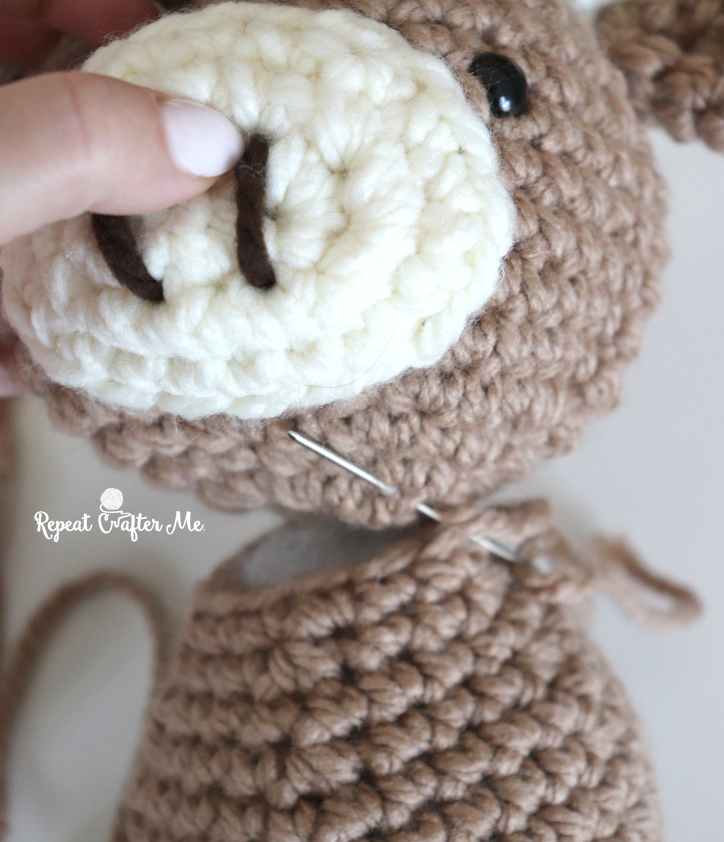
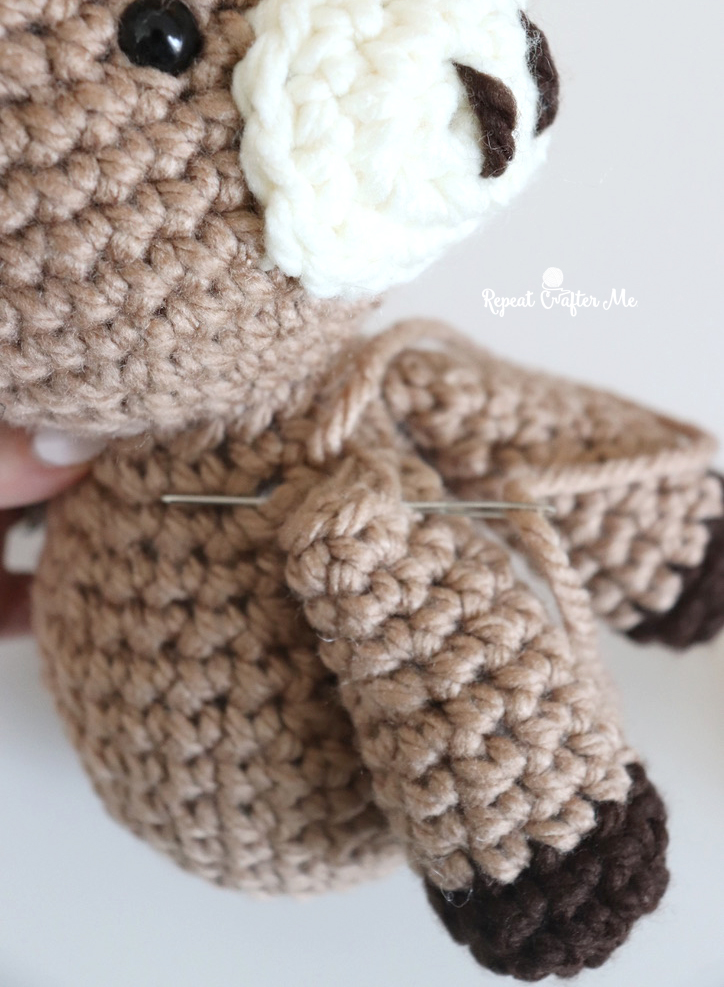
Assembly & Finishing
Now it’s time to bring your Highland Cow to life!
Attach the Head to the Body:
Sew the head securely onto the top of the body, making sure it’s centered and slightly tilted forward for that cute, seated look.
Front Legs:
Stuff lightly, pinch the tops flat, and stitch to the front of the body about 2 rows down from the neck.
Back Legs:
Attach to the sides of the lower body so they sit outward slightly. This helps your cow sit upright.

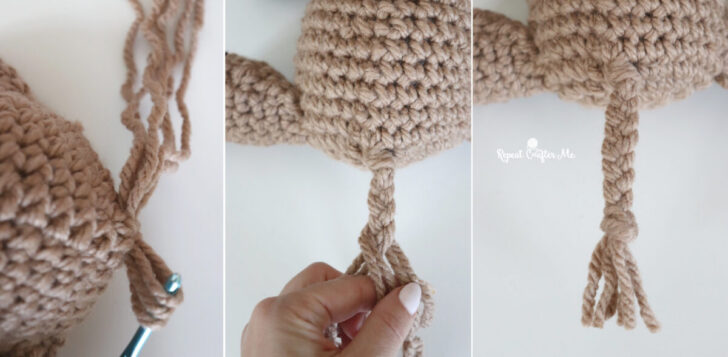
Tail
Cut 6 long strands of light brown yarn.
Loop them halfway through a stitch at the center back bottom of the cow.
- Pull ends through to secure (like a fringe attachment)
- Divide into 3 sections and braid
- Tie a knot at the end
- Trim the ends for a small tassel fringe
I had so much fun designing this little guy (even if I had a tiny camera mishap along the way). If you make your own Highland Cow, I would LOVE to see it! Tag me so I can admire all that fluffy hair and personality.
FOLLOW ME for more FREE Crochet!
Repeat Crafter Me Facebook
Repeat Crafter Me Instagram
Repeat Crafter Me Pinterest
Repeat Crafter Me YOUTUBE

 Starbucks Stitch Markers and Bottled Beverages
 Crochet Christmas Tree Pixel Square
 Crochet Santa Pixel Square
 Crochet Daisy Rug with Clover Amour Large Hooks and Giveaway!
I didn’t see instructions for the body of the Highland cow
I don’t see instructions for the body?
I just love the charm of those Highland Cows! The way their fluffy bodies and sweet faces come together in crochet is simply adorable. If you’re looking for vibrant yarn options, you can find some great choices here: https://spinmama.pl. The idea of experimenting with color for different parts of the cow is so fun, and I can’t wait to try it out myself. Plus, using Bernat Softee Chunky really gives it that perfect texture. I can already imagine making a whole herd of these cuties to brighten up my home!
Thank you for this lovely pattern! I visited Scotland in June of 2023, and it’s my favorite vacation EVER!!!. The Highland Coos are just as you imagine! And, they behave like tall, fluffy puppies. The ones we encountered all moseyed up to us for pets and chin scritches! I fell in LOVE!!!
This is my all-time favorite animal!
The Highland Coo is adorable. My daughter lives in Scotland and my house has many examples. I’m always looking to expand my collection. Thanks so much for the pattern.
Oh my goodness, this Highland Cow is absolutely adorable! The shaggy hair is just perfect.
I’ve been trying to get the right texture for Highland cow patterns, and the video tutorial on the fringe really helped me understand how to get that fluffy, layered look. I found myself struggling with keeping it even, but slowing down and really focusing on each stitch made a huge difference – have you ever used a latch hook to speed up the process for that fringe?
This Highland cow pattern is absolutely adorable! I love how you’ve captured the distinctive shaggy hair and those sweet horns – the chunky yarn choice really brings out the fluffy texture that makes Highland cows so charming. The step-by-step instructions are clear and easy to follow. As someone who works with design tools, I appreciate how you broke down each section from the head to the legs. It reminds me of how our AI sketch-to-design tool at https://sketchto.com helps crafters visualize their projects before starting – though for this pattern, your written instructions are so detailed that you can almost picture the finished cow in your mind! Thank you for sharing this free pattern with the crafting community. Can’t wait to see the video tutorial when it’s ready!
This Highland Cow is so cute! Thank you for the pattern; the braided tail is such a clever detail.
I’m planning to buy through Amazon Cashback to save on my yarn and supplies. Can’t wait to start!
Thanks for sharing this pattern. It looks so cute!
This is such an adorable pattern. The fluffy fringe and chunky yarn choice make the Highland cow look full of personality, and the braided tail is a perfect detail. I can already imagine people making a whole herd of these.
Cute pattern, really detailed and easy to follow, but still takes patience—kind of like geometry dash meltdown, simple idea yet requires focus and timing.
This crochet highland cow pattern is incredibly detailed and easy to follow. It is a wonderful project for anyone looking to create a unique handmade gift. When I am not crafting, I enjoy using my9games to build and share a personalized 3×3 grid of the video games that define my life. It is a great way to showcase your gaming identity and see what others are playing.
This is honestly one of the cutest crochet keychain ideas I’ve seen! The way you turned a simple skein into a keychain is so clever. I also enjoy sharing creative ideas and digital inspiration on my site: https://nihalayasmin.com/
— would love to connect!
When the heat of the day finally fades and you just want something easy to unwind with, having a solid review site ready can turn a simple evening into a genuinely good time. I’ve come to trust onlinecasinobangladesh for honest breakdowns of bonuses, payouts, and game quality — no fluff, just useful info that helps me pick a decent platform without overthinking.
Arrests.org indexes county sheriff booking feeds across 3,000+ counties. Records appear 6–18 hours after intake — not in real time. It is a private booking aggregator, not a police or court database. If federal agents made the arrest (FBI, DEA, CBP, ATF), the person will never appear on Arrests.org.
You can’t change how fast the car goes in Drift Boss. You should instead keep your mind on getting those drifts right at the right times. Don’t let go of the mouse button until you need to go back to your original path, which is right. This will make the car move left.
Seedance 3.0 AI is a comprehensive video generation platform that transforms text and images into high-quality cinematic clips. For creators and craft enthusiasts on Repeat Crafter Me, this tool provides an easy way to create professional video tutorials or showcases for patterns like this highland cow, featuring multi-language lip-syncing and beat-synced editing to make your content stand out.
i love how cute and huggable this highland cow looks! the shaggy hair and sweet face make it irresistible – definitely a scritchy scratchy treasure!
This is such a cute and creative crochet keychain idea. Turning a simple skein into a keychain is a really clever touch. I also like exploring fun creative tools online, and recently came across AgeCanvas.
Honestly, this is one of the sweetest crochet keychain ideas I’ve seen. The concept is simple but super imaginative. I also like discovering interesting websites now and then, and OverlayImage was a neat one I found recently.
This pattern is absolutely adorable! The shaggy hair, tiny horns, and sweet expression really capture the charm of a Highland cow so perfectly. I love how the use of chunky yarn gives it that fluffy, cuddly texture while still keeping a nice structure. ([Repeat Crafter Me][1])
It’s also great that the pattern walks through each detail—from the head shaping to the fun looped hair—making it both creative and rewarding to complete. Definitely a project that stands out and would make such a cute handmade gift. Thanks for sharing such a fun and well-designed pattern!
Kindly check this : https://trionova.in/
Similarly, platforms like Delta Executor provide advanced automation and execution capabilities that help users streamline workflows and improve efficiency in digital environments. Both demonstrate how the right tools and structured approaches can lead to impressive and satisfying results—whether in crafting or Delta iOS Executor digital performance.
This highland cow pattern is absolutely charming and perfect for gifting. I recently used GPT Image to generate some visual inspiration for different yarn textures and colors to see how they might look on a finished plushie. It is a great way to plan out crochet projects visually before picking up the hook. Thank you for such a detailed and easy-to-follow guide!
I love the description of the Highland Cow pattern! The shaggy top and cute faces sound adorable. Can’t wait to try this crochet project.
Get instant insight into your device condition with
Volume Shader BM.
It provides an accessible way to test graphics, monitor quality, camera, audio, and other key hardware components online.
I’ve been reading about this topic, and it’s not always easy to follow. I found a page that explains things in a simple format and keeps it clear. That made it easier for me to understand. You can check this easy guide if you want more info.
This crochet Highland Cow pattern looks both creative and beginner-friendly. The step-by-step approach makes it easier for crafters to achieve great results while learning new techniques. For those who also enjoy researching detailed property data, Stuart Property Records can be a useful resource for exploring public information. Projects like this are a great way to combine relaxation, creativity, and skill development.
Get ready to stream over 30,000 channels, movies, and series for all age groups with our IPTV service. Leave traditional TV behind and step into the future with high-quality 4K, FHD, and HD streaming. Try: IPTV Australia now!
US Sales Tax Guide is a comprehensive resource for businesses, eCommerce sellers, and consumers looking for accurate sales tax information across the United States. The platform provides up-to-date tax rates, calculators, nexus guidance, and compliance tools covering all 50 states, thousands of counties, and major cities.
I just finished making one of these for my niece’s birthday, and the pattern was so easy to follow! The instructions for the fluffy yarn around the face were especially helpful. Have you tried using a different yarn weight for a smaller version?