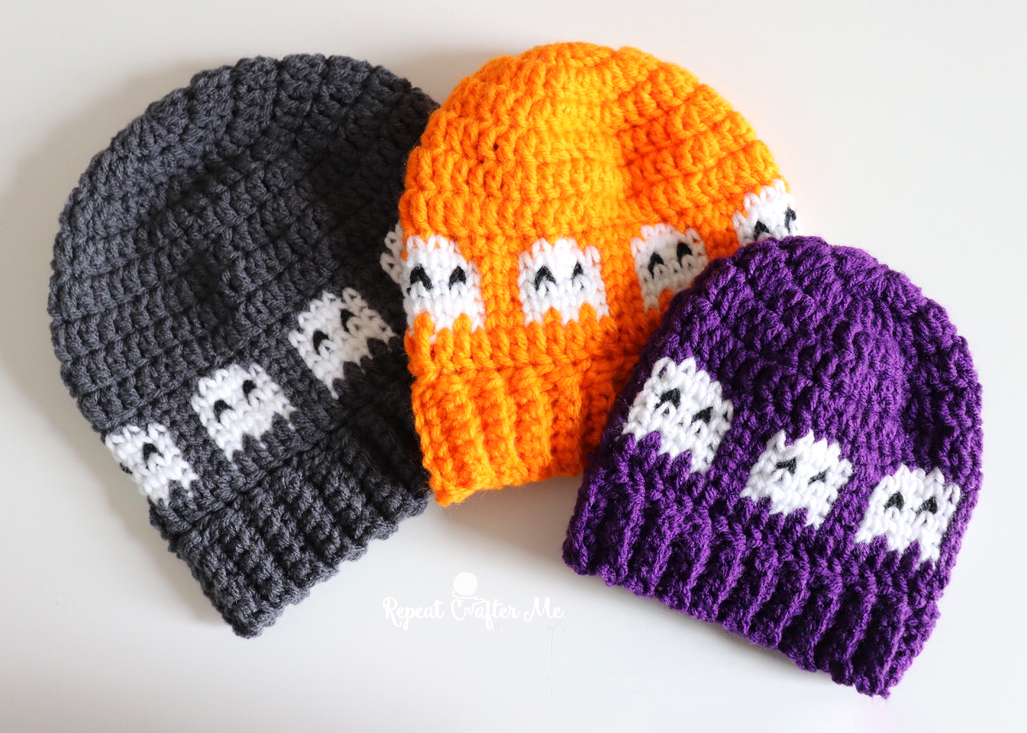
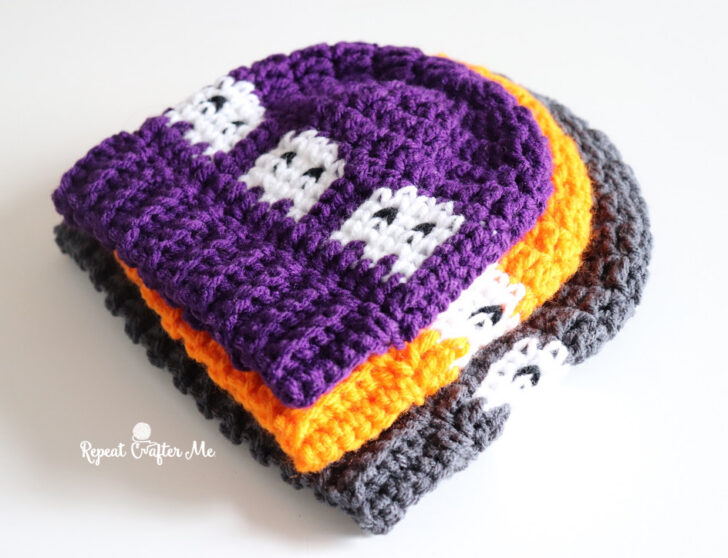
Halloween is officially on my hook! Meet the newest addition to my “In a Row” crochet hat collection: the Ghosts in a Row Crochet Hat!
Over the past few years I’ve created all kinds of “In a Row” hats including hearts, pumpkins, shamrocks, gingerbread men, Christmas trees and more. I love finding different ways to work a repeating design right into the rounds of a hat, and these little ghosts were such a fun one to figure out!
For this design, I decided to keep the entire hat one solid background color and let the white ghosts do all the talking. With the white bodies and little black eyes, there are already plenty of color changes happening in the ghost rounds. Plus, there is something about white ghosts floating across a solid purple, orange or charcoal hat that feels just right for Halloween!
Prefer a printable pattern? The complete 6-page, ad-free PDF is now available in my Etsy Shop, with written instructions for Baby through Adult sizes, full-size graphs for every size, technique tips, and more! >>> PRINTABLE DIGITAL PDF AVAILABLE HERE IN MY ETSY SHOP <<<
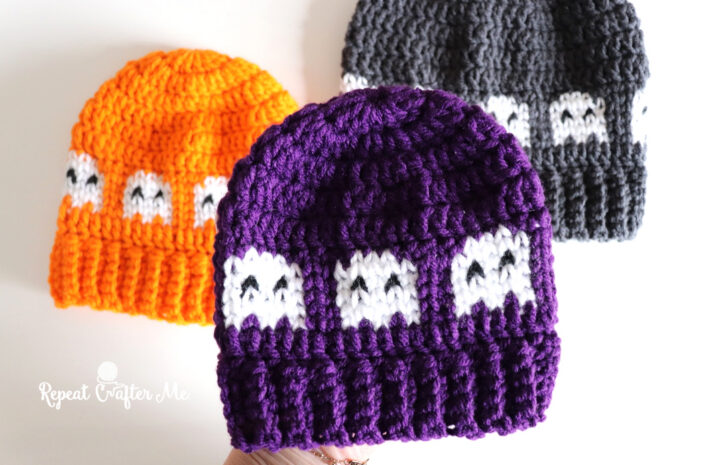
I made my samples with Red Heart Super Saver in Dark Orchid, Pumpkin and Charcoal. Pick your favorite Halloween shade for the background, or make a whole collection in different colors!
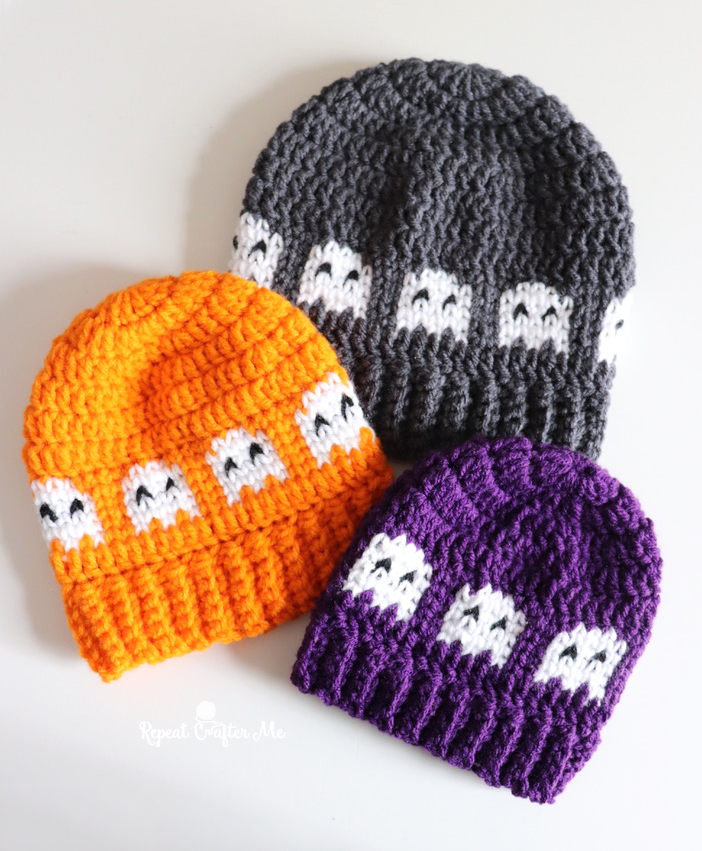
The ghost design is created using a simple 7-stitch repeat, which also helped me come up with a really easy sizing formula. Each larger hat simply adds another 7 stitches — and another ghost!
And yes… I already have another version in mind. Glow-in-the-dark ghosts! Stay tuned for that one!
I also love the person who suggested that this could become a Pac-Man hat as well!
>>> Shop Red Heart Super Glow Yarn HERE on Yarnspirations.com <<<
Waistcoat (Knit-Look) Stitch
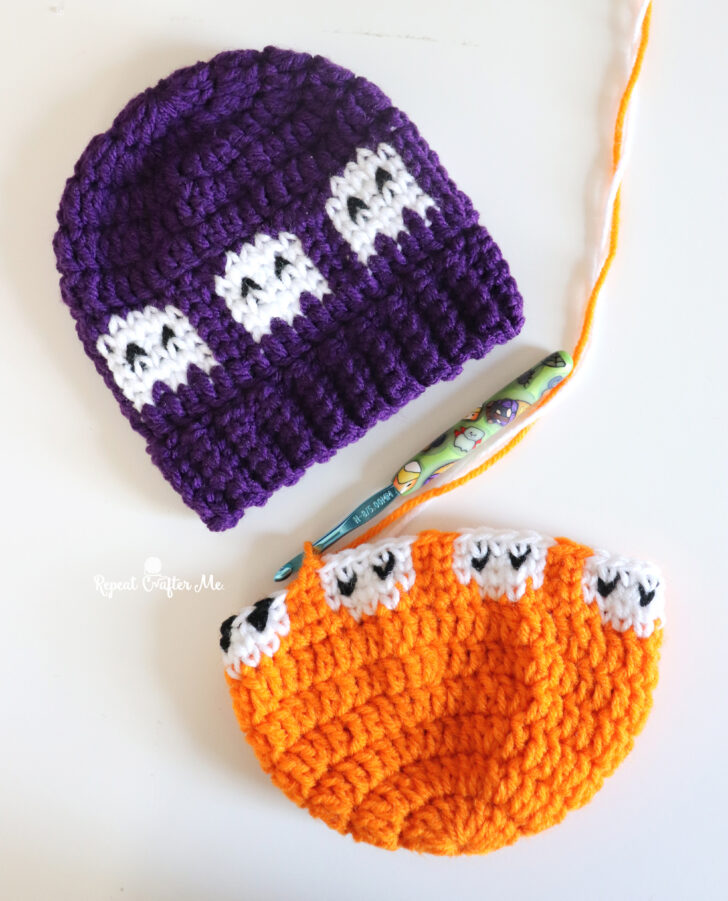
This hat is worked from the top down. The main portion of the hat is crocheted in double crochet (DC) as specified in the pattern below. The waistcoat stitch is used only for the 6 rounds of ghost colorwork.
If you can make a single crochet, you can make the waistcoat stitch! The secret is all in where you insert your hook. Instead of crocheting into the tops of the stitches, insert your hook into the center post of the stitch — right in the middle of the “V” you see on the front. Complete the stitch just like a regular single crochet.
This creates a smooth, knit-look stitch that works especially well for the ghost graph because the stitches stack neatly on top of one another, making the little ghost shapes easy to see.
Tip: Keep your tension a little loose when working the waistcoat stitch. If your stitches are too tight, it can be difficult to insert your hook into the center of the V.
Materials
- Red Heart Super Saver worsted weight yarn >>> Shop colors HERE on Yarnspirations.com <<<
- Dark Orchid
- Pumpkin
- Charcoal
- White
- Small amount of Black for eyes
- Size H (5.0 mm) crochet hook, or hook needed to obtain desired size
- Tapestry needle
- Scissors
- Ghosts in a Row GRAPHS ALL SIZE
>>> Download a FREE Printable of all the graphs on one page <<<
or you can save the images directly from this blog post individualy.
Abbreviations
- CH = Chain
- DC = Double Crochet
- SC = Single Crochet
- WC SC = Waistcoat Single Crochet
- ST(S) = Stitch(es)
Hat Sizes and Stitch Counts
The ghost design has a 7-stitch repeat. Each size adds one additional 7-stitch repeat — which means one additional ghost!
- Baby: 42 stitches — 6 ghosts
- Toddler/Preschool: 49 stitches — 7 ghosts
- Child: 56 stitches — 8 ghosts
- Teen: 63 stitches — 9 ghosts
- Adult: 70 stitches — 10 ghosts
Crochet Hat Pattern
Baby — 42 stitches
Round 1: Magic Ring, chain 1 and make 14 DC in ring, join, chain 2. (14 DC)
Round 2: 2 DC in each stitch around, join, chain 2. (28 DC)
Round 3: 2 DC in first stitch, DC in next 3 stitches; repeat around, join, chain 2. (35 DC)
Round 4: 2 DC in first stitch, DC in next 4 stitches; repeat around, join, chain 2. (42 DC)
Round 5: DC in each stitch around, join, chain 1. (42 DC)
Round 6-11: Work 6 rounds of the Ghost Graph using waistcoat stitch.

Round 12: DC in each stitch around, join (42 DC)
Work ribbing.
Toddler/Preschool — 49 stitches
Round 1: Magic Ring, chain 1 and make 14 DC in ring, join, chain 2. (14 DC)
Round 2: 2 DC in each stitch around, join, chain 2. (28 DC)
Round 3: 2 DC in first stitch, DC in next 3 stitches; repeat around, join, chain 2. (35 DC)
Round 4: 2 DC in first stitch, DC in next 4 stitches; repeat around, join, chain 2. (42 DC)
Round 5: 2 DC in first stitch, DC in next 5 stitches; repeat around, join, chain 2. (49 DC)
Round 6: DC in each stitch around, join, chain 1. (49 DC)
Round 7-12: Work 6 rounds of the Ghost Graph using waistcoat stitch.

Round 13: DC in each stitch around, join (49 DC)
Work ribbing.
Child — 56 stitches
Round 1: Magic Ring, chain 1 and make 14 DC in ring, join, chain 2. (14 DC)
Round 2: 2 DC in each stitch around, join, chain 2. (28 DC)
Round 3: 2 DC in first stitch, DC in next 3 stitches; repeat around, join, chain 2. (35 DC)
Round 4: 2 DC in first stitch, DC in next 4 stitches; repeat around, join, chain 2. (42 DC)
Round 5: 2 DC in first stitch, DC in next 5 stitches; repeat around, join, chain 2. (49 DC)
Round 6: 2 DC in first stitch, DC in next 6 stitches; repeat around, join, chain 2. (56 DC)
Round 7-8: DC in each stitch around, join, chain 1. (56 DC)
Round 9-14: Work 6 rounds of the Ghost Graph using waistcoat stitch.

Round 15: DC in each stitch around, join (56 DC)
Work ribbing.
Teen — 63 stitches
Round 1: Magic Ring, chain 1 and make 14 DC in ring, join, chain 2. (14 DC)
Round 2: 2 DC in each stitch around, join, chain 2. (28 DC)
Round 3: 2 DC in first stitch, DC in next 3 stitches; repeat around, join, chain 2. (35 DC)
Round 4: 2 DC in first stitch, DC in next 4 stitches; repeat around, join, chain 2. (42 DC)
Round 5: 2 DC in first stitch, DC in next 5 stitches; repeat around, join, chain 2. (49 DC)
Round 6: 2 DC in first stitch, DC in next 6 stitches; repeat around, join, chain 2. (56 DC)
Round 7: 2 DC in first stitch, DC in next 7 stitches; repeat around, join, chain 2. (63 DC)
Round 8-9: DC in each stitch around, join, chain 1. (63 DC)
Round 10 -15: Work 6 rounds of the Ghost Graph using waistcoat stitch.

Round 16: DC in each stitch around, join, chain 1. (63 DC)
Work ribbing.
Adult — 70 stitches
Round 1: Magic Ring, chain 1 and make 14 DC in ring, join, chain 2. (14 DC)
Round 2: 2 DC in each stitch around, join, chain 2. (28 DC)
Round 3: 2 DC in first stitch, DC in next 3 stitches; repeat around, join, chain 2. (35 DC)
Round 4: 2 DC in first stitch, DC in next 4 stitches; repeat around, join, chain 2. (42 DC)
Round 5: 2 DC in first stitch, DC in next 5 stitches; repeat around, join, chain 2. (49 DC)
Round 6: 2 DC in first stitch, DC in next 6 stitches; repeat around, join, chain 2. (56 DC)
Round 7: 2 DC in first stitch, DC in next 7 stitches; repeat around, join, chain 2. (63 DC)
Round 8: 2 DC in first stitch, DC in next 8 stitches; repeat around, join, chain 2. (70 DC)
Round 9-11: DC in each stitch around, join, chain 1. (70 DC)
Round 12-17: Work 6 rounds of the Ghost Graph using waistcoat stitch.

Round 18: DC in each stitch around, join, chain 1. (70 DC)
Work ribbing.
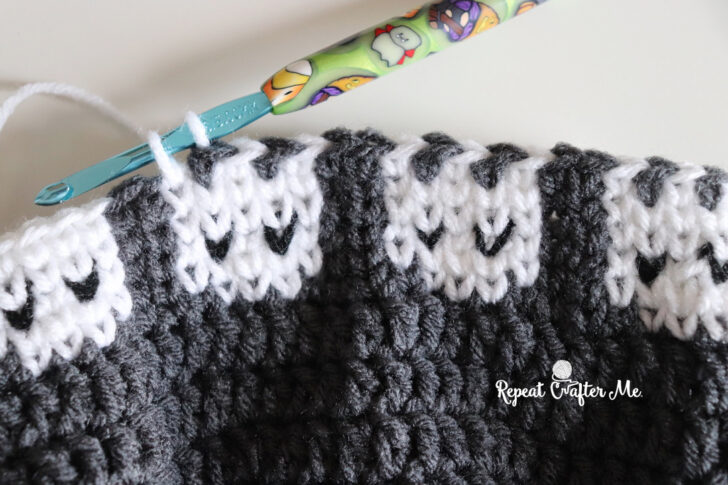
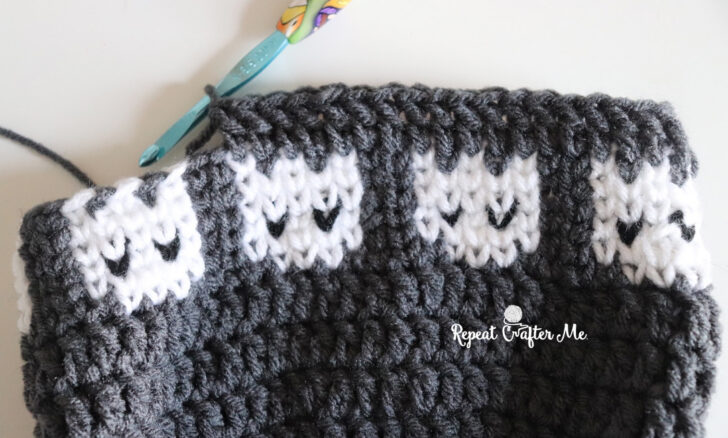
Ghosts in a Row Graph
The graph shown is for the Baby size with 42 stitches and 6 ghosts.
Each ghost is a 7-stitch repeat. For the larger sizes, simply continue repeating the same 7-stitch ghost pattern around:
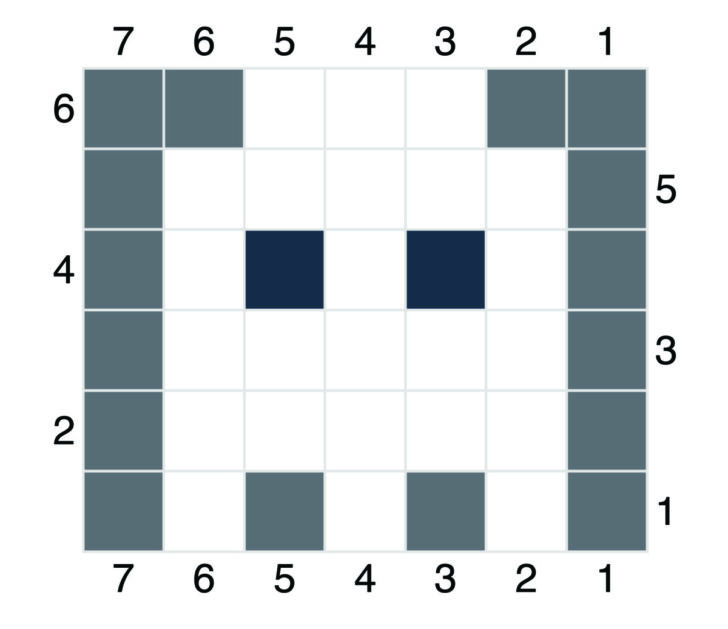
- Baby: Repeat 6 times
- Toddler/Preschool: Repeat 7 times
- Child: Repeat 8 times
- Teen: Repeat 9 times
- Adult: Repeat 10 times
You can follow the graph or use the written instructions below.
Important: How to Read the Ghost Graph
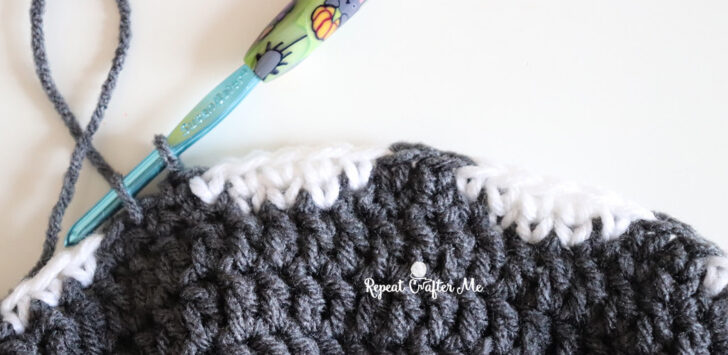
Because this hat is crocheted from the top down, you will work the ghost graph from the top of the graph to the bottom.
Begin with Row 6 of the graph and work downward: Row 6 → Row 5 → Row 4 → Row 3 → Row 2 → Row 1
This creates the rounded top of the ghost first and finishes with the three little points along the bottom.
Ghost Colorwork — Crochet in This Order
- Color A: Hat/background color
- Color B: White
- Color C: Black
Each ghost is a 7-stitch repeat.
Ghost Round 1 — Graph Row 6
A – A – B – B – B – A – A
[WC SC 2 with Color A, WC SC 3 with Color B, WC SC 2 with Color A]; repeat around, join.
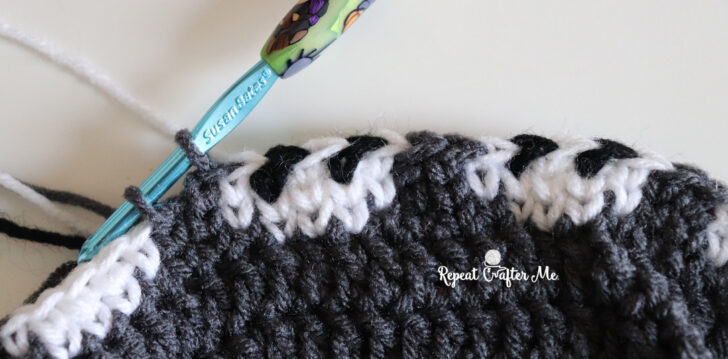
Ghost Round 2 — Graph Row 5
A – B – B – B – B – B – A
[WC SC 1 with Color A, WC SC 5 with Color B, WC SC 1 with Color A]; repeat around, join.
Ghost Round 3 — Graph Row 4
A – B – C – B – C – B – A
[WC SC 1 with Color A, WC SC 1 with Color B, WC SC 1 with Color C, WC SC 1 with Color B, WC SC 1 with Color C, WC SC 1 with Color B, WC SC 1 with Color A]; repeat around, join.
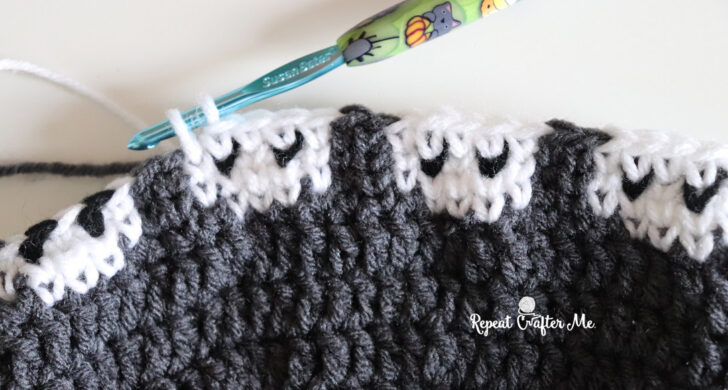
Ghost Round 4 — Graph Row 3
A – B – B – B – B – B – A
[WC SC 1 with Color A, WC SC 5 with Color B, WC SC 1 with Color A]; repeat around, join.
Ghost Round 5 — Graph Row 2
A – B – B – B – B – B – A
[WC SC 1 with Color A, WC SC 5 with Color B, WC SC 1 with Color A]; repeat around, join.
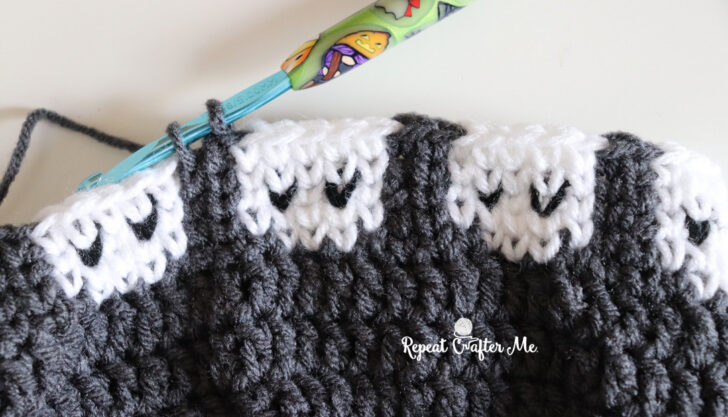
Ghost Round 6 — Graph Row 1
A – B – A – B – A – B – A
[WC SC 1 with Color A, WC SC 1 with Color B] 3 times, WC SC 1 with Color A; repeat around, join.
A Note About Carrying Your Yarn
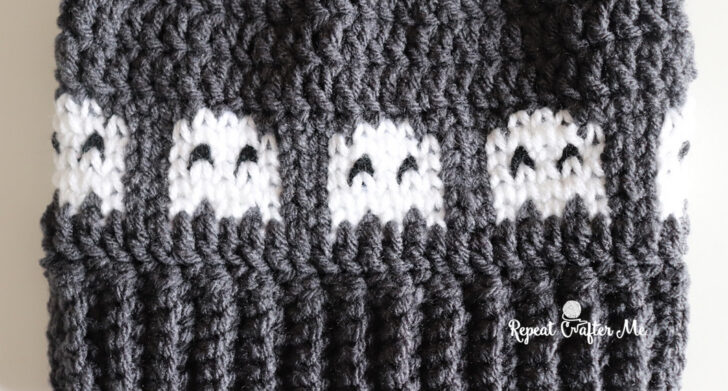
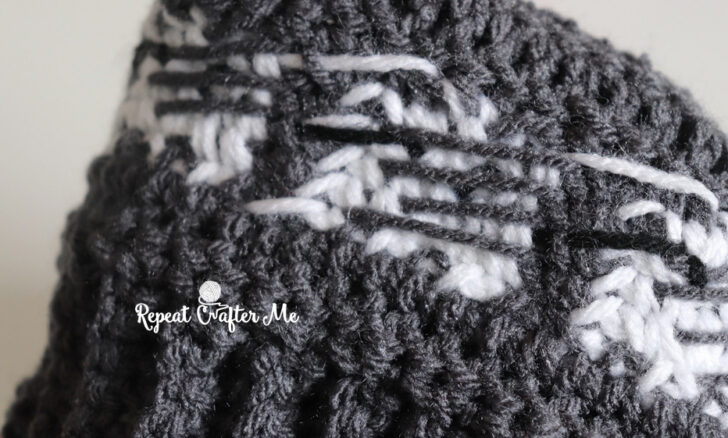
When working the ghost graph, I chose not to carry the unused yarn through the stitches. Because the ghosts are white and the background colors are much darker or brighter, I found that carrying the background yarn inside the white stitches allowed some of that color to show through.
Instead, I carried (or “floated”) the unused yarn loosely along the back of the work, picking it back up when it was needed for the next color change.
Be careful not to pull your floats too tightly! You want them to lie loosely across the inside of the hat so they don’t cause the fabric to pucker or affect the stretch of the hat.
The inside won’t look quite as tidy as the outside and that’s okay! The floats stay hidden inside the finished hat while keeping the white ghosts looking crisp and bright on the outside.
Finish the Hat with a Ribbed Border:
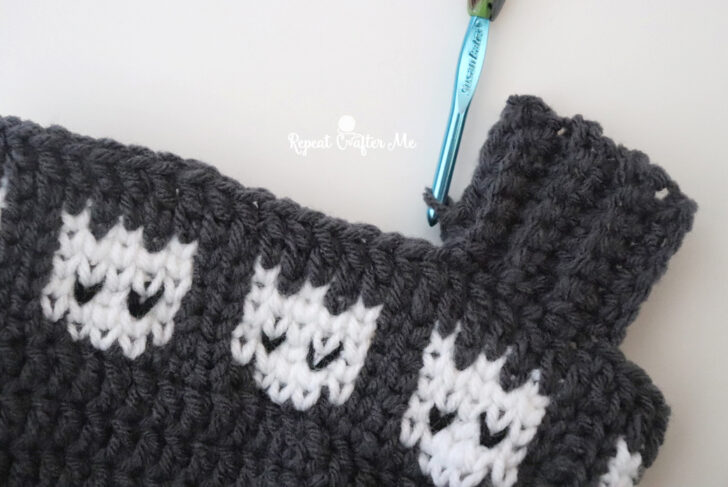
Please be sure and watch THIS TUTORIAL from my friend Daisy Farm Crafts on how to make a single crochet ribbed border. I love this technique because you don’t need to sew the ribbing on separately, it is crochet right onto the edge of the hat! It’s basically a chain 7 (or however long/short your want your ribbed border), SC in each chain until you get back to the hat edge, slip stitch in two stitches along the hat edge and then SC in the back loops of the ribbing and repeat. She has a VERY easy tutorial to follow and you can use this border on many different projects.
When you’ve finished the ribbed border along the edge of the hat you can slip stitch the seam together.
Fasten off and weave in all ends.
Color Ideas
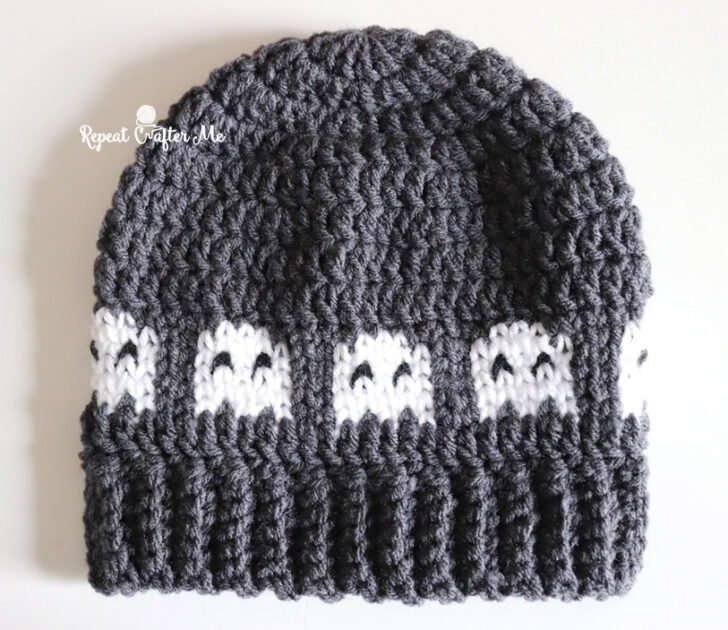
I love how different this hat looks just by changing the background color! Dark Orchid gives it that classic purple Halloween look, Pumpkin is bright and playful, and Charcoal gives you a more neutral spooky version.
You could also try black, lime green or any other Halloween color you have in your yarn stash. Keep the ghosts white with black eyes and they’ll pop against just about any darker or brighter background.
And if you really want your ghosts to stand out when the lights go out, try substituting a worsted weight glow-in-the-dark yarn for the white! I’ll be trying that next!
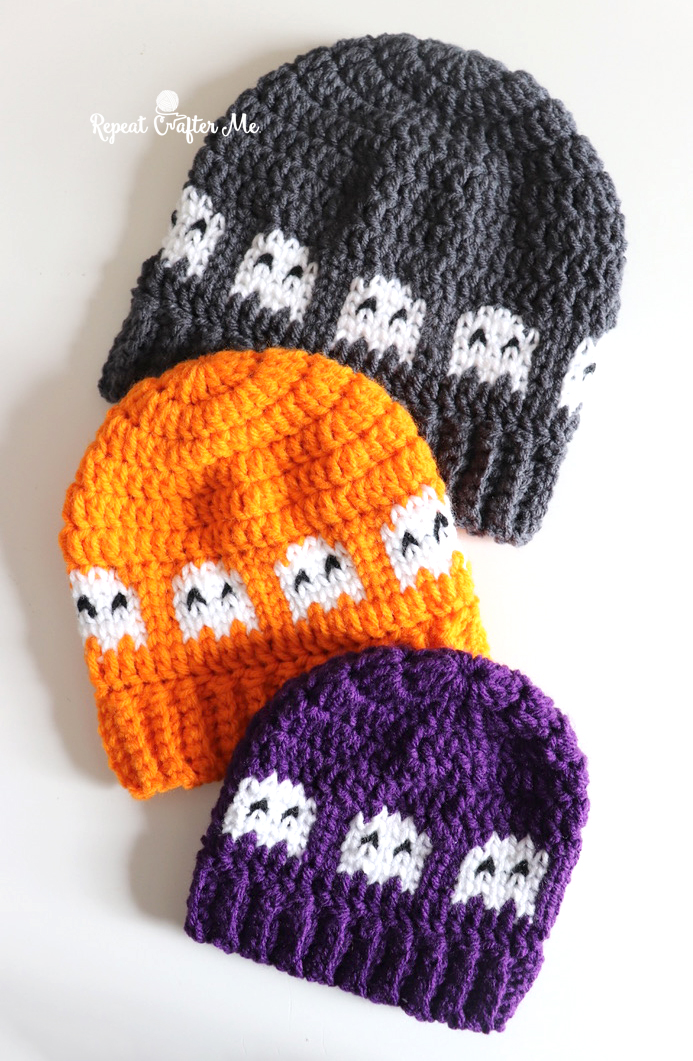
I’m so happy with how these little ghosts turned out! What started as a bit of graph-paper experimenting turned into a whole family of Halloween hats, from tiny baby size all the way up to adult.
Let’s stay connected!
Subscribe to my NEWSLETTER for free patterns straight to your inbox!
Repeat Crafter Me Facebook
Repeat Crafter Me Instagram
Repeat Crafter Me Pinterest
Repeat Crafter Me YOUTUBE
 Starbucks Stitch Markers and Bottled Beverages
 Crochet Christmas Tree Pixel Square
 Crochet Santa Pixel Square
 Crochet Daisy Rug with Clover Amour Large Hooks and Giveaway!
Love how you incorporated the ghost motif using a simple 7-stitch repeat—it’s such a clever way to scale the design for different sizes! The choice of solid purple with white ghosts is perfect for Halloween, and using Red Heart Super Saver makes it so accessible. Can’t wait to see the glow-in-the-dark version; that sounds like a spooktacular twist!
Love how the ghost design floats across the hat with such clean, simple repeats! The choice of Red Heart Super Saver in Dark Orchid gives it such a rich Halloween vibe. I especially appreciate how you kept the background solid to let the ghosts stand out—smart design. Can’t wait to see the glow-in-the-dark version! And now I’m totally imagining a Pac-Man twist with little colored ghosts trailing behind… clever!
Love how you incorporated the ghost motif using just a 7-stitch repeat—so clever! The choice of solid purple with white ghosts really lets the design pop, perfect for Halloween. I also appreciate how you kept the background color consistent to balance the color changes in the ghost rounds. Can’t wait to see the glow-in-the-dark version; that sounds like a spooktacular twist!
I love how you incorporated the ghost design with such a clean, repeating stitch pattern! The choice of solid purple with white ghosts is perfect for Halloween—simple yet so effective. I can already imagine how glow-in-the-dark yarn would add a fun twist. Your “In a Row” series keeps getting better; the sizing formula using multiples of 7 stitches is genius!
Love how you incorporated the ghost motif with the waistcoat stitch—it gives such a smooth, knit-like texture that really makes the white ghosts pop against the dark orchid background! The 7-stitch repeat is genius for sizing, and I’m already imagining how fun this would look in glow-in-the-dark yarn. Your “In a Row” series keeps getting better—Pac-Man next, maybe?
Love how you incorporated the ghost motif into the hat using a simple 7-stitch repeat—so clever! The choice of solid background colors like Dark Orchid and Pumpkin really lets the white ghosts pop. I especially appreciate the waistcoat stitch detail for that knit-look texture in the colorwork rounds. Can’t wait to see the glow-in-the-dark version; that sounds like a spooktacular twist!
Thank you for sharing your insights on this topic. Your post was informative and well-researched, with several valuable takeaways. I look forward to reading more of your content in the future. Additionally, you may find this article on RWA Tokenization equally informative and useful, especially for understanding how real-world assets can be represented and managed on blockchain networks.
This ghost hat is so cute and perfect timing for fall! I really like how you spaced the ghost motifs around the brim. Thanks for the clear pattern notes.
The repeating ghost motif is such a perfect fit for your “In a Row” collection — I love how it carries that same playful rhythm as the pumpkins and gingerbread men, but with just the right amount of spooky. Can’t wait to see what other Halloween designs you dream up next!
The repeating ghost motif worked directly into the rounds is such a clever way to build the pattern — I love how it keeps the hat cohesive without needing separate appliqués. The way you figured out the spacing for the ghosts in the round must have taken some trial and error, but it paid off perfectly for Halloween!
I love how you worked the ghosts right into the rounds instead of sewing them on afterward — that repeating design trick is what makes these “In a Row” hats so clever. The little ghost shape reads perfectly even in a single color, which can’t be easy to pull off.
This hat puts a row of crochet ghosts around the brim for Halloween. I agree a repeating applique is cleaner than trying to crochet faces in the round — it still reads as ghosts from across the room.
The way you worked the repeating ghost motif directly into the rounds is so clever—it gives the hat that seamless “in a row” look without any extra sewing. I love that this joins the pumpkins and shamrocks in the collection; the ghosts might be my new favorite!
Love that you worked the ghosts right into the rounds instead of adding them on after — the repeating design looks so seamless and clever. Can’t wait to see which motif you tackle next for the “In a Row” collection!
I love how you worked the little ghosts right into the rounds instead of sewing them on afterward — that repeating design looks so clean. The way you figured out the spacing for the “In a Row” pattern is really clever, and these might be my favorite of the collection so far!
I came across Dandy Hats while searching for fashionable headwear and found some really eye-catching designs.
Dandy Hats offers a good mix of casual and trendy hat styles that work well for everyday wear.
One thing I like about the Essentials Hoodie is how simple it looks while still giving an outfit a stylish finish.
Essentials Hoodie is a nice choice for people who enjoy neutral colors, relaxed fits, and easy everyday styling.
Love how you worked the ghosts right into the rounds instead of sewing them on after — that repeating design trick is so clever. The way they line up around the hat gives it such a fun, spooky rhythm. Can’t wait to see what’s next in the “In a Row” series!
The Hellstar hoodie has a bold aesthetic that can easily become the main piece in a casual everyday look.
I like how the Hellstar hoodie combines comfort with eye-catching graphics, making it easy to style for relaxed streetwear.
I recently noticed how popular kayali perfume has become among fragrance fans who enjoy layering different scents.
If you like sweet and elegant fragrances, kayali perfume has several scent styles that are worth checking out.
Solid purple/orange/charcoal with white ghosts in the rounds — not a second color for the brim — is what makes this the Halloween “In a Row” hat after hearts and pumpkins. One head-on shot just looks like dots. I take one photo and cut it into a numbered grid so each ghost keeps its black eyes. That’s why we built ImageSplit: one photo, numbered cells in the browser, nothing uploaded.
The repeating ghost design is such a clever addition to your “In a Row” hat collection! I love how you’ve turned the classic Halloween motif into a pattern that works naturally around the rounds.
This ghost hat pattern is adorable, perfect for October! Slightly random but I’ve been using Video2X to upscale some old crochet tutorial videos I filmed years ago, the quality boost is impressive.
Love this pattern, definitely making it for the holidays! Unrelated but I recently used Video Background Remover to clean up a product demo video for my Etsy shop, worked great.
The repeating ghost design is such a clever addition to your “In a Row” crochet hat collection! I love how you’ve turned the Halloween theme into a playful pattern worked right into the rounds.
Adorable crochet hat pattern! On a different note about home projects, I’ve been using AI Interior Design to plan a small craft room makeover from photos.
The repeating ghost design is such a clever addition to the “In a Row” crochet hat collection! I especially love how it brings a Halloween theme right into the rounds while keeping the pattern playful and wearable.
The little ghost pattern is adorable, and I love how the simple repeating design works so well across different hat sizes!
That floating ghost pattern is such a fun addition to the series, especially using the waistcoat stitch so the little shapes stack neatly instead of getting skewed. I tried a knit-look stitch on a colorwork project last year and definitely learned the hard way about keeping my tension loose, or else you spend half your time fighting to shove the hook through the center of the V. Those purple and orange backgrounds look fantastic for October.
That seven-stitch repeat formula makes scaling up the sizes so much less stressful than usual. I usually get tripped up trying to adjust colorwork graphs for different head circumferences, but adding an extra ghost per size is such a clever way to handle it. Working with waistcoat stitch can definitely get a bit tight on the hands if you are not careful with tension, so that reminder is super helpful. I am definitely digging into my stash for some purple yarn tonight.
Those little ghosts floating around the hat look so fun, especially using the waistcoat stitch so the shapes stay nice and crisp without getting warped. I love the idea of doing them on a charcoal background instead of traditional black, it makes the white pop so much more. I might actually try the glow-in-the-dark yarn version for a late-night bonfire walk this October.
Those little ghosts floating across the purple background look so fun, especially with how neatly the waistcoat stitch stacks them up. I’ve always struggled a bit with keeping my tension loose enough for that stitch since it gets so tight, but seeing how clear the ghost shapes turn out makes me want to give it another try. I might have to hunt down some glow-in-the-dark yarn for mine once I dig through my stash.
Those little ghosts floating around the hat look so fun, especially with the purple and orange backgrounds. I usually struggle with colorwork because the stitches get messy, but using the waistcoat stitch in the center of the V makes total sense for keeping the graphs looking clean. I have a bunch of charcoal yarn lying around that would work perfectly for this. I am definitely going to make one for the upcoming holiday season.
These little ghosts are adorable, especially floating against that dark orchid background. I love how you explained the waistcoat stitch technique too; working right into the center of the V makes such a huge difference for colorwork graphs compared to standard single crochet. I usually struggle to keep my tension right with stacked stitches, so the tip about keeping it loose is super helpful. I’m definitely going to have to whip one up in charcoal before October gets here.
The idea of using the waistcoat stitch for the ghost colorwork is brilliant since it keeps the little shapes from getting distorted. I tried a knit-look stitch on a beanie last winter and remember how tricky the tension can be if you pull your yarn too tight, so that tip about keeping it loose is spot on. Those floating ghosts against the dark orchid background look like such a fun project for October.
Those little floating ghosts are adorable, especially against the dark orchid background. I love how you used the waistcoat stitch for the colorwork rounds so the stacked stitches keep the shapes nice and crisp instead of looking jagged. Working from the top down is always my preference for hats too, since it makes trying it on for size as you go so much easier. I might have to try the glow-in-the-dark yarn version next for some extra Halloween fun.
Those little floating ghosts look so fun, especially worked against that dark purple background. I always struggle a bit with tension when trying out the waistcoat stitch, so the tip to keep the stitches a little loose is super helpful to keep from splitting the yarn. I love how adding just seven stitches for each size makes the scaling straightforward without having to completely rethink the pattern.
Those little ghosts floating around the hat look like such a fun project, especially since the 7-stitch repeat makes sizing up so straightforward. I usually struggle with colorwork because the stitches get too bulky or distorted, but using the waistcoat stitch for the ghost rounds sounds like it would keep everything stacking neatly. I have a skein of dark purple yarn sitting in my stash that would work perfectly for the background, and glow-in-the-dark yarn for the ghosts would be an absolute hit with my nieces.
These little floating ghosts are adorable, especially against the dark orchid background. I have always struggled a bit with colorwork alignment in rounds, so using the waistcoat stitch for the ghost sections sounds like a genius way to keep the stitches stacking neatly without getting that messy diagonal drift. I will definitely have to try making one of these for October.
Those little floating ghosts look so fun, and the fact that you managed a simple seven stitch repeat makes sizing up sound totally manageable. I love working with the waistcoat stitch for colorwork because it keeps the graphics from looking distorted, though keeping my tension loose is definitely something I have to consciously remind myself to do. Using charcoal as the background color with those bright white bodies would look awesome.
That seven-stitch repeat formula is brilliant for sizing up without overthinking the math. I tried making one with a charcoal background, and stacking those little ghosts using the waistcoat stitch really does make the shapes pop cleanly instead of looking jagged. Working from the top down made it so much easier to check the fit as I went. I am definitely going to hunt down some glow-in-the-dark yarn for the next batch.
That seven-stitch repeat for the ghost graph is such a smart way to scale the sizes without overcomplicating things. I tried a similar waistcoat stitch project last year and totally agree about keeping the tension loose, otherwise working into those center V posts gets exhausting on the hands fast. Floating those little white ghosts over a dark charcoal background looks so crisp.
The repeating ghost design is such a clever addition to the “In a Row” crochet hat collection! I especially love how it fits perfectly with the Halloween theme while keeping the pattern worked right into the rounds.
I absolutely love your Ghosts in a Row Crochet Hat! The playful design is so charming. I can see how it would resonate with fans of spooky themes, much like how “Five Nights at Freddy’s” captures that eerie fun! Have you thought about adding characters or elements from the game to the design? It could make for an intriguing twist!
Sattamatkag.in is a dedicated platform providing structured updates and chart-based information related to Satta Matka, including detailed insights on Kalyan Satta, Indian Matka and daily number trends. It is helping users explore past records and pattern references in a simple and accessible format.
The repeating ghost design is such a fun addition to your “In a Row” crochet hat collection! I love how the little ghosts are worked right into the rounds—it’s a clever way to make a festive Halloween project.
The little ghosts worked into the repeating rounds are such a clever addition to the “In a Row” hat collection! I love how this pattern brings a playful Halloween feel while keeping the design cozy and wearable.
The repeating ghost design is such a clever addition to your “In a Row” crochet hat collection! I especially love how festive it feels while still using the same creative construction as your hearts, pumpkins, and Christmas trees.
The repeating ghost design is such a clever addition to your “In a Row” crochet hat collection! I love how you’ve turned the ghosts into a Halloween pattern that works right into the rounds.
The repeating ghost design is such a clever addition to your “In a Row” crochet hat collection! I love how the pattern captures a playful Halloween feel while still showcasing the fun challenge of working the ghosts right into the rounds.
The repeating ghost design is such a fun addition to your “In a Row” crochet hat collection! I especially love how you’ve turned the Halloween theme into a pattern worked right into the rounds.
The repeating ghost design is such a clever addition to your “In a Row” crochet hat collection! I especially love how you’ve turned the Halloween theme into a pattern that works right into the rounds.
The repeating ghost design is such a clever addition to the “In a Row” crochet hat collection! I especially love how the pattern brings a Halloween theme into the rounds without making the hat feel too busy.
The repeating ghost design is such a clever addition to your “In a Row” crochet hat collection! I love how the pattern turns a simple Halloween motif into something that looks playful and fun to wear.
I love this pattern, how easy it is to follow, and the result. However, I had a question about the wheat stitch part. I finished making one for my 6yo, but it’s getting stuck on his head. The wheat stitch part doesn’t even want to go over my 2yo head. Do I just need to do that part a lot looser?
Any tips appreciated. Thanks!