
First and foremost, let’s give the Snowplow Crochet Blanket it’s time to shine! Would you do me a favor and download this completely free pattern that I designed? Every click and download counts in a big way for me and my business.
>>> Snowplow Crochet Blanket FREE DOWNLOAD <<<
Inspired by the blanket, I made a matching Snowplow Crochet Hat! Feel free to customize the colors to your liking. Pattern below is sizes newborn – adult.
Materials:
– Red Heart Super Saver Yarn in colors Jade or Pool Blue and White for the Hat. Red or Orange for the Truck, Gray for the plow, and Black for the wheels. Pale Yellow if you want to add a window/headlight.
– Size H Crochet Hook for the Hat
– Size G Crochet Hook for the Snowplow Applique
– Tapestry Needle
– Pom-pom maker (optional)

Size: Newborn
Starting with blue yarn
Magic ring, chain 2 and make 11 DC in ring, join to first DC, chain 2
Round 2: 2 DC in each stitch around, join, chain 2 (22 DC)
Round 3: 2 DC in first, DC in next, repeat around, join, chain 2 (33 DC)
Round 4: 2 DC in first, DC in next 2, repeat around, join, chain 2 (44 DC)
Round 5-7: DC in each around, join, chain 2 (44 DC)
Round 8-9: DC in each around, join, chain 2 (44 DC)
Join in white yarn
Round 10: DC in each around, join, (44 DC)
Do not fasten off, continue to make earflaps as written below.
Size: 3-6 Months
Starting with blue yarn
Magic ring, chain 2 and make 11 DC in magic ring, join to first DC, chain 2
Round 2: 2 DC in each around, join, chain 2 (22 DC)
Round 3: 2 DC in first, DC in next, repeat around, join, chain 2 (33 DC)
Round 4: 2 DC in first, DC in next 2, repeat around, join, chain 2 (44 DC)
Round 5: 2 DC in first, DC in next 10, repeat around, join, chain 2 (48 DC)
Round 6-10: DC in each around, join, chain 2 (48 DC)
Join in white yarn
Round 11: DC in each around, join (48 DC)
Do not fasten off, continue to make earflaps as written below
Size: 6-9 Months
Starting with blue yarn
Magic ring, chain 2 and make 11 DC in magic ring, join to first DC, chain 2
Round 2: 2 DC in each around, join, chain 2 (22 DC)
Round 3: 2 DC in first, DC in next, repeat around, join, chain 2 (33 DC)
Round 4: 2 DC in first, DC in next 2, repeat around, join, chain 2 (44 DC)
Round 5: 2 DC in first, DC in next 10, repeat around, join, chain 2 (48 DC)
Round 6: 2 DC in first, DC in next 11, join, chain 2 (52 DC)
Round 7-11: DC in each around, join, chain 2 (52 DC)
Join in white yarn
Round 12: DC in each around, join (52 DC)
Do not fasten off, continue to make earflaps as written below.
Size: 9-12 Months (Should fit up to about 16 months)
Starting with blue yarn
Magic ring, chain 2 and make 11 DC in magic ring, join to first DC, chain 2
Round 2: 2 DC in each around, join, chain 2 (22 DC)
Round 3: 2 DC in first, DC in next, repeat around, join, chain 2 (33 DC)
Round 4: 2 DC in first, DC in next 2, repeat around, join, chain 2 (44 DC)
Round 5: 2 DC in first, DC in next 10, repeat around, join, chain 2 (48 DC)
Round 6: 2 DC in first, DC in next 11, join, chain 2 (52 DC)
Round 7: 2 DC in first, DC in next 12, join, chain 2 (56 DC)
Round 8-12: DC in each around, join, chain 2 (56 DC)
Join in white yarn
Round 13: DC in each around, join (56 DC)
Do not fasten off, continue to make earflaps as written below.
Size: Toddler/Preschooler
Starting with blue yarn
Magic ring, chain 2 and make 11 DC in magic ring, join to first DC, chain 2
Round 2: 2 DC in each around, join, chain 2 (22 DC)
Round 3: 2 DC in first, DC in next, repeat around, join, chain 2 (33 DC)
Round 4: 2 DC in first, DC in next 2, repeat around, join, chain 2 (44 DC)
Round 5: 2 DC in first, DC in next 10, repeat around, join, chain 2 (48 DC)
Round 6: 2 DC in first, DC in next 11, join, chain 2 (52 DC)
Round 7: 2 DC in first, DC in next 12, join, chain 2 (56 DC)
Round 8: 2 DC in first, DC in next 13, join, chain 2 (60 DC)
Round 9-13: DC in each around, join, chain 2 (60 DC)
Join in white yarn
Round 14: DC in each around, join (60 DC)
Do not fasten off, continue to make earflaps as written below.
Size: Child
Starting with blue yarn
Magic ring, chain 2 and make 11 DC in magic ring, join to first DC, chain 2
Round 2: 2 DC in each around, join, chain 2 (22 DC)
Round 3: 2 DC in first, DC in next, repeat around, join, chain 2 (33 DC)
Round 4: 2 DC in first, DC in next 2, repeat around, join, chain 2 (44 DC)
Round 5: 2 DC in first, DC in next 10, repeat around, join, chain 2 (48 DC)
Round 6: 2 DC in first, DC in next 11, join, chain 2 (52 DC)
Round 7: 2 DC in first, DC in next 12, join, chain 2 (56 DC)
Round 8: 2 DC in first, DC in next 13, join, chain 2 (60 DC)
Round 9: 2 DC in first, DC in next 14, join, chain 2 (64 DC)
Round 10-14: DC in each around, join, chain 2 (64 DC)
Join in white yarn
Round 15: DC in each around, join (64 DC)
Do not fasten off, continue to make earflaps as written below.
Size: Teen/Adult
Starting with blue yarn
Magic ring, chain 2 and make 11 DC in magic ring, join to first DC, chain 2
Round 2: 2 DC in each around, join, chain 2 (22 DC)
Round 3: 2 DC in first, DC in next, repeat around, join, chain 2 (33 DC)
Round 4: 2 DC in first, DC in next 2, repeat around, join, chain 2 (44 DC)
Round 5: 2 DC in first, DC in next 10, repeat around, join, chain 2 (48 DC)
Round 6: 2 DC in first, DC in next 11, join, chain 2 (52 DC)
Round 7: 2 DC in first, DC in next 12, join, chain 2 (56 DC)
Round 8: 2 DC in first, DC in next 13, join, chain 2 (60 DC)
Round 9: 2 DC in first, DC in next 14, join, chain 2 (64 DC)
Round 10: 2 DC in first, DC in next 15, join, chain 2 (68 DC)
Round 11-15: DC in each around, join, chain 2 (68 DC)
Join in white yarn
Round 16: DC in each around, join (68 DC)
Do not fasten off, continue to make earflaps as written below.
Earflap 1:
Chain 1, SC in next 12, chain 1, turn
Row 2: SC decrease, SC in next 8, SC decrease, chain 1, turn
Row 3: SC across (10 SC)
Row 4: SC decrease, SC in next 6, SC decrease, chain 1, turn
Row 5: SC across (8 SC)
Row 6: SC decrease, SC in next 4, SC decrease, chain 1, turn
Row 7: SC across ( 6 SC)
Row 8: SC decrease, SC in next 2, SC decrease, chain 1, turn
Row 9: SC across (4 SC)
Row 10: Make 2 SC decreases, chain 1, turn
Row 11: SC decrease, fasten off, weave in ends
Second earflap placement: Fold hat in half leaving slightly more stitches in the front of the hat than the back. Place the second earflap to line up with the first earflap.
Earflap 2:
Join yarn, chain 1, SC in next 12, chain 1, turn
Row 2: SC decrease, SC in next 8, SC decrease, chain 1, turn
Row 3: SC across (10 SC)
Row 4: SC decrease, SC in next 6, SC decrease, chain 1, turn
Row 5: SC across (8 SC)
Row 6: SC decrease, SC in next 4, SC decrease, chain 1, turn
Row 7: SC across ( 6 SC)
Row 8: SC decrease, SC in next 2, SC decrease, chain 1, turn
Row 9: SC across (4 SC)
Row 10: Make 2 SC decreases, chain 1, turn
Row 11: SC decrease, and continue to SC around hat and earflaps, chain 25 when you get to tip of each earflap and slip stitch down chain, fasten off when you get the entire way around and weave in ends.
Add two pom-poms or crocheted snowballs to the bottom earflap chains.
Add a pom-pom to the top (optional)
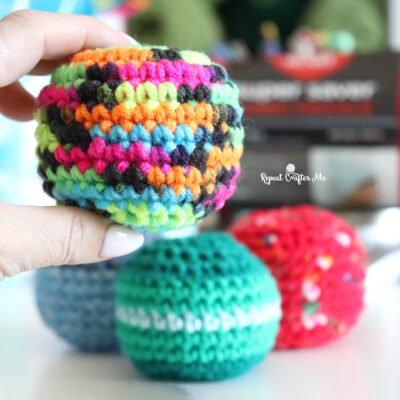
Crochet Snowballs for Hat Earflap Tails:
Magic Ring, chain 1 and make 10 SC in ring, join, chain 1
Round 2: 2 SC in first, SC in next, repeat around, join, chain 1
Round 3-5: SC in each stitch around, join, chain 1
Round 6: SC Decrease, SC in next, repeat around, join, chain 1
stuff with polyfil.
SC decrease until closed.
Snowplow Motif for Hat

Body of Truck:
Starting with red yarn
Chain 15, SC in second chain from hook and red of the way down chain, chain 1, turn
Row 2: SC Decrease over first two, SC in next 6, leave remaining stitches unworked, chain 1, turn
Row 3: SC in first 5 stitches, chain 1, turn
Row 4-5: SC in each of the 5 stitches, chain 1, turn
Row 6: SC in each of the 5 stitches and continue to SC down the side and back of truck, along the bottom and up along the hood, join to first SC, fasten off leaving long tail
Turn truck upside down and attach gray yarn to the bottom right of the truck bed. Chain 1 and HDC along the bottom of the truck (about 15 stitches), continue by chaining 6, turn and make a HDC in the 3rd chain from hook, HDC in remaining 3 stitches, join to the last stitch on the bottom of truck. Fasten off leaving long tail.
Plow:
with gray yarn
Chain 10, HDC in 3rd chain from hook and in next chain, 2 HDC in next 4 chains, HDC in last two, chain 2 and join back down to last chain, fasten off leaving long tail.
Wheels (make 2):
with black yarn
Magic Ring, chain 1 and make 10 HDC in ring, join to first HDC, fasten off leaving long tail.
Piece your snowplow together and stitch onto hat where the row of white begins.
Window:
With pale yellow
Chain 6, DC in 3rd chain from hook, DC in remaining chains, chain 2 and join to last chain. Fasten off leaving long tail to stitch window onto truck.
With strand of pale yellow yarn, stitch on tiny headlight to front of truck (optional).

Snowballs for Hat:
Make 2 in the plow and 3 in the back of truck bed.
with white yarn
Magic Ring, chain 1 and make 10 SC in ring, join to first SC, fasten off leaving long tail.
OR
Attach white yarn to one of the DC stitches in the hat. Make 4 HDC around the same stitch and join to the top of the first HDC to make a little snowball bobble.


Feel free to use the snowplow appliqués on other projects as well! I also think adding a few snowflakes would look cute on this hat. Can’t wait to see what you come up with!
Thank you for supporting the patterns that I design and publish on Yarnspirations.com! Ever single free pattern download helps me tremendously!
2025 House Blanket Crochet-Along! Join anytime!
2025 is going to be NEW YEAR of NEW PATTERNS! Let’s stay connected!
Subscribe to my NEWSLETTER for free patterns straight to your inbox!
Repeat Crafter Me Facebook
Repeat Crafter Me Instagram
Repeat Crafter Me Pinterest
Repeat Crafter Me YOUTUBE

 Starbucks Stitch Markers and Bottled Beverages
 Crochet Christmas Tree Pixel Square
 Crochet Santa Pixel Square
 Crochet Daisy Rug with Clover Amour Large Hooks and Giveaway!
Thank you for the good content you posted. It is really informative.
Looking forward to more of your posts and seeing how you tackle other interesting topics. Keep up the great work!
eih2ak
Hello
Thanks for the good information! It will help me in my knitting.
Thanks for running this blog
qwv5ac
Thank you so much for sharing this pattern! It’s super helpful. By the way, it might be a nice idea to add text directly onto the images, which would make the instructions even clearer. You can easily do that on Creative Fabrica—they have great tools for customizing images. Also, I saw that they’re about to release some exciting updates soon! Here’s the link if you’re interested: https://www.creativefabrica.com/the-artistry/creative-fabrica-news/a-new-era-of-generation-is-coming/
BEST IPTV Pack ensures a smooth viewing experience with advanced anti-freeze and anti-buffering technology, offering crystal-clear 4K visuals on any device, available anytime, anywhere : BEST IPTV
Model HYDERABAD Call Girls are very impressive to perform the better and better hookups again and again for the glossy life. When you are thinking to join the company of the call girls because these girls are fun.
https://www.citiesoflust.com/
I appreciate the excellent content you shared; it’s quite educational.
Thank you so much for sharing this content.
The truck and plow motif on the hat is a hit. Made earflaps with extra snowflakes as suggested. Worked well for my toddler. Will use pattern again.
The little headwear for baby you made from cotton is too good and is perfect for winter, this kind of thing we built in our Chhattisgarh, so come and Explore Chhattisgarh.
Previously, I didn’t really bother about clothes for active recreation — I took something simpler, as long as it was comfortable. But after a couple of trips to nature in the rain and wind, I realized that equipment really does matter. So I started looking for something more reliable and closer to the “outdoor plus” style. As a result, I came across the alpha defense gear — first I bought a balaclava, then gloves, and then I got to the jacket. I can’t say that it’s something ultra-specialized, but it suits my purposes perfectly. In addition, the clothes last a long time, and that’s nice.
One of the highlights of geometry dash breeze is its colorful visual style and custom level design.
Maintaining a high-end fashion aesthetic in your portfolio often involves post-processing tweaks that go far beyond simple color grading. I’ve been exploring some advanced AI techniques regarding how i remove clothes from a picture to seamlessly swap outfits and experiment with different fabrics in my edits. The tutorial provides a very professional approach to digital tailoring, ensuring that the final result looks realistic and high-fashion rather than artificial.
The Snowplow Crochet Blanket pattern looks absolutely stunning! I can’t wait to try it out myself. Supporting creators like you is so important. For more amazing designs, visit Welcome, Dear Human and discover endless inspiration!