– Worsted weight yarn in cream and brown. I used Ashland Bay Montana 100% Targhee wool yarn doubled up for the main part of the hat and Loops & Threads Impeccable Yarn in soft taupe for the bottom part of the cupcake. If you are using a regular worsted weight yarn like Vanna’s Choice you only need to use one strand (don’t double up).
– Colored yarn scraps for the sprinkles
– Red worsted weight yarn for the cherry
Magic Ring= Find the tutorial HERE
ST= Stitch
SC= Single Crochet
HDC= HD
DC= Double Crochet
FPHDC= Front Post Half Double Crochet

Size: 0-3 months
Magic Ring, chain 1, 9 HDC in ring, join, chain 1
Round 2: Work 2 HDC into each st around, join, chain 1 (18 HDC)
Round 3: 2 HDC in first stitch, HDC in next, Repeat around, join, chain 1 (27 HDC)
Round 4: 2 HDC in first stitch, HDC in next 2, Repeat around, join, chain 1 (36 HDC)
Round 5: 2 HDC in first stitch, HDC in next 3, Repeat around, join, chain 1 (45 HDC)
Round 6-9: HDC in each stitch around, join, chain 1 (chain 3 at the end of round 9) (45 HDC)
Now you are going to make the shell edge…
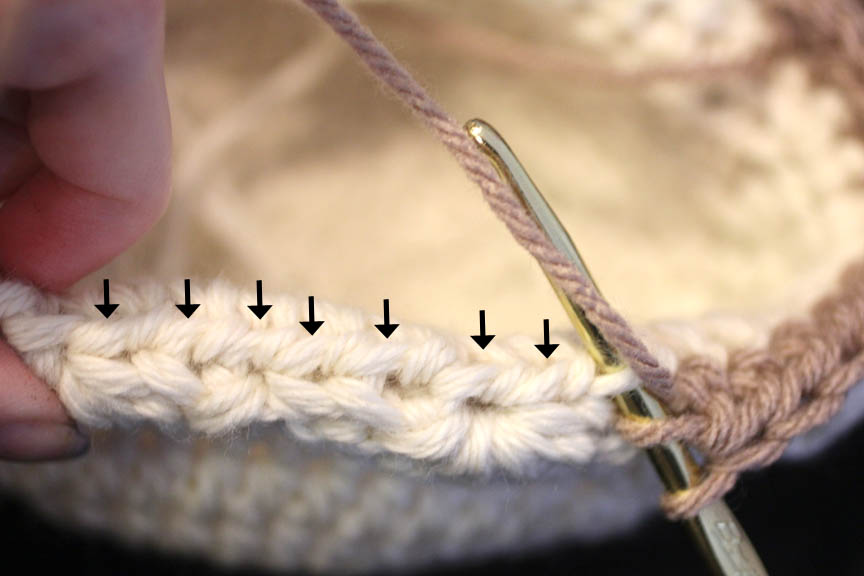
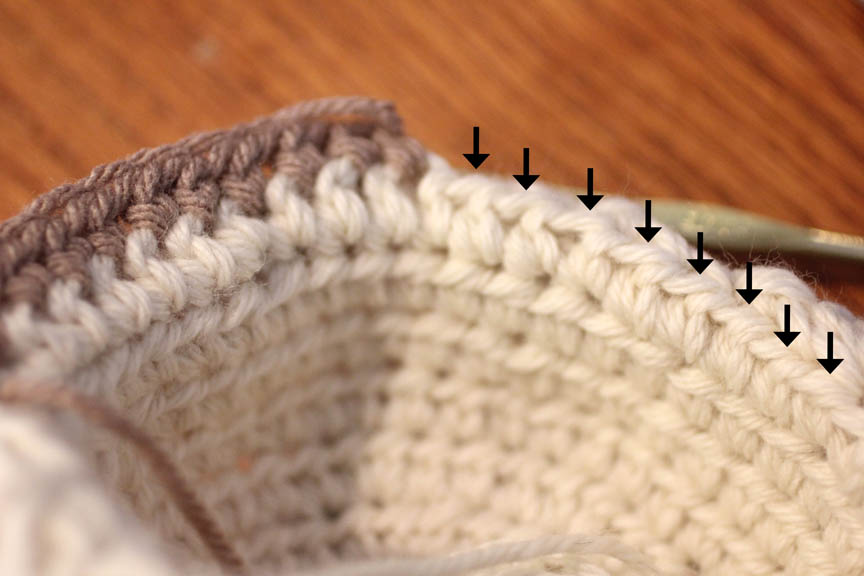
Round 12-14: FPHDC in first stitch, BPHDC in next, repeat around, join, chain 1
Here is a video tutorial on how to make the FPHDC and BPHDC:
Now begin on first earflap as written below.
Chain 1, SC in next 10, chain 1, turn
Row 2: SC decrease, SC in next 6, SC decrease, chain 1, turn
Row 3: SC across (8 SC)
Row 4: SC decrease, SC in next 4, SC decrease, chain 1, turn
Row 5: SC across ( 6 SC)
Row 6: SC decrease, SC in next 2, SC decrease, chain 1, turn
Row 7: SC across (4 SC)
Row 8: Make 2 SC decreases, chain 1, turn
Row 9: SC decrease, fasten off, weave in ends
Earflap 2:
Leave 15 stitches in front
Join yarn, chain 1, SC in next 10, chain 1, turn
Row 2: SC decrease, SC in next 6, SC decrease, chain 1, turn
Row 3: SC across (8 SC)
Row 4: SC decrease, SC in next 4, SC decrease, chain 1, turn
Row 5: SC across ( 6 SC)
Row 6: SC decrease, SC in next 2, SC decrease, chain 1, turn
Row 7: SC across (4 SC)
Row 8: Make 2 SC decreases, chain 1, turn
Row 9: SC decrease, and continue to SC around hat and earflaps, when you get to the top of each earflap: chain 40 (or as long/short as you wish), slip stitch in 2nd chain from hook and the rest of the way down the chain. Continue to SC around the hat and fasten off when you get the entire way around.
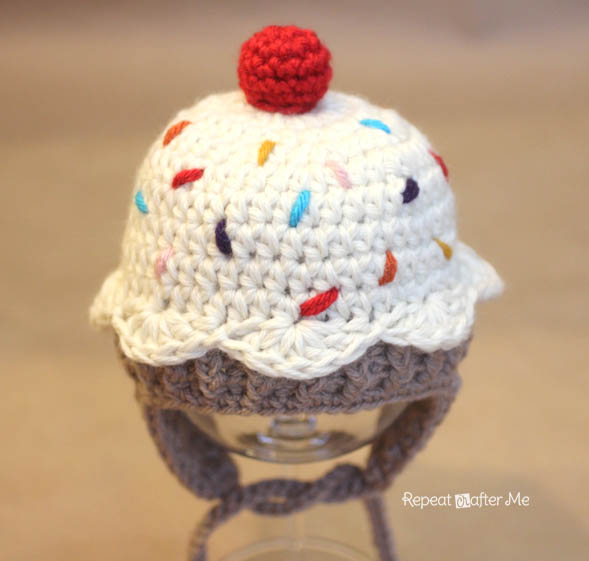
Crochet Cherry Pattern:
Magic Ring, chain 1, make 6 SC inside the magic ring, pull tight and continue to SC in rounds (do not join) use a stitch marker if needed.
Round 2: 2 SC in each stitch around (12 SC)
Round 3-4: SC in each stitch around (12 SC)
Round 5: *SC decrease, SC, repeat from * the rest of the way around, join, and fasten off leaving long tail.
You should now have an opening at the end that you will need to stuff with extra yarn or a small amount of poly-fil. Use the long tail to sew the cherry onto the top of the hat.
Sprinkles:
Use scraps of colored yarn (I used red, orange, mustard yellow, turquoise, light pink and purple) and with your tapestry needle, sew the yarn on in random spots so they look like long sprinkles.

If you are anxious to make this hat in larger sizes and want to attempt it on your own, you can follow the sizing increases on my gingerbread man hat. You will want the bottom part of your cupcake to be at least 4-6 rows long for larger hats so that is where you will make your FPHDC and BPHDC’s. Follow the same instructions as above for the shell edge as well. That will go on the row before you begin the bottom of the cupcake.
*** You may make and sell products from my patterns but if you do I ask that you link back to my post. Please do not copy and post this pattern and claim it as your own. Please do not re-publish photos as your own.***
Want more free patterns? Keep in touch on my Repeat Crafter Me Facebook Page for new pattern sneak peeks and when they will be available on my blog!

 Starbucks Stitch Markers and Bottled Beverages
 Crochet Christmas Tree Pixel Square
 Crochet Santa Pixel Square
 Crochet Daisy Rug with Clover Amour Large Hooks and Giveaway!
Thank you
I'm sooooo excited to try this! I've made several hats for my nieces and daughter using your other patterns and I LOVE them. Thank you so much!!!!
I was just looking at different cupcake hat patterns so I could make one. I love yours!!! Thank you so much!
This is so cute! It's just like a real cupcake, absolutely adorable!
OH MY GOD it's so cuuuuuuuuuuuuuuuuuute!!!! <3<3<3
That is so adorable! I love your patterns. I've made a number of newborn owl ones.
J'adore tous vos modèles et vous remercie pour les tutos.
Si vous le permettez, je vais essayer de faire ce cupcake hat.
Joëlle de France
Adorable as usual. Can't wait to make one!
Thank you so much for such an adorable pattern! I have a friend with a baby on the way who would LOVE one of this 😀
What a nice pattern, i prefer knitting but I must admit this hat is very cute!
Could you use a single strand of worsted weight yarn for the top of the cupcake or would that not be thick enough? Super cute little hat…thankyou for another fabulous pattern 🙂
i love all your patterns i have a suggestion on round 9 when you start the shell stitch do them in them front loops and when you go back to do the bottom you have the back loops to crohet in
I totally agree! I did it the other way and it showed through.
also did it this way as other way did not work for me. Its a stunning hat
This is lovely! My sister is having a baby soon 🙂 I bet she would adore this! Thank you!
What a wonderful hat!thanks for the pattern,I will try to make one for my 1month baby soon!
Just when I thought your blog couldn't get any better you go and give us a cupcake pattern! Thank you sooo much
Awwwwwwwwwww this is totally cute and yummi and I am pinning this right away! LOVE it! thanks for sharing! xx
I liiiiiike it!!!!!!
So cute ♥
Oh Sarah… I don't know HOW to thank you for sharing your sweet patterns. My neice's little baby girl has a growing collection of the CUTEST little hats… all our thanks to YOU! The baby has her first birthday THIS FRIDAY, so I'm wondering if I can get this hat made and sent to her in time! I'll see what I can do! ~tina
Oh no! Only up to three months! (didn't see that!) That's o.k… It's so sweet, it's worth the wait! ~me again (0;
Oh my, so much cuteness! We call my baby girl Cupcake, so this would have been perfect!
Very cute! Much easier than the pattern I designed a few years ago. Thanks again Sarah!
That looks so adorable! I love it! I will have to modify it to make a "Birthday" hat for some of the toddlers I know.
LOVE IT! I have been trying to come up with one on my own! you are a lifesaver!
love it! you need a pin it button 🙂
Thanks for the pattern!
I tried designing one of my own…not so good
LOL you should read this post just to see my cupcake turned crysanthymum!
http://asktracyann.crochethappy.com/2012/12/fasten-off-fridayi-tried-to-design.html
As always, your stuff is great! Thanks so much for sharing your amazing patterns!
Jamie
http://www.huckleberrylove.com
AWSOME!! cant wait to go to the craft store to get some vanna's Choice yarn and start on this proj
ect. Can you increase you sizes w/the same pattern only use a bigger hook size? i heard that makes the loops bigger and would make the hat bigger. You always have the cadallac's of patterns!!!
Another fabulous pattern! You are so talented 🙂
Thank you for another adorable pattern! I love them all!
Thank you soo much for sharing this. I can't believe how fast these come together. I can get one done (minus the sprinkles) in about 1.5 hours. Soo much fun. My friend had a really good idea. If we continue the bottom section (cupcake base) a few more rows, stuff, then sew on a bottom, it would make a great stuffed cupcake toy. I may try that too.
Again, thank you soo much for sharing all your wonderful creations and patterns.
Love the sprinkles! Thank You…..gonna make one of these ASAP….oh and Thanks So Much!! 😀
I did it using the gingerbreadman pattern for bigger sizes actually I made one for a child size and it went out perfect. I am proud of myself because this is the most beautiful thing I have ever crocheted after my Mary Jane booties set. 🙂 thank you very much. I have learnt a lot from you and your patterns.
Thank you loads and congrats on th enew baby.
After which row number did you change to the shell stitch?
Newest follower here! I found you through the blog hop. You have a super cute blog, I can't wait to read more. You can find me at meandmr.com
-Melanie @meandmr.com
Love love love this pattern Sarah! Thanks so much for linking up at Hookin On Hump Day!
Oh my goodness Sarah!!! LOVE LOVE LOVE LOVE LOVE it!!!
Thanks so much for sharing this at The DIY Dreamer.. From Dream To Reality! I can't wait to see what you link up tomorrow evening!
CONGRATS!!!!!! You have been featured at The DIY Dreamer! YAY!! Come on over and grab your featured button, you deserve it!!
http://thediydreamer.com/from-dream-to-reality/features-58/
Don't forget to swing by this evening to link up again to From Dream To Reality!
Thank you for another wonderful pattern. You also give me such great ideas. I'd like to say that your blog is one of the BEST I've seen. Keep up the great work.
if i need help anyone willing to skype with me???
oh it will link to my email and send me a message for the skype question
Ohhhhhhmygosh!!!! Cute, cute, CUTE!!!! You are so awesome. I have made several of your patterns and everyone just has a fit at how cute they are. I always point them to your blog for the patterns. I am totally making this cupcake hat. It is adorable. Thank you so much for all you share and your fabulous step-by-step instructions and videos.
gotta learn to crochet!!!!!
Yeah!!! I just finished your Newborn Cupcake Hat!! It' is da Bomb!! (does anyone say that anymore??) I'm going to work up a cute pair of booties to put with this for a cute set. Thanks for the free pattern.
Hello! I have found your blog and I think you are very good making crafts 🙂 I love your designs and probably I will try to do some of them, if you don´t mind I can put the link to your site in my blog for patterns? Thank you for sharing the patterns! Ragards from Madrid
How did you all put the sprinkles on without all the strings going everywhere on the inside? I am trying to hide them but not sure if there is an easier way.
Hi, I absolutely love this pattern. I'm linking your pattern on my blog as one of the patterns I love. http://thecraftycosplayer.blogspot.com/p/patterns-i-love.html
Thank you for posting such adorable patterns!
Thank you for this cute cupcake pattern. I have made one for my granddaughter. I call her my little cupcake. It's absolutely adorable! 🙂
This is the cutest cupcake hat I have seen yet! I have seen others and they either had to much going on or looked awkward. I am making this for a couple little girls in my family. Thank you so much for sharing!
Love this pattern so much that i featured it on my blog 🙂 Thank you so much for posting and sharing at no cost <3 Love your site & look forward to many more patterns from you in future. See featured post here http://moorecrochetandcrafts.blogspot.com/2013/05/free-crochet-patterns-galore.html
We're expecting baby #2 in Nov and just found out its a girl. So I made two of these in different sizes 🙂 thank you so much for sharing your creativity 🙂
carinissimo
How do I adjust this size for a 1y/o? I have hats like these for myself, and love them…and have 2 little girls who are 1 this year that would be able to wear them this winter….but its for up to 3mo old only =/
Your patterns are wonderful! I have used several and each one turns out perfect. Thank you for being so creative and generous. You're amazing!
Will you be making patterns for larger sizes of this hat?
Will you be making patterns for larger sizes of this hat?
how do you hide all the ties and knots on the inside of the hat?
awesome…kind wait for make it one soon..thank you for sharing this ..
Thank you so much for the pattern! Currently working on it.. Just a bit confused on the ear flap pattern…Since we are not Ch 1 and turning on rows 3 5 7 are rows 4 6 8 worked backwards?? Or am I doing something wrong?
Your patterns are the best and easiest to follow! Thank you!!!
Thank you for sharing this! I made one that turned out great in bigger size, i didn't really follow you pattern, more had it as a help to just make one. But i have a problem with sprinkles! – how one supposed to deal with all the ends on the inside? Please, help somebody!
i'd really like an adult or teen size one. do you have a pattern this is so! cute
I am confused on round 10… it seems like I don't have enough stitches. I have 45 stitches after round 9. In round 10 I am working a repeat of 5dc, skip, skip, 1sc, skip, skip… this pattern uses 6 stitches, so I would need a multiple of 6 to make this come out evenly (i.e. 42 or 48 stitches). I end up doing the 5dc in my 43rd stitch, and then skipping the next 2 stitches (44 and 45), and then I am at the chain 3 that began my first shell and am not able to finish out the pattern. What am I doing wrong?
Deb, try to not do that extra stitch, instead, once you are done with your last "shell" you should be able to grab the top of your "chain 3" and pull it down right next to the end of your last shell to finish the pattern… Or you can just look up some other "shell" pattern that maybe will be less confusing for you… i never start with the chain when making shells.
I just made this for my baby and it's sooo cute! Thanks!
no bigger sizes??? I want to make ot for my 2 year old baby 🙁
I just completed your pattern. Kudos to you. Thank-you so much for sharing. I followed the pattern and the cupcake hat is just perfect!!!! My new little granddaughter will look so cute in this one and her mom is going to love it. So very excited <3
Thanks for sharing!!!
I finished this Cupcake hat so fast and did the sprinkles a bit different. Love all the ones I made but this turned out stunning. Thanks again. I do post finished hats on my facebook but I do add your link each time. Thanks again for sharing and all work you put into showing us how its done.
So… My 14 yr old sister wants this hat SO BADLY. How would I change it to fit her teenage head?
love this pattern, but for some reason my hat ends up being way to small…. the 0-3 month version is max 10cm across, to small even for a small doll. What am I doing wrong. I'm using a 4,5mm hook (a bit smaller than a H-hook) and 100gr yarn. Is my yarn too thin? My hook to small? Who can help me?
What about a pattern sizer for a 22" head? How many more rounds and things would I add?
You are my crocheting hero!!! That video is amazing!
I have just made it for my three year-old and the results are stunning!! I had to adjust the pattern to fit a bigger head so I looked at a measurements for a child in an Owl Hat pattern. Here in the UK the equivalent of Lion Brand in my opinion is Hayfield (I used Hayfield Baby in Tufty shade and t's just perfect).
Thank you so much for your free patterns!!!!! You are a star!!
I want to do this in 3/6 mo size. How many stitches in the beginning should I add?
I would like that info too (3/6 mo size)
Did you ever make this pattern bigger? For a child (7 year old)
Great pattern! I am also interested in 3-6 month pattern:)
love this hat. i followed the directions for the gingerbread man hat like you said to for bigger size. too bad other people cant read that part. keep it up with awesome patterns!!!
I'm wondering if there are directions for the ties at the end of the ear flaps? Am I missing it? Thanks for your super cute patterns!
Is there a newborn size pattern?
Would really like to purchase this pattern in bigger sizes? I haven't found one as aesthetically pleasing as this one. Please let me know if this is possible.
downright inspiring you are….a new follower of yours as you have heart….and stitches too…
Very cute hat…… Going to try this….Thanks for the pattern
Hey there! I have been looking for the perfect cupcake hat pattern and while I SUPER adore yours, it’s seriously the best looking one of them all, I was wondering if you’d gotten around to making adjustments in the pattern for larger sizes? I’m sure I can figure it out, but I am not sure how many times I’ll end up having to pull it out and start over to get it right! Please get back to me! THANK YOU!!! 🙂
Actually, I just found where you mentioned the size increases to follow the instructions on the gingerbread man hat! Sorry I missed that on the first read through! I’ll see if I can work it out and then let you know how it turns out! I’m not the best crocheter, so I hope I can follow it and get it right! 🙂
I followed the increases and found the end of the frosting part to fall very high on the head. Did you ever finish yours? I’m trying to rework the pattern, and find a good number or rounds to make the frosting long enough before starting the bottom of the cupcake. Let me know what you did!
Greetings! I love this pattern! I’m almost finished but I am having trouble with the sprinkles! Did you have a lot of strings on the inside? Please help thanks!
PLEASE SELL ONE TO ME FOR MY 15 MONTH OLD GRANDBABY!!!!!!! PLEASE CONTACT
I can’t wait to make it to my little girl. Thank you so much for this post!!! Greetings from Venezuela! 🙂
I saw this and had to make it right away. I crochet baby and children’s hats for Miller Children’s Hospital in Long Beach, CA. I plan to make several of these because I know the children will love them. Thanks for sharing.
Thank you for the awesome pattern. I’ve finished the hat but I was wondering about how you hide all the ties(sprinkles) on the inside of the hat.
This pattern is great and so easy to follow!!! Thanks for sharing! One question though – how much would you sell something like this hat for? I’ve been crocheting for quite some time and usually just make them as gifts, but I’m considering trying to sell them this year. Any suggestions?
I love your cupcake hat. Do you have the pattern in larger sizes than the 0-3mon. ?
First time mommy here! I really love this hat and was wondering if you sell these. I would love to purchase one if so
I made hat using this pattern and thought that I wanted to share it with others because It was so pretty. I translated it into Korean on my blog and if there is any problem, please tell me. Of course I will link to your blog. Thank you.
See featured post here https://blog.naver.com/phaaan/221404447354
lovely pattern but I wold like to make in larger sizes. can anyone help with that.
I have noticed you don’t monetize repeatcrafterme.com, don’t waste your traffic,
you can earn additional cash every month with new monetization method.
This is the best adsense alternative for any type of website (they approve all
websites), for more info simply search in gooogle:
murgrabia’s tools
Love this pattern. My crocheting tends to turn out bigger than most people. Does anyone have a gauge for thiscpattern?
Partager cet article sur Facebook Like Us Nouvelles connexes manquant Broncos Fan: Père Vanishes Pendant Denver Broncos vs San Diego Chargers GameNFL équipe de football annexe \u0026 Prédictions 2014: 5 équipes qui doivent gagner Semaine 9 GamesRomo est juste un 89 OVR, mais cette blessure ne devrais ‘ t lui entravent trop.
For mise à jour des nouvelles sportives, les scores, et plus encore, suivez latine post Sports sur TwitterFOR PLUS NOUVELLES NFL, COMMERCE ET AGENCE mises à jour gratuites , cliquez sur ce lien pour visiter LATIN POST.
I just finished making this cupcake hat
My daughter’s cravings throughout her pregnancy was Cupcakes !!
So upon her arrival I found this, Thank You Very Much for the Amazing pattern.
I was able to whip it up in no time ❤
Nancy
This is darling. I will anxiously be waiting for the large sizes as I’m not sure I’m ready to try myself. ( Although I might.;) ). Love your patterns.