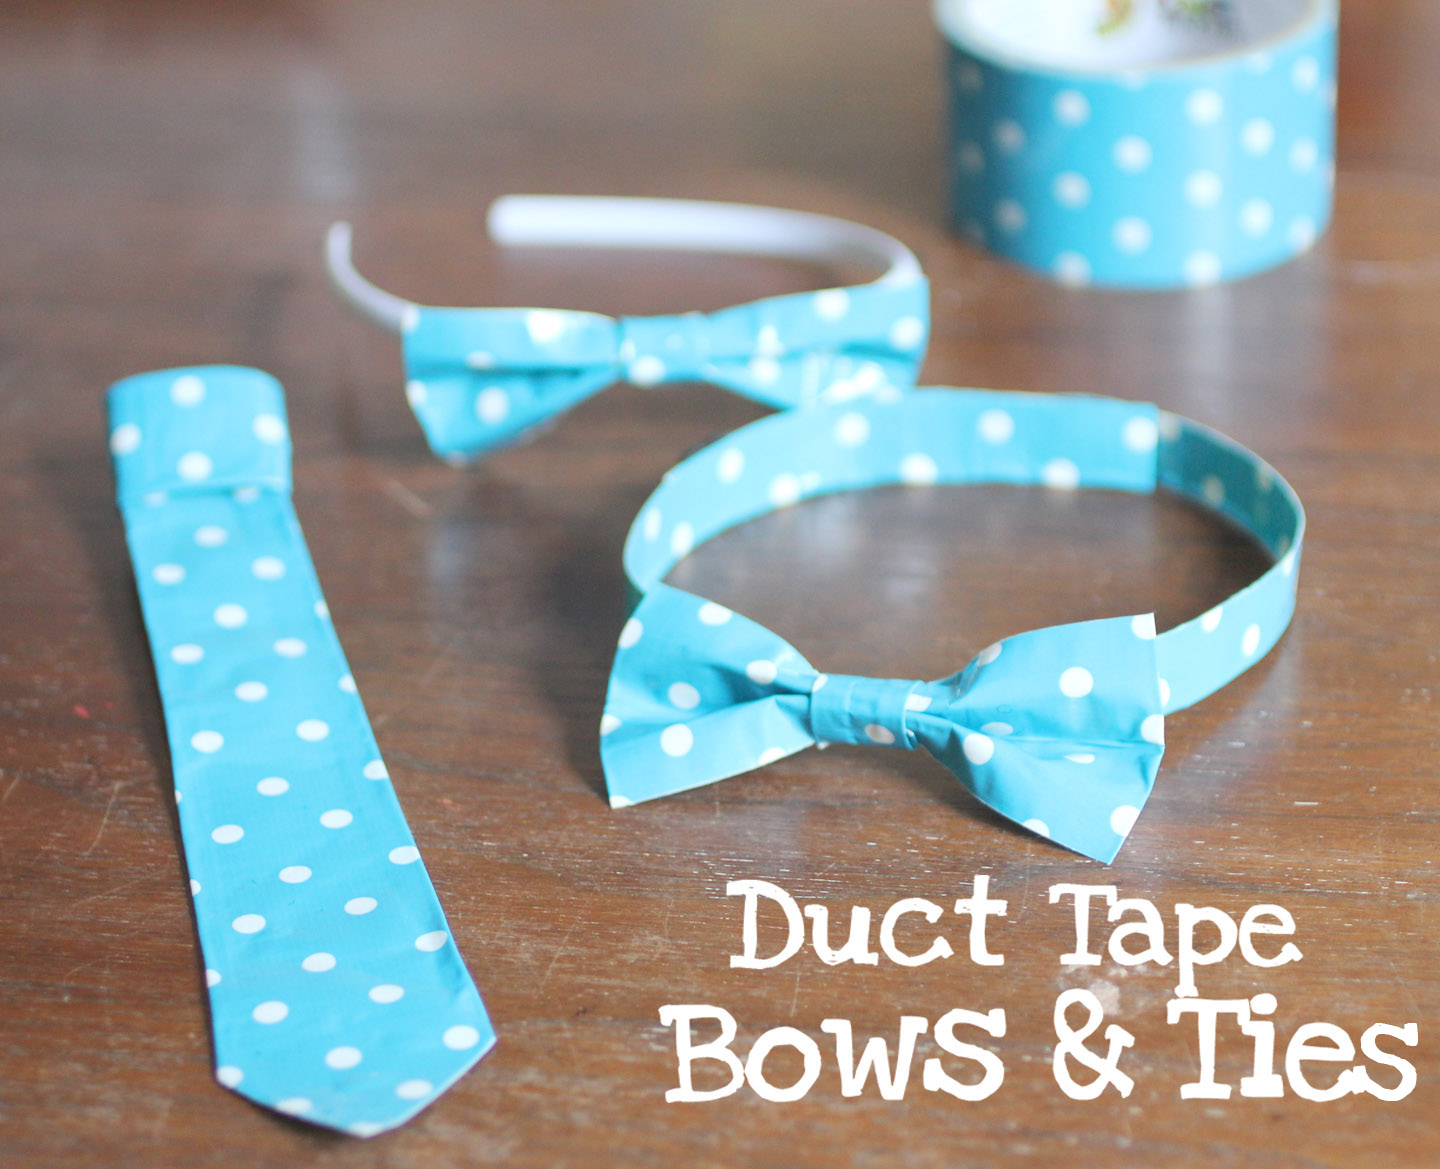
When I was shopping at Target last week, I came across some blue polka dot duct tape and today I did something fun with it. I made bows and ties! I thought these would be a good addition to our trunk of dress-up clothes, but they turned out so well I think they could be a fun photo prop or even a cute accessory. Best part is, you can dispose of them when they get torn or ruined and create a new one easily and cheaply.
Here is how to make the bow:
1. Cut a piece of duct tape about 9 inches long.
2. Fold both ends over so they overlap slightly in the center. Your piece should now be about 4 inches long.
3. Fold the piece accordion style, 3 times. Cut another small strip of tape and fold over edges leaving some stickiness in the center (this will be the middle of your tie).
4. Wrap the small piece of tape around the center to make a bow!

You could stick a headband through it for a cute little hair accessory.

But since I don’t have a daughter who can wear a this, I made my little guy a bow tie!

I cut a long strip of duct tape, folded it in half and stuck it through the bow. I used a couple pieces of velcro on the ends so it could fit different neck sizes.
I was having so much fun with this, I went ahead and made a neck tie as well!

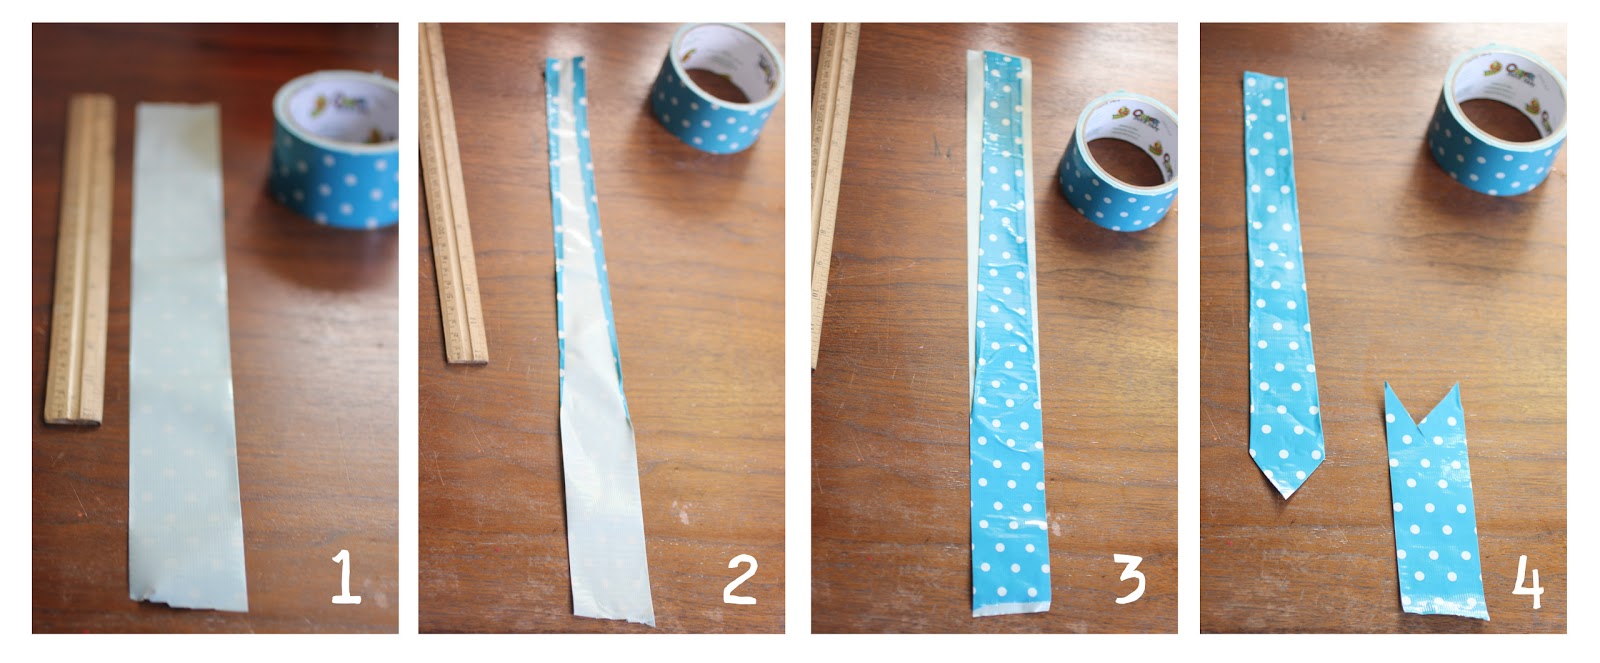
Here is how to make the neck tie:
1. Cut a long piece of duct tape (about 16 inches).
2. Fold the edges over at an angle as in picture #2.
3. Cut another piece of duct tape, the same length as your first and stick it on top. Flip it over and fold over the sticky edges.
4. Cut the bottom into a point.
Here is how to fold the top of the tie:
1. Fold top section behind at an angle.
2. Bring flap around and over top.
3. Fold the last little flap around to the back. Cut another small piece of duct tape. I like to fold the edges in for a cleaner look, but it’s not necessary.
4. Use it to tape the back in place. Tuck the tape in so you have a place to clip the tie. I used a snap clip barrette to clip it on my sons shirt.

After a little internet surfing, I found you can buy duct tape in MANY different colors and patterns on Amazon. Leopard print, damask pattern, argyle, paisley, stripes and more! Just think of the all the possibilities!
I think I might need to get crafty with this Skulls Printed Duct Tape  for my boys.
And you could do so many things with this Hello Kitty Duct Tape for little girls!

 Starbucks Stitch Markers and Bottled Beverages
 Crochet Christmas Tree Pixel Square
 Crochet Santa Pixel Square
 Crochet Daisy Rug with Clover Amour Large Hooks and Giveaway!
LOve the colored and patterned duct tapes — would never have thought of this use in a million years! I’d love it if you would consider linking with Busy Monday (open Monday through Thursdays) at A Pinch of Joy, a linky party for ideas that make life better, easier and more fun!
This is incredibly cute!!! It's great that the tie won't get too mess since its duct tape! Thanks for sharing your tutorial!!! xoxo- Rachel @ bubblynaturecreations.com
Charlene, I would love to link up to your party! Thank you so much for the invite!
Seriously, you always have such awesome crafts! Love this!
http://tutusandteaparties.blogspot.com/2012/03/pinteresting-party-week-29.html
How cute! Such a great little photo prop!
I'd love for you to stop by and share at my party 🙂
http://www.cherishedbliss.com/2012/03/craft-and-tell.html
Clever idea and CUTE little model. I love this Duct tape print. Fun craft. Thanks for sharing.
This is such a creative idea. I would love for you to stop by and Link up at my Link Party via: http://www.ourdelightfulhome.blogspot.com
Mrs. Delightful
http://www.ourdelightfulhome.blogspot.com
What a fun idea! He's too cute in those and I love the little spiked hair! Can't wait until my little guy's hair grows a little more so I can do that too.
They are unbelievably cute! What a unique idea!
What a great idea for all the fancy duct tapes out there! I guess you really can use duct tape for anything!
These turned out so cute! And what an adorable little model as well! Thanks so much for sharing such a great idea at this week's Tutorial Tuesday!
Kari
Newlyweds on a Budget
Thanks for linking to Take-A-Look Tuesday – you were featured today!
Mandy, http://www.SugarBeeCrafts.com
Stopping by from Show & Share with Southern Lovely! http://queenofsavings.com
What a clever, cute idea. I'm now following along. 🙂 Jodi @ http://www.meaningfulmama.com
What a cute idea and perfect for the dressing up box.
Thank you for linking up to Tuesday Tots this week and look forward to seeing you next week
How fun!! When I was a teacher I had a student who made an entire suit out of duct tape–he used the old silver stuff so people would know what it was. Thank you for sharing at Sharing Saturday!! I hope you are having a wonderful week!
Wow! Thank you! I permanently needed to write on my website something like that. Can I include a part of your post to my website?
iwillexposeanyone https://iwillexposeanyone.tumblr.com/
Thank you for any other informative web site. The place else may I am getting that kind of information written in such a perfect approach?
I have a undertaking that I am just now running on, and I’ve been on the
look out for such info.
Thank you for every other great post. The place else may just anyone get that type of info in such a perfect way of writing? I have a presentation next week, and I am at the look for such info.
Thanks for sharing this.
สมัครสล็อตFachai
Thanks for sharing this.
บาคาร่าบนมือถือ
Thanks for sharing this.
แทงบาคาร่าขั้นต่ำ10บาท
Thanks for sharing this
web design services
Thanks for sharing this
new and used motorcycle for sale Dallas