
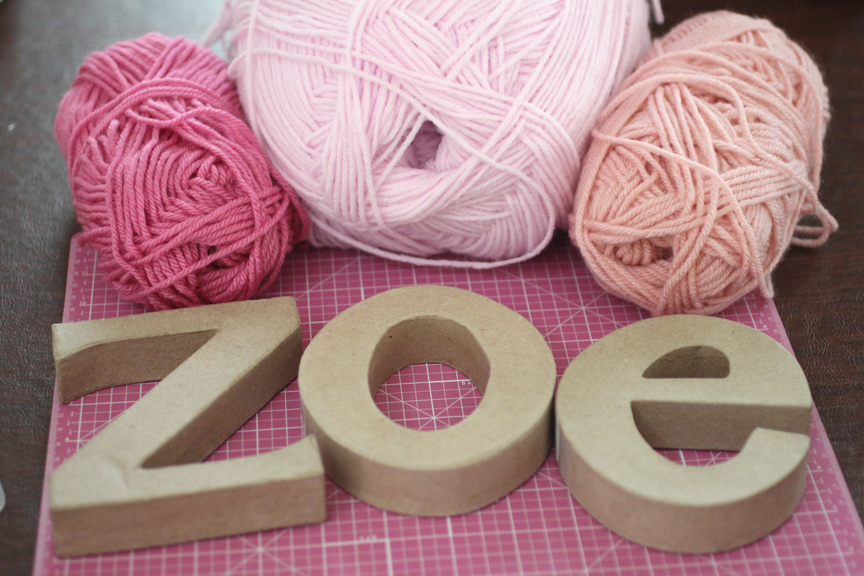
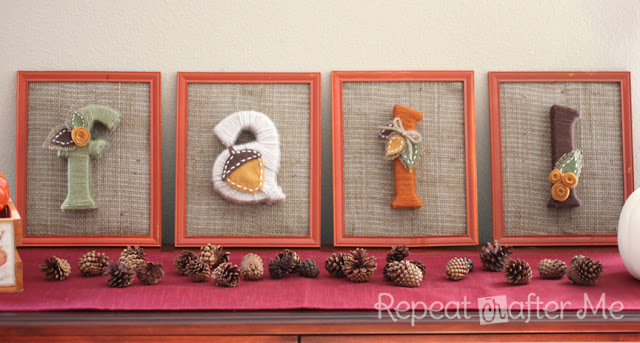
Last September I made Yarn Wrapped Letters for Fall and I just loved how they turned out! The project started out with a craft fail and then turned into one of my favorite projects to date. Shortly after I made them, a friend asked if I would make a set for her baby girl (see picture at the bottom of the post) and I loved how they turned out as well. So as soon as I became pregnant again, I knew I was going to have to make a set for my baby as well!
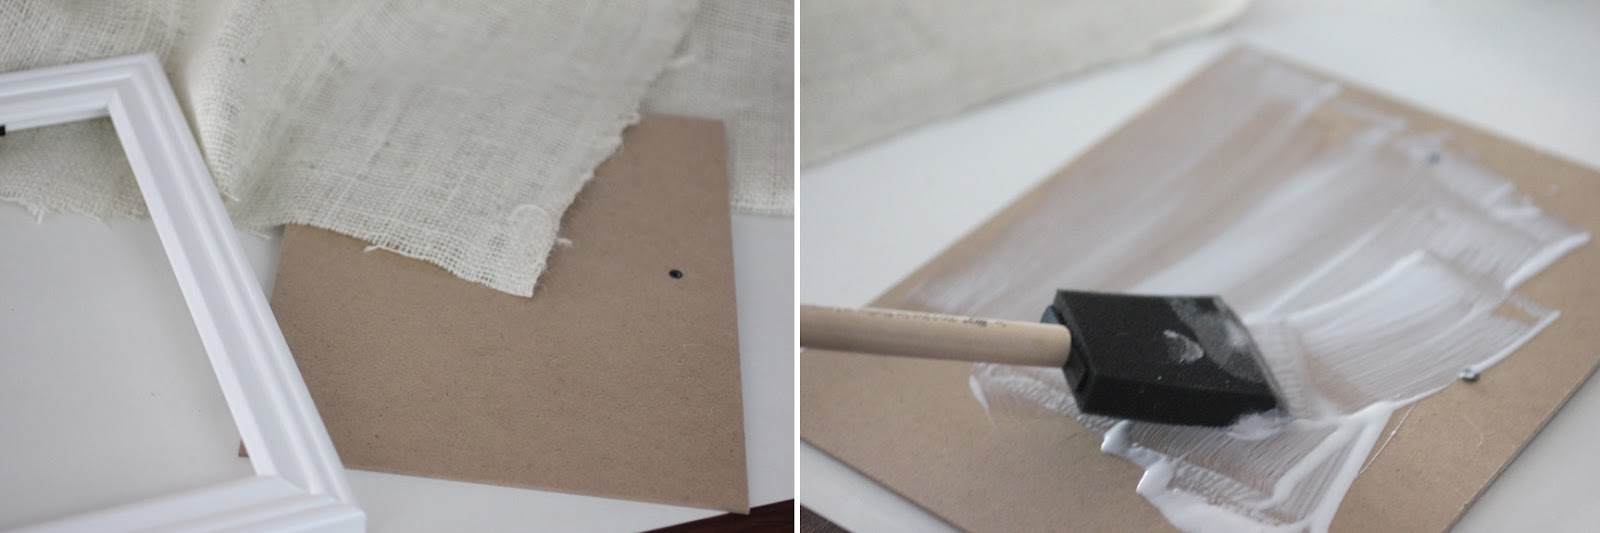
I bought from Amazon. It protects your work surface and the glue gun drips peal right off!


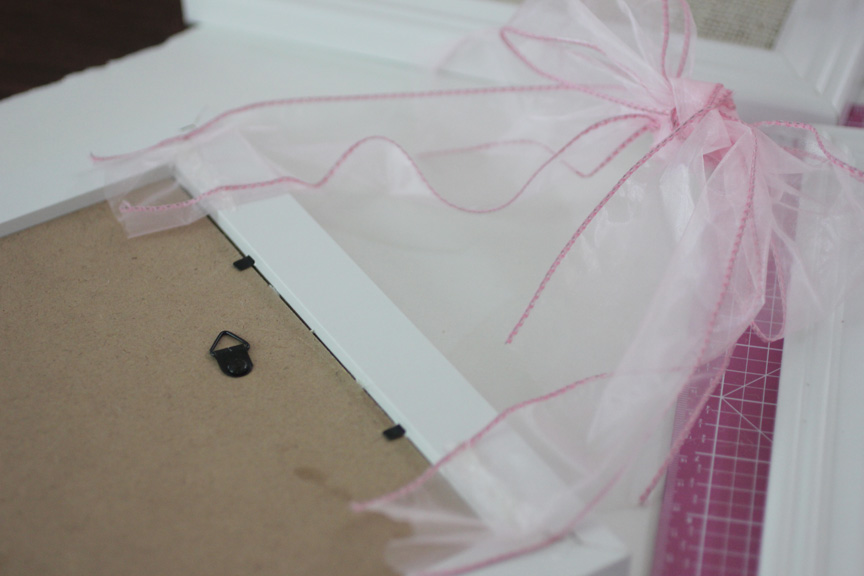
Now hang your letters in the nursery!


This is still little brothers room and this is his crib. Zoe will have big brothers old crib which is white. I will take better pictures when I put her room together!
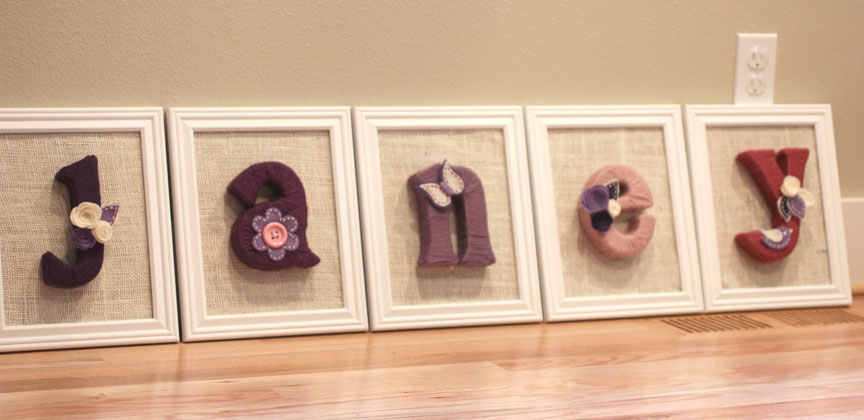
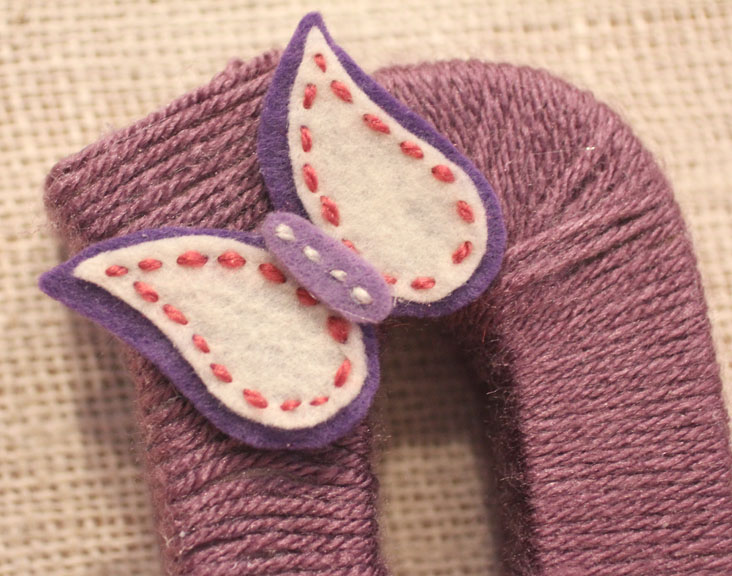
Here are the letters I made from my friends baby Jane (they call her Janey). The butterfly is my favorite!

 Starbucks Stitch Markers and Bottled Beverages
 Crochet Christmas Tree Pixel Square
 Crochet Santa Pixel Square
 Crochet Daisy Rug with Clover Amour Large Hooks and Giveaway!
SO cute! How did you do the side ends?
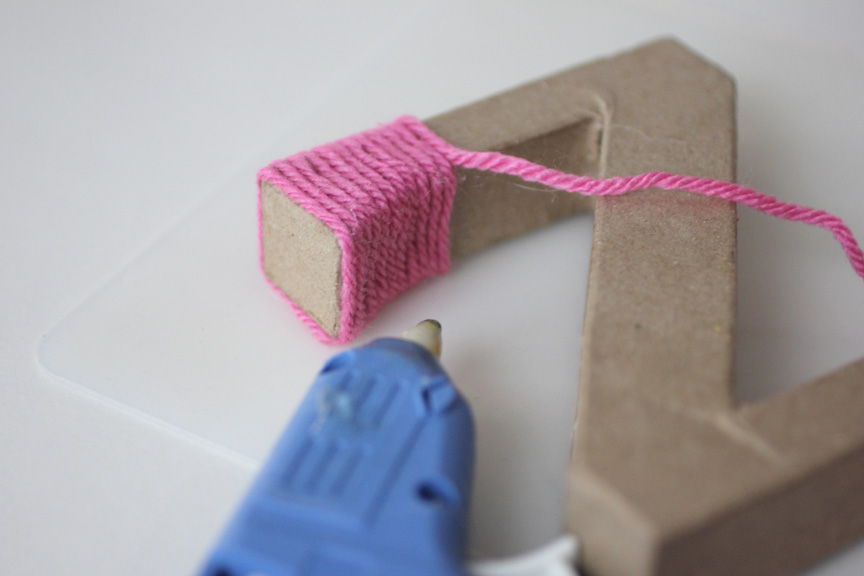
I glued the yarn in a square spiral until the end was filled in. Hope that helps!
And its easier to start your spiral from the outside and work your way to the middle!
I really love this idea! Your letters look beautiful!
Oh my goodness, so cute! I'm making #1 and #2 share a room for now, so not so much decorating for me 🙂
Also curious about the ends…. Love the idea. Beautiful hand crafted art for baby`s nursery 🙂
This is such a sweet idea! Love it:)
Me encanta! El nombre que le vas a poner a tu hija me parece precioso. Enhorabuena!
Un beso enorme!
Ana.
Those are adorable! I am totally pinning this idea! 🙂
I find your letters lovely. And I understand that your babygirl's name will be Zoe? Here in the Netherlands we almost never tell the name of our baby to be born. For a couple of years ago we didn't even know if it was a boy or a girl. And if we knew than we didn't tell. I wish you a good pregnancy. Sandra
so sweet!!!
oh I love this!!! I need to do this for my living room!!!! It would be adorable over the couch, or under a family photo I think!!! So many great idea's!!!! thank you for sharing!!!!
These are really, really adorable!
How adorable are those. I love them. What a creative and nice idea 🙂
These are awesome, Sarah!! Your sweet daughter is going to have a beautiful room 🙂
wow, this is wonderful project, I love this idea thanks for sharing
Sarah – these are beautiful! I am suddenly thinking of all sorts of great ways to use yarn-wrapped letters!
(Sharing, of course!)
These will be perfect for our new nursery! I can't wait to start them. Love the added ribbon!
They are really cute! Now wishing for a baby girl! =)
What a wonderful idea!! I'm having a babygirl too, maybe I will make this for her…
Thanks for much for linking to Take-A-Look Tuesday over at Sugar Bee Crafts – you were featured today!
–Mandy, http://www.SugarBeeCrafts.com
My daughter's name is Arabella, so it will take me a while to finish all those letters but more colors to work with so it's going to be fun. Thank you for the inspiration! <3
P.S. she will probably be 6 months by the time I'm done Lolol she is 4 months now. 😛
I love these!!! I'll have to do this whenever I have a little one!
cuuuute! how lovely are these! thank you for sharing!
I remember your fall letters and LOVED them. But I think the girly colors are even cuter! I showed this to my daughter and she loved them too. I'd just told her the day before that I wanted to put her name on her wall – Now I know how to execute that idea. Pinned! Gotta do this soon!
What a great idea. I LOVE you "f-a-l-l" design so much!
Love it!! Ready to get my Kamila's letter done! Please, share the pattern for the daisy and the butterfly and if you happen to have one for a dragonfly I will love too!!
Love it!! Ready to get my Kamila's letter done! Please, share the pattern for the daisy and the butterfly and if you happen to have one for a dragonfly I will love too!!
You can find whatever shapes you want to use in childrens colouring books, the black and white pictures provide an ideal template when glued onto card.
I love this idea! I am new to crafting but your idea inspired me to try this myself. I wonder how many yards of burlap fabric would I need for 6 frames and leave shapes?
We’ve arerivd at the end of the line and I have what I need!
With October 31st, 2008 great good locuinte was decided within the United Areas District Courtroom pertaining to this Southern District of the California. Your scenario is certainly just as follows: Your Tina’s fell in the in their own mortgage payments and also Countrywide instituted the foreclosure and also trustee purchase. In to response into the foreclosure, they will decided think about matters in to their own personal hands.
Hi Joanne I love reading your posts. In fact I suggested to my family that we're gonna order in from Famous Larry's tomorrow night. Some comments about the hard crust concern me a bit, as it'll probably be an hour after the pizza's cooked before we can enjoy the chow. Anyway great blog and keep up the good work!
I adore the baby’s name wrapped in yarn. This is a perfect addition to our baby’s nursery. BTW, I use fire-resistant curtains in my baby’s room. Companies and individuals living in California are given registration certificates for authorized fire resistant chemicals by the office of the State Fire Marshal. In respect to that, the SFM has ordered that all fabrics in schools, dining establishments and places of public assembly be made with fire retardant material or treated using fire retardant chemicals that are approved.
Anyway, I love reading your blog. Thanks!
LOVE, LOVE, LOVE THIS!! I am currently working on something similar to the yarn letters !! I cannot stress how much I adore how you added to the letters !! But I am using the wood letters instead of cardboard letters. (Any suggestions)? Plus, I am having difficulty getting the yarn at the top and bottom of the letters. I was told to use a marker but I really don’t know how that would look ?! Especially being a beginner on this. What is your thoughts on putting a second layer of yarn onto letters? (The first layer is getting pretty fuzzy)
My wife and I decided to update the children’s room and found a great decor store gardner white . There are so many cute and unusual things: from cozy pillows to stylish shelves and wall stickers. I especially liked that everything is safe for children and easy to install. My daughter was delighted when she saw her updated corner.
This yarn-wrapped letter project is such a sweet idea for a baby’s room! I love the soft colors you chose for the yarn and the floral embellishments you added. It really makes the letters stand out and gives a personal touch to the nursery. I’ve been thinking about getting a folding mattress for the baby’s room as well, just to have an extra, portable sleeping option. It would be so convenient for when family visits or for nap time. A folding mattress would fit perfectly in the space while also serving as a practical addition to the room. Thanks for the inspiration!
Those yarn-wrapped letters are so cute! I love how a craft fail turned into a fave. I once had a similar experience. Can’t wait to see pics of your baby’s set. Do you think you’ll add any embellishments?
This yarn-wrapped letter idea is absolutely adorable for a nursery! The soft yarn shades and delicate floral details give the letters such a charming, personalized feel. It’s a simple project, but it adds so much warmth and character to the baby’s room.
I’ve also been considering adding a foldable sleeping option to the nursery for convenience, especially when relatives come over or for quick daytime naps. Having something practical yet comfortable makes a big difference. While planning, I’ve been exploring options from a best mattress collection to ensure both portability and proper support. Thoughtful decorative touches combined with functional choices can really make a baby’s room both beautiful and practical.
This yarn wrapped letter project is such a lovely touch for a nursery. The soft color palette and floral accents make each letter feel unique and full of personality. It is amazing how a simple handmade detail can instantly make a baby’s room feel warmer and more special.
I have also been thinking about adding a foldable sleep option in the nursery for extra convenience, whether for visiting family members or quick daytime naps. Practical additions can make a big difference in how functional the space feels. While planning, I have been looking into options from affordable mattress brands in Pakistan to find something that offers both comfort and value. Combining thoughtful décor with smart, flexible furniture choices can truly make a nursery both beautiful and practical.
This yarn wrapped letter idea is such a charming addition to a nursery. The gentle colors and floral details give the space a soft, personal feel, and it is wonderful how a small handmade project can instantly add warmth and character.
I have also been considering a foldable sleeping option for added flexibility, especially for visiting guests or quick naps. While planning the setup, I have been comparing spring mattress prices to find something that balances comfort and practicality. Thoughtful décor paired with smart, space saving choices can truly make a nursery both inviting and functional.
What a lovely and creative project! I really like how something that started as a craft fail turned into a beautiful handmade décor idea—that’s the best part of DIY projects. The yarn-wrapped letters add such a personal and cozy touch, especially for a baby’s room. Handmade pieces like this truly make a space feel warm and meaningful.
And since a baby’s comfort is just as important as décor, a supportive sleep setup also makes a big difference in those early years. For example, Best Mattress Brand in UAE focuses on comfortable sleep solutions that can complement a cozy nursery environment. Such a sweet and inspiring idea overall!