
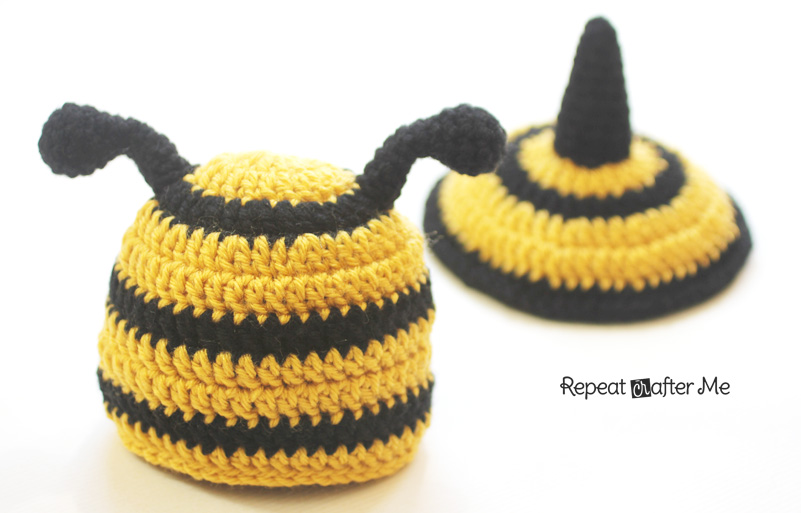
I wish I had a baby to model this on (7 more weeks until my baby girl arrives!) because the pictures of this set would be MUCH cuter, but I think you get the idea of how adorable a little baby would be in this bumble bee hat and matching tushie cover with a little stinger! I am also including the pattern for larger size hats as well 🙂
Materials:
– Lion Brand Vanna’s Choice yarn in Mustard (yellow) and Black
– Size H Crochet Hook
– Small amount of Poly-fil
– Tapestry needle
Abbreviations:
SC – Single Crochet
SC Decrease – Single Crochet Decrease
DC – Double Crochet
HDC – Half Double Crochet
DC – Double Crochet
HDC – Half Double Crochet
Hat Pattern:
Size: 0-3 Months
With yellow yarn..
Magic ring, chain 2 and make 11 DC in magic ring, join to first DC, chain 2
Round 2: 2 DC in each around, join (22 DC)
Magic ring, chain 2 and make 11 DC in magic ring, join to first DC, chain 2
Round 2: 2 DC in each around, join (22 DC)
Change to black yarn…
Round 3: Chain 2, 2 DC in first, DC in next, repeat around, join (33 DC)
Round 3: Chain 2, 2 DC in first, DC in next, repeat around, join (33 DC)
Change to yellow yarn…
Round 4: Chain 2, 2 DC in first, DC in next 2, repeat around, join, chain 2 (44 DC)
Round 5: DC in each around, join(44 DC)
Round 4: Chain 2, 2 DC in first, DC in next 2, repeat around, join, chain 2 (44 DC)
Round 5: DC in each around, join(44 DC)
Change to black yarn…
Round 6: Chain 2, DC in each stitch around, join (44 DC)
Change to yellow yarn…
Round 7-8: Chain 2, DC in each stitch around, join (44 DC)
Change to black yarn…
Round 9: Chain 2, DC in each stitch around, join (44 DC)
Change to yellow yarn…
Round 10: Chain 2, DC in each stitch around, join
Round 11: SC in each stitch around (or Slip stitch for a nice finished edge as pictured in the photo)
fasten off and weave in ends.
Size: 3-6 Months
With yellow yarn..
Magic ring, chain 2 and make 11 DC in magic ring, join to first DC, chain 2
Round 2: 2 DC in each around, join (22 DC)
Magic ring, chain 2 and make 11 DC in magic ring, join to first DC, chain 2
Round 2: 2 DC in each around, join (22 DC)
Change to black yarn…
Round 3: Chain 2, 2 DC in first, DC in next, repeat around, join (33 DC)
Round 3: Chain 2, 2 DC in first, DC in next, repeat around, join (33 DC)
Change to yellow yarn…
Round 4: Chain 2, 2 DC in first, DC in next 2, repeat around, join, chain 2 (44 DC)
Round 5: 2 DC in first stitch, DC in next 10, repeat around, join (48 DC)
Round 4: Chain 2, 2 DC in first, DC in next 2, repeat around, join, chain 2 (44 DC)
Round 5: 2 DC in first stitch, DC in next 10, repeat around, join (48 DC)
Change to black yarn…
Round 6: Chain 2, DC in each stitch around, join (48 DC)
Change to yellow yarn…
Round 7-8: Chain 2, DC in each stitch around, join (48 DC)
Change to black yarn…
Round 9: Chain 2, DC in each stitch around, join (48 DC)
Change to yellow yarn…
Round 10-11: Chain 2, DC in each stitch around, join (48 DC)
Change to black yarn…
Round 12: SC in each stitch around (48 SC)
fasten off and weave in ends.
Size: 6-9 Months
With yellow yarn..
Magic ring, chain 2 and make 11 DC in magic ring, join to first DC, chain 2
Round 2: 2 DC in each around, join (22 DC)
Magic ring, chain 2 and make 11 DC in magic ring, join to first DC, chain 2
Round 2: 2 DC in each around, join (22 DC)
Change to black yarn…
Round 3: Chain 2, 2 DC in first, DC in next, repeat around, join (33 DC)
Round 3: Chain 2, 2 DC in first, DC in next, repeat around, join (33 DC)
Change to yellow yarn…
Round 4: Chain 2, 2 DC in first, DC in next 2, repeat around, join, chain 2 (44 DC)
Round 5: 2 DC in first stitch, DC in next 10, repeat around, join (48 DC)
Round 4: Chain 2, 2 DC in first, DC in next 2, repeat around, join, chain 2 (44 DC)
Round 5: 2 DC in first stitch, DC in next 10, repeat around, join (48 DC)
Change to black yarn…
Round 6: Chain 2, 2 DC in first stitch, DC in next 11, repeat around, join (52 DC)
Change to yellow yarn…
Round 7-8: Chain 2, DC in each stitch around, join (52 DC)
Change to black yarn…
Round 9: Chain 2, DC in each stitch around, join (52 DC)
Change to yellow yarn…
Round 10-11: Chain 2, DC in each stitch around, join (52 DC)
Change to black yarn…
Round 12: Chain 2, DC in each stitch around, join (52 SC)
Round 13: SC in each stitch around
fasten off and weave in ends.
Size: 9-12 Months (Should fit up to about 16 months)
With yellow yarn..
Magic ring, chain 2 and make 11 DC in magic ring, join to first DC, chain 2
Round 2: 2 DC in each around, join (22 DC)
Magic ring, chain 2 and make 11 DC in magic ring, join to first DC, chain 2
Round 2: 2 DC in each around, join (22 DC)
Change to black yarn…
Round 3: Chain 2, 2 DC in first, DC in next, repeat around, join (33 DC)
Round 3: Chain 2, 2 DC in first, DC in next, repeat around, join (33 DC)
Change to yellow yarn…
Round 4: Chain 2, 2 DC in first, DC in next 2, repeat around, join, chain 2 (44 DC)
Round 5: 2 DC in first stitch, DC in next 10, repeat around, join (48 DC)
Round 4: Chain 2, 2 DC in first, DC in next 2, repeat around, join, chain 2 (44 DC)
Round 5: 2 DC in first stitch, DC in next 10, repeat around, join (48 DC)
Change to black yarn…
Round 6: Chain 2, 2 DC in first stitch, DC in next 11, repeat around, join (52 DC)
Change to yellow yarn…
Round 7: Chain 2, 2 DC in first stitch, DC in next 12, repeat around, join, chain 2 (56DC)
Round 8: DC in each stitch around, join (56 DC)
Change to black yarn…
Round 9: Chain 2, DC in each stitch around, join (56 DC)
Change to yellow yarn…
Round 10-11: Chain 2, DC in each stitch around, join (56 DC)
Change to black yarn…
Round 12: Chain 2, DC in each stitch around, join (56 DC)
Change to yellow yarn…
Round 13: Chain 2, DC in each stitch around, join (56 DC)
Round 14: SC in each stitch around (56 SC)
fasten off and weave in ends.
Size: Toddler/Preschooler
With yellow yarn..
Magic ring, chain 2 and make 11 DC in magic ring, join to first DC, chain 2
Round 2: 2 DC in each around, join (22 DC)
Magic ring, chain 2 and make 11 DC in magic ring, join to first DC, chain 2
Round 2: 2 DC in each around, join (22 DC)
Change to black yarn…
Round 3: Chain 2, 2 DC in first, DC in next, repeat around, join (33 DC)
Round 3: Chain 2, 2 DC in first, DC in next, repeat around, join (33 DC)
Change to yellow yarn…
Round 4: Chain 2, 2 DC in first, DC in next 2, repeat around, join, chain 2 (44 DC)
Round 5: 2 DC in first stitch, DC in next 10, repeat around, join (48 DC)
Round 4: Chain 2, 2 DC in first, DC in next 2, repeat around, join, chain 2 (44 DC)
Round 5: 2 DC in first stitch, DC in next 10, repeat around, join (48 DC)
Change to black yarn…
Round 6: Chain 2, 2 DC in first stitch, DC in next 11, repeat around, join (52 DC)
Change to yellow yarn…
Round 7: Chain 2, 2 DC in first stitch, DC in next 12, repeat around, join, chain 2 (56DC)
Round 8: 2 DC in first stitch, DC in next 13, repeat around, join (60 DC)
Change to black yarn…
Round 9: Chain 2, DC in each stitch around, join (60 DC)
Change to yellow yarn…
Round 10-11: Chain 2, DC in each stitch around, join (60 DC)
Change to black yarn…
Round 12: Chain 2, DC in each stitch around, join (60 DC)
Change to yellow yarn…
Round 13-14: DC in each stitch around (60 DC)
Change to black yarn…
Round 15: SC in each stitch around (60 SC)
fasten off and weave in ends.
Size: Child
With yellow yarn..
Magic ring, chain 2 and make 11 DC in magic ring, join to first DC, chain 2
Round 2: 2 DC in each around, join (22 DC)
Magic ring, chain 2 and make 11 DC in magic ring, join to first DC, chain 2
Round 2: 2 DC in each around, join (22 DC)
Change to black yarn…
Round 3: Chain 2, 2 DC in first, DC in next, repeat around, join (33 DC)
Round 3: Chain 2, 2 DC in first, DC in next, repeat around, join (33 DC)
Change to yellow yarn…
Round 4: Chain 2, 2 DC in first, DC in next 2, repeat around, join, chain 2 (44 DC)
Round 5: 2 DC in first stitch, DC in next 10, repeat around, join (48 DC)
Round 4: Chain 2, 2 DC in first, DC in next 2, repeat around, join, chain 2 (44 DC)
Round 5: 2 DC in first stitch, DC in next 10, repeat around, join (48 DC)
Change to black yarn…
Round 6: Chain 2, 2 DC in first stitch, DC in next 11, repeat around, join (52 DC)
Change to yellow yarn…
Round 7: Chain 2, 2 DC in first stitch, DC in next 12, repeat around, join, chain 2 (56DC)
Round 8: 2 DC in first stitch, DC in next 13, repeat around, join (60 DC)
Change to black yarn…
Round 9: Chain 2, 2 DC in first stitch, DC in next 14, repeat around, join (64 DC)
Change to yellow yarn…
Round 10-11: DC in each stitch around (64 DC)
Change to black yarn…
Round 12: Chain 2, DC in each stitch around, join (64 DC)
Change to yellow yarn…
Round 13-14: Chain 2, DC in each stitch around, join (64 DC)
Change to black yarn…
Round 15: DC in each stitch around (64 DC)
Change to black yarn
Round 16: SC in each stitch around (64 SC)
fasten off and weave in ends.
Size: Teen/Adult
With yellow yarn..
Magic ring, chain 2 and make 11 DC in magic ring, join to first DC, chain 2
Round 2: 2 DC in each around, join (22 DC)
Magic ring, chain 2 and make 11 DC in magic ring, join to first DC, chain 2
Round 2: 2 DC in each around, join (22 DC)
Change to black yarn…
Round 3: Chain 2, 2 DC in first, DC in next, repeat around, join (33 DC)
Round 3: Chain 2, 2 DC in first, DC in next, repeat around, join (33 DC)
Change to yellow yarn…
Round 4: Chain 2, 2 DC in first, DC in next 2, repeat around, join, chain 2 (44 DC)
Round 5: 2 DC in first stitch, DC in next 10, repeat around, join (48 DC)
Round 4: Chain 2, 2 DC in first, DC in next 2, repeat around, join, chain 2 (44 DC)
Round 5: 2 DC in first stitch, DC in next 10, repeat around, join (48 DC)
Change to black yarn…
Round 6: Chain 2, 2 DC in first stitch, DC in next 11, repeat around, join (52 DC)
Change to yellow yarn…
Round 7: Chain 2, 2 DC in first stitch, DC in next 12, repeat around, join, chain 2 (56DC)
Round 8: 2 DC in first stitch, DC in next 13, repeat around, join (60 DC)
Change to black yarn…
Round 9: Chain 2, 2 DC in first stitch, DC in next 14, repeat around, join (64 DC)
Change to yellow yarn…
Round 10: 2 DC in first stitch, DC in next 15, repeat around, join, chain 2 (68 DC)
Round 11: DC in each stitch around, join (68 DC)
Change to black yarn…
Round 12: Chain 2, DC in each stitch around, join (68 DC)
Change to yellow yarn…
Round 13-14: DC in each stitch around (68 DC)
Change to black yarn
Round 15: DC in each stitch around (68 DC)
Change to yellow yarn…
Round 16: DC in each stitch around (68 DC)
Round 17: SC in each stitch around (68 SC)
fasten off and weave in ends.

Antennae Pattern (make 2):
Magic Ring, Chain 1 and make 6 SC in ring, continue to work in rounds. Use a stitch marker if needed.
Round 2: 2 SC in first stitch, SC in next stitch, repeat around (9 SC)
Round 3: 2 SC in first stitch, SC in next 2, repeat around (12 SC)
Round 4: SC in each stitch around (12 SC)
Round 5: SC Decrease, SC in next 2 stitches, repeat around
Round 6: SC Decrease, SC in next stitch, repeat around
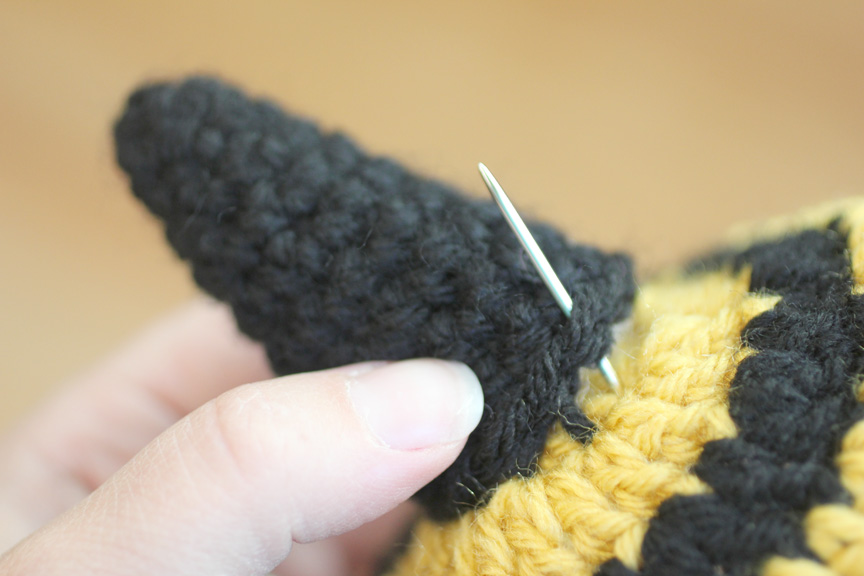
At this point you want to stuff the “ball” with poly-fil and continue
Round 7-12: SC in each stitch around (6 SC)
Fasten off leaving a long tail to sew onto hat or feel free to continue SC in rounds to make longer.
I did not stuff the rest with poly-fil so they would have a little flop to them, but you could stuff them to make them stick up straight before sewing onto hat.
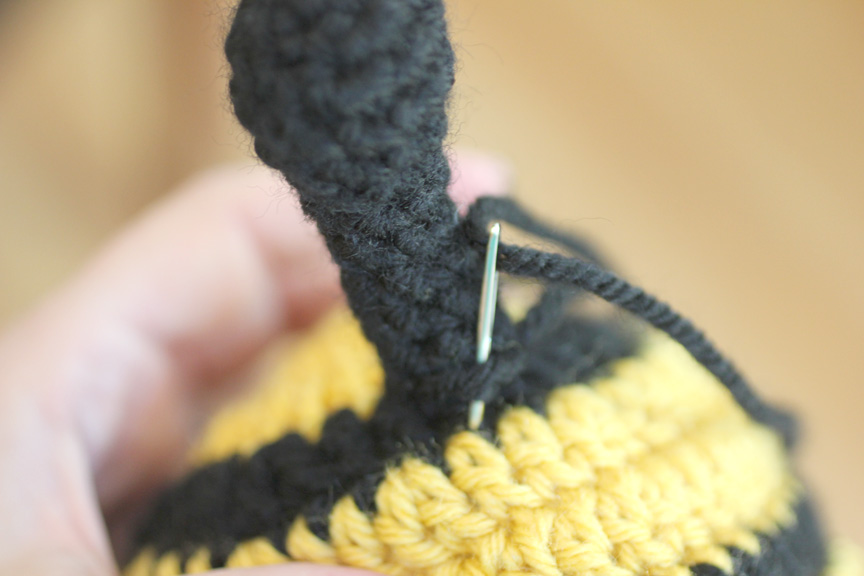
Use your tapestry needle to sew the bottom round of stitches onto the hat. I placed mine along the first black ring, evenly across from each other.
Tushie Cover Pattern:
With yellow yarn..
Magic ring, chain 2 and make 11 DC in magic ring, join to first DC, chain 2
Round 2: 2 DC in each around, join (22 DC)
Magic ring, chain 2 and make 11 DC in magic ring, join to first DC, chain 2
Round 2: 2 DC in each around, join (22 DC)
Change to black yarn…
Round 3: Chain 2, 2 DC in first, DC in next, repeat around, join (33 DC)
Round 3: Chain 2, 2 DC in first, DC in next, repeat around, join (33 DC)
Change to yellow yarn…
Round 4: Chain 2, 2 DC in first, DC in next 2, repeat around, join, chain 2 (44 DC)
Round 5: 2 DC in first stitch, DC in next 3, join (55 DC)
Round 4: Chain 2, 2 DC in first, DC in next 2, repeat around, join, chain 2 (44 DC)
Round 5: 2 DC in first stitch, DC in next 3, join (55 DC)
Change to black yarn…
Round 6: 2 HDC in first stitch, HDC in next 4, join (66 HDC)
Round 7: Slip stitch or SC in each stitch around (I chose to slip stitch)
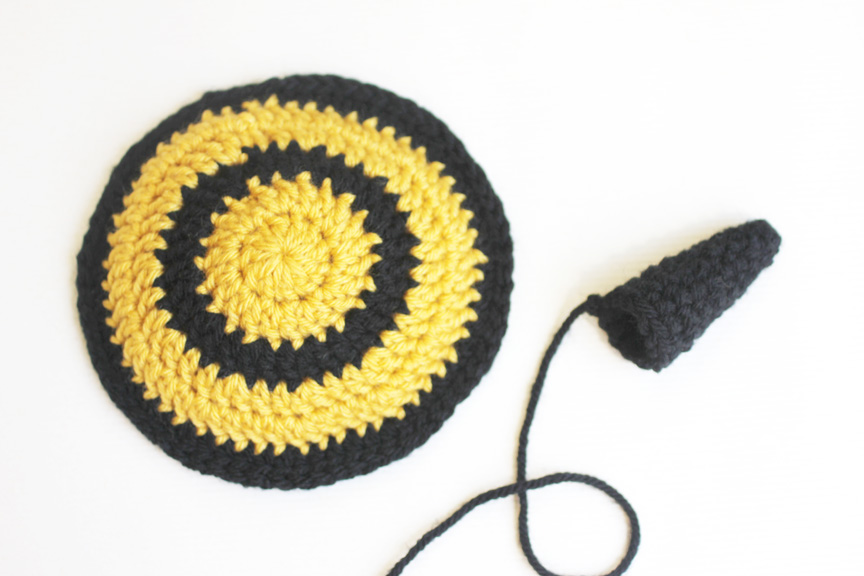
Stinger Pattern:
Magic ring, chain 1 and make 4 SC inside the ring, continue to work in rounds. Use a stitch marker if needed.
Round 2: 2 SC in first stitch, SC in next, repeat around (6 SC)
Round 3: SC in each stitch around (6 SC)
Round 4: 2 SC in first stitch, SC in next two, repeat around (8 SC)
Round 5: SC in each stitch around (8 SC)
Round 6: 2 SC in first stitch, SC in next 3, repeat around (10 SC)
Round 7: SC in each stitch around (10 SC)
Round 8: 2 SC in first stitch, SC in next 4, repeat around (12 SC)
Round 9-10: SC in each stitch around (12 SC)
fasten off leaving long tail to sew onto tushie cover
Stuff stinger with poly-fil and use your tapestry needle to sew the bottom round of stitches onto the middle of the tushie cover. It should be almost the exact width of your first round so use the first round as a guide to help you sew the stinger on so it is centered.
*** You may make and sell products from my patterns but if you do I ask that you link back to my post. Please do not copy and post this pattern and claim it as your own. Please do not re-publish photos as your own.***
Want more free patterns? Keep in touch on my Repeat Crafter Me Facebook Page for new pattern sneak peeks and when they will be available on my blog!

 Starbucks Stitch Markers and Bottled Beverages
 Crochet Christmas Tree Pixel Square
 Crochet Santa Pixel Square
 Crochet Daisy Rug with Clover Amour Large Hooks and Giveaway!


So SO cute!!! Another great pattern from you 🙂
I can't wait to make this. I don't have any little ones, but love to make stuff to donate!
Not to sound silly, but what is a tushie cover?
Goes over the bare bottom. Lol
Oh my gosh! So stinkin' cute 🙂
My question is this: How do you attach the tushie cover to the tushie?
It doesn't attach. It is a photo prop that sits over an infants butt 🙂 Like in these photos: http://www.etsy.com/search?q=bee%20hat%20and%20bum%20cover&view_type=gallery&ship_to=US
This has got to be my favorite site. I have made several of your crochet projects for my kids and have a very, very, very, very long list projects I want to do. Like Briana I can't wait to make this just to donate or give away as a gift. This just too adorable. Normally I don't comment on blogs, but I just love your site and follow you on Pinterest as well. Thanks for all the great FREE patterns.
I have a 4 month old granddaughter who will love this hat in the Autumn months Thank you for all the free patterns. I will make one for Charlotte and I know that her friends Moms will want one for their little ones also. Sharing items I have made is such fun I think I know what a 'tushie' is but I really don't know what a tushie cover is unless this would be added just for the 'cuteness' factor ? Thank you again and keep up the wonderful work as you cherish your boys and wait for your little girl <3
this is too cute!!! my baby is due in january so this would be just in time for carnival!!! however, have the same question as Lori Beth… how do you attach the tushie cover?
Love!
This is so, so adorable, and I love that you take these patterns from newborn to early childhood…just awesome! THANK YOU SO MUCH!!
I am SO in Love with this! 🙂 SO gonna have to make! Thanks for another Great Pattern! You Should try an Owl one sometime! 😉
~Madi
Hello this is such a cute pattern. I know it's okay to sell online but I won't be selling online so I was wondering if it was okay to sell these hats at flea markets? 🙂
Love your patterns and I'm looking forward to more crock pot recipes
So so cute! 🙂 I love it 🙂
Is it a bit tragic that I am actually going to make myself the full bee ensemble…….my name is Frantic and I am a 41 year old school teacher! Thanks for this- it looks straightforward and very cute too xx
You are a very talented woman. I'm always amazed at what you have on your blog. I am inspired with a ton of ideas yet no time.
So cute! Thanks for all the patterns. Have you ever made a ladybug? I bet that would be cute!
This is adorable! I know someone who is a photographer. She would LOVE this to use for photo props! How would that work for using your pattern? She just has her Co. name on the pictures. I would never take credit for someone's creative effort. I design also. Imagine how weird I felt when I saw MY angel pattern on the cover of a pattern book in Michaels crafts store! I sold them at Christmas.
I have just recently discovered your blog and it is so inspiring! I am expecting my first little one in about 3 weeks. I was wanting to make some photo props and these are just adorable! Thank you! And good luck with the rest of your pregnancy. It isn't long now!
Hi Sarah,
I LOVE your hats! I have made your cupcake hat (pics can be found here http://sallystrawberrycrochetandknitting.blogspot.co.uk/2013/07/cute-crochet.html) and here is a link to your bumble bee hat I have made. https://www.facebook.com/SallyStrawberrycreations It has received loads of compliments 🙂 Thanks again for all the time you take putting together these amazing patterns.
Sally
For you new moms & moms to be (how exciting!) this adorable pattern could be attached to a diaper cover. I've seen patterns for them & they look easy to make. Just go into a site like Ravelry or AllFreeCrochet and type "diaper cover" in the search bar. There are some baby costumes too, not all of them free, the wonderful designers need to make a living. Good luck with your new babies. Cherish them as much as you can….they grow so fast…my twins are 26. I miss babies! God Bless You all!
thank you for the pattern.. I tried making the same too..
http://www.janzcrystalz.info/2013/10/crochet-bumble-bee-hat.html
On the bee hat.antennaes..I was having trouble with the magic circle and black yarn and small piece! So I started with 7 chains and did 6 stitches back and forth for rows 7-12 – in this case 1-6. Then I reversed the pattern going up – I ended up with a flat piece and from the top wove yarn through to drawstring and then sewed downward to close. Once the top was sewn shut, I stuffed and get sewing seam downward – much easier and both look fab!
You are simply awesome…) Love your patterns…
Hi,I love all your patterns and made some too but have a request can you please post baby ladybug costumes and cowboy outfit please,please..Thank you.God Bless U..
just finished! i LOVE it! and those antennas and stinger are not as hard as i thought they'd be. thank you, thank, thank you!!
Do you have a loom knit version of this pattern?
I have just recently discovered your blog and it is so inspiring. Once the top was sewn shut, I stuffed and get sewing seam downward – much easier and both look fab.
http://www.kalajadoo.net/black-magic-with-needles/
I love your patterns! I cannot wait to make this! My friend is a photographer and she sent me the link to this and asked if I could make it for her. We are both sooooooo excited! I do have a question though. What size would the cover be?
Thank you so much for the hat pattern. Especially for the antenna on the hat. It’s really helping me.
I made your bumble bee tushi and hat set for a newborn photo session I had booked it turned out so awesome! Then I was able to get a super cute photo of my great nephew also! Your patterns are awesome! Thank you for sharing this pattern and so many others!
~}i{~ TinaDee ~}i{~
Crafty Narwhal will exchange orders placed that were the wrong size on unworn and undamaged items. Unfortunately, I cannot guarantee delivery dates and no refund will be given for an item not received by a specific date. Due to the nature of pattern purchases, there are no refunds given on patterns that have been downloaded.
If you have a problem with an item, please contact us and I will do my best to resolve the problem.
This listing is for a pattern only, not a finished product.
If you have any questions or problems with the pattern – feel free to contact me
https://www.thewarofdestiny.com/
I followed the pattern for the toddler size, and the hat fits an adult. 60 stitches around just seems like to much for a small child. Maybe the 12 month size works better? Has anyone made all of the sizes?
I dont understand the tushie cover. How does it stay on the baby?
Thanks for sharing the great post and nice information.
nice information.Thank you so much for the hat pattern
very nice article thanks for this wonderful knowledge
Hi
I love the little bee beanie thank you, what is a tushie cover?
Not sure where/how to use it….
Thank you!