Repeat Crafter Me

Crafts, DIY projects, FREE crochet patterns, crock pot recipes and more!

  • Home
  • About Me
  • Crafting
  • Crocheting
  • Crockpotting
  • Contact
  • Books

Crochet Candy Cane Hat Pattern

December 1, 2013

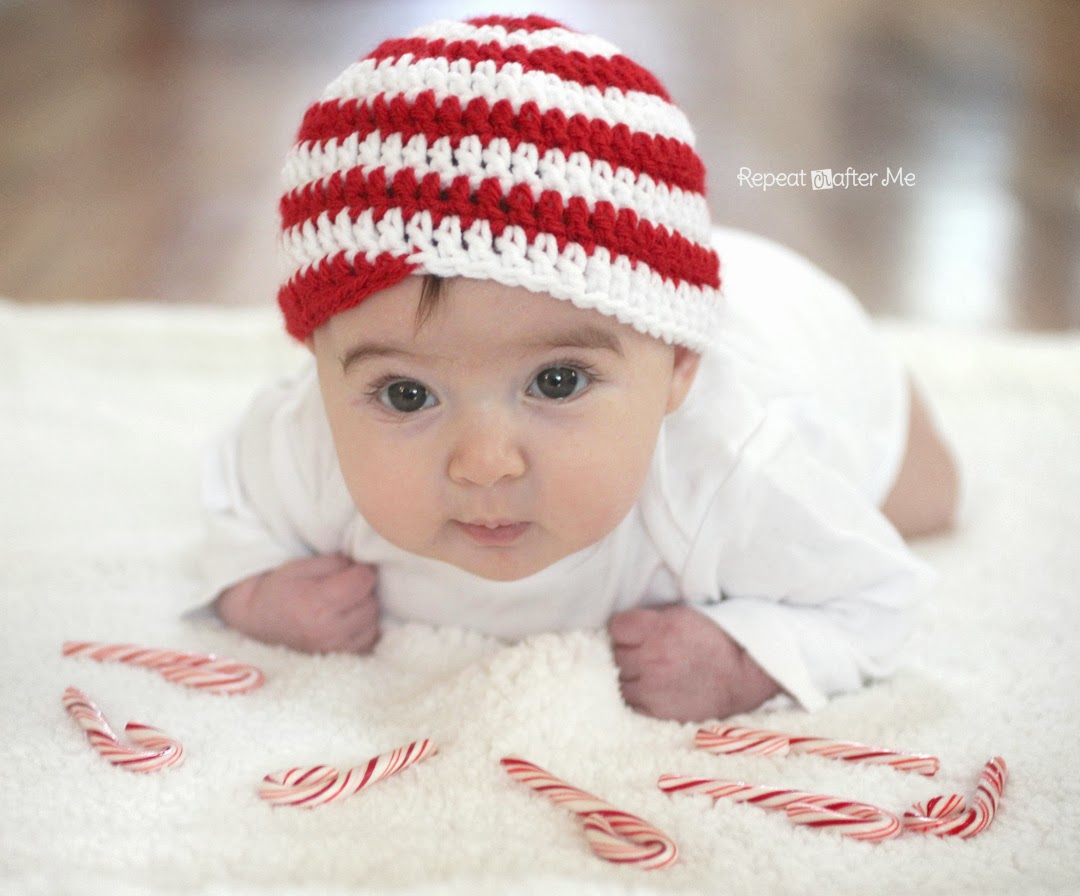
With it’s red and white swirled stripes, this crocheted candy cane hat is perfect for little heads this holiday season! Change the colors and you just have a fun swirly patterned beanie! This could pass for a lollipop hat as well πŸ™‚ And the best part is that you don’t have to weave in any ends until the end. The pattern works up in continuous rounds. I will try to explain with pictures and a video tutorial.

Materials:
– Worsted weight yarn in red and white.
– Size H Crochet Hook
– Stitch Marker (if you feel more comfortable using one)
– Tapestry needle

Abbreviations:
SC = Single Crochet
HDC = Half Double Crochet
DC = Double Crochet

Note: because of the large jumps in increases between sizes, you may need to try the hat on to make sure it’s a good fit. You can also check these standard beanie measurements to make sure your hat measures up. If it were me, and I needed an “in-between” size, I would make the larger size with a smaller hook. You can also make the hat longer or shorter…so for a 3 month old I might only make 11 rows and for a 6 month old I would make 12. You will see that listed in the pattern.

Now here is how to start your hat:

Sorry for the poor video quality. One day I will have a more professional set up and better equipment.


Candy Cane Hat Pattern


Newborn:
(with white) Magic Ring, ch 1, make 2 SC, 2 HDC, DC in ring, don’t fasten off, don’t pull tight
(with red) Make a slip knot, chain 1 onto magic ring loop, make 2 SC, 2 HDC, DC in ring, now pull tight.
Round 2: (with white) 2 DC in next 5 stitches. (now switch to red) 2 DC in next 5 stitches. You should have 10 white DC’s and 10 red DC’s for a total of 20 DC’s for this round.
Round 3: (with white) 2 DC in first stitch, DC in next, repeat until you have a total of 15 stitches. (with red) 2 DC in first stitch, DC in next, repeat until you have a total of 15 stitches. (30 DC)
Round 4: (with white) 2 DC in first stitch, DC in next two stitches, repeat around until you have a total of 20 stitches. (with red) 2 DC in first stitch, DC in next two stitches, repeat around until you have a total of 20 stitches. (40 DC)
Round 5-10: (with white) DC in next 20 stitches. (with red) DC in next 20 stitches. (40 DC)
To end, make a HDC, SC and slip stitch with each color and fasten off, weave in ends.

Size 3-6 Months: (I finished at 10 rows for my 2 month old baby and it fit well)
(with white) Magic Ring, ch 1, make 2 SC, 2 HDC, DC in ring, don’t fasten off, don’t pull tight
(with red) Make a slip knot, chain 1 onto magic ring loop, make 2 SC, 2 HDC, DC in ring, now pull tight.
Round 2: (with white) 2 DC in next 5 stitches. (now switch to red) 2 DC in next 5 stitches. You should have 10 white DC’s and 10 red DC’s for a total of 20 DC’s for this round.
Round 3: (with white) 2 DC in first stitch, DC in next, repeat until you have a total of 15 stitches. (with red) 2 DC in first stitch, DC in next, repeat until you have a total of 15 stitches. (30 DC)
Round 4: (with white) 2 DC in first stitch, DC in next two stitches, repeat around until you have a total of 20 stitches. (with red) 2 DC in first stitch, DC in next two stitches, repeat around until you have a total of 20 stitches. (40 DC)
Round 5: (with white) 2 DC in first stitch, DC in next three stitches, repeat around until you have a total of 25 stitches. (with red) 2 DC in first stitch, DC in next three stitches, repeat around until you have a total of 25 stitches. (50 DC)
Round 6-11(or 12): (with white) DC in next 25 stitches. (with red) DC in next 25 stitches. (50 DC)
To end, make a HDC, SC and slip stitch with each color and fasten off, weave in ends.
Size 6-12 months:
(with white) Magic Ring, ch 1, make 2 SC, 2 HDC, DC in ring, don’t fasten off, don’t pull tight
(with red) Make a slip knot, chain 1 onto magic ring loop, make 2 SC, 2 HDC, DC in ring, now pull tight.
Round 2: (with white) 2 DC in next 5 stitches. (now switch to red) 2 DC in next 5 stitches. You should have 10 white DC’s and 10 red DC’s for a total of 20 DC’s for this round.
Round 3: (with white) 2 DC in first stitch, DC in next, repeat until you have a total of 15 stitches. (with red) 2 DC in first stitch, DC in next, repeat until you have a total of 15 stitches. (30 DC)
Round 4: (with white) 2 DC in first stitch, DC in next two stitches, repeat around until you have a total of 20 stitches. (with red) 2 DC in first stitch, DC in next two stitches, repeat around until you have a total of 20 stitches. (40 DC)
Round 5: (with white) 2 DC in first stitch, DC in next three stitches, repeat around until you have a total of 25 stitches. (with red) 2 DC in first stitch, DC in next three stitches, repeat around until you have a total of 25 stitches. (50 DC)
Round 6: (with white) 2 DC in first stitch, DC in next 4 stitches, repeat around until you have a total of 30 stitches. (with red) 2 DC in first stitch, DC in next 4 stitches, repeat around until you have a total of 30 stitches. (60 DC)
Round 7-12 (or 13): (with white) DC in next 30 stitches. (with red) DC in next 30 stitches. (60 DC)
To end, make a HDC, SC and slip stitch with each color and fasten off, weave in ends.

Size Toddler/Child:
(with white) Magic Ring, ch 1, make 2 SC, 2 HDC, DC in ring, don’t fasten off, don’t pull tight
(with red) Make a slip knot, chain 1 onto magic ring loop, make 2 SC, 2 HDC, DC in ring, now pull tight.
Round 2: (with white) 2 DC in next 5 stitches. (now switch to red) 2 DC in next 5 stitches. You should have 10 white DC’s and 10 red DC’s for a total of 20 DC’s for this round.
Round 3: (with white) 2 DC in first stitch, DC in next, repeat until you have a total of 15 stitches. (with red) 2 DC in first stitch, DC in next, repeat until you have a total of 15 stitches. (30 DC)
Round 4: (with white) 2 DC in first stitch, DC in next two stitches, repeat around until you have a total of 20 stitches. (with red) 2 DC in first stitch, DC in next two stitches, repeat around until you have a total of 20 stitches. (40 DC)
Round 5: (with white) 2 DC in first stitch, DC in next three stitches, repeat around until you have a total of 25 stitches. (with red) 2 DC in first stitch, DC in next three stitches, repeat around until you have a total of 25 stitches. (50 DC)
Round 6: (with white) 2 DC in first stitch, DC in next 4 stitches, repeat around until you have a total of 30 stitches. (with red) 2 DC in first stitch, DC in next 4 stitches, repeat around until you have a total of 30 stitches. (60 DC)
Round 7: (with white) 2 DC in first stitch, DC in next 5 stitches, repeat around until you have a total of 35 stitches. (with red) 2 DC in first stitch, DC in next 5 stitches, repeat around until you have a total of 35 stitches. (70 DC) 
Round 8-14 (or 15): (with white) DC in next 35 stitches. (with red) DC in next 35 stitches. (70 DC)
To end, make a HDC, SC and slip stitch with each color and fasten off, weave in ends.
Teen/Adult:
(with white) Magic Ring, ch 1, make 2 SC, 2 HDC, DC in ring, don’t fasten off, don’t pull tight
(with red) Make a slip knot, chain 1 onto magic ring loop, make 2 SC, 2 HDC, DC in ring, now pull tight.
Round 2: (with white) 2 DC in next 5 stitches. (now switch to red) 2 DC in next 5 stitches. You should have 10 white DC’s and 10 red DC’s for a total of 20 DC’s for this round.
Round 3: (with white) 2 DC in first stitch, DC in next, repeat until you have a total of 15 stitches. (with red) 2 DC in first stitch, DC in next, repeat until you have a total of 15 stitches. (30 DC)
Round 4: (with white) 2 DC in first stitch, DC in next two stitches, repeat around until you have a total of 20 stitches. (with red) 2 DC in first stitch, DC in next two stitches, repeat around until you have a total of 20 stitches. (40 DC)
Round 5: (with white) 2 DC in first stitch, DC in next three stitches, repeat around until you have a total of 25 stitches. (with red) 2 DC in first stitch, DC in next three stitches, repeat around until you have a total of 25 stitches. (50 DC)
Round 6: (with white) 2 DC in first stitch, DC in next 4 stitches, repeat around until you have a total of 30 stitches. (with red) 2 DC in first stitch, DC in next 4 stitches, repeat around until you have a total of 30 stitches. (60 DC)
Round 7: (with white) 2 DC in first stitch, DC in next 5 stitches, repeat around until you have a total of 35 stitches. (with red) 2 DC in first stitch, DC in next 5 stitches, repeat around until you have a total of 35 stitches. (70 DC) 
Round 8: (with white) 2 DC in first stitch, DC in next 6 stitches, repeat around until you have a total of 40 stitches. (with red)  2 DC in first stitch, DC in next 6 stitches, repeat around until you have a total of 40 stitches. (80 DC)
Round 9-15 (or 16): (with white) DC in next 40 stitches. (with red) DC in next 40 stitches. (80 DC)
To end, make a HDC, SC and slip stitch with each color and fasten off, weave in ends.
I haven’t test the larger sizes… the teen/adult size seems large as it is written… If you make this hat let me know how it turns out in the comments! 

*** You may make and sell products from my patterns but if you do I ask that you link back to my post. Please do not copy and post this pattern and claim it as your own. Please do not re-publish photos as your own.

*** Want more free patterns? Keep in touch on my Repeat Crafter Me Facebook Page for new pattern sneak peeks and when they will be available on my blog! 
Signature
Print Friendly, PDF & Email
Share

Filed Under: Crocheting, Uncategorized 45 Comments

Related Posts

  • Starbucks Stitch Markers and Bottled Beverages
  • Crochet Christmas Tree Pixel Square
  • Crochet Santa Pixel Square
  • Crochet Daisy Rug with Clover Amour Large Hooks and Giveaway!

Comments

  1. Jennifer Buczynski says

    December 1, 2013 at 6:43 pm

    Soooo adorable!

    Reply
  2. Carol Lucente says

    December 1, 2013 at 6:53 pm

    I have a problem starting with magic circle. How else can hats be started? Thanks! Love your patterns!

    Reply
  3. Carol Lucente says

    December 1, 2013 at 6:54 pm

    I have a problem starting with magic circle. How else can hats be started? Thanks! Love your patterns!

    Reply
    • Kimberly Davis says

      December 1, 2013 at 7:08 pm

      Carol you can Chain 3 or 4 then join with a slip stitch to form a ring, then crochet into that ring. But you will not be able to tighten your ring at all so I am not sure how well that would work for this style hat.

      Reply
  4. Carmen says

    December 1, 2013 at 6:55 pm

    So adorable, Sarah! You are so incredibly generous and your patterns work up well and look great! Thanks again!

    Reply
  5. Terri Jones says

    December 1, 2013 at 7:37 pm

    have you made this for an adult

    Reply
  6. Mary says

    December 1, 2013 at 9:25 pm

    Thanks! this is adorable, and so creative!

    Reply
  7. April says

    December 2, 2013 at 2:51 am

    I am working on the teen/adult hat right now. It definitely wont be snug. I'm on row 12 now. When I finish I'll comment to let you know how it turned out–I'll also give you my head circumference–AND I'll post a picture on your FB page as well.

    Reply
  8. sarah shamsi says

    December 2, 2013 at 3:04 am

    This is lovely, Sarah! Would love to make it for my 2 year old nephew. What size should I follow?

    Reply
    • Marlena Olson says

      December 2, 2013 at 5:28 am

      I'd make the toddler / child size for a 2 year old. My son is almost 2 and I will be making this in that size for him.

      Reply
  9. wendy says

    December 2, 2013 at 3:20 am

    Gorgeous!!

    Reply
  10. April says

    December 2, 2013 at 3:24 am

    I've just finished up to round 16. My head is 22" and this is 12" across laid flat so roughly 24" circumference. I am thinking of adding a sc border dec round to snug it up.

    Reply
    • Angela says

      November 26, 2019 at 3:55 pm

      I’m making the adult size as well and am on row 10 and it’s big, I’m thinking the same thing adding some decreases to tighten it up .

      Reply
  11. April says

    December 2, 2013 at 3:47 am

    I did round 17 as a dec sc round (dec every 10 st–so at 9/10, 19/20, etc.) but it was still looser around the brim than I'd like, so I took round 17 and round 16 out and did round 16 as a sc dec round (dec every 5 st–4/5, 9/10, 14/15, etc.) and the fit is better. It is still not snug and probably looser than I'd prefer. Before doing the dec round I had my husband try it on–his head is 23"–and he said it was too loose for him as well. Hope all this info helps. πŸ™‚ I'll post a picture of the finished–modified–had on your FB page.

    Reply
    • [email protected] says

      December 2, 2013 at 9:24 pm

      Thanks so much for your help April! I really appreciate it and will have people refer to your comments!

      Reply
  12. April says

    December 2, 2013 at 3:49 am

    Oh, also I made the 40th stitch at the end of round 15–both colors–hdc before starting round 16 in a sc and at the end of round 16 I did a sl st after the 40th stitch and finished off.

    Reply
  13. Jillian says

    December 2, 2013 at 9:47 am

    I did the adult size. I used H hook, left out row 8 and did 15 rows. It's not snug and a bit boxy in shape. Could have gone down to a G hook.

    Reply
    • [email protected] says

      December 2, 2013 at 9:25 pm

      Thank you Jillian! So happy to have a couple testers out there! G hook sounds about right!

      Reply
  14. arjette says

    December 2, 2013 at 9:34 pm

    Ooohhh this is really awesome!!!! What size is an "h" hook in dutch sizes?? Hope you can tell me…. thank you!!!!

    Reply
    • Megan Looke says

      March 19, 2014 at 8:27 pm

      H is the same as an "8" hook…. or 5.00mm

      Reply
  15. Amber says

    December 2, 2013 at 10:14 pm

    So cute this hat. Adorable baby with this beanie. Thanks for the pattern.

    Love, Margaret

    Reply
  16. Holly Louise says

    December 3, 2013 at 2:09 pm

    I can't wait to try out this pattern!! too cute (as is your littlest one modeling!!!)

    Reply
  17. Leigha says

    December 4, 2013 at 12:29 pm

    I love this hat!!! I did the toddler/child size for my friends little girl who is the same age as my tot. I added one more row to it because I like the entire ear to be covered up. It's a smidge big, but that just gives some growing room which I love too. I'm going to add a satin ribbon and sparkly button bow to fancy it up a bit.

    Very easy to follow and worked up really well in a few hours of stop/start crocheting!

    Reply
  18. jessica olson says

    December 5, 2013 at 7:28 pm

    i just made this adorable hat!! It was for my 2 year old. i used camo and light pink bulky yarn! with a 6.5 hook it worked great. i used the directions for the toddler size but only increased to 40 sts. added a pompom on the top!!! LOVE it!!! Thanks Sarah!!

    Reply
  19. Jody Hubler says

    December 6, 2013 at 9:55 pm

    Just made an awesome version using Christmas red and white bulky yarn and an L size hook. I used the newborn hat pattern and hoped for an adult hat and it worked perfect. Only took 45 minutes using the chunky yarn and super cute. Wish i could add a picture. Thank you for sharing.

    Reply
  20. Misty says

    December 8, 2013 at 3:45 am

    You are amazing. I love your patterns. I just made the toddler/child sized hat and did 16 rows. I added a ribbed brim using the directions from Moogly (http://www.mooglyblog.com/leaping-stripes-and-blocks-beanies/#more-9668) and it fits my big head perfectly. LOL

    Reply
  21. Ivonne Cerezo says

    January 14, 2014 at 12:48 am

    Hi Mrs. Sarah! I Just want to say that I recently found your page on the internet and I truly LOOOOVE your patterns/tutorials!!! You are so talented and so generous for sharing this with all of us, I really appreciate it. I haven't made this one yet, but I am looking forward for that "lollipop pattern" (hint, hint) ;-D Thanks again, Ivonne

    Reply
  22. Adrienne Thomas says

    February 2, 2014 at 7:14 pm

    I made the teen/adult hat using a chunky yarn and left out rows 7 and 8 and finished on row 13. It turned out really well!

    Reply
  23. Marianne Guymon says

    August 6, 2014 at 3:22 pm

    I didn't read through all the comments yet, but I'm hoping this helps…I finished the teen/adult size and revamped it a bit as it was HUGE when I made it to the pattern specs above. I stopped at Round 7 and then instead of doing 40 dc I did 36dc and just continued it till it was the right length, not sure how many rows that was. I hope that helps! =)

    Reply
  24. Jessica says

    August 29, 2014 at 5:52 pm

    Ahhhh! Too fast!!! You are so talented, but I can't follow what you're doing because it's like watching Piccaso on fast forward! Please remember the beginners when you make these videos.
    :0)
    I'm still going to try.

    Reply
  25. Jamie Thompson says

    November 12, 2014 at 1:14 am

    Im trying to make this hat with worsted cotton yarn and a H hook but I can't keep it from curling which is preventing it from laying flat any advice

    Reply
  26. cvogie says

    December 23, 2014 at 7:30 am

    I've tried this with the teen/adult size with an "h" hook, it was WAY to big for me. I tore it out until the 7th round and started going of the toddler/child specs and that seems to be better however, still big for me. Maybe I messed up doing the rounds in the beginning.

    Reply
  27. Bwright1109 says

    December 27, 2014 at 12:38 am

    I stopped increasing after round 7 but did do one increase in both the white and the red so that I would know where I stopped increasing in case I had to rip it out. I also measured the diameter and it was already at a little over 8 inches. I did a total of 15 rounds and then did TWO hdc and then a single crochet and then a slip stitch before finishing it off. It fits my big head with NO stretching. If I was to make one for my tiny little niece (21 yrs old) I would probably use a G hook as well.

    Reply
  28. Purfylle says

    May 17, 2015 at 2:54 am

    I did the adult size last night. It turned out to be the perfect size for hubby's head. I'll be writing a post about later this week.

    Reply
    • Purfylle says

      May 19, 2015 at 12:28 am

      You can see my beanie here :o) I'm really happy with how it turned out, Thank you so much for the pattern. http://www.purfylle.com/2015/05/crochet-spiral-beanie.html

      Reply
  29. cucicucicoo: ecological living says

    May 21, 2015 at 9:11 am

    Ooh, I love this! Great hat design and thank you for the pattern! πŸ™‚ Lisa

    Reply
  30. Patricia says

    September 24, 2015 at 7:44 am

    Thank you for your pattern, it’s beautiful!! Anymore so could make that??

    Reply
  31. LaPulga says

    December 20, 2015 at 10:05 pm

    adult size was way to big, even for my big fat head. so smaller hook? or HDC instead of DC?

    Reply
  32. Tiffany says

    February 26, 2016 at 8:47 pm

    I just made the adult/teen size as directed, and it was a bit big, however, I omitted round 8, and added an extra round on the end, and it was perfect. The other sizes that i’ve done have all been great.

    Thanks!

    Reply
  33. Emily Mleczko says

    November 11, 2016 at 11:21 am

    Hey. Great pattern for beginners !! I tried to make the newborn hat for my sister to be ,but the hat turned out too big

    Reply
  34. Breahna says

    December 13, 2016 at 10:34 pm

    What do you recommend for a preemie size? Beautiful pattern!

    Reply
  35. Nichole says

    November 26, 2017 at 12:49 pm

    I have started this hat and it is a easy and fast work up. I was shocked how easy it was. Thank you. I have found out that the adult pattern is pretty large so I skipped round 8 and went right to 9 and it is a tad big but it works considering everyone’s head is different sizes. :). On rounds 9-15, I have to add a few more rows to cover the bottom of the ears but this pattern overall is amazing and fast! Thank you for sharing this!

    Reply
  36. Marie Phillips says

    January 11, 2018 at 3:14 pm

    I made the teen/ adult hat. The pattern was super easy to follow. I only increased to 70 stitches not 80. It was perfect. Thank you for this pattern.

    Reply
  37. Jessica Bolinger says

    September 15, 2021 at 11:17 pm

    So I’ve made the toddler/child hat then added 2 rows to fit my head. I used an h- hook. It turned out amazing! Thanks for this awesome hat.

    Reply
  38. Cindy M says

    November 21, 2022 at 6:53 pm

    I made the teen/adult hat and it is definitely loose. I would probably skip rows 7 and 8 and move directly to 9 having 60 stitches the remaining way. It is cute though.

    Reply

Leave a Reply Cancel reply

Your email address will not be published. Required fields are marked *

Let’s Connect!

  • Email
  • Facebook
  • Instagram
  • Pinterest
  • Twitter
Hi and thanks for stopping by! I'm Sarah, the crafter, crocheter and occasional crockpotter behind this blog. As a wife and mom of 3 my days are busy but I always find time to pick up my crochet hook or indulge in something crafty. I have a passion for crafting and crocheting and offer my patterns and tutorials for free! I hope you enjoy everything you find here and please feel free to repeat after me!

NEW BOOK PRE-ORDER!
Crochet Cute Critters on Sale!

Privacy

Follow by Email

© 2023 · Repeat Crafter Me · Site by High Note Designs