
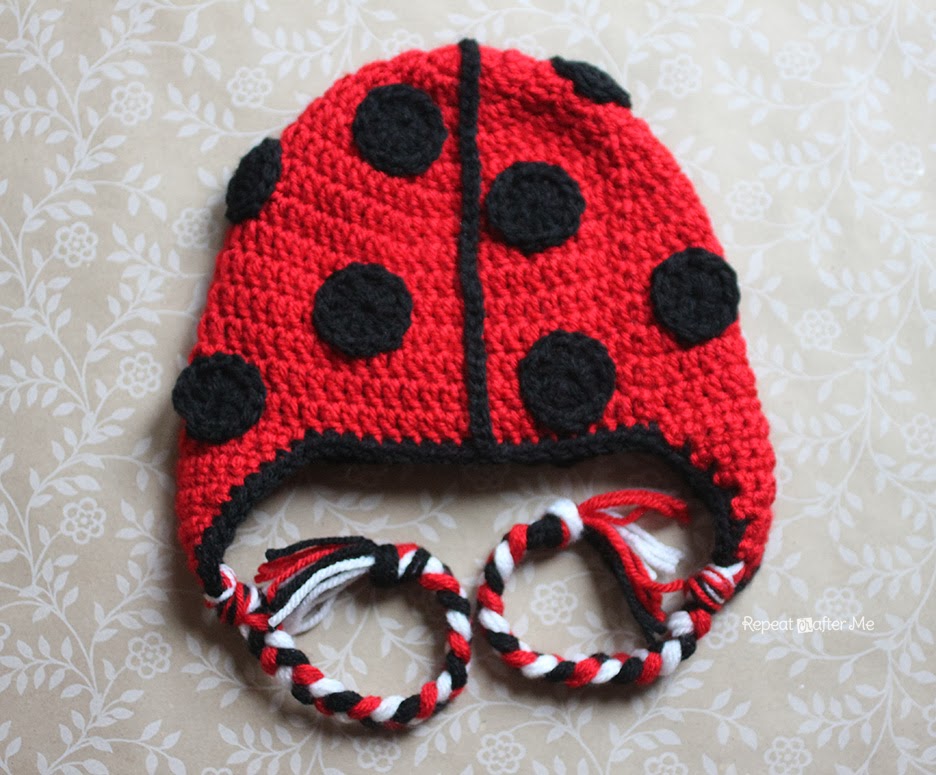
Christmas is over but if you’re like me, you still have a lot of red yarn in your stash. This ladybug hat is the perfect project to help you use up that yarn! It also makes a great Valentines Day gift for your little love bug and can easily be worn throughout the spring.
Materials:
– Worsted weight yarn in Red, Black and White.
I used Lion Brand Vanna’s Choice in Scarlet (Red), Black and White.
– Size H Crochet Hook
– Two small black buttons
– Tapestry needle
Abbreviations:
Magic Ring Tutorial
SC = Single Crochet
DC = Double Crochet
HDC = Half Double Crochet
SC Decrease = Single Crochet Decrease
Magic ring, 11 DC in magic ring, join to first DC, chain 2
Round 2: 2 DC in each around, join, chain 2 (22 DC)
Round 3: 2 DC in first, DC in next, repeat around, join, chain 2 (33 DC)
Round 4: 2 DC in first, DC in next 2, repeat around, join, chain 2 (44 DC)
Round 5-10: DC in each around, join, chain 2 (44 DC)
Round 2: 2 DC in each around, join, chain 2 (22 DC)
Round 4: 2 DC in first, DC in next 2, repeat around, join, chain 2 (44 DC)
Round 5: 2 DC in first, DC in next 10, repeat around, join, chain 2 (48 DC)
Round 6-11: DC in each around, join, chain 2 (48 DC)
do not fasten off, begin on earflap as written below
Round 2: 2 DC in each around, join, chain 2 (22 DC)
Round 4: 2 DC in first, DC in next 2, repeat around, join, chain 2 (44 DC)
Round 5: 2 DC in first, DC in next 10, repeat around, join, chain 2 (48 DC)
Round 6: 2 DC in first, DC in next 11, join, chain 2 (52 DC)
Size: 9-12 Months (Should fit up to about 16 months)
Round 3: 2 DC in first, DC in next, repeat around, join, chain 2 (33 DC)
Round 4: 2 DC in first, DC in next 2, repeat around, join, chain 2 (44 DC)
Round 5: 2 DC in first, DC in next 10, repeat around, join, chain 2 (48 DC)
Round 7: 2 DC in first, DC in next 12, join, chain 2 (56 DC)
Round 8-13: DC in each around, join, chain 2 (56 DC)
do not fasten off, begin on earflap as written below
Size: Toddler/Preschooler
Round 2: 2 DC in each around, join, chain 2 (22 DC)
Round 3: 2 DC in first, DC in next, repeat around, join, chain 2 (33 DC)
Round 4: 2 DC in first, DC in next 2, repeat around, join, chain 2 (44 DC)
Round 5: 2 DC in first, DC in next 10, repeat around, join, chain 2 (48 DC)
Round 7: 2 DC in first, DC in next 12, join, chain 2 (56 DC)
Round 9-14: DC in each around, join, chain 2 (60 DC)
do not fasten off, begin on earflap as written below
Size: Child
Magic ring, 11 DC in magic ring, join to first DC, chain 2
Round 2: 2 DC in each around, join, chain 2 (22 DC)
Round 3: 2 DC in first, DC in next, repeat around, join, chain 2 (33 DC)
Round 4: 2 DC in first, DC in next 2, repeat around, join, chain 2 (44 DC)
Round 5: 2 DC in first, DC in next 10, repeat around, join, chain 2 (48 DC)
Round 7: 2 DC in first, DC in next 12, join, chain 2 (56 DC)
Round 8: 2 DC in first, DC in next 13, join, chain 2 (60 DC)
Round 9: 2 DC in first, DC in next 14, join, chain 2 (64 DC)
Round 10-15: DC in each around, join, chain 2 (64 DC)
do not fasten off, begin on earflap as written below
Magic ring, 11 DC in magic ring, join to first DC, chain 2
Round 2: 2 DC in each around, join, chain 2 (22 DC)
Round 3: 2 DC in first, DC in next, repeat around, join, chain 2 (33 DC)
Round 4: 2 DC in first, DC in next 2, repeat around, join, chain 2 (44 DC)
Round 6: 2 DC in first, DC in next 11, join, chain 2 (52 DC)
Round 7: 2 DC in first, DC in next 12, join, chain 2 (56 DC)
Round 8: 2 DC in first, DC in next 13, join, chain 2 (60 DC)
Round 9: 2 DC in first, DC in next 14, join, chain 2 (64 DC)
Round 10: 2 DC in first, DC in next 15, join, chain 2 (68 DC)
Round 11-16: DC in each around, join, chain 2 (68 DC)
do not fasten off, begin on earflap as written below
Earflap 1:
Chain 1, SC in next 10, chain 1, turn
Row 2: SC decrease, SC in next 6, SC decrease, chain 1, turn
Row 3: SC across (8 SC)
Row 4: SC decrease, SC in next 4, SC decrease, chain 1, turn
Row 5: SC across ( 6 SC)
Row 6: SC decrease, SC in next 2, SC decrease, chain 1, turn
Row 7: SC across (4 SC)
Row 8: Make 2 SC decreases, chain 1, turn
Row 9: SC decrease, fasten off, weave in ends
Earflap 2:
See my PUPPY HAT PATTERN if you need help on where to place the second earflap.
Chain 1, SC in next 10, chain 1, turn
Row 2: SC decrease, SC in next 6, SC decrease, chain 1, turn
Row 3: SC across (8 SC)
Row 4: SC decrease, SC in next 4, SC decrease, chain 1, turn
Row 5: SC across ( 6 SC)
Row 6: SC decrease, SC in next 2, SC decrease, chain 1, turn
Row 7: SC across (4 SC)
Row 8: Make 2 SC decreases, chain 1, turn
Row 9: SC decrease, fasten off and weave in ends.
Earflap 1:
Chain 1, SC in next 12, chain 1, turn
Row 2: SC decrease, SC in next 8, SC decrease, chain 1, turn
Row 3: SC across (10 SC)
Row 4: SC decrease, SC in next 6, SC decrease, chain 1, turn
Row 5: SC across ( 8 SC)
Row 6: SC decrease, SC in next 4, SC decrease, chain 1, turn
Row 7: SC across ( 6 SC)
Row 8: SC decrease, SC in next 2, SC decrease, chain 1, turn
Row 9: SC across (4 SC)
Row 10: Make 2 SC decreases, chain 1, turn
Row 11: SC decrease, fasten off, weave in ends
Earflap 2:
See my PUPPY HAT PATTERN if you need help on where to place the second earflap.
Chain 1, SC in next 12, chain 1, turn
Row 2: SC decrease, SC in next 8, SC decrease, chain 1, turn
Row 3: SC across (10 SC)
Row 4: SC decrease, SC in next 6, SC decrease, chain 1, turn
Row 5: SC across ( 8 SC)
Row 6: SC decrease, SC in next 4, SC decrease, chain 1, turn
Row 7: SC across ( 6 SC)
Row 8: SC decrease, SC in next 2, SC decrease, chain 1, turn
Row 9: SC across (4 SC)
Row 10: Make 2 SC decreases, chain 1, turn
Row 11: SC decrease, fasten off and weave in ends.
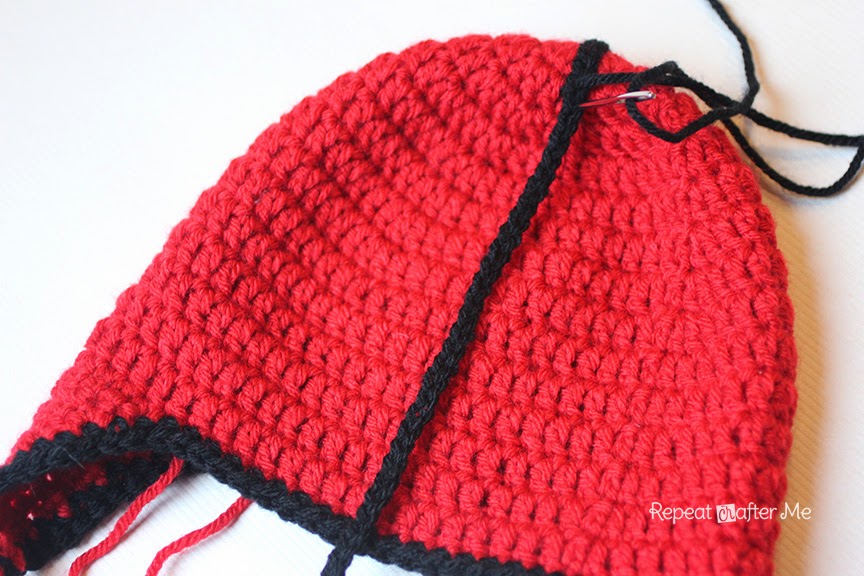
Make as many spots as you need. I made 12 spots for my toddler hat (pictured). Better to wait to sew your spots on after you have the face in place. Sew them on at random at the front and back.


With black yarn…
Magic Ring, 6 SC in ring. Pull tight but don’t join. You should have a half circle. Chain 1, turn.
Row 2: 2 SC in first stitch, SC in next stitch, repeat to end, ch 1, turn (9 SC)
Row 3: 2 SC in first stitch, SC in next 2 stitches, repeat to end, ch 1, turn (12 SC)
Row 4: 2 SC in first stitch, SC in next 3 stitches, repeat to end, ch 1, turn (15 SC)
Row 5: 2 SC in first stitch, SC in next 4 stitches, repeat to end, ch 1, turn (18 SC)
Row 6: 2 SC in first stitch, SC in next 5 stitches, repeat to end (21 SC)
Fasten off leaving long tail to sew into hat. No need to sew antennae down. Just the face area.


 Starbucks Stitch Markers and Bottled Beverages
 Crochet Christmas Tree Pixel Square
 Crochet Santa Pixel Square
 Crochet Daisy Rug with Clover Amour Large Hooks and Giveaway!
I love your patterns and link most of them in my blog, DIVERSIDADES
Thanks!!!
Why can't your pattern be printer friendly
It's so much easier on my eyes 🙂
There is a Printer Friendly button you can click on just above the comments section 🙂
So cute. thanks.
This is so cute. Gives me some ideas to modify my ladybug pattern:) Thanks for posting!!
Splendid idea to use the red yarn for this adorable hat. Thank you for sharing the pattern.
Happy NewYear for your and your family.
Love, Margaret
This is so very cute! Thank you for sharing it. I may make at least one to give to our children's Christmas tree program for next year.
Is there anyway to adjust the pattern to use a J hook ?
I don't know if this helps, but I know I crochet tight so I use a I hook and it comes out the correct size. I would suggest that if you want to use a J hook, one of the smaller sizes would be used (i.e. using a J hook on a Toddler size would actually produce a Adult size hat). Hope this helps.
I know someone that would simply LOVE this – thank you for sharing your patterns!!!!!
What an adorable hat for your little one!
I love this pattern and made this also! Thank you for sharing!!
Just made this. Super cute!
This is super cute. I crochet the child size and it was awfully big. I used the H hook and crocheted the 64 around but the hat really was more of a teen/adult size.
I noticed that too.
Really easy and cute pattern. I just made this. Thank you 🙂
http://paperafterhours.blogspot.com/2014/01/zamiast-przepraszam-biedronka.html
Huge fan of your patterns. Since our grand-daughter was born a lost 5 months ago I've been addicted to making her hats….most of them from your patterns. She was wearing her ladybug hat today….has the piglet hat, owl hat, just finished the giraffe last night ( my daughter loves it as it matches her "sophie" teether she loves. Thank you again for sharing these fantastic patterns!
Me encanta todo tus trabajos. Gracias por compartir !!!
I love this little hat and wish I had a little one to make it for! I would love to use this pattern in a round up I will be posting on Wednesday 4/23. I will give proper credit to you, of course. Thanks!
If I'd like to sell hats based on your patterns, how do I go about linking back to you? I'm sure that my grandkids could tell me, but they aren't here now. I really enjoy the simplicity and creativity of your patterns. Thanks for sharing!!
I'd like to make this hat but from cotton. How should I adjust the size properly (for hook 4 mm)?
Oh my this is adorable I am going to make this starting in the morning. I love it!
Thank you for sharing this gorgeous pattern. I made this hat for a Christmas fair coming up at my son’s nursery in Italy, I made the minion hat which also turned out perfectly so I’m going to browse now for my next crochet project on your website as you write beautiful clear instructions and photos. Thanks again!
Simply lovely !! Well suitable for baby little heads! Perfect
I am back again, but today in copying to print the LADY BUG hat, it is HORRIBLE! It has GIANT spaces between lines – in the middle of the pattern for each size! and several in some. This takes up far too much space. I crochet Non-stop/on the go and I have to have it directions as compact as possible, and with all these un-necessary spaces, it takes up twice as much space. There is NO way ro remove the extra spaces, and then when I went back to the pattern on line, I see that is how you have it written. Perhaps it does not show up that way – ON YOUR SIDE. Go in as a customer, and look at it.
I have a site and I know that it looks much different on my side, than it does for my customers.
I crochet for the Newborn Nursery at Hillcrest Hosp. in Waco, TX , for the Children’s Hospital- McLane Children’s Hosp., in Temple, Tx. , and for our Nursing Home here in
Marlin, TX. HELP!!
Thanks, Susan
Does the ch. 2 count as a dc in each round?
Im making this for my daughter but I’m still new to crocheting hats and am wondering in the second and subsequent rounds, do I join to the first DC or to the chain 2??
Thanks
Julie
I’ve made the hat, the spots and the wing line, now I’m onto the face. For the hat and other components, you don’t count the beginning chains as a stitch. For the other parts, when you make a magic circle and crochet 11 DC in the circle, chain 2 and turn. The chain 2 doesn’t count as a stitch because after making 2 DC in each of the 11 stitches, you end up with 22 DC. Makes sense and follows the pattern. But when you get to the face it says to crochet 6 in the magic circle, chain 1, turn. Then 2 stitches in the first stitch, and 1 in each remaining stitch, chain 1 turn. Now it says I’m supposed to end up with 9 stitches. Since the pattern up to this point does not count these chains as the first stitch, for the face it’s the only way I’m going to end up with 9 stitches. Which is correct? Count the chain as the first stitch (unlike the rest of the pattern) and end up with 9 stitches, or not count them and end up with 7 stitches. It is unclear and the Gingerbread Man Hat video doesn’t cover this. I think you’re not supposed to count the beginning chains as a stitch, but for the hat you do even though the pattern does not indicate one way or the other.
Thanks!
I wanted to let you know I have several of your designs for Charity City OF Hope Cancer Kids. They love these hats and this puts a bit of happiness into their lives. Thank You
adorabe , j’adore
C’est Magnifique
j’adore
super article
nice post
bon article