
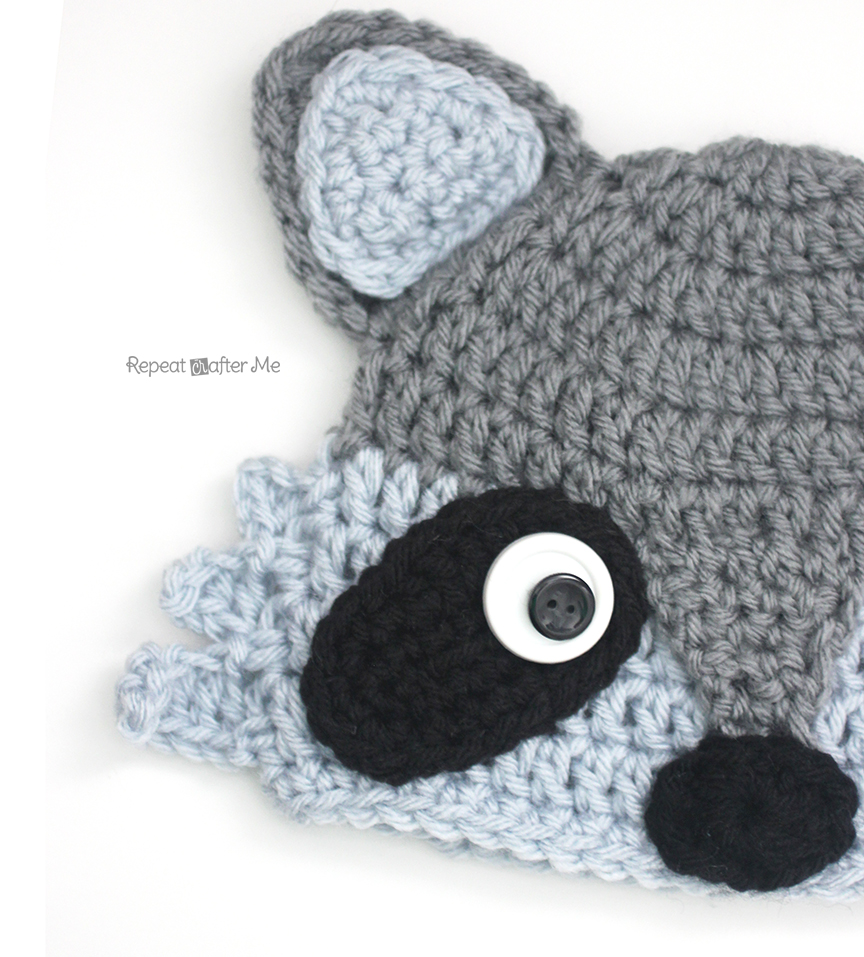
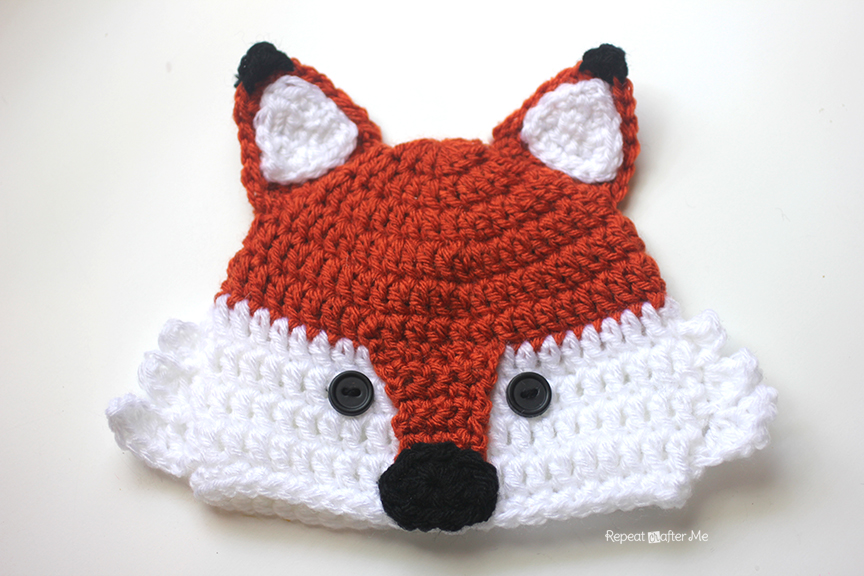
Earlier this week I posted the pattern and tutorial for a CROCHET FOX HAT and the more I looked at the it, I started to see some resemblance to a raccoon as well! With just a few tweaks and the addition of black eye patches, Mr. Fox turned into a cute little raccoon! Full pattern is posted below!
Materials:
– Worsted weight yarn. I used Lion Brand Vanna’s Choice in Silver Grey, Silver Blue, and Black.
– Size H Crochet Hook
– Two White buttons (about 1 inch wide) and two black buttons (about 1/4 inch round)
– Tapestry needle
Abbreviations:
Magic Ring Tutorial
SC = Single Crochet
SC Decrease = Single Crochet Decrease
HDC = Half Double Crochet
HDC Decrease = Half Double Crochet Decrease
DC = Double Crochet
Size: 0-3 Months
Starting with dark gray yarn
Round 2: 2 DC in each stitch around, join, chain 2 (22 DC)
Round 3: 2 DC in first, DC in next, repeat around, join, chain 2 (33 DC)
Round 4: 2 DC in first, DC in next 2, repeat around, join, chain 2 (44 DC)
Round 5-10: DC in each around, join, chain 2 (44 DC)
Round 2: 2 DC in each around, join, chain 2 (22 DC)
Round 3: 2 DC in first, DC in next, repeat around, join, chain 2 (33 DC)
Round 4: 2 DC in first, DC in next 2, repeat around, join, chain 2 (44 DC)
Round 5: 2 DC in first, DC in next 10, repeat around, join, chain 2 (48 DC)
Round 6-11: DC in each around, join, chain 2 (48 DC)
Round 12: SC in each around, join, fasten off, weave in ends (48 SC)
Magic ring, chain 2 and make 11 DC in magic ring, join to first DC, chain 2
Round 5: 2 DC in first, DC in next 10, repeat around, join, chain 2 (48 DC)
Round 7-12: DC in each around, join, chain 2 (52 DC)
Round 5: 2 DC in first, DC in next 10, repeat around, join, chain 2 (48 DC)
Round 7: 2 DC in first, DC in next 12, join, chain 2 (56 DC)
Round 8-13: DC in each around, join, chain 2 (56 DC)
Size: Toddler/Preschooler
Magic ring, chain 2 and make 11 DC in magic ring, join to first DC, chain 2
Round 2: 2 DC in each around, join, chain 2 (22 DC)
Round 3: 2 DC in first, DC in next, repeat around, join, chain 2 (33 DC)
Round 4: 2 DC in first, DC in next 2, repeat around, join, chain 2 (44 DC)
Round 6: 2 DC in first, DC in next 11, join, chain 2 (52 DC)
Round 8: 2 DC in first, DC in next 13, join, chain 2 (60 DC)
Round 9-14: DC in each around, join, chain 2 (60 DC)
Size: Child
Magic ring, chain 2 and make 11 DC in magic ring, join to first DC, chain 2
Round 2: 2 DC in each around, join, chain 2 (22 DC)
Round 3: 2 DC in first, DC in next, repeat around, join, chain 2 (33 DC)
Round 4: 2 DC in first, DC in next 2, repeat around, join, chain 2 (44 DC)
Round 6: 2 DC in first, DC in next 11, join, chain 2 (52 DC)
Round 7: 2 DC in first, DC in next 12, join, chain 2 (56 DC)
Round 8: 2 DC in first, DC in next 13, join, chain 2 (60 DC)
Round 9: 2 DC in first, DC in next 14, join, chain 2 (64 DC)
Round 10-15: DC in each around, join, chain 2 (64 DC)
Round 16: SC in each around, join, fasten off, weave in ends (64 SC)
Magic ring, chain 2 and make 11 DC in magic ring, join to first DC, chain 2
Round 2: 2 DC in each around, join, chain 2 (22 DC)
Round 3: 2 DC in first, DC in next, repeat around, join, chain 2 (33 DC)
Round 4: 2 DC in first, DC in next 2, repeat around, join, chain 2 (44 DC)
Round 6: 2 DC in first, DC in next 11, join, chain 2 (52 DC)
Round 7: 2 DC in first, DC in next 12, join, chain 2 (56 DC)
Round 8: 2 DC in first, DC in next 13, join, chain 2 (60 DC)
Round 9: 2 DC in first, DC in next 14, join, chain 2 (64 DC)
Round 10: 2 DC in first, DC in next 15, join, chain 2 (68 DC)
Round 11-16: DC in each around, join, chain 2 (68 DC)
Turn hat upside down. You are going to want to locate the 6 stitches in the middle of the hat. Doesn’t need to be perfect because ANY spot could be the middle since we haven’t attached any other features yet.
Attach orange yarn along the last row of orange stitches. chain and make 6 SC in the next 6 spots, chain 1, turn
Row 2: SC decrease, SC in next 2, SC decrease, chain 1, turn
Row 3: SC in each stitch across, chain 1, turn (4 SC)
Continue repeating row 5 until nose bridge is long enough to reach the base of hat.
Fasten off leaving long tail.
Sew all side of the nose bridge to the hat.
Nose:
With black yarn…
Magic Ring, chain 2 and make 2 DC, HDC, 2 SC, HDC, 2 DC, HDC, 2 SC, HDC, and join to first DC. Pull tight and leave long tail to sew onto base of the nose bridge.
Right Side: Attach yarn over the DC on the edge of the last row of hat.
Chain 6, SC in second chain from hook, HDC decrease over next two, DC decrease over next last two, join with a SC to next DC on edge of hat, chain 5, HDC decrease over first two, DC decrease over last two, join with a SC to next DC row on hat, chain 3, HDC decrease and join to next DC on edge of hat. Fasten off, weave in ends.
Left Side: Starting on the 4th DC row of white from bottom of the hat, attach yarn and chain 3, SC in second chain from hook, HDC in last, join to next DC space on edge, chain 4, SC in second chain from hook, HDC in next, DC in last, join to next DC space on edge, chain 5, SC in second chain from hook, DC in next two, 2 DC in last, join and fasten off, weave in ends.
Feel free to add more fluff “spikes” if you want it to fill more of the white area on large hats. The pattern above works perfectly for a 0-3 month size hat.
Round 2: 2 DC in first 3 stitches, HDC in next, SC in next, 2 SC in next 3, SC in next rest of stitches, join to top of first DC. Fasten off leaving long tail to sew onto hat.
Right Eye:
Chain 7, SC in second chain from hook and in next 5, make 3 SC in last chain. SC in each stitch along other side of chain, join, chain 1 (13 SC)
Round 2: SC in first 5 stitches, 2 SC in next 3 stitches, SC in next, HDC, 2 DC in last 3, join to first SC. Fasten off leaving long tail to sew onto hat.
Starting with dark gray yarn…
Chain 9, SC in second chain from hook and the rest of the way down chain, chain 1, turn (8 SC)
Row 2: SC decrease, SC in next 4, SC decrease over last two, chain 1, turn
Row 3: SC in each stitch across, chain 1, turn (6 SC)
Row 4: SC decrease, SC in next 2, SC decrease over last two, chain 1, turn
Row 5: SC in each stitch across, chain 1, turn (4 SC)
Row 6: SC decrease two times, continue to SC around edge of ear.
Small Inner Ear (Make 2):
With light gray yarn…
Chain 7, SC in second chain from hook and rest of the way down chain, ch 1, turn
Row 2: SC decrease, SC in next 2, SC decrease, chain 1, turn
Row 3: SC across (4 SC)
Row 4: SC decrease over next two, chain 1, turn
Row 5: SC decrease, and continue to SC around edges of ear.
Fasten off leaving long tail to sew inner ear onto outer ear.
Large Ears (Make 2):
Starting with dark gray yarn…
Chain 11, SC in second chain from hook and rest of the way down chain, chain 1, turn
Row 2: SC decrease, SC in next 6, SC decrease, chain 1, turn
Row 3: SC in each stitch across, chain 1, turn (8 SC)
Row 4: SC decrease, SC in next 4, SC decrease, chain 1, turn
Row 5: SC in each stitch across, chain 1, turn (6 SC)
Row 6: SC decrease, SC in next 2, SC decrease, chain 1, turn
Row 7: SC in each stitch across, chain 1, turn (4 SC)
Row 8: SC decrease two times, chain 1, turn
Row 9: SC decrease and continue to SC around edges of ear.
Large Inner Ear (Make 2):
With light gray yarn…
Chain 9, SC in second chain from hook and rest of the way down chain, ch 1, turn
Row 2: SC decrease, SC in next 4, SC decrease, chain 1, turn
Row 4: SC decrease, SC in next 2, SC decrease, chain 1, turn
Row 6: Make 2 SC decreases, chain 1, turn
Row 7: SC decrease, and continue to SC around edges of ear.


 Starbucks Stitch Markers and Bottled Beverages
 Crochet Christmas Tree Pixel Square
 Crochet Santa Pixel Square
 Crochet Daisy Rug with Clover Amour Large Hooks and Giveaway!
Adorable❤️
When I print your patterns, the print is to small for me to read even with glasses.
How can I make it larger? Thank-you
You can copy all then paste on a word document and then choose how you want it and print.
: )
Your Raccoon hat gives me a big smile on my face. Great design!
Have a nice weekend, Margaret
Really awesome!! Kisses
Just made this and it was so easy to follow. Not sure if the ears where meant to have black but I like how it turned out! thank you for a great pattern!!!
I noticed that for the racoon hat instructions, Sarah left some of the fox instructions in that should have been changed for the racoon; i.e., the color red for the nose bridge for the racoon should say dark grey. The black tips on the ears were for the fox hat.
Regards,
Kim
You are one of my favorite people!!!!!!! I have really enjoyed all of your patterns that I have made for my little grandson!!!!! God bless you for your giving those adorable patterns to all of us!!!!
You are one of my favorite people!!!!!!! I have really enjoyed all of your patterns that I have made for my little grandson!!!!! God bless you for your giving those adorable patterns to all of us!!!!
This has is SO SO cute! Just adorable.
How much yarn is required?
Thank you
I’m currently adapting this to be a red panda! We’ll see how it turns out.
Also, I’m curious about your sizing. The 0-3 month size fits my (large) 2 year old! ???
This hat is super cute! I would love to see this hat in an earflap version 🙂
I love your patterns. You explain everything so clearly.
I absolutely love everything you design, your hat patterns are always a go to design for me.
Thank you for what you do for us non-designers,
Lori
Love the hat but HELP! I can’t for the life of me figure out the cheek fluff…I’m throwing in the yarn for now. Mine is cheekless. 🙁 I need a video tutorial. I’ve tried a good dozen times or more and to no avail. Argh! Please help anyone!
Had a hard time with this site. The pattern is great but your site kept crashing and refreshing and had some populous. I use alot of your patterns and I’ve experienced this many times. Can this be fixed?
On the nose bridge you put the directions for the fox pattern .
Raccoon has an error
On the nose bridge you have wrong color yarn listed
This is what it says –Attach orange yarn along the last row of orange stitches. chain and make 6 SC in the next 6 spots, chain 1, turn
I love this pattern and am currently making it for my niece, but I’m stuck on the eye patches. If we start with chain 7 and sc next 5 starting with 2nd stitch then 3sc in last, we would have 9sc. And if we sc around the other side, there are 6sts, so wouldn’t we have 15sc, not 13? Am I missing something?
Can you please provide the gauge you used when creating this pattern?
Thanks in advance.
My son is 5 yrs old and racoon OBSESSED! This will be a Christmas gift this year and he’ll be overjoyed!
I just made this for my niece. Their baby is due soon and i thought this was adorable! Changed the color to matched the yarn I used for a baby blanket. Wish i could post the photo, so cute!
In the child size it says to change to black for the last row which really messed me up because now I have to make a matching adult size!!!! 🙁
The hat is so beautiful and adorable.
geometry dash 23
It’s amazing how a small change can transform a project! While taking a break after an afternoon of crafting, I stumbled across the playjonny bonus on a forum. I started playing Sweet Bonanza and went through a few rounds of small losses that almost made me give up. Then I upped the ante and triggered a bonus round that gave me a nice win and completely lifted my spirits. With bonuses for all new spanish players it was very easy to get started, and I would recommend it if you want to unwind for a while after your creative projects.