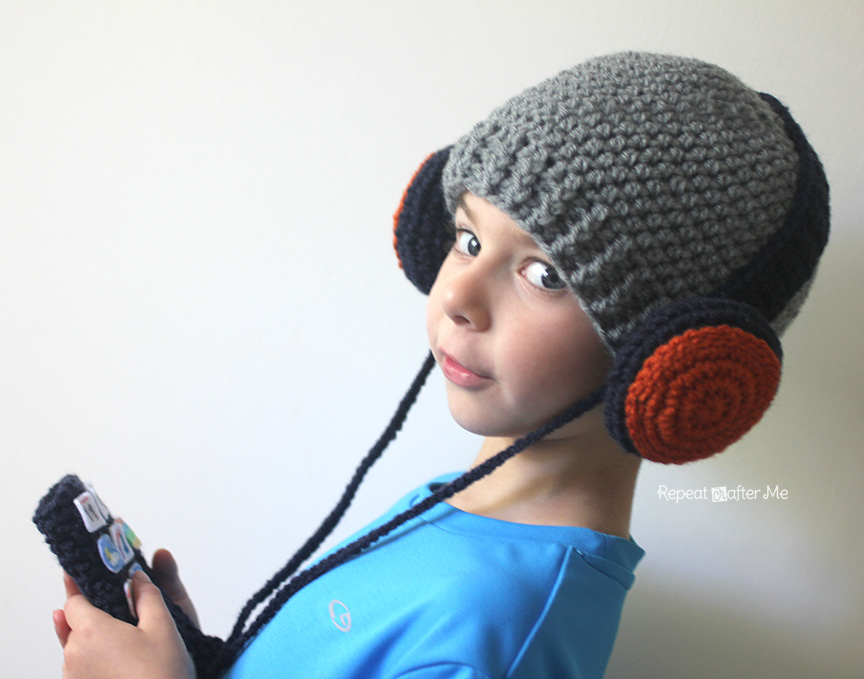
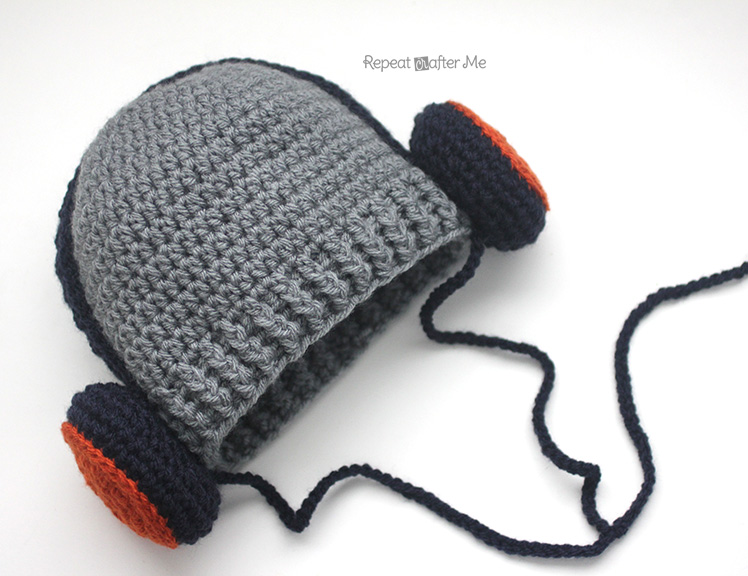
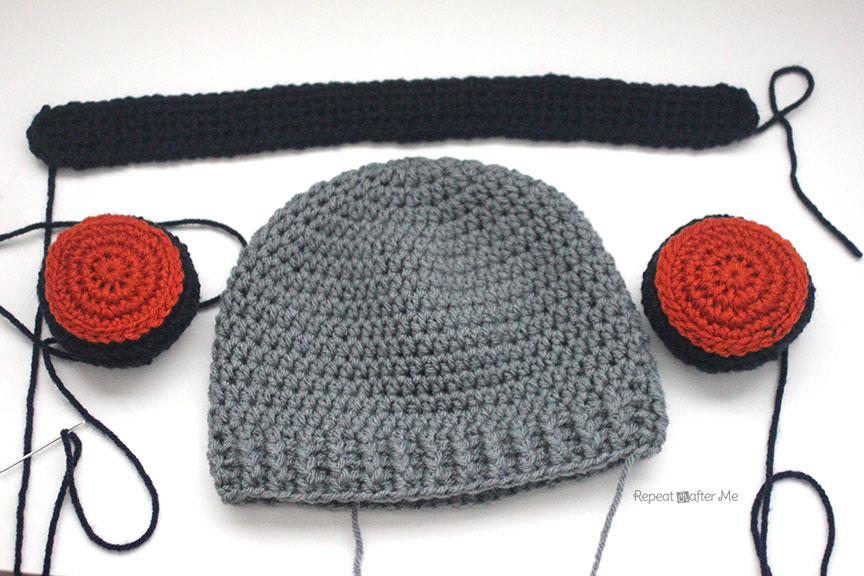
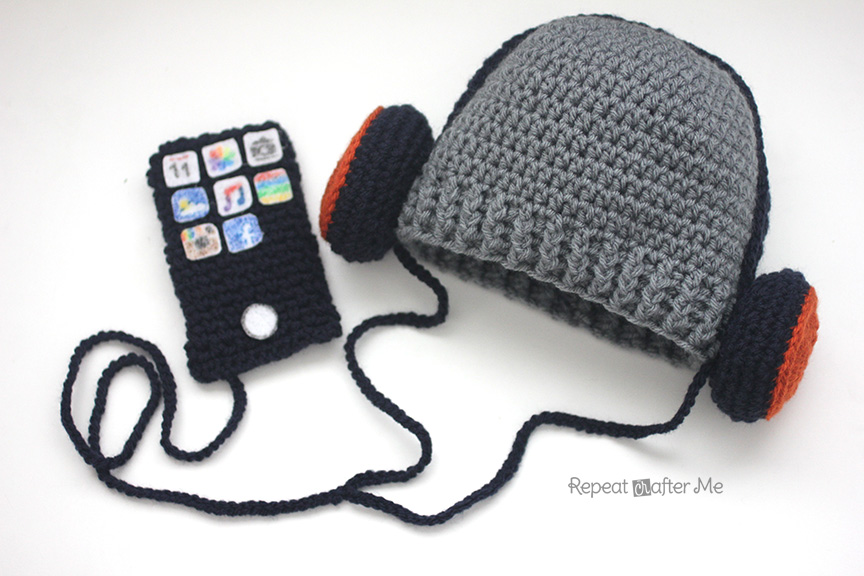
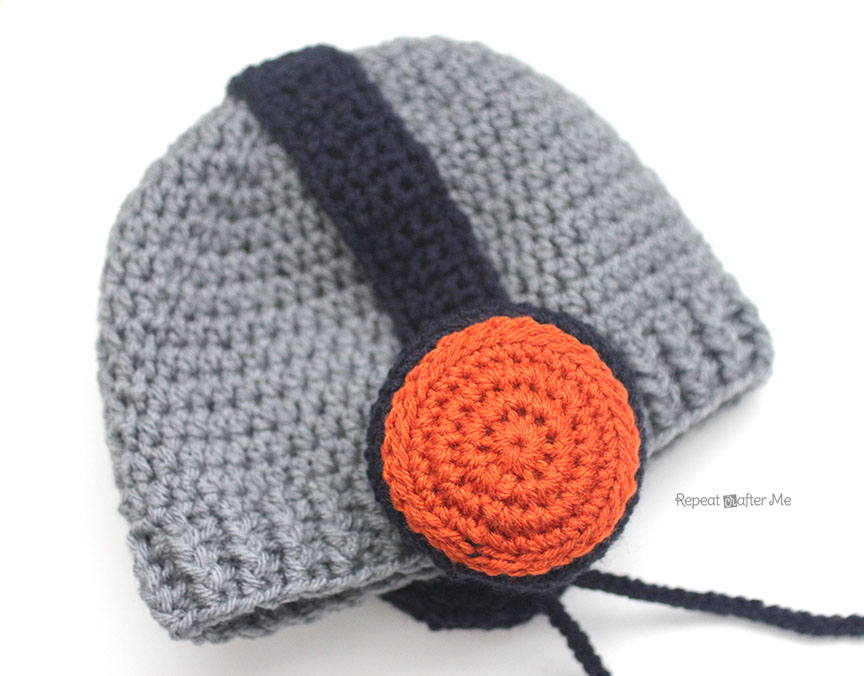
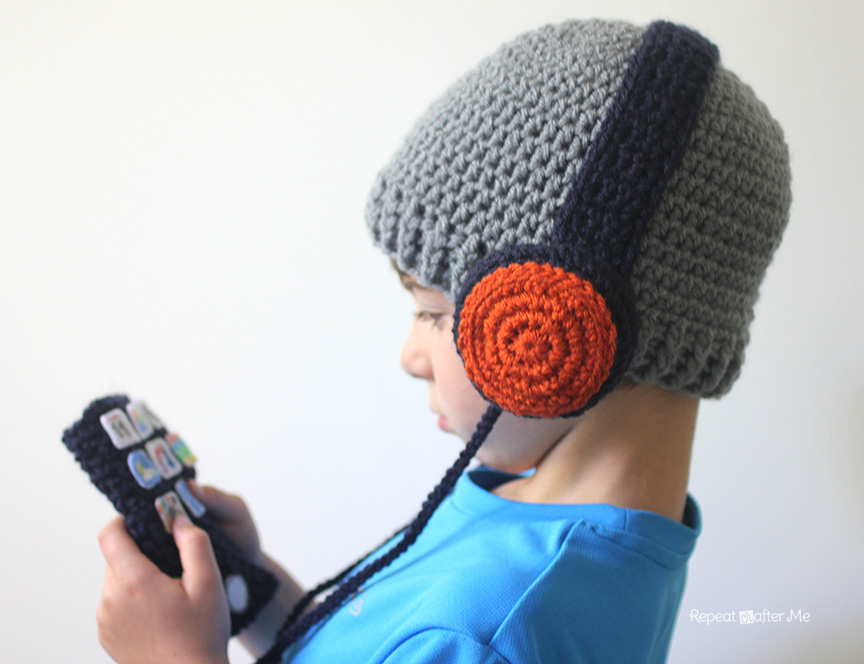
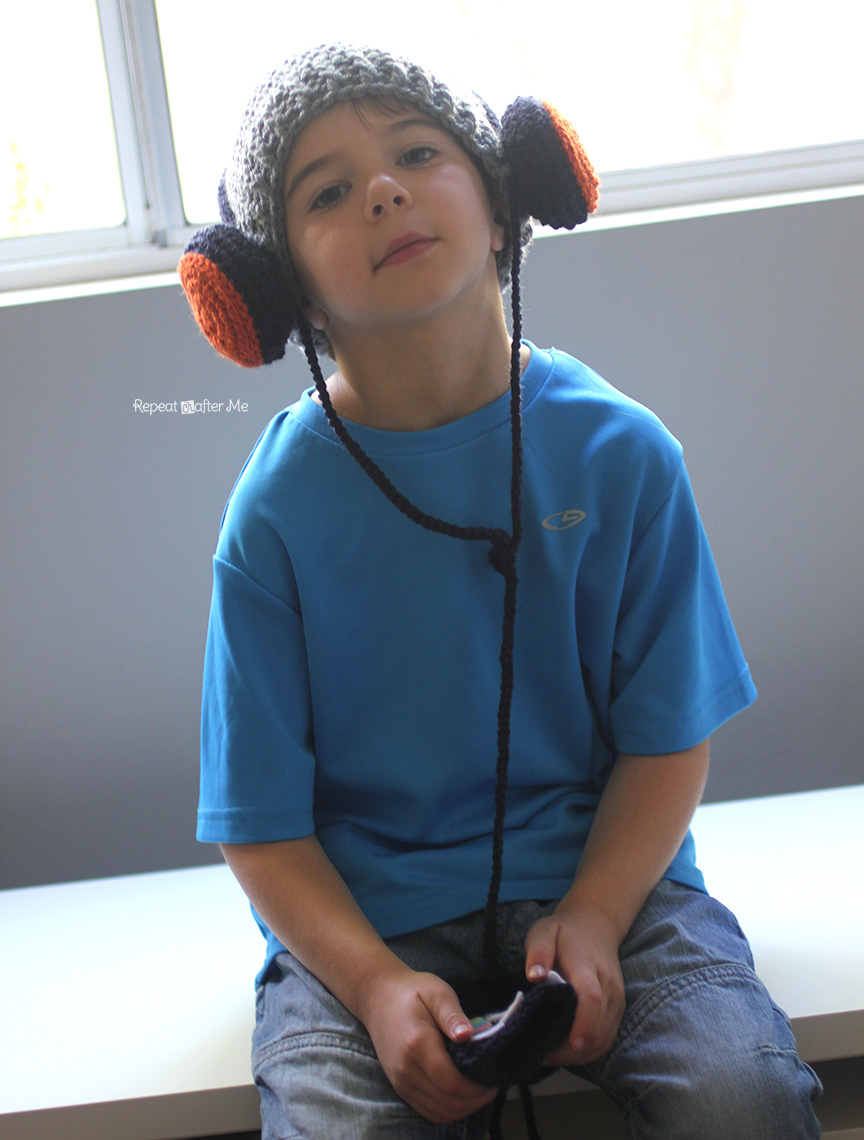
Know a music lover or aspiring DJ? This crochet headphones hat will be the perfect accessory! Start with a basic HDC beanie and then stitch the crocheted headphones on. They could also double as earmuffs for a cute winter hat 🙂
Materials:
– Worsted weight yarn. I used Lion Brand Vanna’s Choice in silver grey, navy, and terra-cotta.
– Size H Crochet Hook
– Tapestry needle
– Poly-fil stuffing
Abbreviations:
Magic Ring Tutorial
SC = Single Crochet
SC Decrease = Single Crochet Decrease
HDC = Half Double Crochet
FPHDC = Front Post Half Double Crochet
BPHDC = Back Post Half Double Crochet
Basic HDC hat with FP/BPHDC ridge.
(pictured in gray)
Size: 0-3 months
Magic Ring, chain 1, 9 HDC in ring, join, chain 1
Round 2: Work 2 HDC into each st around, join, chain 1 (18 HDC)
Round 3: 2 HDC in first stitch, HDC in next, Repeat around, join, chain 1 (27 HDC)
Round 4: 2 HDC in first stitch, HDC in next 2, Repeat around, join, chain 1 (36 HDC)
Round 5: 2 HDC in first stitch, HDC in next 3, Repeat around, join, chain 1 (45 HDC)
Round 6 -12: HDC in each stitch around, join, chain 1 (45 HDC)
Round 13-14: FPHDC in first stitch, BPHDC in next, repeat around, join, chain 1 (45)
Fasten off weave in ends.
Magic Ring, chain 1, 9 HDC in ring, join, chain 1
Round 2: Work 2 HDC into each st around, join, chain 1 (18 HDC)
Round 3: 2 HDC in first stitch, HDC in next, Repeat around, join, chain 1 (27 HDC)
Round 4: 2 HDC in first stitch, HDC in next 2, Repeat around, join, chain 1 (36 HDC)
Round 5: 2 HDC in first stitch, HDC in next 3, Repeat around, join, chain 1 (45 HDC)
Round 7 -13: HDC in each stitch around, join, chain 1 (50 HDC)
Round 14-15: FPHDC in first stitch, BPHDC in next, repeat around, join, chain 1 (50)
Magic Ring, chain 1, 9 HDC in ring, join, chain 1
Round 2: Work 2 HDC into each st around, join, chain 1 (18 HDC)
Round 3: 2 HDC in first stitch, HDC in next, Repeat around, join, chain 1 (27 HDC)
Round 4: 2 HDC in first stitch, HDC in next 2, Repeat around, join, chain 1 (36 HDC)
Round 5: 2 HDC in first stitch, HDC in next 3, Repeat around, join, chain 1 (45 HDC)
Round 7 -14: HDC in each stitch around, join, chain 1 (54 HDC)
Round 15-16: FPHDC in first stitch, BPHDC in next, repeat around, join, chain 1 (54)
Magic Ring, chain 1, 9 HDC in ring, join, chain 1
Round 2: Work 2 HDC into each st around, join, chain 1 (18 HDC)
Round 3: 2 HDC in first stitch, HDC in next, Repeat around, join, chain 1 (27 HDC)
Round 4: 2 HDC in first stitch, HDC in next 2, Repeat around, join, chain 1 (36 HDC)
Round 5: 2 HDC in first stitch, HDC in next 3, Repeat around, join, chain 1 (45 HDC)
Round 9 -14: HDC in each stitch around, join, chain 1 (60 HDC)
Round 15-17: SFPHDC in first stitch, BPHDC in next, repeat around, join, chain 1 (60)
Magic Ring, chain 1, 9 HDC in ring, join, chain 1
Round 2: Work 2 HDC into each st around, join, chain 1 (18 HDC)
Round 3: 2 HDC in first stitch, HDC in next, Repeat around, join, chain 1 (27 HDC)
Round 4: 2 HDC in first stitch, HDC in next 2, Repeat around, join, chain 1 (36 HDC)
Round 5: 2 HDC in first stitch, HDC in next 3, Repeat around, join, chain 1 (45 HDC)
Round 10 -16: HDC in each stitch around, join, chain 1 (62 HDC)
Round 17-19: FPHDC in first stitch, BPHDC in next, repeat around, join, chain 1 (62)
Magic Ring, chain 1, 9 HDC in ring, join, chain 1
Round 2: Work 2 HDC into each st around, join, chain 1 (18 HDC)
Round 3: 2 HDC in first stitch, HDC in next, Repeat around, join, chain 1 (27 HDC)
Round 4: 2 HDC in first stitch, HDC in next 2, Repeat around, join, chain 1 (36 HDC)
Round 5: 2 HDC in first stitch, HDC in next 3, Repeat around, join, chain 1 (45 HDC)
Round 10 -16: HDC in each stitch around, join, chain 1 (66 HDC)
Round 17-20: FPHDC in first stitch, BPHDC in next, repeat around, join, chain 1 (66)
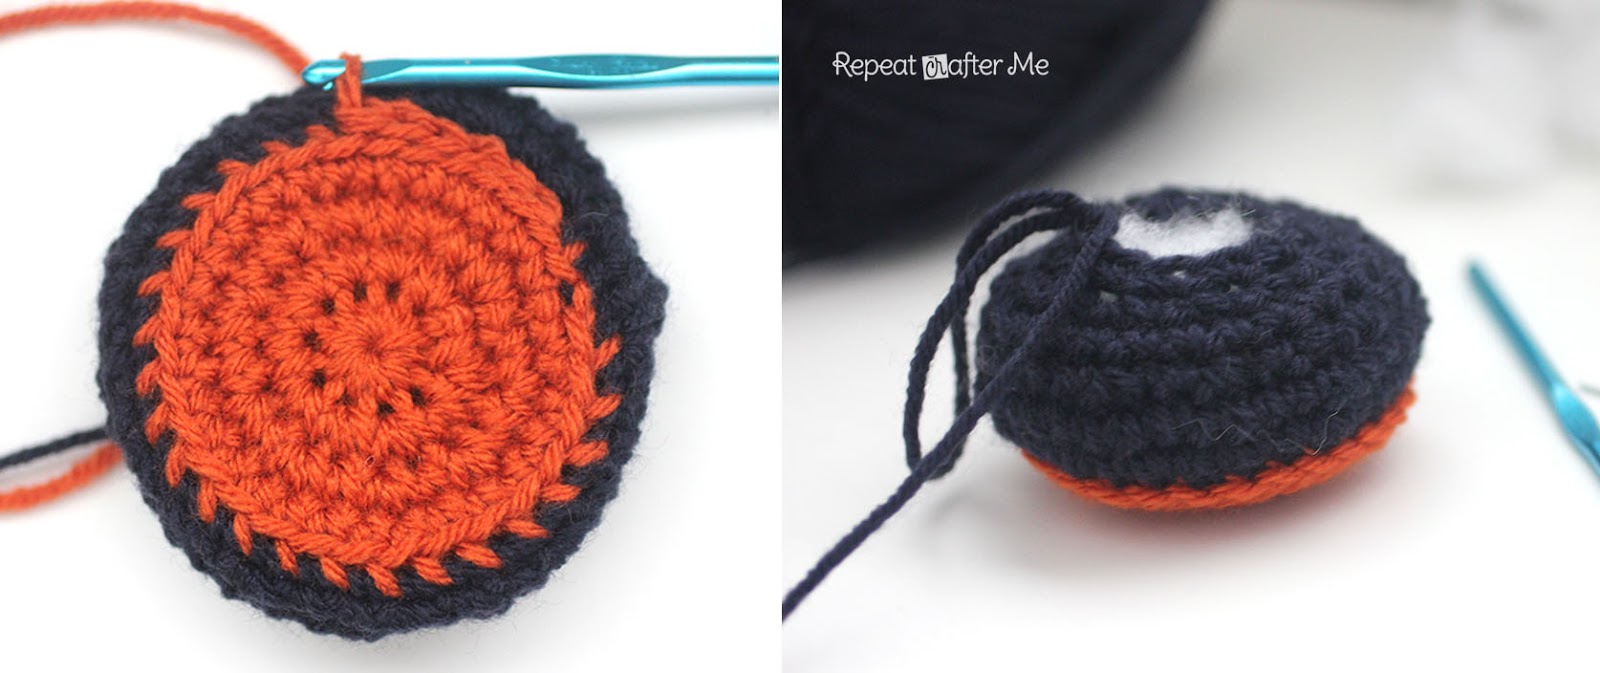
Starting with orange yarn
Magic ring, chain 1 and make 10 SC in ring, pull tight and join to first SC, chain 1
Round 2: 2 SC in each stitch around, join, chain 1
Round 3: 2 SC in first stitch, SC in next, repeat around, join, chain 1
Round 4: SC in each stitch around, join with navy blue, chain 1
Round 5: in back loops only SC in each stitch around, join, chain 1
Round 6: now working in both stitches, 2 SC in first, 2 SC in next, repeat around, join, ch 1
Round 7: SC in each stitch around, join, ch 1
Round 8: SC decrease, SC in next, repeat around. Make SC in last lonely stitch 🙂
At this point you will want to slip stitch with orange around edge of the orange circle.
Round 9: SC in each stitch around, join, chain 1
Round 10: SC Decrease around, join, chain 1
Round 11: SC in each stitch around, join, chain 1
Stuff with poly-fil and SC Decrease until closed.
Headphone strap:
with navy blue yarn
Chain 4, SC in second chain from hook and in last two chains, chain 1, turn
Row 2- end*: SC in each stitch across, chain 1, turn (3 SC)
*Strap should be long enough to reach from one side of hat to the other.
SC around edges of strap. Fasten off leaving long tail to sew onto beanie.
Sew strap on first and then earphones over the strap.
Too add a little more character to the hat you can chain a pretend cord. Attach to each earphone and then chain a another long cord down the middle. I don’t suggest adding this embellishment if making this for a baby or small child. You can even crochet a little iPhone with felt apps 🙂


 Starbucks Stitch Markers and Bottled Beverages
 Crochet Christmas Tree Pixel Square
 Crochet Santa Pixel Square
 Crochet Daisy Rug with Clover Amour Large Hooks and Giveaway!
This is awesome! You just keep wow'ing me with your crochetivity.
Cool!
Hi, Sarah, what a terrific pattern! Great way to hide the headphones; I love it!
I was also thinking that this could be a Princess Leia hat from Star Wars. Haha! 😉
Thanks much!
Super cool! This is so awesome. Mahalo for sharing. Found your blog via Bloglovin' which rec'd it.
SO so cute! Wonderful pattern! I am making this hat for my son as soon as it’s not blistering hot outside, love it!
I made something similar for my teenager not too long ago but left spots in the bottom for him to run his earbuds up into 😀 LOVE the pattern 🙂
I love your creativity! Thank you for sharing your patterns!
I have a question about round 6 of the earphones, is it 2 SC in each stitch around? (That’s how I’m reading it, but I just want to be sure)
Hi! I was wondering the same thing about row 6. Did you ever figure it out? Cheers,
Alicia
From what I gather, it should read *2sc in first, sc 1 each in the next two*. But then I couldnt follow the rest of the instructions with slip stitching into the orange, so I just made up my own 🙂
I have a question. Where do you buy the felt apps?? Thank you!!
I also would like to know this
Round 6: now working in both stitches, 2 SC in first, 2 SC in next, repeat around, join, ch 1
I think this row is a type-o.
I have made 4 of these and the speaker part on this section doesn’t look right.
I changed it to 2SC, 1SC repeat. It doesn’t draw the speaker section up and gives it a cleaner look like the pictures.
But if you intend to brighten it-up a bit, you may get yourself a tiny bouffant on the top, ongoing on to straight tresses,
which eventually leads to waves.
Ooh I love this. Is there a pattern for the iPhone? How does it attach to the hat when not being held?
These headphone hats are looking very cool and a unique and different idea from others, there should be some headphone expert that blows this idea, I personally loved these keep the good work.
The image of a boy listening to music is very cute because I like music so I sympathize. My favorite chord is Cm and what I like is downloading ringtones. Song making ringtone is one of the art that people like.
Headphones are more than just audio devices; they’re portals to immersive soundscapes. Whether you’re a music enthusiast, gamer, or audiophile, the right pair of headphones can enhance your experience. For musicians, quality headphones are essential for precise mixing and recording. Share your music with listeners who appreciate the nuances by using a Spotify promotion service. Let your tracks be heard in all their glory through premium headphones.