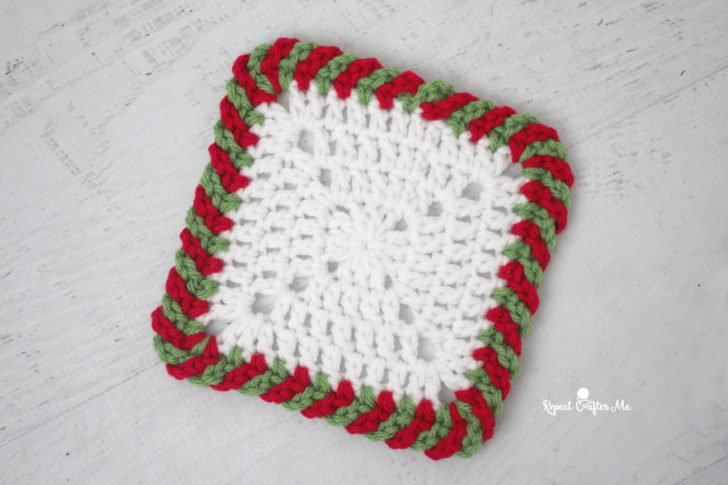
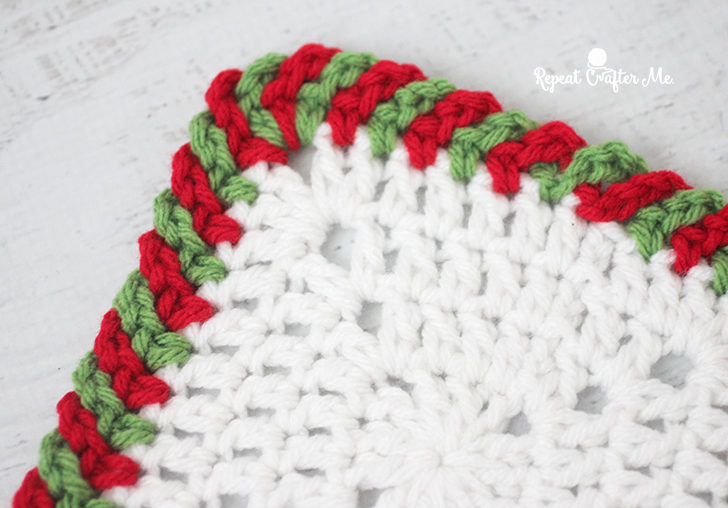
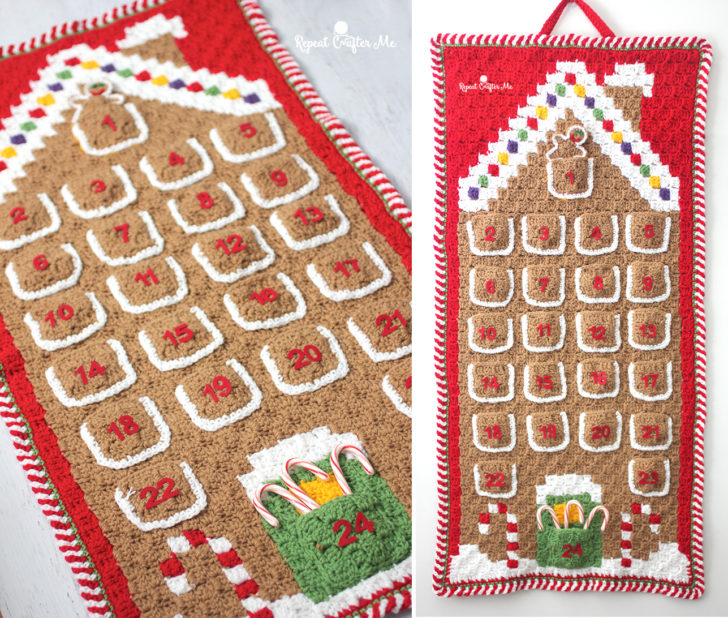
As promised, here is a better look at how to crochet the Candy Cane Border around blankets and afghans! I used this edging on both my Gingerbread House Advent Calendar as well as my Christmas Lights Blanket and it really gave both pieces the most perfect (and festive) finishing touch! But beyond the Christmas holiday, the candy cane border works in any color combo on any blanket! Give it a try!
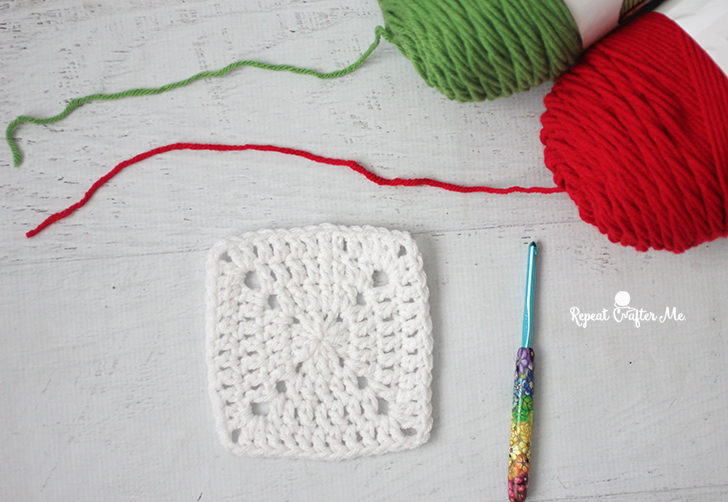
You will need two skeins of yarn in different colors. I am using Bernat Super Value in Green and Red but you can use any two colors you’d like!
Use the same size crochet hook that you used on the main portion of your project. I am using a size H crochet hook.
I am going to demonstrate this technique around a small granny square but apply this tutorial to crochet around larger blankets and projects!
Watch the video tutorial or use the picture tutorial below!
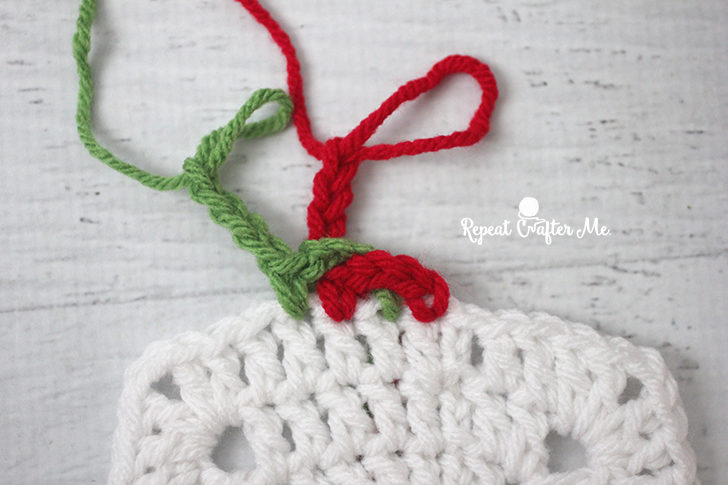
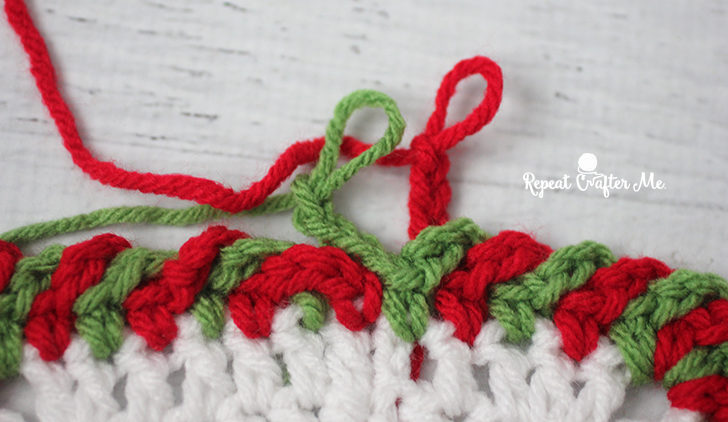
Starting at any point along the edge of your project, attach color #1 (in this case red) and chain 4. Leave hook hanging and in next stitch, attach color #2 (in this case green) and chain 4.
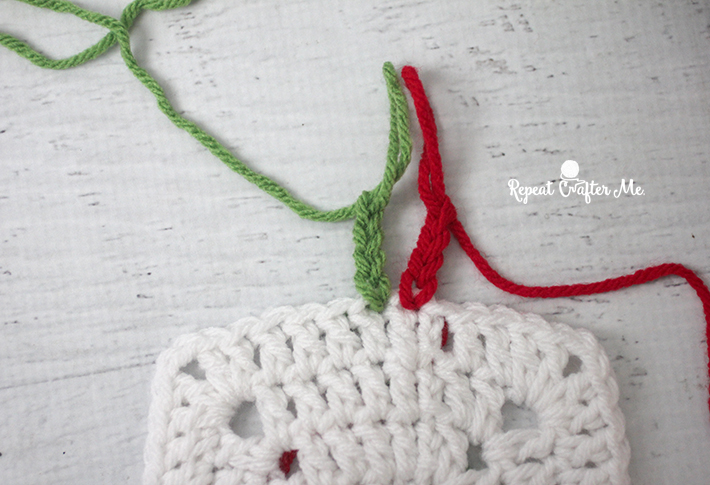
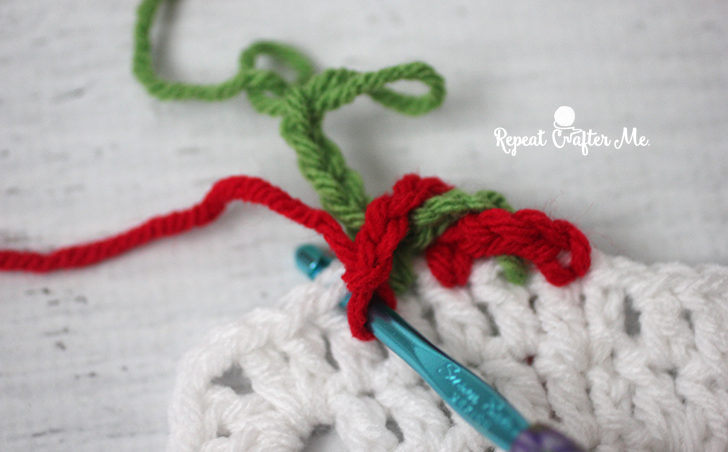
Put hook back in red loop and SC to join to next open stitch (the stitch next to the green) and chain 4. You are essentially overlapping the red chain 4 over the green chain 4.
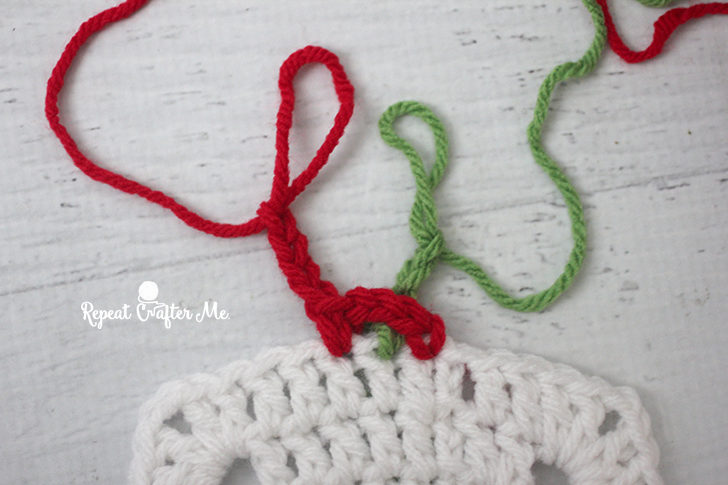
Now do the same with the green. SC to join the green chain 4 to the next available stitch and chain 4.
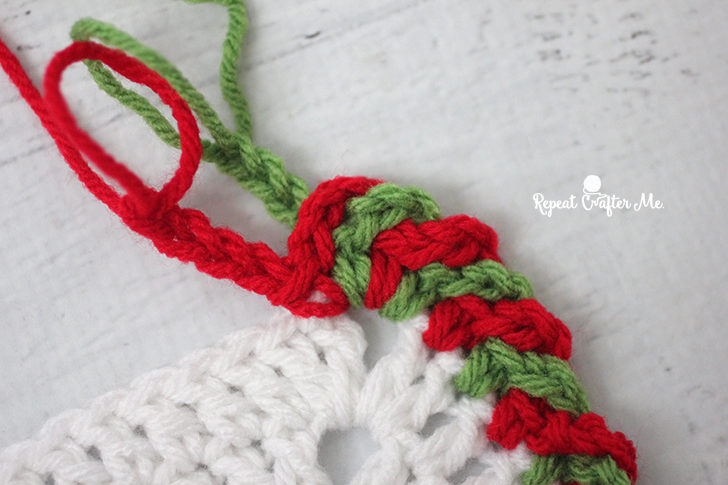
Keep going in same pattern sequence!
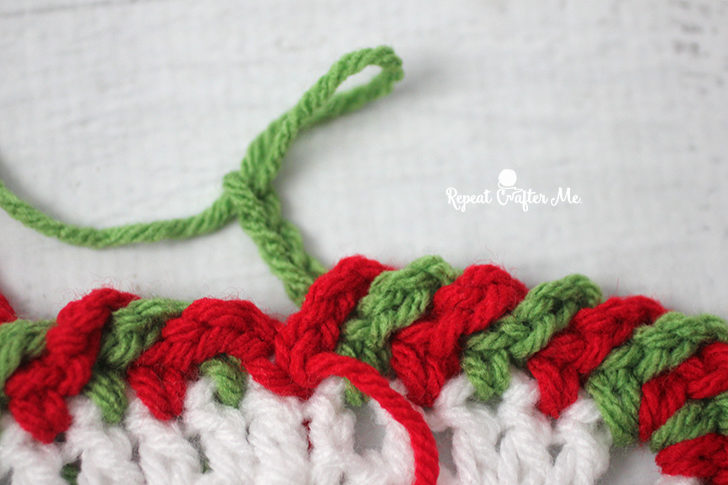
Don’t be intimidated by the corners! Keep doing what you have been doing, just make 4 stitches in each corner (2 green and 2 red).
When you get to the end…
You will either have two scenarios….
Scenario #1 (as pictured below): your pattern lines up and you can just go ahead and slip stitch to attach the red chain 4 to the bottom of the beginning red chain 4 and then slip stitch to attach the green chain 4 to the bottom of the first green chain 4 you made.
Scenario #2 (as shown in the video tutorial): your pattern won’t line up and you will need to skip a stitch. No harm in skipping a stitch! You won’t be able to tell! You just want to make sure that you keep the red/green alternating pattern.
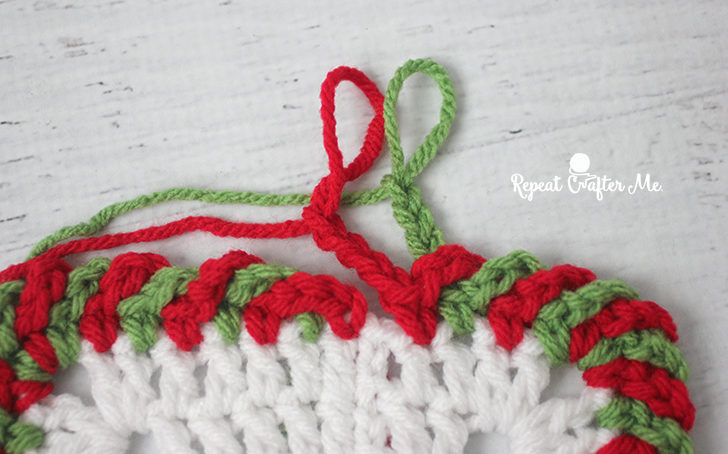
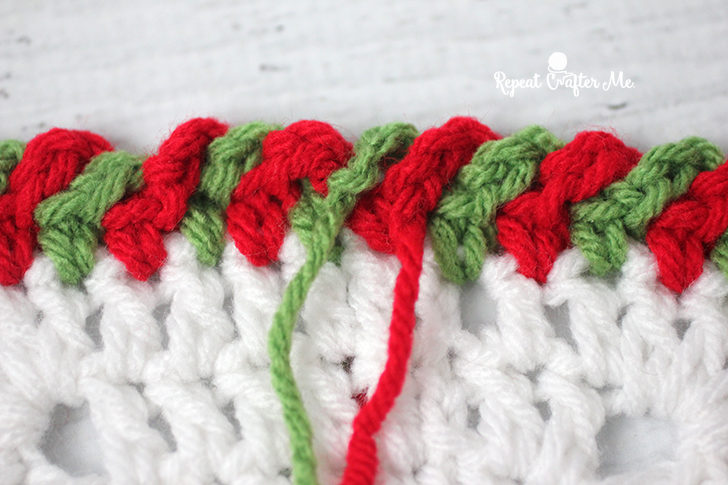
Pictures below: The green will be joined to the bottom of your starting green chain. And the red will be joined to the bottom of your starting red chain.
All that’s left is weaving in ends!
![]()
Be sure to tag @RepeatCrafterMe on social media so I can see your work!

 Starbucks Stitch Markers and Bottled Beverages
 Crochet Christmas Tree Pixel Square
 Crochet Santa Pixel Square
 Crochet Daisy Rug with Clover Amour Large Hooks and Giveaway!
candy cane border, what a great finish, thanks so much for sharing!
Genious! Great simple edging, love it.
Pretty pretty pretty. Congratulations on that work. You teach very well. I have not yet started preparing for Christmas, in the next few days I will buy all the Christmas linahs. I have a crochet shop here in Brazil, who can access, I am grateful: http://www.mundodocroche.com.br/tapete-de-barbante-quadrado
Thank you ever so much. This is a great idea and I intend to use it a lot.
Question Please
How do I keep the 2 colors of yarn from tangling up while doing this? I have to keep stopping and unravel them so I can continue.
I love the looks of this and how it goes except the yarn strings attached to the balls of yarn twisting as I go and the times spent nravelingto be able to continue.
Any help with this will be greatly appreciated.
Thank you,
Sandie
Very pretty, but I had the same problem with the yarn twisting up all the time. Don’t see how that can be avoided.
I agree. I used this stitch on 2 stockings I crocheted and it twisted constantly. It is a very pretty border but I can’t imagine doing it on an afghan or any large item.
Would like to try this with. 4 colors!
As a beginner, this was GREAT INSTRUCTION for a very CUTE IDEA! Thanks!
adorable! great idea. Sandie, unfortunately that happens when changing colors during a regular row too, just have to keep moving the skeins around under each other to keep them straight. Annoying but just part of the deal lol
okay. so now I know that although the yarn ball is twisting and needs to be untwisted…I am doing it right! Thank you…
hey guys if you are a roblox player and want to hack roblox then try roblox hack 2018 its best way to hack roblox
It is the thing we have been ever looking for here.
great article, nice site robux codes
Here’s a tip: since the colors keep twisting, what I do is put the two cake colors ina. Rounded bottom metal bowl. Then I can just spin the bowl on the table to keep the two yarn strands untangled! 🙂
Great tip! Thank you.
Wonderful edging! Using it on a large afghan. Question: Any secrets for keeping the yarns from coiling around one another?
wow! I want to use this on my wall. I am a sports lover and wanted to buy this.
Thank you for your unwavering belief in Drift Boss me, even when I doubted myself.
Great article! The crochet candy cane border tutorial is creative and beautifully explained, making it perfect for holiday-themed projects. The step-by-step instructions and images make it easy for both beginners and experienced crafters to follow. If you’re looking for high-quality tools to support your crafting and DIY projects, Industrial Cart offers a wide range of reliable products to meet your needs. Visit us at Industrial Cart for all your tool and equipment requirements!
This candy cane border is adorable! What a perfect way to add a festive touch to any project. The tutorial is clear and easy to follow, even for a beginner like me. I love how versatile it is – any color combination would work. I’m definitely going to try this on my next blanket project. I did see some comments about the yarn tangling with the color changes, so any tips on managing that would be appreciated!
https://twiddlefinger.org/
Shop a wide range of premium makeup, skincare, nail care, and beauty products at Yves Morel. With 23 years of trusted excellence in the cosmetics industry, Yves Morel is renowned for quality and innovation. Explore products designed to deliver value and long-term satisfaction.
Shop abaya online and choose from a variety of styles by DK Abaya including open abayas, closed abayas, embellished abayas, and everyday essentials. Our collection reflects sophistication, combining timeless modest wear with contemporary trends. Whether you’re searching for a black abaya, a colorful abaya, or a designer abaya dress, DK Abaya ensures every piece adds grace and confidence to your wardrobe.
At Noor Azhari, we prioritize affordable women’s fashion without compromising on quality. Our online store provides a seamless shopping experience, featuring the latest in fashion trends and exclusive designs tailored to suit your unique style. Whether you’re looking for casual everyday outfits, office-ready looks, or glamorous evening wear, Noor Azhari has it all.
Bella Nina is your dedicated cheerleader, a reliable support system, and a trusted haven for everything maternity and baby. We believe every mom deserves to feel valued and supported, and we’re here to make your journey our top priority. Explore our range of Baby Care and Maternity Care products at Bella Nina.
Daze Me offers affordable and stylish home decor, furnishings, and goods designed to enhance your living space. Our commitment to quality and the latest furniture designs ensures you’ll find pieces that suit your style and budget. Discover how we make beautiful furniture accessible to homes across the region.
This crochet candy cane border is absolutely adorable! It’s such a festive touch for holiday projects. Thanks for sharing the pattern—I can’t wait to try it out on my next crochet project! Visit. Can you bring deodorant on a plane?
What a cute and creative idea! This candy cane border will add the perfect festive touch to any crochet project. Thanks for the detailed instructions—I’m excited to give it a try! Visit. The Chippiparai Dog History and Heritage
It’s time to free your mind from the hustle and unwind! Why not kick back and warm up with a round of Drift Boss? Take on a few laps, master those tricky curves, and when you return, inspiration might just strike like a bolt of lightning!