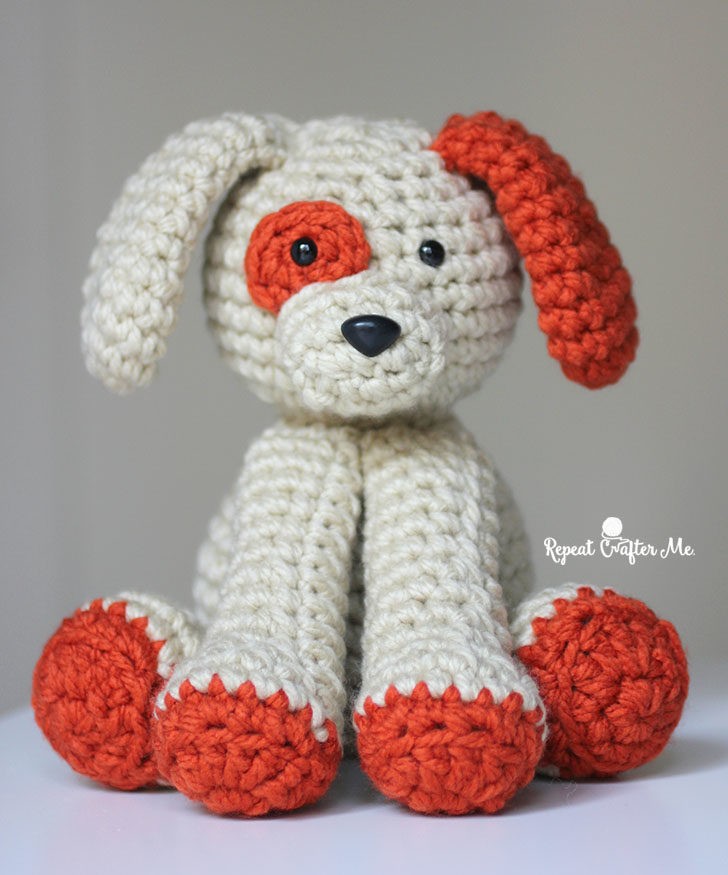
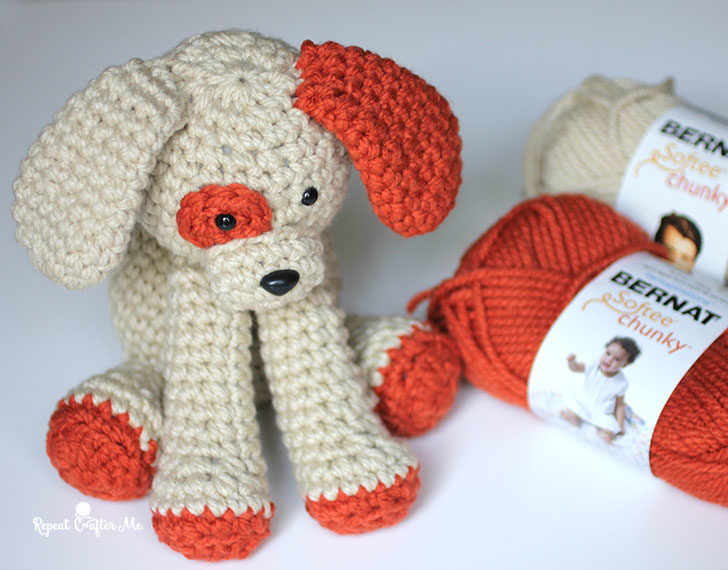
I am so excited to be taking part in the 2018 Softie CAL sponsored by Fairfield World, the makers of Poly-fil Fiber Stuffing! This adorable crochet Plush Puppy is the fourth project in the CAL series and you can follow along with the CAL projects (and get help from the designers) by joining the facebook group CAL Central Crochet. Also be sure to be sure to use the hashtag #CALCentral on Facebook, Ravelry, and Instagram.
There are a total of 10 talented crochet designers who are taking part in this CAL and every week a new softie pattern is posted! You can find more details about the 2018 Softie CAL by visiting THIS blog post by our CAL leader, Marie, from Underground Crafter!
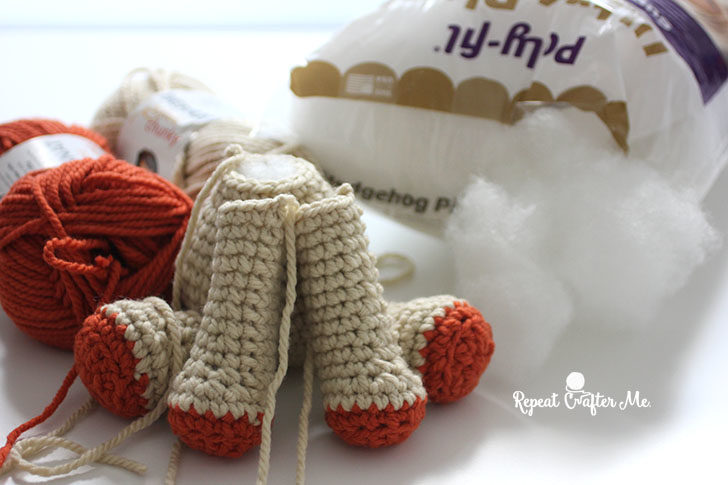
Materials:
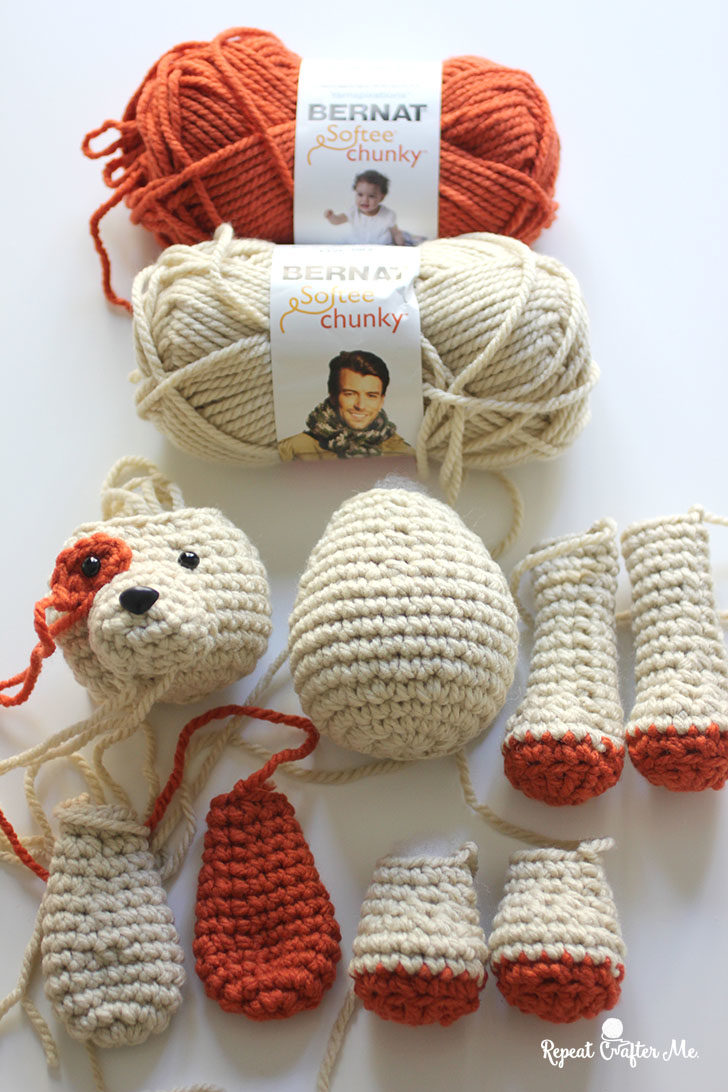
– Bernat Softee Chunky yarn in Linen (2 skeins) and Pumpkin (1 skein)Shop this yarn HERE at Yarnspirations.com. This is a super bulky weight 6 yarn. Use coupon code RCMSOFTEE20 for 20% off!!
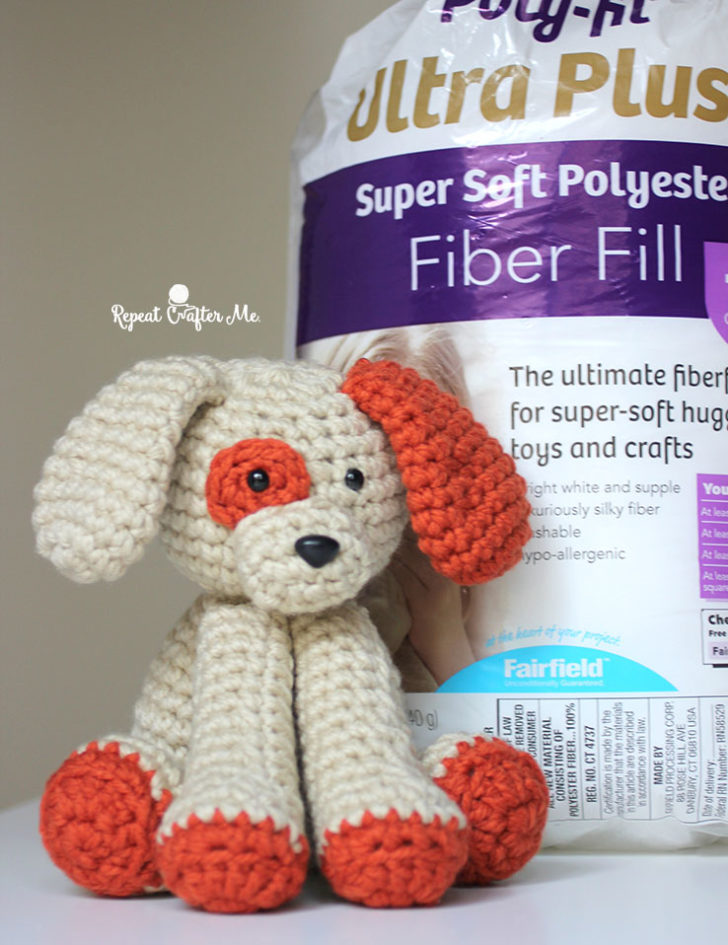
– Fairfield Fiber Stuffing (aff)
– Two 12mm Black Safety eyes (aff)
– 1 Black Safety Animal Nose (18mm) (aff)
– Size H Crochet Hook
– Tapestry Needle
Finished Size: Approximately 9 inches tall by 9 inches wide (tail to front paws)
Plush Puppy Pattern:
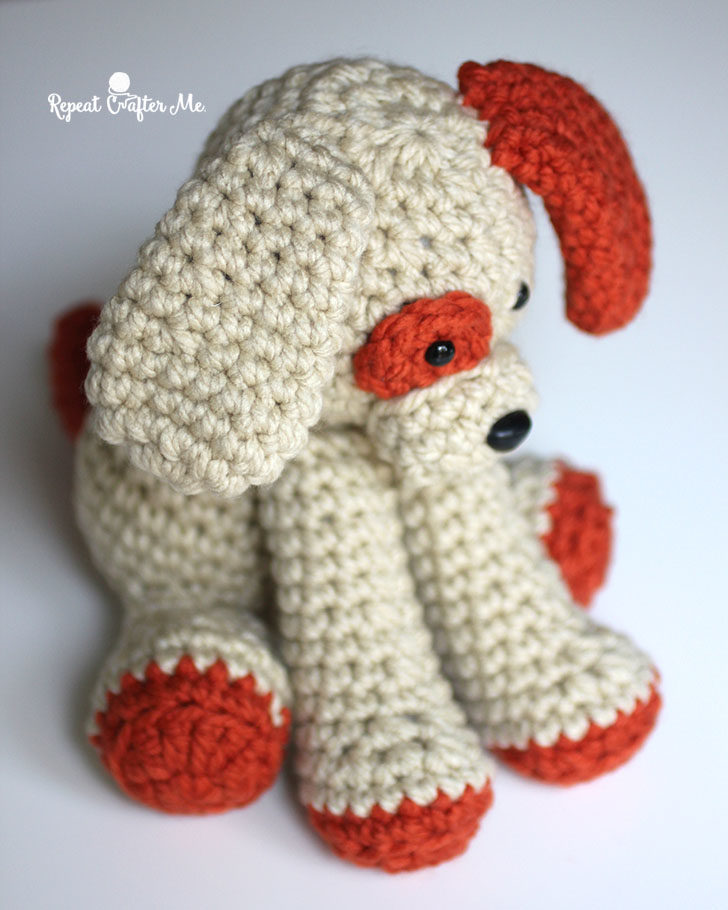
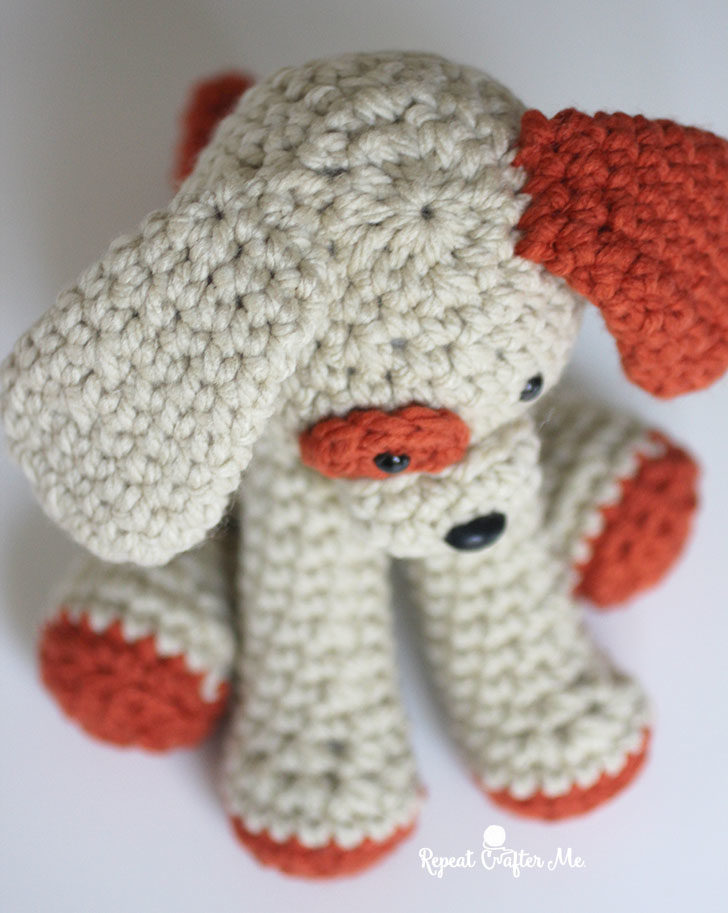
(helpful photos of puppy construction below written pattern)
Body:
with Linen color yarn
Magic Ring, chain 1 and make 10 SC in ring, join to first SC, chain 1
Round 2: 2 SC in each stitch around, join, chain 1 (20 SC)
Round 3: SC in each stitch around, join, chain 1 (20 SC)
Round 4: 2 SC in first stitch, SC in next, repeat around, join, chain 1 (30 SC)
Round 5-9: SC in each stitch around, join, chain 1 (30 SC)
Round 10: SC decrease, SC in next 4, repeat around, join, chain 1 (25 SC)
Round 11: SC in each stitch around, join, chain 1 (25 SC)
Round 12: SC decrease, SC in next 3, repeat around, join, chain 1 (20 SC)
Round 13: SC in each stitch around, join, chain 1 (20 SC)
Round 14: SC decrease, SC in next 2, repeat around, join, chain 1 (15 SC)
Round 15: SC in each stitch around, join, chain1 (15 SC) Stuff with polyfil and leave top open.
Head:
with Linen color yarn
Magic Ring, chain 1 and make 8 SC in ring, join to first SC, chain 1
Round 2: 2 SC in each stitch around, join, chain 1 (16 SC)
Round 3: 2 SC in first, SC in next, repeat around, join, chain 1 (24 SC)
Round 4: 2 SC in first, SC in next 2, repeat around, join, chain 1 (32 SC)
Round 5-10: SC in each stitch around, join, chain 1 (32 SC)
Round 11: SC decrease, SC in next 2, repeat around, join, chain 1 (24 SC)
Round 12: SC in each stitch around, join, chain 1 (24 SC)
Round 13: SC decrease, SC in next, repeat around, join, chain 1 (16 SC)
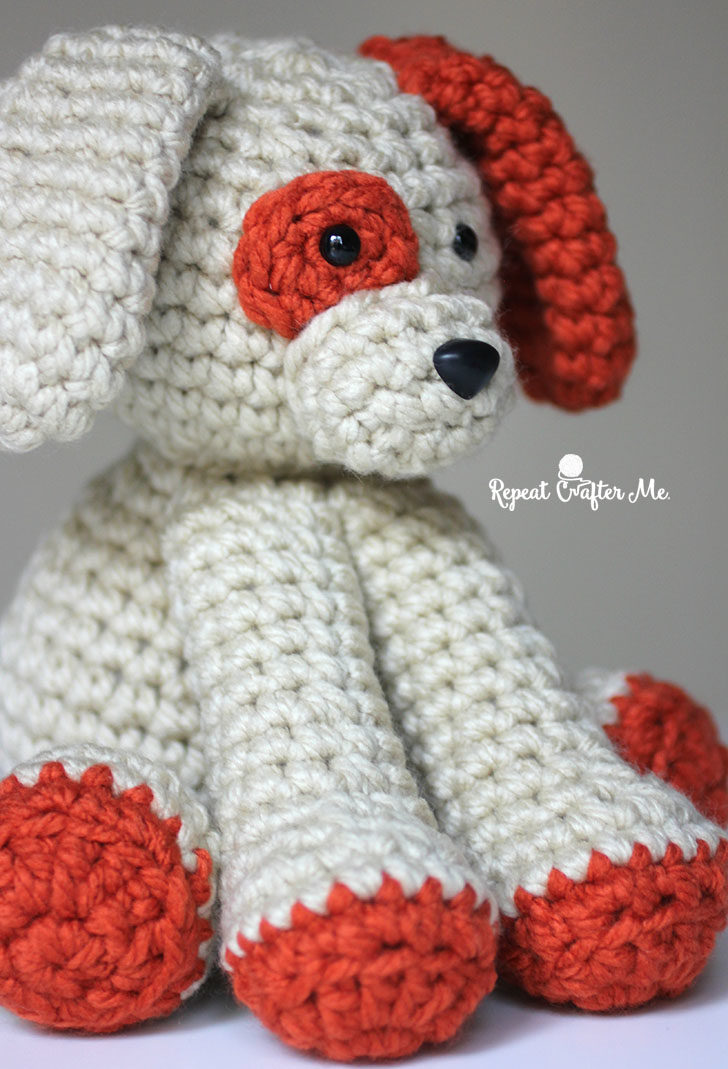
Round 14: SC in each stitch around, join, chain 1 (16 SC) now is good time to sew on nose and 12mm safety eyes stuff with polyfil and add snout/nose/eyes before completely closing
Round 15: SC decrease, SC in next 2, join, chain 1 (12 SC)
Round 16: SC decrease until closed.
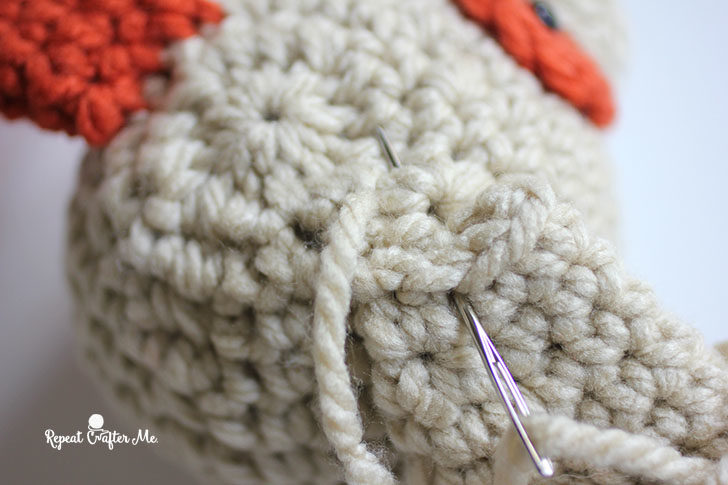
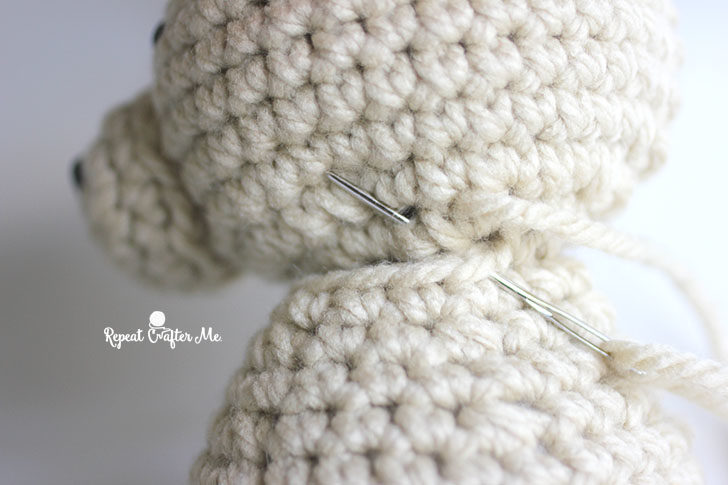
Sew head onto body.
Snout:
With the Linen color
Chain 5, SC in second chain from hook, SC in next two, 2 SC in last, now working on other side of chain, SC in each stitch making 2 SC in last chain, join to first SC, chain 1 (10 SC)
Round 2: SC in first 3, 2 SC in next 2, SC in next 3, 2 SC in last two, join.
Round 3: SC in each stitch around, join, fasten off leaving long tail (14 SC)
Add safety nose to top middle.
Eye Patch:
With orange yarn
Magic Ring, chain 1 and make 4 SC in ring, do not join, pull tight, chain 1, turn
Round 2: SC in first, 2 SC in next two stitches, SC in last, fasten off leaving long tail.
Add safety eye and stitch onto head above the right side of the snout.
Ears (Make 2 – one in each color):
Magic Ring, chain 1 and make 8 SC in ring, pull tight and join to first SC, chain 1
Round 2: 2 SC in each stitch around, join, chain 1 (16 SC)
Round 3-4: SC in each stitch around, join, chain 1 (16 SC)
Round 5: SC Decrease, SC in next 6 stitches, repeat around, join, chain 1 (14 SC)
Round 6: SC in each stitch around, join, chain 1 (14 SC)
Round 7: SC Decrease, SC in next 5 stitches, repeat around, join chain 1 (12 SC)
Round 8: SC in each stitch around, join, chain 1 (12 SC)
Round 9: SC Decrease, SC in next 4 stitches, repeat around, join, chain 1 (10 SC)
Round 10: SC in each stitch around, join, chain 1 (10 SC)
Round 11: SC Decrease, SC in next 3 stitches, repeat around, join chain 1 (8 SC)
Round 12: SC in each stitch around, join, fasten off leaving long tail (8 SC)
No need to stuff ears. Sew onto head about 3 rounds down from top.
Feet: (make 2)
Starting with orange yarn
Magic Ring, chain 1 and make 6 SC in ring, join to first SC, chain 2
Round 2: 2 DC in first two, 2 HDC in next, 2 SC in next two, 2 HDC in last, join to first DC, chain 1 Round 3: working in back loops only… 2 SC in first stitch, sc in next, repeat around, join, chain 1 Round 4-5: working both loops and switching to cream color yarn… SC in each stitch around, join, chain 1 (18 SC)
Round 6: SC decrease 4 times, SC in last 10 stitches, join, chain 1
Round 7: SC decrease 2 times, SC in last 10 stitches, join, chain 1
Round 8: SC in each stitch around, join, chain 1 (12 SC)
Round 9: SC in each stitch around, join (12 SC)
Fasten off and stuff with Fairfield Fiber stuffing.
Sew onto bottom of body.
Legs (make 2):
Starting with orange yarn
Magic Ring, chain 1 and make 6 SC in ring, join to first SC, chain 2
Round 2: 2 DC in first two, 2 HDC in next, 2 SC in next two, 2 HDC in last, join to first DC, chain 1 Round 3: working in back loops only… 2 SC in first stitch, sc in next, repeat around, join, chain 1 Round 4: working both loops and switching to cream color yarn… SC in each stitch around, join, chain 1 (18 SC)
Round 5: SC decrease 4 times, SC in last 10 stitches, join, chain 1
Round 6: SC decrease 2 times, SC in last 10 stitches, join, chain 1
Round 7: SC in each stitch around, join, chain 1 (12 SC) (This might be a good time to start stuffing with Fairfield fiber stuffing)
Round 8: SC Decrease, SC in last 10 stitches, join, chain 1
Round 9: SC in each stitch around, join, chain 1 (11 SC)
Round 10: SC Decrease, SC in last 9 stitches, join chain 1
Round 11-16: SC in each stitch around, join, chain 1 (10 SC)
Fasten off around 16 leaving a long tail.
Stuff with Fairfield fiber stuffing.
Sew legs onto top of body (right under the head).
Legs should touch the ground when sitting Puppy upright.
Tail:
With orange yarn
Magic Ring, chain 1 and make 6 SC in ring, join, chain 1, turn
Round 2: SC in each stitch around, chain 1, turn (6 SC)
Round 3: 2 SC in first, SC in next, repeat around, join, chain 1 (9 SC)
Round 4-5: SC in each stitch around, join, chain 1 (9 SC)
Round 6: SC Decrease, SC in last 7, join, chain 1 (8 SC)
Round 7: SC Decrease, SC in last 6 stitches, join fasten off leaving long tail. (7 SC)
Stuff and sew onto back of puppy.

Big thanks to Fairfield for providing me with the fiber stuffing to make this Plush Puppy!
Check out the other 2018 Softie CAL Patterns!
Week 1 – Underground Crafter: Lion Pocket Pillow
Week 2 – Oombawka Design: Baby Monkey Amigurumi
Week 3 – The Friendly Red Fox: The Friendly Little Super Hero
Remember to use the hashtag #CALCentral and get help from the 2018 Softie Designers by joining our facebook group HERE. Can’t wait to see your plush puppies! Woof Woof!

 Starbucks Stitch Markers and Bottled Beverages
 Crochet Christmas Tree Pixel Square
 Crochet Santa Pixel Square
 Crochet Daisy Rug with Clover Amour Large Hooks and Giveaway!
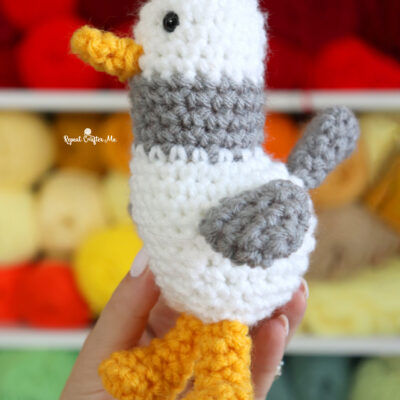
very nice
Hi! I am in love with this puppy! I was wondering how much of the main color yarn did you use? I want to make 2 puppy for my little guy.
Read the post carefully and play this huge fan following online card game so without wasting the time enjoy this boundless fun online euchre and thank you so much for sharing the information.
wow, very creative and unique, thank you for sharing how to do.
Thanks for this post dear.
Amazing your content
Hi there – Do you think you can use regular weight yarn on this little guy? Or is the bulky really key to the pattern? Thank you!
Tried several times to print pattern but it won’t let me.
This was such a fun pattern! Made this puppy for my son’s first birthday! Thanks so much for sharing!
The head has one more row than the body but in pictures it looks shorter. Did you have problems with this?
I’ve looked at this carefully, and it seems like the body pattern is correct, but the head is off. I can clearly see 15 rounds in her body segment. There are definitely too many rounds in the pattern for the head. It looks like the stiches for the head increase up to round 4, and then don’t start decreasing until round 9. So, for the head, it is most likely rounds 5 – 8 are 32 SC. Her round 11 is reallly round 9, her round 12 is really round 10, etc. You’ll end with round 14.
very great article, good job
this is very helpfull, thanks for sharing
Im trying to make the puppy but my head is bigger than his belly. Which is ok according to the pattern, 16 rows for the head and 15 of the belly, however it looks really strange and totally not like the pictures… Am i doing something wrong?
I just finished the body and starting on the head I noticed it has one more row than body. Wondered if it would come out looking different than picture. Did you ever get an answer to your question?
I figured out the error, I’ve replied to Jane’s comment further down showing what it should be
Hope this helps
Useful Information, Keep It Up And Post More New information
I really find it annoying when there are questions in the comments but they are never answered! It would be really helpful for someone like me who is finding the same problem…head has more rows than the body yet pictures clearly show the head is shorter. Another person finished the head and found it to be not same as pictured. So what’s the deal? Anyone have an answer? Is the pattern wrong?
Thanks to your comment I saw there was a problem before attempting to make this, I looked at another of her patterns for a bear which is based on the same body and head, so I’ve figured out where the problem is
Round 5-9 should be Round 5-11
Round 11 should be Round 12
Round 12 should be Round 13
Round 13 should be Round 14
Round 14 should be Round 15
Round 15 should be Round 16
Round 16 should be Round 17
Hope this helps and you’re right the publisher should reply to their own messages
Are the corrections that are posted for the head or the body?
I’m struggling with understanding the instructions for the tail for the plush puppy. Thank you for any clarification you can give.
thanks for such post. This post gives a brief idea.
Excellent blog site right here! Likewise your site loads up fast!What webhosting are you using? Can I get your associate link to your host? I want my web site loaded up as quickly as yours lol
I love this puppy! Thank you so much for sharing.
Muchas gracias! Hippy Halloween
Has anyone crocheted this puppy using bernat velvet yarn or any other velvet yarn? I want to make one of these for my great nephew with velvet yarn but not sure if it would work out or not. Thanks for any info you can give.
really love the info dear
How can I get this pattern in print. I don’t want to sit and copy all the instructions by hand. Where is it available.
Such a cute puppy , I will make it for my son.
i love this puppy / dog but after reading that the head and body pattern rows of the puppy arent in co ordination i am hesitant to make it . as it is i am having diffuclty getting the exact yarn ply and weight here where i reside
Thank you so much for sharing your beautiful pattern. Nice puppy my niece will love it.
Again thank you
Mary
DO NOT READ IF YOU CANNOT HANDLE OPINION OF OTHERS-
I LOVE this designers designs BUT in many of her patterns I have noticed a couple of things.
1. She rarely responds to help people when they ask questions
2. She often has a error- usual slight as in rows misnumbered or similar
As I said I love her designs but because the lack of response I will probably not purchase from her. That is me but I would worry about getting help if I needed or there was an error.
THIS IS MY OPINION and YOU DO YOU PEOPLE!
Me, I just think that when we are told it is a free design we cannot expect like a paid pattern is nonsense! There are MANY who give away and companies give away designs and this has been done forever! No patterns should be OK to have errors!
BUT ALSO- I think we as customers DEMAND too much by saying “I am a visual learner and need video” . Boo Hoo- sorry but it costs a LOT to do videos and there are literally thousands on You-Tube for anything you need! Learn to read patterns! Heck learn to read!
–
Lastly- Please designers stop writing paragraphs inside your patterns! This one does not seem to do that but I am trying to get this known- The American Crochet Association has all the guides and we learn the symbols and everything but when we have paragraphs written between or even some do the whole “pattern” in sentences- it is confusing! Symbols are used to make a pattern and easily read!
I know I have vented and for that I am sorry. We have so many wonderful designers in the world and so much available to us so let’s continue to help each other. I do usually see the people helping as I see below also~