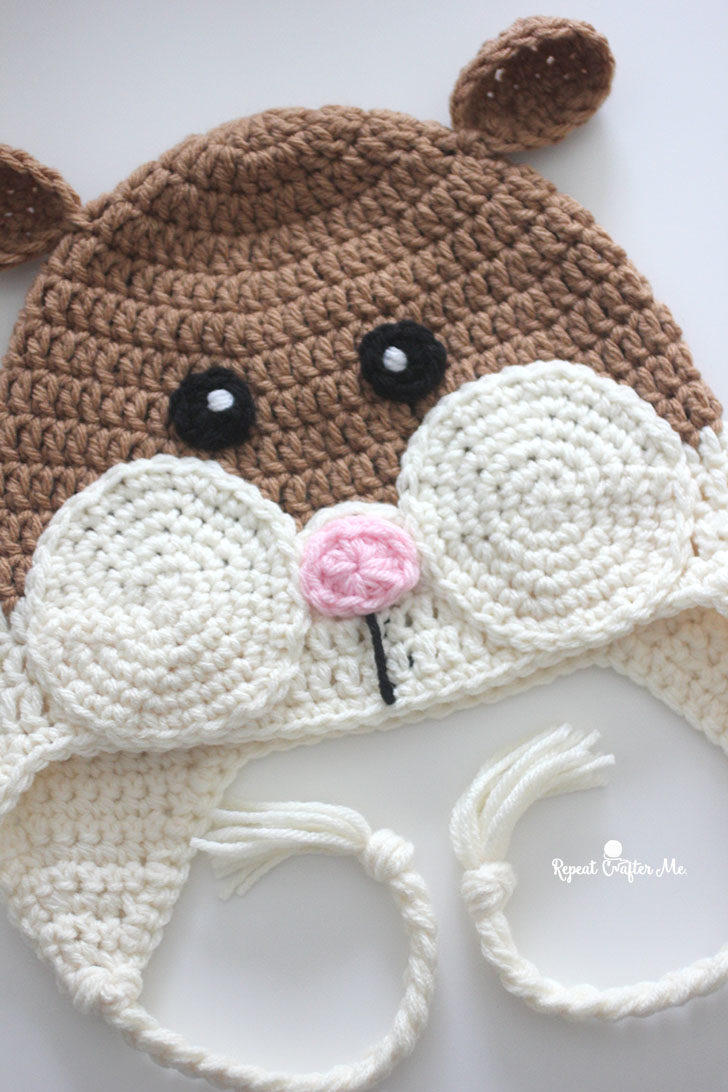
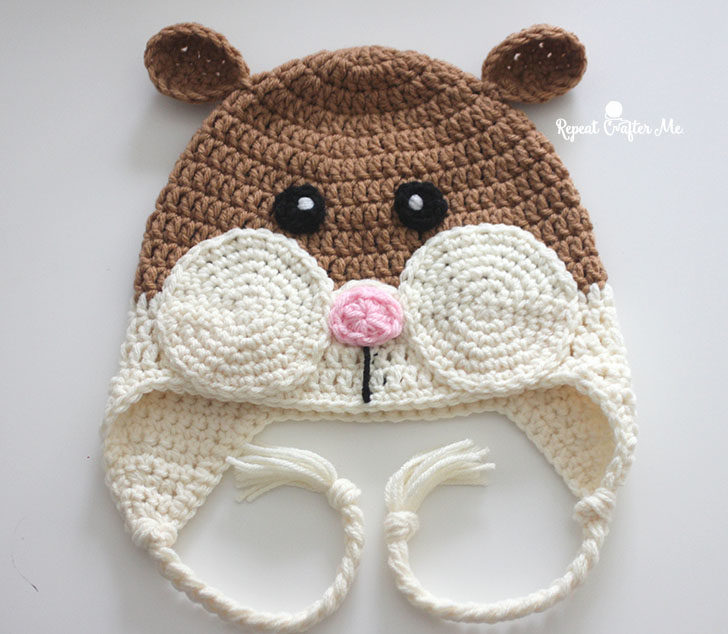
It’s been too long since I posted a hat pattern but thought it was time to get back to where my crochet adventures began – with cute character and critter hats! Here is a Hamster Hat! Growing up, we had hamsters and gerbils. Usually in pairs. We named them Mario and Luigi and Bert and Ernie 🙂 With just a few tweaks to my fox hat pattern (see it here), I re-imagined it into a Hamster!
Materials:
– Bernat Super Value in Topaz and Natural (less than one skein each) and a bit of baby pink for the nose and black for the eyes and mouth. Shop all colors HERE at Yarnspirations.com
– Size H Crochet Hook
– Tapestry Needle
Hamster Hat Pattern:
Starting with darker brown (topaz) yarn
Magic ring, chain 2 and make 11 DC in ring, join to first DC, chain 2
Round 2: 2 DC in each stitch around, join, chain 2 (22 DC)
Round 3: 2 DC in first, DC in next, repeat around, join, chain 2 (33 DC)
Round 4: 2 DC in first, DC in next 2, repeat around, join, chain 2 (44 DC)
Round 5-7: DC in each around, join, chain 2 (44 DC)
Change color to cream
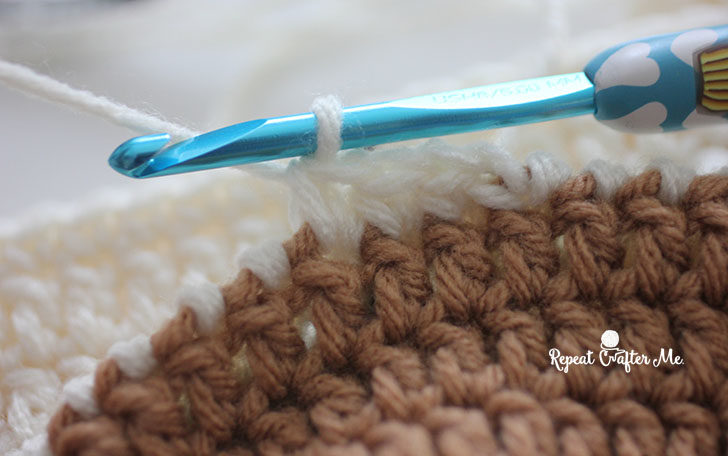
Round 8-10: DC in each around, join, chain 2 (44 DC)
Do not fasten off, continue to make earflaps as written below.
Starting with darker brown (topaz) yarn
Round 2: 2 DC in each around, join, chain 2 (22 DC)
Round 3: 2 DC in first, DC in next, repeat around, join, chain 2 (33 DC)
Round 4: 2 DC in first, DC in next 2, repeat around, join, chain 2 (44 DC)
Round 5: 2 DC in first, DC in next 10, repeat around, join, chain 2 (48 DC)
Round 6-8: DC in each around, join, chain 2 (48 DC)
Round 9-11: DC in each around, join, chain 2 (48 DC)
Do not fasten off, continue to make earflaps as written below.
Starting with darker brown (topaz) yarn
Magic ring, chain 2 and make 11 DC in magic ring, join to first DC, chain 2
Round 5: 2 DC in first, DC in next 10, repeat around, join, chain 2 (48 DC)
Round 7-9: DC in each around, join, chain 2 (52 DC)
Change color to cream
Round 10-12: DC in each around, join, chain 2 (52 DC)
Do not fasten off, continue to make earflaps as written below.
Size: 9-12 Months (Should fit up to about 16 months)
Starting with darker brown (topaz) yarn
Magic ring, chain 2 and make 11 DC in magic ring, join to first DC, chain 2
Round 5: 2 DC in first, DC in next 10, repeat around, join, chain 2 (48 DC)
Round 7: 2 DC in first, DC in next 12, join, chain 2 (56 DC)
Change color to cream
Round 11-13: DC in each around, join, chain 2 (56 DC)
Do not fasten off, continue to make earflaps as written below.
Size: Toddler/Preschooler
Starting with darker brown (topaz) yarn
Magic ring, chain 2 and make 11 DC in magic ring, join to first DC, chain 2
Round 2: 2 DC in each around, join, chain 2 (22 DC)
Round 3: 2 DC in first, DC in next, repeat around, join, chain 2 (33 DC)
Round 4: 2 DC in first, DC in next 2, repeat around, join, chain 2 (44 DC)
Round 5: 2 DC in first, DC in next 10, repeat around, join, chain 2 (48 DC)
Round 6: 2 DC in first, DC in next 11, join, chain 2 (52 DC)
Round 7: 2 DC in first, DC in next 12, join, chain 2 (56 DC)
Round 8: 2 DC in first, DC in next 13, join, chain 2 (60 DC)
Round 9-11: DC in each around, join, chain 2 (60 DC)
Change color to cream
Round 12-14: DC in each around, join, chain 2 (60 DC)
Do not fasten off, continue to make earflaps as written below.
Size: Child
Starting with darker brown (topaz) yarn
Magic ring, chain 2 and make 11 DC in magic ring, join to first DC, chain 2
Round 2: 2 DC in each around, join, chain 2 (22 DC)
Round 3: 2 DC in first, DC in next, repeat around, join, chain 2 (33 DC)
Round 4: 2 DC in first, DC in next 2, repeat around, join, chain 2 (44 DC)
Round 6: 2 DC in first, DC in next 11, join, chain 2 (52 DC)
Round 7: 2 DC in first, DC in next 12, join, chain 2 (56 DC)
Round 8: 2 DC in first, DC in next 13, join, chain 2 (60 DC)
Round 9: 2 DC in first, DC in next 14, join, chain 2 (64 DC)
Round 10-12: DC in each around, join, chain 2 (64 DC)
Change color to cream
Round 13-15: DC in each around, join, chain 2 (64 DC)
Do not fasten off, continue to make earflaps as written below.
Size: Teen/Adult
Starting with darker brown (topaz) yarn
Magic ring, chain 2 and make 11 DC in magic ring, join to first DC, chain 2
Round 2: 2 DC in each around, join, chain 2 (22 DC)
Round 3: 2 DC in first, DC in next, repeat around, join, chain 2 (33 DC)
Round 4: 2 DC in first, DC in next 2, repeat around, join, chain 2 (44 DC)
Round 5: 2 DC in first, DC in next 10, repeat around, join, chain 2 (48 DC)
Round 6: 2 DC in first, DC in next 11, join, chain 2 (52 DC)
Round 7: 2 DC in first, DC in next 12, join, chain 2 (56 DC)
Round 8: 2 DC in first, DC in next 13, join, chain 2 (60 DC)
Round 9: 2 DC in first, DC in next 14, join, chain 2 (64 DC)
Round 10: 2 DC in first, DC in next 15, join, chain 2 (68 DC)
Round 11-13: DC in each around, join, chain 2 (68 DC)
Change color to cream
Round 14-16: DC in each around, join, chain 2 (68 DC)
Do not fasten off, continue to make earflaps as written below.
Chain 1, SC in next 10, chain 1, turn
Row 2: SC decrease, SC in next 6, SC decrease, chain 1, turn
Row 3: SC across (8 SC)
Row 4: SC decrease, SC in next 4, SC decrease, chain 1, turn
Row 5: SC across ( 6 SC)
Row 6: SC decrease, SC in next 2, SC decrease, chain 1, turn
Row 7: SC across (4 SC)
Row 8: Make 2 SC decreases, chain 1, turn
Row 9: SC decrease, fasten off, weave in ends
Second earflap placement: Fold hat in half leaving slightly more stitches in the front of the hat than the back. Place the second earflap to line up with the first earflap (Refer to earflap placement from the pictures available at the end of my puppy hat pattern).
Join yarn, chain 1, SC in next 10, chain 1, turn
Row 2: SC decrease, SC in next 6, SC decrease, chain 1, turn
Row 3: SC across (8 SC)
Row 4: SC decrease, SC in next 4, SC decrease, chain 1, turn
Row 5: SC across ( 6 SC)
Row 6: SC decrease, SC in next 2, SC decrease, chain 1, turn
Row 7: SC across (4 SC)
Row 8: Make 2 SC decreases, chain 1, turn
Row 9: SC decrease, and continue to SC around hat and earflaps and fasten off when you get the entire way around and weave in ends.
Chain 1, SC in next 12, chain 1, turn
Row 5: SC across (8 SC)
Row 6: SC decrease, SC in next 4, SC decrease, chain 1, turn
Row 7: SC across ( 6 SC)
Row 8: SC decrease, SC in next 2, SC decrease, chain 1, turn
Row 9: SC across (4 SC)
Row 10: Make 2 SC decreases, chain 1, turn
Row 11: SC decrease, fasten off, weave in ends
Second earflap placement: Fold hat in half leaving slightly more stitches in the front of the hat than the back. Place the second earflap to line up with the first earflap (Refer to earflap placement from the pictures available at the end of my puppy hat pattern).
Row 5: SC across (8 SC)
Row 6: SC decrease, SC in next 4, SC decrease, chain 1, turn
Row 7: SC across ( 6 SC)
Row 8: SC decrease, SC in next 2, SC decrease, chain 1, turn
Row 9: SC across (4 SC)
Row 10: Make 2 SC decreases, chain 1, turn
Row 11: SC decrease, and continue to SC around hat and earflaps and fasten off when you get the entire way around and weave in ends.
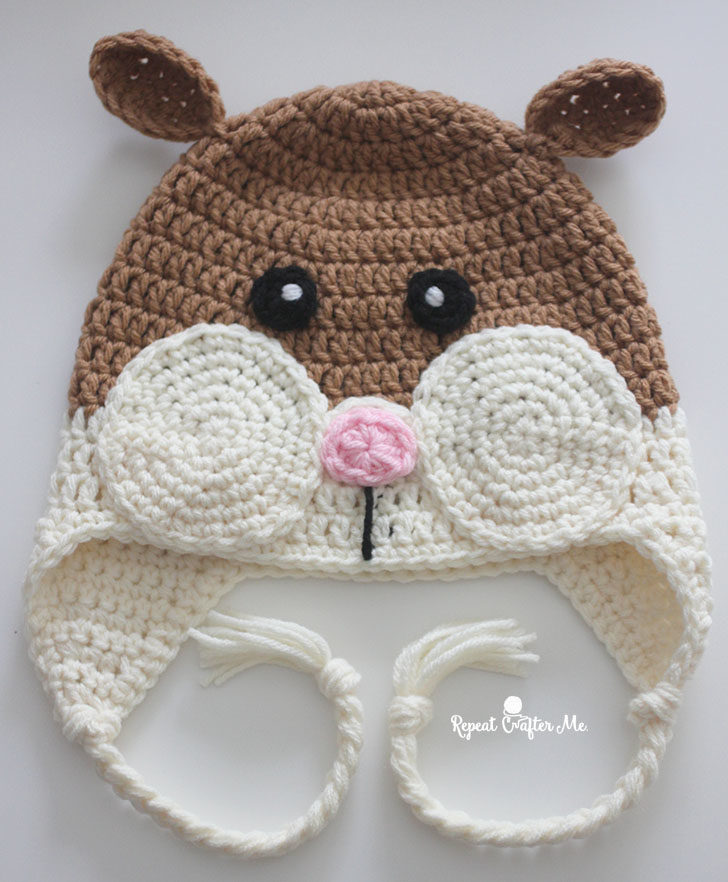
Braided Tails:
Cut six 18 inch strands of cream yarn.
Pass halfway through last space in earflap. You should now have 12 strands to braid with.
Make knot and braid approx 5.5 inches long, knot, trim ends.
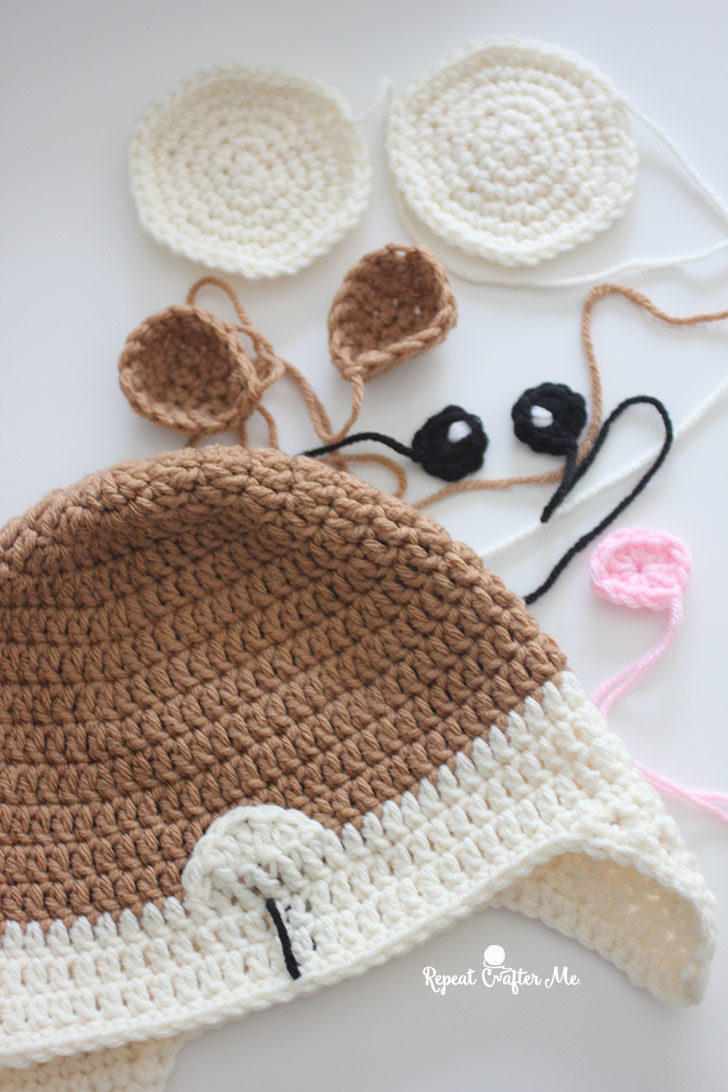
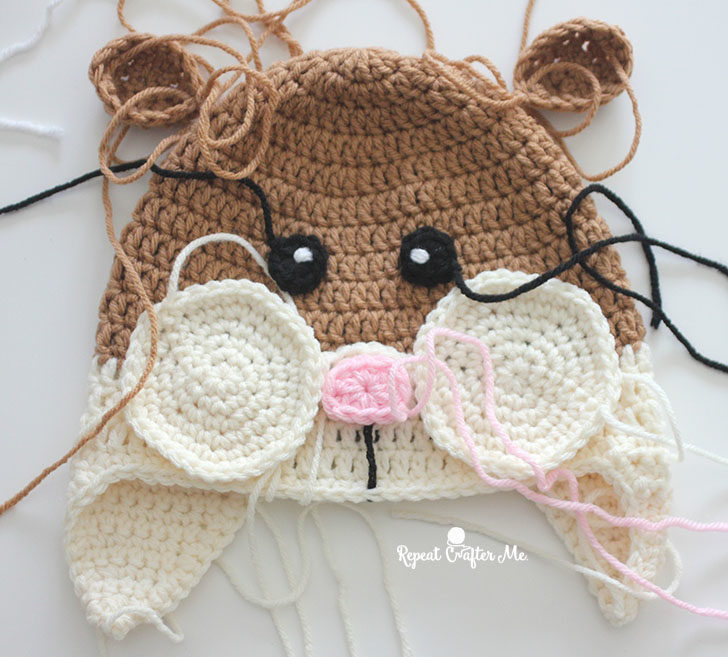
Nose Bridge:
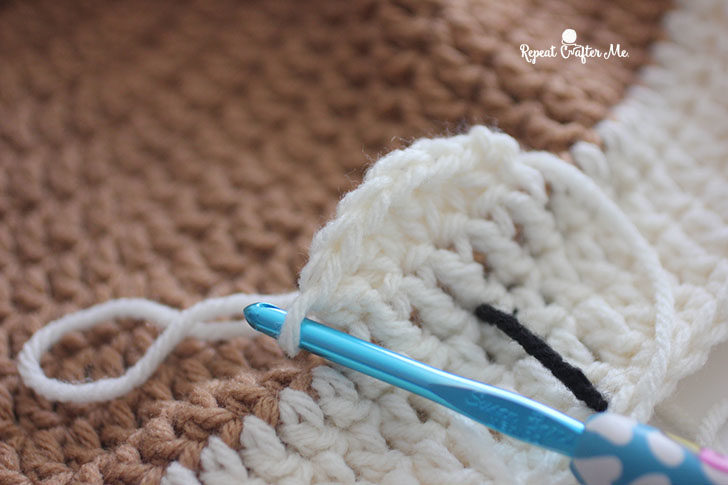
Turn hat upside down. You are going to want to locate the 6 stitches in the middle of the hat. Doesn’t need to be perfect because any spot could be the middle since we haven’t attached any other features yet.
Attach cream yarn along the last row of dark brown stitches. chain and make 6 SC in the next 6 spots, chain 1, turn
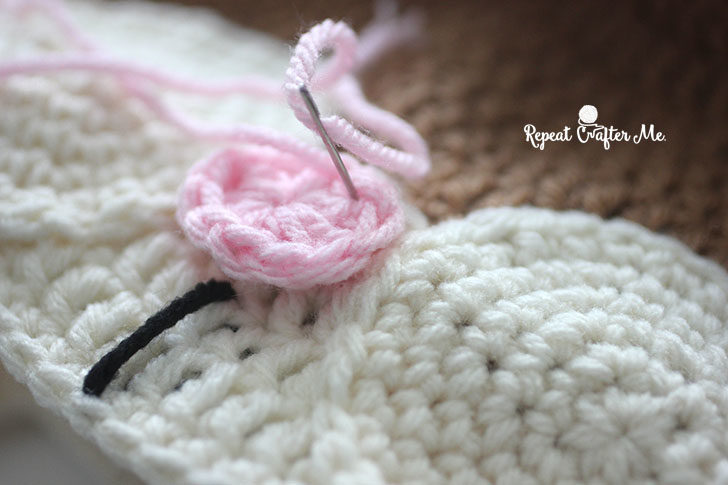
Row 2: SC decrease, 2 DC in next 2, SC decrease, fasten off and leaving long tail to sew all sides of the nose bridge to the hat.
Use your tapestry needle and small strand of black yarn to make a tiny little line under the nose bridge.
Cheeks (make 2):
Note: Stop increasing after rounds 4 or 5 for smaller hats.
with cream yarn
Magic Ring, chain 1 and make 8 SC in ring, join, chain 1
Round 2: 2 SC in first, SC in next, repeat around, join, chain 1 (12 SC)
Round 3: 2 SC in first, SC in next, repeat around, join, chain 1 (18 SC)
Round 4: 2 SC in first, SC in next 2, repeat around, join chain 1 (24 SC)
Round 5: 2 SC in first, SC in next 3, repeat around, join, chain 1 (30 SC)
Round 6: 2 SC in first, SC in next 4, repeat around, join, fasten off leaving long tail (36 SC)
Sew cheeks onto hat on either side of Nose Bridge.

Nose:
with pink yarn
Magic Ring, chain 2 and make 2 DC, HDC, 2 SC, HDC, 2 DC, HDC, 2 SC, HDC, and join to top of first DC, pull tight and fasten off leaving long tail to sew nose on top of nose bridge.
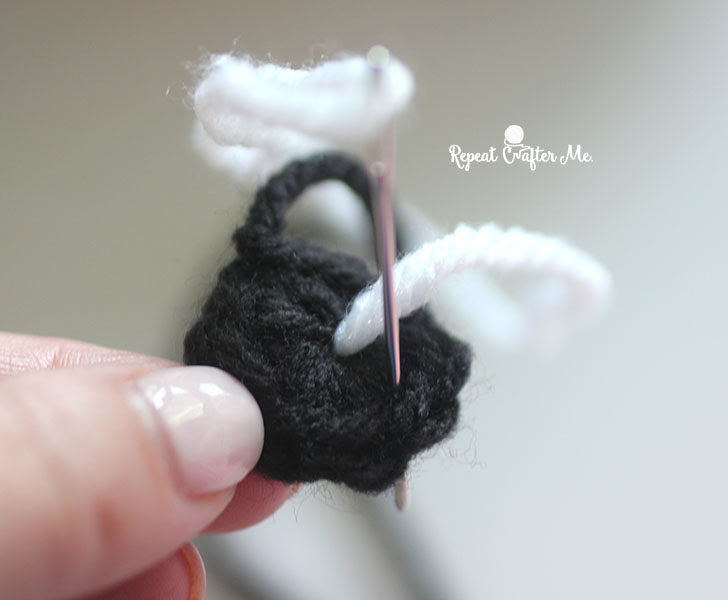
Eyes (Make 2):
with black yarn
Magic Ring, chain 1 and make 8 SC in ring, join, fasten off leaving long tail
with strand white or cream yarn and tapestry needle, stitch on a tiny pupil.
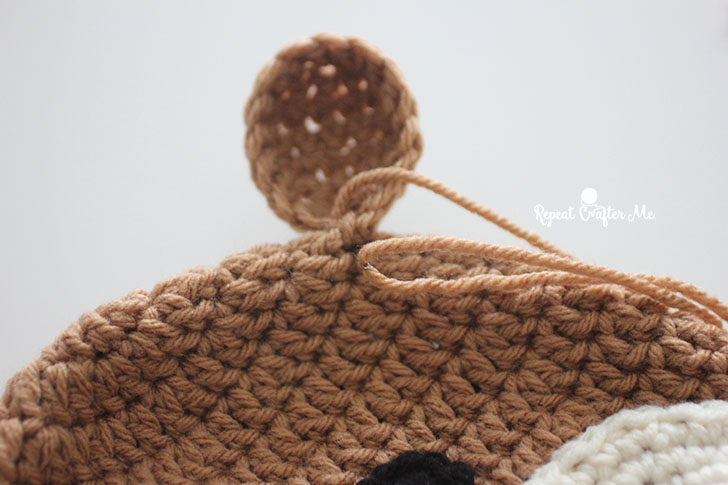
Ears (Make 2):
With darker brown (topaz yarn)
Chain 5, SC in 2nd chain from hook and in remaining chains, ch 1, turn (4 SC)
Row 2: 2 SC in first stitch, SC in next two, 2 SC in last stitch, ch 1, turn (6 SC)
Row 3-5: SC in each stitch across, ch 1, turn (6 SC)
Row 6: SC Decrease, SC in next two, SC decrease, ch 1, turn
Row 7: SC in each stitch across, ch 1, turn (4 SC)
Row 8: Make 2 SC decreases, continue to SC around entire ear. Join to the second SC (this will cause the ear to cup). Fasten off leaving long tail to sew onto hat.
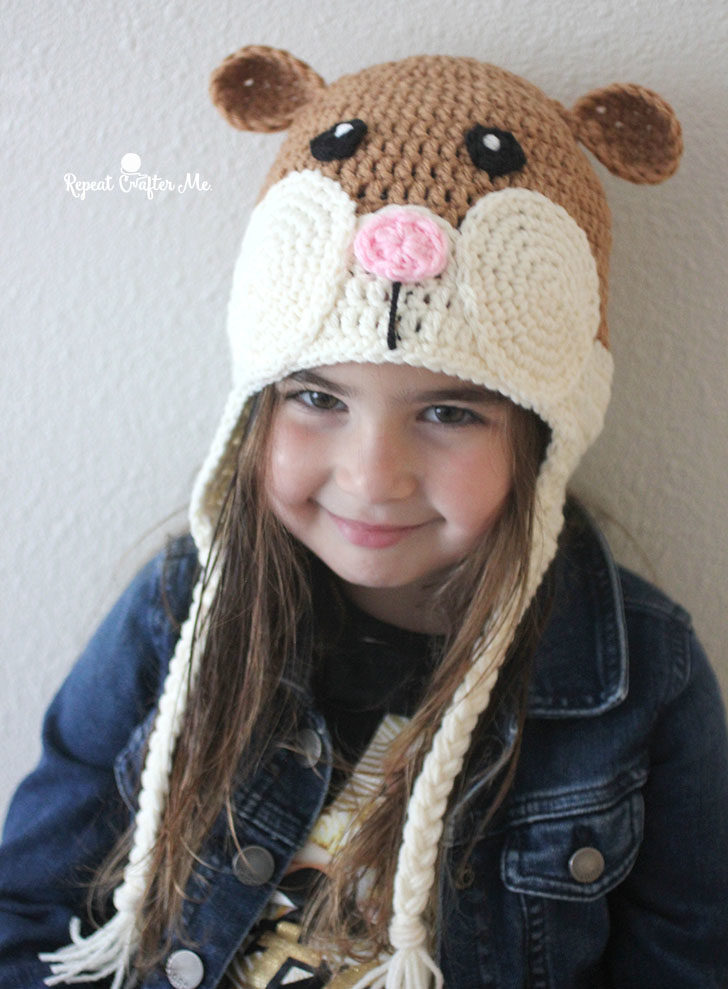
(btw, when did Zoe start looking like a teenager?! I’m not sure how much longer she will model for me!)
Happy Hamster Hat making!
Be sure to tag me on social media if you make this project using the hashtag #RepeatCrafterMe

 Starbucks Stitch Markers and Bottled Beverages
 Crochet Christmas Tree Pixel Square
 Crochet Santa Pixel Square
 Crochet Daisy Rug with Clover Amour Large Hooks and Giveaway!
This is just the cutest.
Windows 10 provides the ideal platform for classroom teaching, they will need to ensure that their supporting. Learn more here about fix errors in windows 10, fix windows 10 errors, how to fix windows problems.
Living in canada
If you allow me, i would like to share your post on my website http://onlinecasinohex.de. May i have your permission please? Thanks in advance.
I just finished this hat. Can’t wait for my granddaughter to see it. She had the biggest smile when I showed her the picture. I love your patterns they are so easy to follow. Thank you for sharing.
Thank You – Thank you for the great pattern – I made five Hamster Hats for chemo donations – they totally make me smile. I certainly appreciate your adorable patterns
the nice game post thnks
Your patterns are amazing!! SO detailed and easy to follow. Appreciate that you share your creativity. I can’t wait for my grandson to try on his hamster hat. THANKS
Here are share most popular platforms to use consistently. You will arrive at the greater part of the known locales which you may show online with different domains field. You will be happy to ride them. The satta king is a free public website that allows you to search for technology and it is sharing information about the internet.
The Matka is a free public website that allows you to search for make money online and it is sharing information about finance.