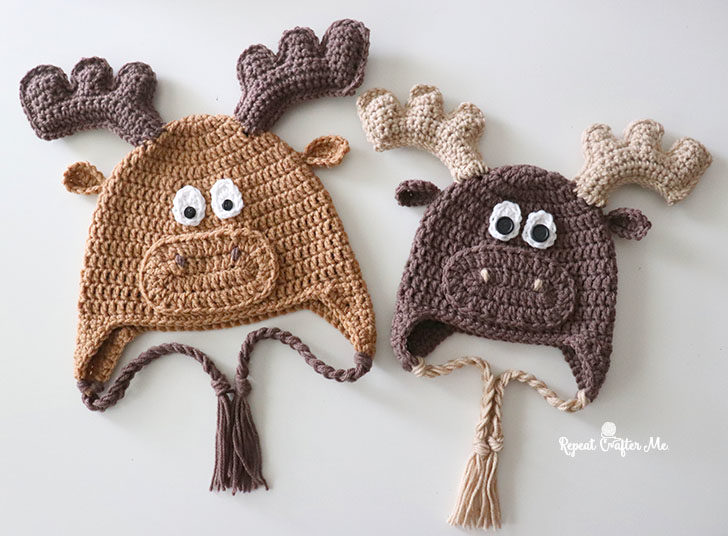
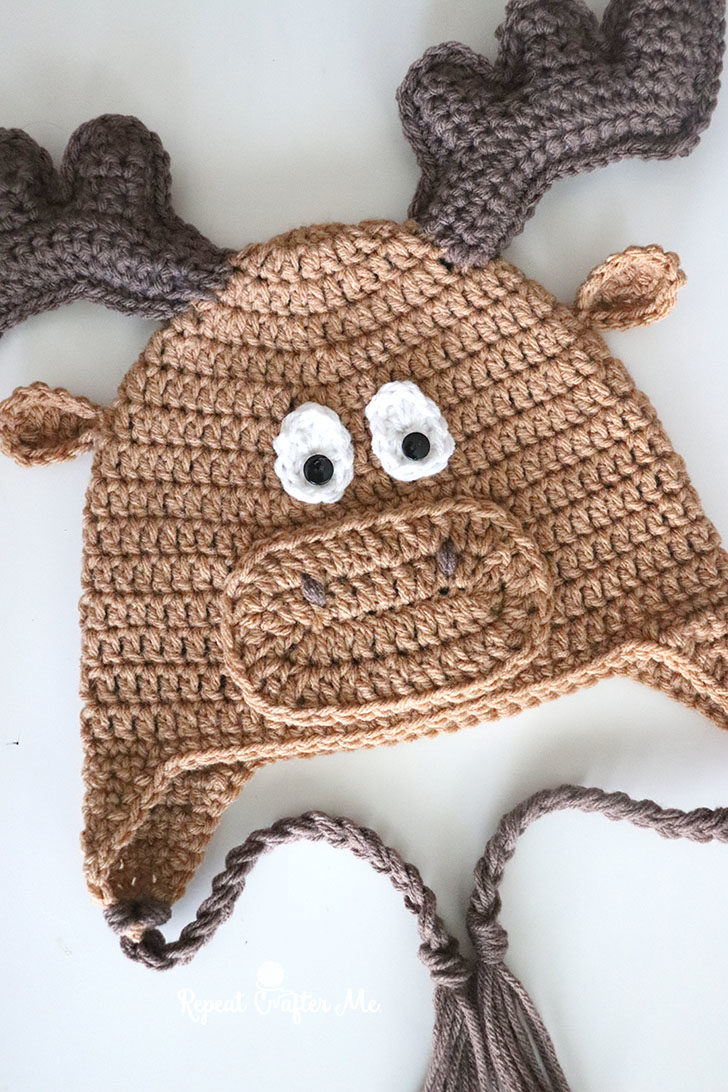
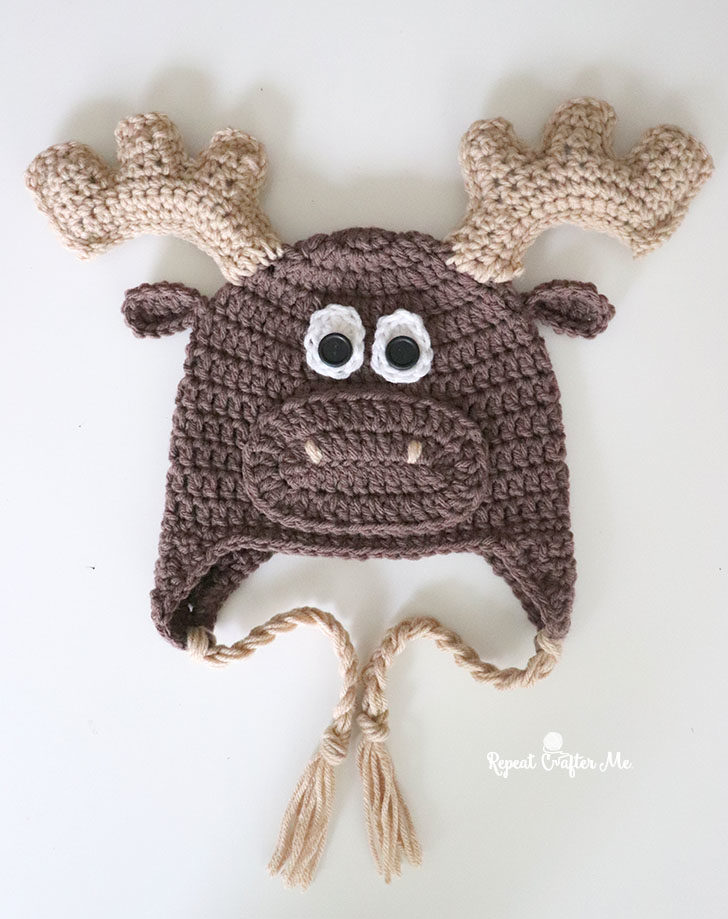
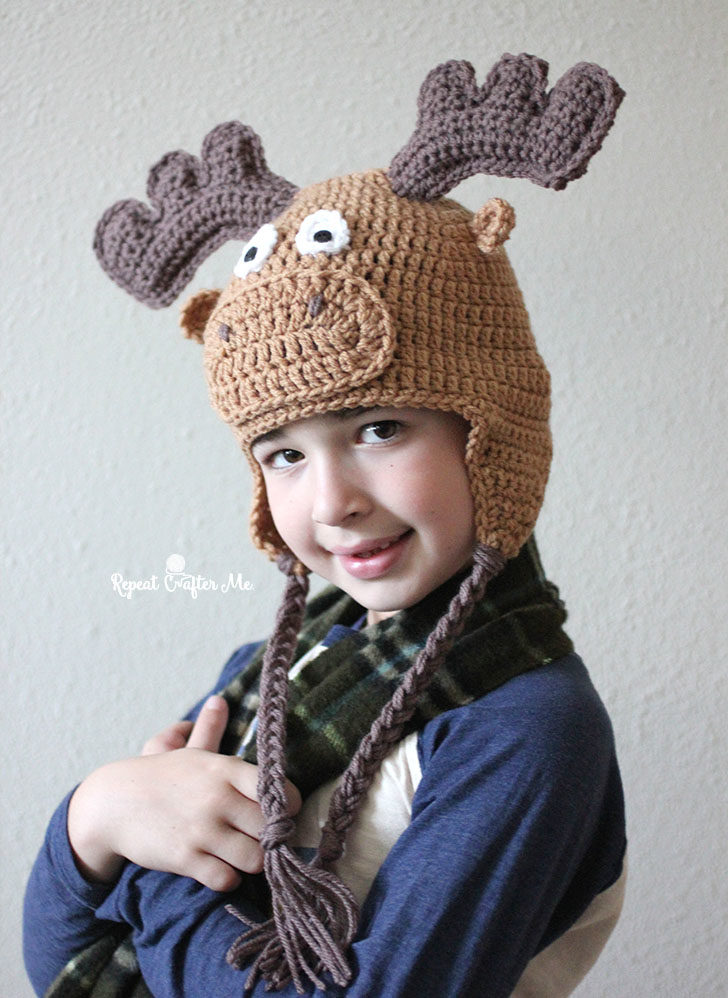
I thought it was time for another hat pattern! This moose is so cute for kids and adults so I am giving you pattern sizes for all ages! Pair it with a buffalo check (plaid) scarf and you have the perfect Fall/Winter ensemble! It would make an adorable gift this holiday season!
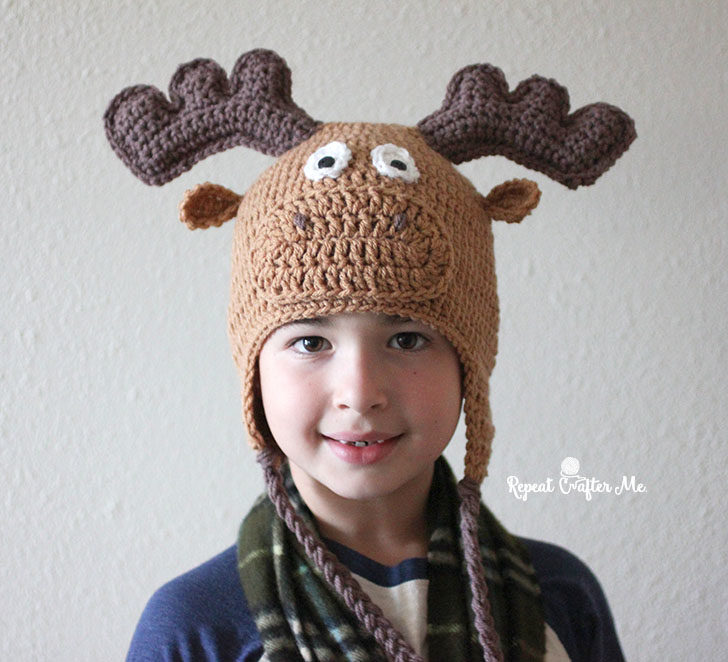
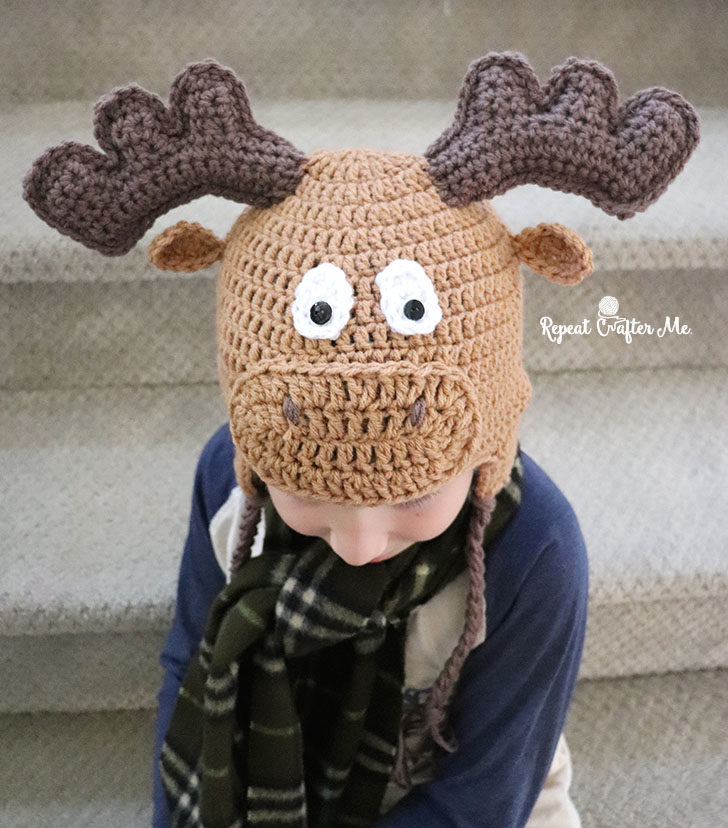
My son Chase is modeling the hat for me this time! I think he’s totally rockin this hat! And look how well the Antlers stay up! Watch my video tutorial below to see how I got them to stay up and not flop over.
Materials:
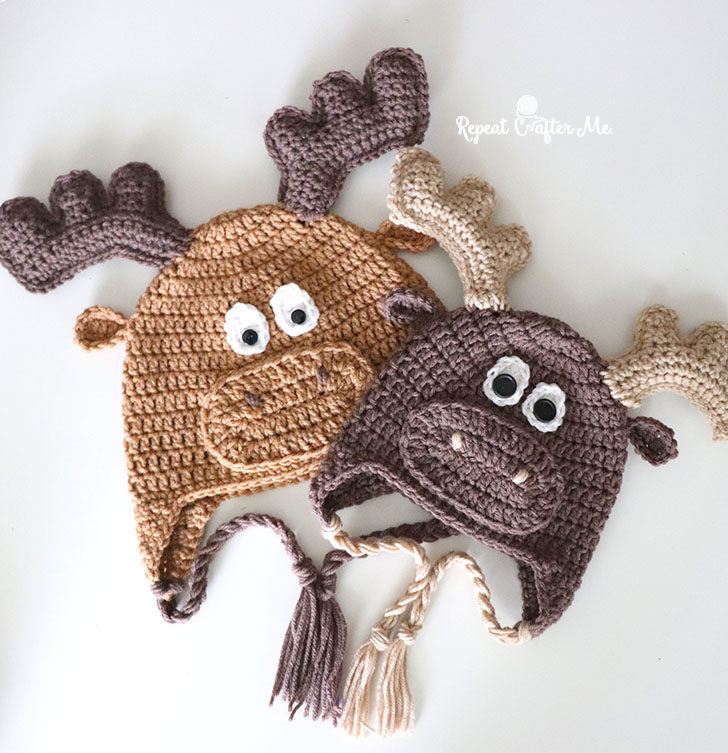
– Bernat Super Value Yarn in two shades of brown. I suggest Topaz and Taupe (dark brown). or Taupe and Oatmeal (lighter brown antlers). You will need a bit of white for the eyes.
Shop yarn colors HERE on Yarnspritions.com
– Size H Crochet Hook
– Two small black buttons
– Poly-fil Fiber Stuffing for the antlers
– Tapestry Needle
Hat Pattern:
Size: 0-3 Months
Magic ring, 11 DC in magic ring, join to first DC, chain 2
Round 2: 2 DC in each around, join, chain 2 (22 DC)
Round 3: 2 DC in first, DC in next, repeat around, join, chain 2 (33 DC)
Round 4: 2 DC in first, DC in next 2, repeat around, join, chain 2 (44 DC)
Round 5-10: DC in each around, join, chain 2 (44 DC)do not fasten off, begin on earflap as written below
Size: 3-6 Months
Magic ring, 11 DC in magic ring, join to first DC, chain 2
Round 2: 2 DC in each around, join, chain 2 (22 DC)
Round 3: 2 DC in first, DC in next, repeat around, join, chain 2 (33 DC)
Round 4: 2 DC in first, DC in next 2, repeat around, join, chain 2 (44 DC)
Round 5: 2 DC in first, DC in next 10, repeat around, join, chain 2 (48 DC)
Round 6-11: DC in each around, join, chain 2 (48 DC)
do not fasten off, begin on earflap as written below
Size: 6-9 Months
Magic ring, 11 DC in magic ring, join to first DC, chain 2
Round 2: 2 DC in each around, join, chain 2 (22 DC)
Round 3: 2 DC in first, DC in next, repeat around, join, chain 2 (33 DC)
Round 4: 2 DC in first, DC in next 2, repeat around, join, chain 2 (44 DC)
Round 5: 2 DC in first, DC in next 10, repeat around, join, chain 2 (48 DC)
Round 6: 2 DC in first, DC in next 11, join, chain 2 (52 DC)
Round 7-12: DC in each around, join, chain 2 (52 DC)do not fasten off, begin on earflap as written below
Size: 9-12 Months (Should fit up to about 16 months)
Magic ring, 11 DC in magic ring, join to first DC, chain 2
Round 2: 2 DC in each around, join, chain 2 (22 DC)
Round 3: 2 DC in first, DC in next, repeat around, join, chain 2 (33 DC)
Round 4: 2 DC in first, DC in next 2, repeat around, join, chain 2 (44 DC)
Round 5: 2 DC in first, DC in next 10, repeat around, join, chain 2 (48 DC)
Round 6: 2 DC in first, DC in next 11, join, chain 2 (52 DC)
Round 7: 2 DC in first, DC in next 12, join, chain 2 (56 DC)
Round 8-13: DC in each around, join, chain 2 (56 DC)
do not fasten off, begin on earflap as written below
Size: Toddler/Preschooler
Magic ring, 11 DC in magic ring, join to first DC, chain 2
Round 2: 2 DC in each around, join, chain 2 (22 DC)
Round 3: 2 DC in first, DC in next, repeat around, join, chain 2 (33 DC)
Round 4: 2 DC in first, DC in next 2, repeat around, join, chain 2 (44 DC)
Round 5: 2 DC in first, DC in next 10, repeat around, join, chain 2 (48 DC)
Round 6: 2 DC in first, DC in next 11, join, chain 2 (52 DC)
Round 7: 2 DC in first, DC in next 12, join, chain 2 (56 DC)
Round 8: 2 DC in first, DC in next 13, join, chain 2 (60 DC)
Round 9-14: DC in each around, join, chain 2 (60 DC)
do not fasten off, begin on earflap as written below
Size: Child
Magic ring, 11 DC in magic ring, join to first DC, chain 2
Round 2: 2 DC in each around, join, chain 2 (22 DC)
Round 3: 2 DC in first, DC in next, repeat around, join, chain 2 (33 DC)
Round 4: 2 DC in first, DC in next 2, repeat around, join, chain 2 (44 DC)
Round 5: 2 DC in first, DC in next 10, repeat around, join, chain 2 (48 DC)
Round 6: 2 DC in first, DC in next 11, join, chain 2 (52 DC)
Round 7: 2 DC in first, DC in next 12, join, chain 2 (56 DC)
Round 8: 2 DC in first, DC in next 13, join, chain 2 (60 DC)
Round 9: 2 DC in first, DC in next 14, join, chain 2 (64 DC)
Round 10-15: DC in each around, join, chain 2 (64 DC)
do not fasten off, begin on earflap as written below
Size: Teen/Adult
Magic ring, 11 DC in magic ring, join to first DC, chain 2
Round 2: 2 DC in each around, join, chain 2 (22 DC)
Round 3: 2 DC in first, DC in next, repeat around, join, chain 2 (33 DC)
Round 4: 2 DC in first, DC in next 2, repeat around, join, chain 2 (44 DC)
Round 5: 2 DC in first, DC in next 10, repeat around, join, chain 2 (48 DC)
Round 6: 2 DC in first, DC in next 11, join, chain 2 (52 DC)
Round 7: 2 DC in first, DC in next 12, join, chain 2 (56 DC)
Round 8: 2 DC in first, DC in next 13, join, chain 2 (60 DC)
Round 9: 2 DC in first, DC in next 14, join, chain 2 (64 DC)
Round 10: 2 DC in first, DC in next 15, join, chain 2 (68 DC)
Round 11-16: DC in each around, join, chain 2 (68 DC)
do not fasten off, begin on earflap as written below
Earflaps for 0-3 months – Preschooler
Earflap 1:
Chain 1, SC in next 10, chain 1, turn
Row 2: SC decrease, SC in next 6, SC decrease, chain 1, turn
Row 3: SC across (8 SC)
Row 4: SC decrease, SC in next 4, SC decrease, chain 1, turn
Row 5: SC across ( 6 SC)
Row 6: SC decrease, SC in next 2, SC decrease, chain 1, turn
Row 7: SC across (4 SC)
Row 8: Make 2 SC decreases, chain 1, turn
Row 9: SC decrease, fasten off, weave in ends
Earflap 2: See my PUPPY HAT PATTERN if you need help on where to place the second earflap.
Chain 1, SC in next 10, chain 1, turn
Row 2: SC decrease, SC in next 6, SC decrease, chain 1, turn
Row 3: SC across (8 SC)
Row 4: SC decrease, SC in next 4, SC decrease, chain 1, turn
Row 5: SC across ( 6 SC)
Row 6: SC decrease, SC in next 2, SC decrease, chain 1, turn
Row 7: SC across (4 SC)
Row 8: Make 2 SC decreases, chain 1, turn
Row 9: SC decrease, fasten off, weave in ends
Earflaps for Child – Adult
Earflap 1:
Chain 1, SC in next 12, chain 1, turn
Row 2: SC decrease, SC in next 8, SC decrease, chain 1, turn
Row 3: SC across (10 SC)
Row 4: SC decrease, SC in next 6, SC decrease, chain 1, turn
Row 5: SC across ( 8 SC)
Row 6: SC decrease, SC in next 4, SC decrease, chain 1, turn
Row 7: SC across ( 6 SC)
Row 8: SC decrease, SC in next 2, SC decrease, chain 1, turn
Row 9: SC across (4 SC)
Row 10: Make 2 SC decreases, chain 1, turn
Row 11: SC decrease, fasten off, weave in ends
Earflap 2:
See my PUPPY HAT PATTERN if you need help on where to place the second earflap.
Chain 1, SC in next 12, chain 1, turn
Row 2: SC decrease, SC in next 8, SC decrease, chain 1, turn
Row 3: SC across (10 SC)
Row 4: SC decrease, SC in next 6, SC decrease, chain 1, turn
Row 5: SC across ( 8 SC)
Row 6: SC decrease, SC in next 4, SC decrease, chain 1, turn
Row 7: SC across ( 6 SC)
Row 8: SC decrease, SC in next 2, SC decrease, chain 1, turn
Row 9: SC across (4 SC)
Row 10: Make 2 SC decreases, chain 1, turn
Row 11: SC decrease, fasten off, weave in ends
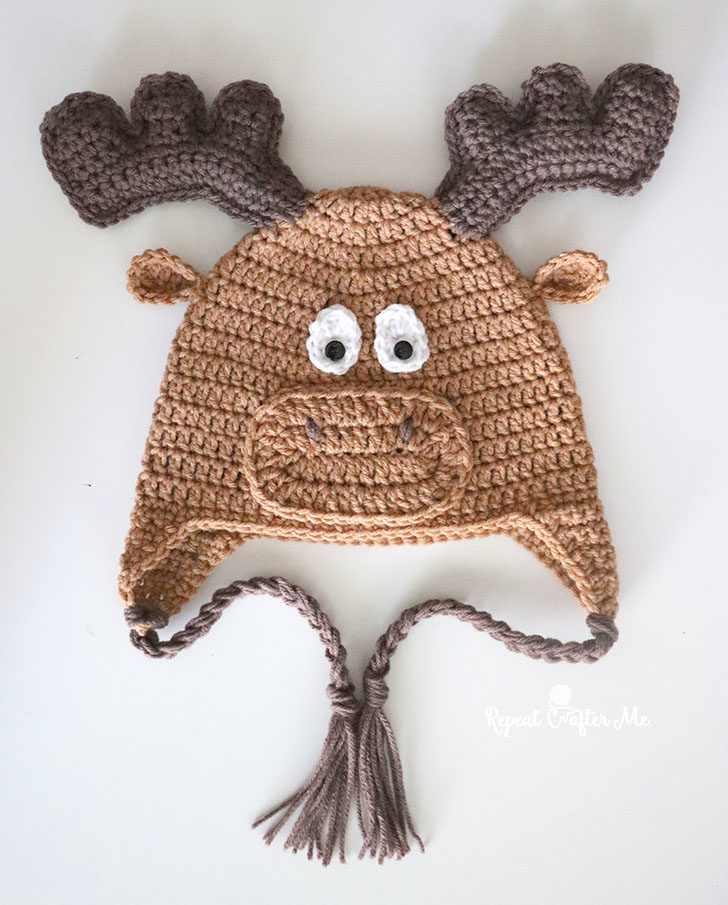
With main hat color, attach yarn and SC around the entire bottom edge of the hat (including earflaps). Fasten off and weave in ends.
Braided Tails: Cut 6 long strands of the same color yarn you used for the antlers. Pull yarn halfway through last loop of the earflaps (you now have 18 strands). Knot, braid, and knot again at the end of your braid. Trim ends of braided tails so yarn is even. Do this for both earflaps.
Antlers: Make 4
Chain 17, SC in second chain from hook and the rest of the way down chain, chain 1, turn
Row 2-3: SC in each stitch across, chain 1, turn
Row 4: SC in first 4 stitches (leave remaining stitches unworked for now), chain 1, turn, SC in 4 stitches, chain 1, turn, SC in 4 stitches, chain 1, turn, SC in 4 stitches and continue to SC down side of first antler pieces until you get back to your main row, SC in 4 stitches of your main row, chain 1, turn
Second and Third Antler: *SC in first 3 stitches (leaving last stitch unworked – its the space between the antlers), chain 1, turn, SC in 3, chain 1, turn, SC in 3, chain 1, turn, SC in 3 and SC down side of second antler piece until you get to the main row. SC in 4 stitches along main row and repeat from * to make the third antler.
When you get back to your main row, SC in last 4 stitches. Fasten off.
Place two antler pieces together and SC edges together. Stuff lightly with poly-fil as you go. Leave end open to stitch onto hat.
Feeling Confused? Don’t worry! I made a video tutorial on how to make the Antler Pieces and sew them onto the hat!
Snout:
Chain 12, DC in 3rd chain from hook and the rest of the way down chain. Make a total of 3 DC in last stitch. Now working on other side of chain, DC in each stitch and make 3 DC in last stitch. Join to first DC, chain 2.
Round 2: (2 DC in first stitch, DC in next stitch)-do that 4 times, 2 DC in next 3 stitches, (2 DC in first stitch, DC in next stitch)- do that 4 times, 2 DC in last 4 stitches. Join to first DC. (38 DC)
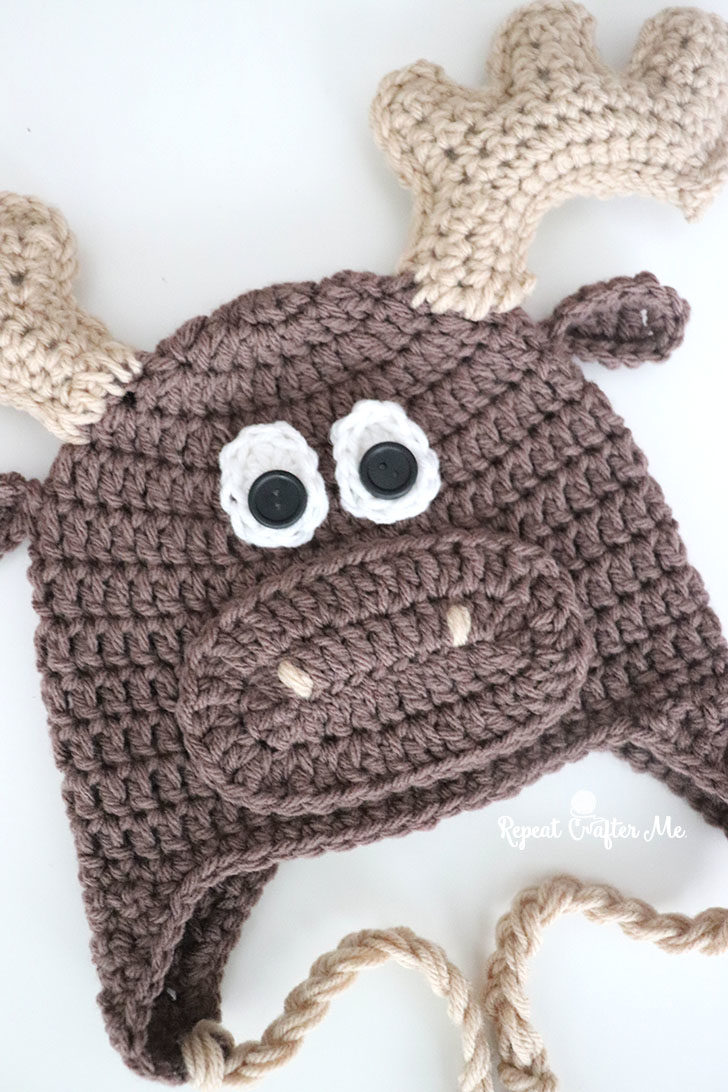
Stitch on two little nostrils with contrasting yarn.
Ears (Make 2):
Chain 6, TC in 3rd chain from hook, DC in next two, SC in last, chain 1, turn
Row 2: SC around ear making 2 SC in each stitch along the top of ear.Leave long tail to sew onto hat.
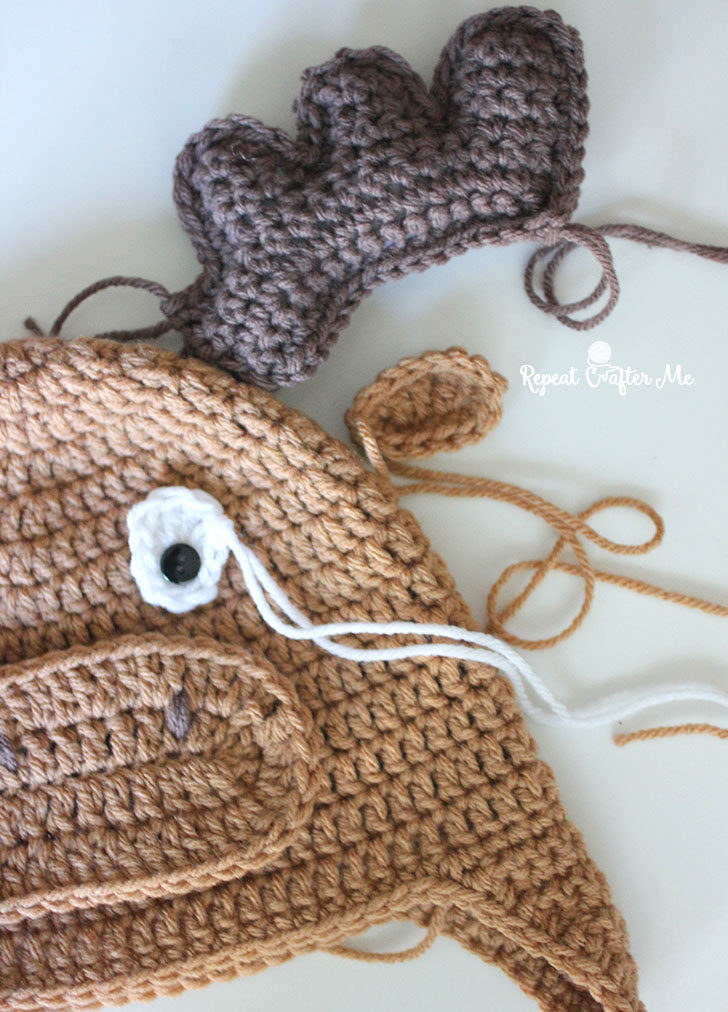
Eyes (Make 2):
Magic Ring, chain 2 and make 3 DC + 2 SC + 3 DC + 2 SC all in ring. Pull tight and join to first DC.Leave long tail to sew onto hat.Stitch on the two black buttons before sewing eyes onto hat.
If you make these fingerless gloves please be sure to tag me on social media using #RepeatCrafterMe or @RepeatCrafterMe!
***You may make and sell products from my patterns but if you do I ask that you link back to my post. Please do not copy and post this pattern and claim it as your own. Please do not re-publish photos as your own.
Want more free patterns? Keep in touch on my Repeat Crafter Me Facebook Page for new pattern sneakpeeks and when they will be available on my blog! And feel free to post pictures of your finished hats and/or links to your shops on my Facebook wall so all can see. Be sure to also follow me on Instagram! I love when you tag me (@repeatcrafterme)!

 Starbucks Stitch Markers and Bottled Beverages
 Crochet Christmas Tree Pixel Square
 Crochet Santa Pixel Square
 Crochet Daisy Rug with Clover Amour Large Hooks and Giveaway!
Love the hat as well as the video about connecting the antlers!! My grandchildren have adored all of the hats I’ve made using your well-written instructions! Thank you for sharing!!!!!!
These are just so cute!
Apreciei esse site. o material é extremamente bom. Vou reaparecer mais uma vez.
Wow! I love it! so cute
Cutest hat to try! And this gonna be a great gift idea for Christmas, too! Thank you so much for the pattern!
How I love to do something with my hands. I don’t know how to describe it, but it gives me tremendous pleasure. You probably yourself have often felt how pleasant it is to use what you did yourself. Unfortunately, I have not had time for this recently, since it was not possible to cope with all the things for the university, but I found those who helped me https://meowessay.com/blog/mit-transfer-acceptance-rate/ I want to share, maybe you will also need help with this. But the most important thing is that I finally got some time to make something and read your wonderful blog, which has so many new and informative things for me.
The deer hat looks cute, and the kids will definitely love it.
My grandchildren have adored all of the hats I’ve made using your well-written instructions! Thank you for sharing!!!!!!
Banking is an industry that handles cash, credit, and other financial transactions. Banks provide a safe place to store extra cash and credit. They offer savings accounts, certificates of deposit, and checking accounts. Banks use these deposits to make loans.
I think I need to learn more, thank you for sharing
Great post, I really like your information and I will try to make it by myself. I’m interested in to create creative art instead of writing unique creative content. For unique content I use https://edubirdie.net/about-us I preferred this one because they always provide best services, you can also check their about us page if you wanna know more about that.
hi
I think I need to learn more, thank you for sharing
thank you for sharing i also want ot share about https://www.aaronsmithphd.com who is an author and international speaker and always comes up with new ideas
https://www.gosaveshop.com/product/167-long-battery-life-earbuds-earphone are now available at gosaveshop on a very reasonable price.
If you are want to visit Sydney or famous places of Sydney than must visit https://www.marcopolosydney.com.au hotel which is the centeral point among all the famous places of Australia
Want to get Indian chaska at UK, must visit indigo Indian takaway menu, where you will find all the Indian foods with desi tarka. For more detail please visit https://indigoindian.co.uk
if you are disturbed in your life and want assistance in your life than must visit https://navneetfamilycoach.com/ family coach website,you will find a best person for guideness.
Detailed Article How to disable and delete Samsung Pay from your Galaxy phone?
https://netmag.pk/how-to-disable-and-delete-samsung-pay/
Read and download or send valentines day quotes for your love or friends.
https://mindtipz.com/happy-valentines-day-quotes/
thanks for such good blog unicorn coloring pages
so cute hat u crocheted! appreciate for sharing
TCL Pakistan opens its first flagship store in Karachi
Denise Bidot Measurements biography and full-body statistics like her breast size, bra size, height, weight, shoe, eyes color, favorite perfume, favorite destination, favorite food, dress size, music albums, celebrity favorite makeup kit, Denise Bidot Social Media Profiles and hobbies! Check some other body measurements also!
thanks for sharing this, Aviabiletebi really interesting and helpful post
Hi I am Kate Hudson, your article is awesome. Please check my article also. Guide me from your best experience. Thanks
But the most important thing is that I finally got some time to make something and read your wonderful blog, Télécharger pdf which has so many new and informative things for me.
Thank you so much for this excellent Post kalonkis-xelosani and all the best for your future. I hope you and we will be sharing more thoughts and keep writing more like this one.
Great post, I really like your information windousis gadayeneba and I will try to make it by myself. I’m interested in to create creative art instead of writing unique creative content.
Read and download or down or not send valentines day quotes for your love or friends.
You have shared such amazing knowledge with us. https://broadapk.com/turbo-vpn/
Our local movers is trained to be service providers who specialize in moving. We understand what it takes to pack and handle storage and moving. With our help with us, you’ll be at your new destination without trouble.
Our best Sara movers and packers is there for you to sort out your stuff from one to another place in very reasonable rate.
Great post,I’m interested in to create creative art instead of writing unique creative content.
This is an appropriate weblog for everyone who is would like to find out about this topic.
local movers
Waow this is quite pleasant article, my sister love to read such type of post, I am going to tell her and bookmarking this webpage. Thanks cheap barber chairs
you can get the best hereduct cleaning services.
You can get the premium services of movers and packers in Dubai.
Test your Mouse. easily and effectively
Seven X Sports. is a luxury athleisure clothing line with sophisticated fashion twists.
Nursing homes are a well known medical services choice for individuals in their 80s and 90s. A great many people residing in nursing homes. Bellevue WA are more than 75, and others live in nursing homes because of multiple factors.
Such a cool cap idea. I was searching for some cool ideas to vinyl wrap my car and suddenly encounter this added to my wishlist. Point me to Cool Car Wrap. ideas if you have shared some already.
I have seen some amazing stuff about wraps here in this blog., hope you will love it
Great crafting tips like your every other article. Last winter I visited Makeen Marketing. Office and the receptionist was wearing a Cute Cap Like this.(It was there off time)
you can try the best pokemon. generator here
home decore is important so get the best decorative products.
Super blog post forever. If you are looking for house moving services in Dubai, please contact with them
https://trendmoversdubai.com/
The dial featured a completely new guilloche pattern for AP Replica Watches. It has the appearance of a checkered flag waving directly across from left to right.
This is such an amazing article, i love website design though. We are a professional moving company in dubai that provides local residential and commercial moving.
World Apparel Enterprises is the name of excellence in the world where we bring a wealth of experience and technologies to manufacture and supply new styles Products. with the best top Quality workmanship & best possible prices to our foreign vendors and winning their full confidence.
SHARD Sharp edge. Custom Hand tailored Blade and Device Encompassed in mystery, Damascus steel has an emanation encompassing it like no other material. Rumors have spread far and wide suggesting that, the first edge of a Damascus blade can trim neatly through another sword will in any case cut off a hair falling on it. Damascus steel has accomplished a legendary status, as the need might have arisen to deliver this old material was lost in the mid 1800s. SHARD Edge is a family own business situated in Chicago,IL. Our work is sold all around the world in retail and discount (mass). Around here at Old neighborhood Blades we utilize the best current prepares and amalgams (15N20, 1095 and 4340HT).
Try the bestthree name combiner .
Waist trainer underbust corsets are another great idea as a Christmas gift to your beauty
Nice and perfect blog post. Thanks for sharing https://trendmoversdubai.com/
<a href="https://www.indigomovers.ae/service/storage-dubai/"best storage service in Dubai the best local movers and packers service in Dubai having storage and loded unloaded service
checkout the weightlifting on https://mexstrength.com/how-to-use-a-dipping-belt/
Wonderful web site. Plenty of useful information here. I’m sending it to a few buddies and also sharing in delicious. And of course, thanks for your effort!
Great pattern.Thank you for posting it. Just finished it. Hoping my Great Grandchild will love it. We call his Dad “Moose” so now there will be a moose JR. Love all your patterns and your model is adorable.
We are the bestmovers and packers in Dubai and we provide reliable services if you want our services then contact us at +971-42322437
What a lovely hat pattern! I love the moose design and the colors you chose. You are very talented and creative. Your son Chase looks adorable in the hat and I’m sure he loves it too. Thank you for sharing this pattern with us. I can’t wait to try it out myself.
This is such a cute and cozy hat pattern! I love how you made the antlers stand up and the moose face is adorable. Your son Chase is a great model and he looks so happy in the hat. You are a very skilled and generous crocheter. Thank you for sharing this pattern with us. I’m sure it will be a hit this holiday season.
If you are looking to hire packers and movers in Mumbai, Orbit is the trusted name in the moving companies area. We have 5 lacs+ trusted clients since 1995, 4.9 star rating google reviews our team use latest technology and best packing material for shift your goods.
If you’re interested in earning around $200 every day, check out this website. Once you’ve analyzed it, send me a similar website link like this my paye, and you can receive your payment online.
The content was good. Keep posting . Mobile app development companies in Riyadh
HI,Thanks for sharing this you can get the premium services of mobile app development company in Saudi Arabia
Best Movers in Dubai at just click on link for moving and packing services in Dubai.
Discover unparalleled efficiency and convenience with our cutting-edge solution. Streamline your workflow and maximise productivity today! with Google ad
Are you searching for reliable movers in Abu Dhabi to ease your moving experience? Look no further! At amovers.ae, we specialize in providing top-notch movers and packers services in Abu Dhabi, ensuring a stress-free relocation. Our professional team takes care of everything, from packing to unpacking, to ensure your valuable belongings reach their destination safely.
Tremendous blog. Really useful, thanks for share. Visit Packingshifting to hire the top movers and packers in Rohtak. At reasonable prices, we offer full packing, moving, and shifting services.
Best Office Movers in Dubai:- aba Movers LLC is a reputable office movers in Dubai that provide quality moving and packing services.
This is amazing information, I really appreciate your work. dark web websites
I truly value the work you’ve done; it’s a great source of information. linkpokerqq13.fans
Packing Shifting offer Fully coordinated and trustworthy Loading and Unloading administrations keeping products from any sort of scratches and breakage during the most common way of Loading and Unloading. Sonipat Packer and mover service provider houserelocator.com.
Lovely !! Thanks For Sharing Awesome Content
Music On Hold – Illinois Audio Productions
i lke it .thanks fotr the idea
reagrds,https://carforcash.ae/
Watch my video tutorial below to see how I got them to stay up and not flop over.
I found this amazing site for combining names—it’s so fun! Check it out here:
https://www.mygirlynames.com/combine-names
Such a cool cap idea! I was looking for unique vinyl wrap designs for my car and stumbled upon this—instantly added to my wishlist. If you’ve shared any Cool Car Wrap ideas, I’d love to check them out!
OMG, this moose hat pattern is the cutest! I’ve been looking for a fun Fireboy and Watergirl is perfect. Plus, it comes in all sizes! Definitely gonna try making one for my niece. Thanks for sharing!
Spotify Playlist Randomizer is the cutest moose hat ever! I gotta try this pattern. My nephew would look adorable in it! Thanks for sharing!
Hat ia beautiful and i admire your blogging way. For digital marketing in kuwait you can contact Cliqtechno It company in Kuwait.