What do you do when you order too much green colored blanket yarn?! You start stitching SEA TURTLES! I love using Bernat Blanket Yarn for crochet stuffies because it works up quickly and they turn out so soft and squishy. And isn’t it fitting that the shell color is named Deep Sea?! You can actually make several sea turtles from just two balls of Bernat Blanket Yarn. The turtle measures about 10 x 10 inches when laying flat and uses very simple repeating stitches. Let’s make one!
Materials:
– Bernat Blanket Yarn in Deap Sea and Smoky Green. Or choose any color from the Bernat Blanket line of yarn! You can make lots of turtles from just two balls. SHOP YARN HERE ON YARNSPIRATIONS.COM
– Size K Crochet Hook
– Poly-fil Fiber Stuffing
– Tapestry needle
– Two 12mm Black Safety Eyes
Colors in the picture below from left to right: smoky green, deep sea, go-go green (bernat blanket brights), misty green, misty jungle green (bernat baby blanket)
SHOP Bernat Blanket YARN HERE ON YARNSPIRATIONS.COM
Crochet Sea Turtle Pattern:
Top of Shell:
with deep sea green yarn
Magic Ring, chain 1 and make 10 SC in ring, join, chain 1
Round 2: 2 SC in each stitch around, join, chain 1 (20 SC)
Round 3: 2 SC in first stitch, SC in next, repeat around, join, chain 1 (30 SC)
Round 4: SC in each stitch around, join, chain 1 (30 SC)
Round 5: 2 SC in first stitch, SC in next 2, repeat around, join, chain 1 (40 SC)
Round 6: SC in each stitch around, join, chain 1 (40 SC)
Round 7: IN FRONT LOOPS ONLY, SC in each stitch around, join (40 SC)
fasten off, weave in ends. You will use the BACK LOOPS later.
Bottom of Shell:
with smoky green yarn
Magic Ring, chain 1 and make 10 SC in ring, join, chain 1
Round 2: 2 SC in each stitch around, join, chain 1 (20 SC)
Round 3: 2 SC in first, SC in next, repeat around, join, chain 1 (30 SC)
Round 4: 2 SC in first, SC in next 2, repeat around, join, chain 1 (40 SC)
Round 5: SC in each stitch around, join, fasten off leaving long tail. (40 SC)
Note: You will want to attach the head, flippers, and tail to the bottom shell before joining the top and bottom shells together.
Head:
with smoky green yarn
Magic Ring, chain 1 and make 10 SC in ring, join, chain 1
Round 2: 2 SC in first, SC in next, repeat around, join, chain 1 (15 SC)
Round 3-4: SC in each stitch around, join, chain 1 (15 SC)
Round 5: SC Decrease, SC in next, repeat around, join, chain 1 (10 Sts)
Round 6-7: SC in each stitch around, join, chain 1
Fasten off after round 7 and leave long tail.
Add safety eyes between round 3 and 4, about 5 stitches apart.
Stuff with poly-fil.
Tail:
Magic ring, chain 1 and make 4 SC in ring, join, chain 1
Round 2: SC in each stitch around, join, chain 1 (4 SC)
Round 3: SC in each stitch, make 2 SC in the last stitch, join, fasten off leaving long tail (5 SC)
No need to stuff tail.
Pinch closed and stitch onto bottom of shell, opposite from head.
Flippers (make 4):
with smoky green yarn
Round 1: Magic Ring, chain 1 and make 8 SC in ring, join, chain 1
Round 2: 2 SC in each stitch around, join, chain 1 (16 SC)
Round 3: SC in each stitch around, join, fasten off leaving long tail (16 SC)
Fold in half and pinch closed. No need to stuff with poly-fil.
Use your tapestry needle to stitch the flipper closed.
Leave tail attached to then stitch all 4 of the flippers onto the bottom of the shell.
Tip: Lay out all your pieces along the bottom of shell before you stitch them on just to make sure they are positioned correctly.
When attaching the head/flippers/tail, try to work your needle at least one row below the edge of the shell. You will need the stitches from the last row later to attach to sew the bottom and top of shell together.
While this project isn’t no-sew, the inside of your bottom shell can be messy! Feel free to leave the ends a big long. They are going to be hidden inside the turtle.
Lay the top of shell and bottom shell together. They have the same amount of stitches so they should match up.
You are going to be working your tapestry needle in the unused back loops of Round 7 of your top shel and the top stitches of your bottom shell. Stuff with poly-fil as you go!
Belly up!
If you need more ideas for green Bernat Blanket Yarn, check out my jumbo Squish-a-Saurus!

 Starbucks Stitch Markers and Bottled Beverages
 Crochet Christmas Tree Pixel Square
 Crochet Santa Pixel Square
 Crochet Daisy Rug with Clover Amour Large Hooks and Giveaway!
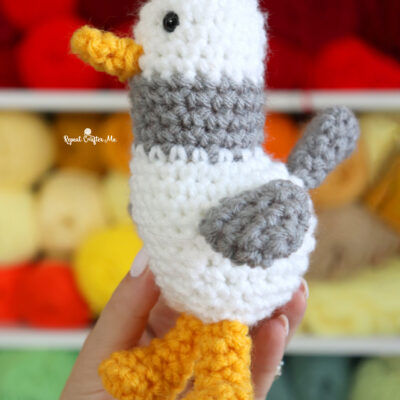

wow, It’s so cute! Some lovely and colorful designs
Can you support me make it?
I see your designes so lovely and lokeed nice. I empressed see it. You can reply what is your mind about this
Love it! The flippers/head/tail attachment is a bit confusing though. It doesn’t give enough details. Do I sew on the right side/ wrong side? How do I sew it? More clarification would be awesome! Unless I just missed it!
Amazing Design, i Love it thank you for sharing this amazing craft for turtle
We saw crocheted turtles at a craft fair last week and my girls asked me to make some. I am so glad you put out this pattern!
gimmys-best-shaver
برند جیمی یکی از معروفترین و محبوبترین برندهای ریش تراش در بازار است. آنها محصولات با کیفیتی تولید میکنند و دارای مجموعهای گسترده از مدلها هستند.
برای انتخاب بهترین ریش تراش جیمی، مهم است که نیازها و ترجیحات شما را مد نظر قرار دهید. در نظر داشته باشید که عواملی مانند نوع پوست، نوع موی صورت، سبک تراش، قابلیتهای خاص و قیمت محصولات نقشی در انتخاب دارند.
برای انتخاب بهترین ریش تراش جیمی، میتوانید این مراحل را دنبال کنید:
۱. تحقیق: مطالعه نقد و بررسیها و نظرات کاربران در مورد مدلهای مختلف جیمی میتواند به شما در انتخاب کمک کند. میتوانید بر روی سایتها و فروشگاههای آنلاین نظرات مشتریان را بررسی کنید و از تجربههای آنها استفاده کنید.
۲. نیازها و ترجیحات شخصی: مشخص کنید که به دنبال چه ویژگیهایی در ریش تراش خود هستید. آیا به باتری قوی، تنظیمات متنوع، طول تراش قابل تنظیم، قابلیت تمیز کردن آسان و یا سایر ویژگیهای خاص نیاز دارید؟
۳. بودجه: محدوده قیمتی خود را تعیین کنید. قیمتهای ریش تراشهای جیمی متفاوت است، بهترین ریش تراش جیمی بنابراین بودجه خود را محدود کنید و گزینههایی را بررسی کنید که در محدوده قیمتی شما قرار دارند.
۴. مقایسه و انتخاب: براساس تحقیقات خود، مدلهایی که به نظر شما برتری دارند را مقایسه کنید و با توجه به نیازها و ترجیحات شخصی خود، بهترین گزینه را انتخاب کنید.
با انجام این مراحل، شما میتوانید بهترین ریش تراش جیمی برای نیازهای خود را پیدا کنید. همچنین، ممکن است در فروشگاههای مربوطه یا از کسانی که از ریش تراش جیمی استفاده میکنند، نصیحت و راهنمایی بیشتری دریافت کنید.
ماشین ریش تراش جیمی
جیمی (Gillette) یکی از معروفترین و محبوبترین برندهای ریش تراش در جهان است. آنها محصولات با کیفیت و متنوعی را در دستهبندی ریش تراشها عرضه میکنند. در مورد ماشین ریش تراش جیمی، چندین مدل مختلف وجود دارد که هر یک ویژگیها و قابلیتهای خاص خود را دارند.
برخی از ماشینهای ریش تراش جیمی که مورد توجه قرار میگیرند عبارتند از:
جیمی فیوژن پروگلاید (Gillette Fusion ProGlide): این مدل با 5 تیغه برای تراش صورت و یک تیغه دقیق برای مناطق دشوار، ارائه میشود. همچنین دارای ویژگیهایی مانند نوار لغزش کنترل شده، صفحه برش پشتیبان و دسته ارگونومیک است.
جیمی ماش 3 (Gillette Mach3): این مدل با 3 تیغه قابل تراش، بند موزنی برای تنظیم بهتر و بدون نیاز به تعویض پنجره ارائه میشود. طراحی ساده و کاربردی آن مورد توجه قرار میگیرد.
جیمی سنسور 3 (Gillette Sensor3): این مدل نیز با 3 تیغه قابل تراش عرضه میشود و دارای نوار لغزش و دسته ارگونومیک است. این ریش تراش برای تجربهی مراقبت روزانه مناسب است.
Actually quite glad to say, your post is extremely fascinating to read.
Continue to send in more valuable and astonishing information on your blog so that we enjoy it.
Continue to send in more valuable and astonishing information on your blog so that we enjoy it.
Thanks for the information. I really like the way you express complex topics in lucid way. It really helps me understand it much better way.
Hi I found here very Good Information thanks so much for sharing
Bekaboo
Hi I found here very Good Information thanks so much for sharing
Sapno Ki Chhalaang
Hi I found here very Good Information thanks so much for sharing
woh toh hay albela
Jim Sherman LCSW is a reputable =”https://jimshermanlcsw.com/”>psychotherapist in California. Trust in the expertise of Jim Sherman LCSW, your go-to psychotherapist in Palm Springs, California, and embark on a transformative journey towards a happier and healthier life. Visit our website at jimshermanlcsw.com to learn more and schedule an appointment today.
Very helpul artical Video Banane Wala Apps
I love this turtle color.
You wrote it very well. I’m blown away by your thoughts. how do you do.
Time to talk about it I feel learned more from what you said
Wow, what a stunning sea turtle! Thanks for this fantastic article! I’m thinking of gifting a handmade turtle like this on my first date with a girl. But, oddly enough, the ukrainian-ladies website, all about love and long-term relationships, doesn’t say a thing about such presents. What’s your take? Is this a great idea, or should I stick with the usual flowers?
This is such a creative and resourceful way to handle excess yarn! Turning the surplus green blanket yarn into adorable sea turtles is such a fantastic idea. Using Bernat Blanket Yarn for crochet stuffies sounds like a perfect choice, especially when they turn out soft and squishy. The choice of “Deep Sea” https://okthesis.net/ for the shell color adds a delightful touch of ocean inspiration. It’s impressive how you’ve managed to make multiple sea turtles from just two balls of yarn, and the dimensions and stitches you’ve shared sound perfect for crafting these charming creatures. Your enthusiasm is contagious – let’s definitely make some sea turtles!
Continue to send in more valuable and astonishing information on your blog so that we enjoy it. stussyofficials.com
Easily, the article is actually the best topic on this issue. Great job. Thankyou
My son love to have a crochet sea turtle, he love to play Traffic Jam 3D too – a fun racing game.
Degree certificate attestation is a crucial process for validating your academic qualifications for international use.
Block Blast is compatible with both iOS and Android devices, making it easy to download and play on smartphones and tablets.
In the UAE, the large number of foreign nationals living and working in the country attracts a lot of interest. Whether it is for business or just for leisure, there are many opportunities that beckon foreigners to visit Dubai and other Emirates. People from different parts of the world are attracted by its unique architecture, convenience and activities provided by the UAE. It also helps to explore their cultural differences and learn about their traditions, values, and lifestyles.
In the amazing town of Dubai, UAE, there are many Filipino nationals who come here and settle down. They come here to work and live a decent life. In order to get a job in any country for foreigners, you have to do your Philippines certificate attestation in UAE country. The Philippines is one of the countries that has a difficult time getting their documents attested in Dubai. If a person wishes to work or travel to Dubai, their certificates must be attested by the UAE Embassy or consulate.
The certification of a job seeker in the UAE or Dubai is necessary for seeking a visa to do business there. The Philippines certificate attestation in Dubai is one of the most important documents that every candidate has to show when applying for a job. For Filipinos, this document must be signed and verified by an official certifying body from both the Philippines and the UAE. The Philippines certificate attestation in UAE is a legal procedure for approving and authenticating documents to obtain a visa to enter the UAE. The process is important because it will allow you to enter the UAE as a legitimate traveler.
Only authorised people are allowed to attest to the documents. The documents must be verified at various levels of government while being attested. A power attestation service in the UAE is a company of experienced and professional employees, so the process is simple for us. We help in the attestation of your Philippine certificates and documents in Dubai, UAE and make them valid and legal for use in Dubai
Getting a Philippines certificate attestation in Dubai is highly beneficial for Philippine nationals, especially for those who travel for the first time to the UAE. The Philippines’ documents attestation is important for many reasons. Getting a Philippine certificate attestation in the UAE will help them to apply for jobs, start a business, renew their passports and get permanent residency status in the UAE.
In the case of students from the Philippines who have their certificates attested in the UAE, this formality will persuade the college or university that your educational certificates are genuine and you intend to pursue the course offered by this organization.
We are the country’s largest certificate attestation services provider. We have been providing certificate attestation services for Philippine nationals for over 20 years now in the UAE. The following is a list of certificate attestation services we are providing for Philippine documents in the UAE:
When starting a new business in the UAE and requiring it to run smoothly, you must obtain a commercial attestation from the UAE government. The certificate will assist you in a variety of different ways, including starting a business, obtaining credit, and exporting to countries with which the Philippines has trade agreements. If you want to start your own business in the UAE or import items from the Philippines, you’ll need to apply for a business certificate attestation service to make the process easier.
When starting a new business in the UAE and requiring it to run smoothly, you must obtain a commercial attestation from the UAE government. The certificate will assist you in a variety of different ways, including starting a business, obtaining credit, and exporting to countries with which the Philippines has trade agreements. If you want to start your own business in the UAE or import items from the Philippines, you’ll need to apply for a business certificate attestation service to make the process easier.
✔️ Attestation of a Philippine Degree Certificate in Dubai, UAE
✔️ Attestation of Certificate of Post-Graduation in the Philippines in Dubai, UAE
✔️ Attestation of the Philippine Diploma Certificate in Dubai, United Arab Emirates
✔️ Attestation of the Philippine School Diploma in Dubai, UAE
✔️ Attestation of the Philippine School Transfer Certificate in Dubai, UAE.
✔️ Attestation of the Philippine Transcript Certificate in Dubai, UAE.
✔️ Attestation of a Philippine Nursing Certificate and other educational certificates.
Power attestation services in the UAE provide you with all kinds of your Philippine personal certificate attestation at the best prices. The following Philippine personal certificates need to be attested in the UAE:
✔️ The Philippines issued marriage certificates in Dubai, UAE.
✔️ The Philippines issued birth certificates in Dubai, UAE.
✔️ The Philippines issued Police Clearance in Dubai, UAE.
A transfer certificate’s attestation is a difficult process. However, the attestation processes will be made simple for you by Power Attestation Services. We obtain legalization for the document from all of the attestation agencies in both the country of granting and the UAE. We pick up the document from your home or office address and deliver it after it has been attested.
Yes, getting the TC certificate attested for the UAE is required. The document must be attested in order to enroll your child in school. The document is only valid in the UAE after it has been attested by the appropriate authorities
The divorce certificate is an official document used to end a marriage. The court issues it along with its final judgment. It contains the names of the separated husband and wife, the date and location of the marriage’s dissolution, and each party’s post-divorce rights and duties. Divorce Certificate Attestation in Dubai is required if you want to use your divorce certificate for legal purposes in the UAE or any other foreign country.
We can help you get your certificate attested without having to visit any department. Divorce Certificate Attestation in UAE is a time-consuming and costly process that varies depending on the country and its regulations. The sections that follow describe the utility, required papers, and Divorce Certificate Attestation procedure.
A divorce certificate is a legal document that confirms the divorce of two legally married people. The certificate will include the following:
✔️ identities of the parties
✔️ The terms of their separation.
✔️ Wages were granted by the court.
✔️ The date they divorced.
✔️ Other relevant information
What exactly is Divorce Certificate Attestation in Dubai, and why is it necessary?
The authority to certify divorce certificates has been delegated to government agencies. If a divorced person wishes to marry someone from another country, the divorced person’s own country must first approve the certificate. When a single parent applies for permanent residency, this certificate must be certified.
Purposes of obtaining Divorce Certificate and its Attestation in UAE
It can be used for a variety of purposes, such as changing the name on bank nominee paperwork. In the UAE, Divorce certiicate attestation in UAE verifies the document’s validity. For the following reasons it’s better to attest your divorce certificate in UAE:
✔️ Change the name on your passport and other official documents.
✔️ For the Purposes of Marriage with new partner
✔️ Visa applications for foreign countries (only where applicable).
✔️ To make changes to your insurance policy’s beneficiaries.
✔️ Any other legal reason.
Documents Required for Divorce Certificate Attestation in UAE
✔️ Divorce Certificate (May vary depending on countries).
✔️ Photocopy of the certificate passport holders
✔️ a visa photocopy (if applicable)
✔️ Provide power of attorney (POA) or authorization letter (If appropriate).
The Procedure for Attesting Divorce Certificates in the Dubai and UAE
The attestation process for a divorce certificate issued in the UAE or other countries is comparable. It must be sent to the UAE’s Home Ministry, the Ministry of External Affairs (MEA/MOFA), the UAE’s Embassy/Consulate, as well as the application and supporting documentation. The final divorce certificate will be certified in Dubai by the Ministry of Foreign Affairs (MOFA).
The following is the procedure for attesting to a divorce certificate:
When you want to get Divorce certificate attestation in Dubai you have to follow some procedure
The Notary Public’s Attestation: The first organization or institution that must certify your certificate is the Notary Department. The divorce certificate must be stamped at a Notary or Collector’s office in the area. It would help if you then visited the Department of Justice.
The Home Department’s Attestation: After being stamped by the Notary Department, you must present your certificate to the Home Department for attestation. If you plan to stay in Dubai, this is the final stage of the attestation procedure; however, if you plan to return abroad, you must visit the MOFA.
Ministry of Foreign Affairs Attestation: Because you intend to relocate to another country, the Ministry of Foreign Affairs, a branch of the central government responsible for the country’s external or foreign affairs, must certify your certificate
Embassy Recognition: The final step is to obtain certification from the embassy of the country to which you wish to relocate.
Attestation by the MOFA: The stamp and seal of an authorized individual in the Ministry of Foreign Affairs must attest to the authenticity of a certificate or document. The Ministry of Foreign Affairs is the final authority in the UAE to verify certification. It is also the final step in the certificate verification process. Once your certificate has the MOFA seal stamped on it, it can be used for a variety of purposes in the UAE.
The amount of time required is determined by a number of factors, including the countries for which you require attestation, the type of documents required, and the state from which you require it. Normally, it takes 15 to 25 days to finish. However, it can last for several weeks longer than a month. The previously mentioned factors will alter the overall time.
The cost of attestation of a divorce decree certificate varies by country and state in Dubai. It could be influenced by the request’s urgency and the location where the documents were delivered. The cost of attestation may be low or high, depending on additional services such as with pick-up and drop-off. Call us to learn about Divorce Certificate attestation rates in Dubai.
Because of the involvement of multiple departments and ministries, the attestation procedure is lengthy. It is possible that you will need to inquire several times at each location to ensure that authorities verify and certify the paper. If you don’t understand how departments work, you may be puzzled. You won’t have to be concerned if you entrust the duty to Power Attestation Services. Since the beginning of our business, we have been among the most dependable attestation services in Dubai. Our experts carefully follow our documentation attestation procedures. They will finish the procedure more quickly than you expect and give you the Divorce Certificate Attestation in UAE.
Medical Certificate Attestation in UAE is the act of witnessing a Medical document with official seal and signature by authorized persons / Departments/authorities/ government officials. This attestation also confirms that the specified Medical certificate was issued by that department and that the Seal and signature on that specific Medical certificate are genuine.
What is the meaning of Medical Certificate Attestation in Dubai?
The Medical Certificate is a declaration written by a professional and certified doctor that confirms the patient has undergone a medical test; sick Report is another name for it. The certificate could be required in Dubai to obtain health benefits such as sick leave, short and long-term absence leaves, health insurance claims, and so on. To legalize the use of certificates in Dubai, you must first obtain Medical Certificate Attestation in Dubai, UAE. You can also confirm the authenticity and originality of issued documents through Attestation.
The importance of doing medical certificate attestation in the UAE
Medical Report Attestation is required in order to claim health care benefits; it is also regarded as a legal document in the event that you are unable to attend work or company.
✔️ To Extend Leaves
✔️ For claiming Medical Insurance
✔️ For proving your leave of absence in a professional environment
✔️ In order to obtain Medical Benefits and Allowances.
Power Attestation Services is the leading Best certificate attestation company in UAE or for certifying documents and certificates. We offer professional services for certifying documents and certificates. We assist Clients to obtain Attestation Services or embassy legalization for their documents & certificates.
A Certificate Attestation Services or embassy legalization certifies the authenticity of documents and are notarized before they can be accepted by Government & Business Establishment. We believe in customer satisfaction, our service is consistent, hasty, and cost-effective, and at the same time committed to the highest business standards.
We do our best to provide the finest and most customer-friendly services. We are integrated with a vision to provide the absolute solution for your certificate attestation formalities from India, UK, USA, Canada, Australia & all G.C.C. Our aim is to attain client satisfaction.
Power attestation services is a top-notch organization that brings the best of technology and also innovation to arrange all your requirements. From ordinary items to extraordinary news, we are here to make your life easy and simple & will give you the best of services for all your needs.
We are a team of highly skilled and talented individuals whose mission is to develop world-class products, provide the highest level of service and constantly work towards bettering our craft. We continually contribute our ideas and expertise to further improve ourselves and the services we offer.
✔️ Free pick & Drop Facility
✔️ Free advice from Attestation Experts
✔️ Online Tracking
✔️ Live Chat Facility
✔️ 24/7 Call centre support
“We can complete all Certificate Attestation Services in Dubai procedures from anywhere in the world without your presence”
We certify commercial documents such as Board Resolutions, Articles of Incorporation, Commercial agreements, Appointment of Directors, Establishment of branch offices, Commercial Invoices, Certificate of Origin, Certificate of good standing, etc. Attestation is a onetime process, if you attested once you can use that for life time, always beware of fake attestations. We provide you only original attestations from all the departments.
Power Attestation Services provides Document Attestation Services across all Emirates in the UAE ( Dubai | Abu Dhabi | Sharjah | Al Ain | Ajman | Ras Al Khaimah | Umm Al Quwain )
France certificate attestation in Dubai will need to have a long list of documents attested if you plan to travel from France to the UAE. Before approving your travel visas, their ministries demand that you provide each of these proven documents. Therefore, you may need a variety of documents, all of which you should have attested before you start applying.
Services for France Certificate Attestation in UAE to use documents and certificates issued by France in other foreign nations, attestations must be obtained to confirm their validity and its originality. We offer to assist you in obtaining reliable and quick notary public and verification services for vital papers such as those issued in France by schools, colleges, and universities, as well as for birth, marriage, and company records.
What exactly does the France certificate attestation in Dubai mean?
Obtaining an attestation stamp from a France embassy or consulate is a type of legal procedure that provides proof of document verification. The certification of documents required to conduct business in UAE or another country or obtain a visa is known as France Embassy attestation. It is necessary because it will confirm your status as a permissible individual. To have the document attested, the relevant papers must be verified at various levels o
The following are the reasons for attesting French documents in the UAE:
Attestation is required in the UAE for a variety of reasons, including obtaining an employment visa and sponsoring your family in the UAE. When admitting your wife to the hospital for delivery and enrolling your children in school, Certificates must be attested when applying for insurance for your family, internal and external promotion, pursuing higher education, opening a company account in UAE, applying for VISA designation change, and many other reasons.
If you apply for higher education in the UAE, you will need to prove the authenticity of your documents at the Ministry of Education. If you plan to work in the UAE, this document is essential for you as well as for your work visa.
It is critical to present your certificate to a licensed Attestation company in the UAE. We can provide legalization services beginning with the collection of certificates and ending with the delivery of the documents.
REMEMBER, an incorrect stamping don’t do it on your original Documents.
Steps involved in Legalisation of French certificates in UAE:
✔️ The Embassy attests and authenticates the Department of Foreign Affairs France’s seal and stamp; thus, the standard seals of the entities listed will be required for the Embassy to document certification (each document must have a Foreign Affairs Authentication).
✔️ Original – All school, academic, birth, death, marriage, and other certificates must be translated by a certified translator and bear the signature of a recognized translator. The stamp from the Department of Foreign Affairs should be included. (Only applicable in certain circumstances)
Power Attestation Services provides professional attestation services in UAE.
Power Attestation Services have been providing Attestation and Embassy Legalization services for 20 years. We are international business service agents with an A grade in the reliability report, The trust from customers all over the world has made us what we are now.
The way you presented complex information so simply is remarkable.
Is it possible to make this with regular worsted weight yarn?
Topmost skilled and highly confident, most experienced international translators and interpreters are the asset and capital of this company. You can request at any time our services and help to assist you and supporting the team for the growth and development. This Hub should make your concerns and quires solved in very fast and quickly mode and deal. So that’s why Wadi Alhuroof is the Best Translation & Attestation Service in Dubai.
This was exactly what I see to read today—thank you!
OMG, those sea turtles are adorable! Bernat Blanket yarn is my go-to too. Making them must have been so relaxing! Speaking of quick projects, I sometimes unwind by playing block blast online – it’s a fun way to test my reflexes.
potent stream is designed to address prostate health by targeting the toxic, hard water minerals that can create a dangerous buildup inside your urinary system.
Plan your next adventure with EscapesRoad – explore nature, culture, and adventure trips designed for thrill-seekers and peace lovers alike.
Enjoy faster progress in Brawl Stars with Nulls Brawl. Build your dream roster with unlimited coins, gems, and access to all skins.
This article explains the Null’s Brawl experience really well. I like how it highlights the faster progression and the ability to explore different brawlers, skins, and in-game features without the usual limits. It makes the gameplay feel much more exciting for fans who enjoy experimenting with new strategies and characters. ✨
this crochet sea turtle pattern is so cute!
Great article thanks for sharing. Keep it up looking forward to more amazing posts.
This sea turtle is absolutely adorable, and I love how soft Bernat Blanket Yarn makes these stuffies; the ‘Deep Sea’ color is so fitting! When I’m planning out big crafting projects like this, I often use a handy calendar calculate days https://calendarcalculator.net tool to keep track of my time. I’ll definitely be trying this pattern soon!
cookie clicker masterfully implements exponential growth, making every new purchase feel significant.
Clicker Games online provide a unique mix of strategy and relaxation, letting players advance with each click while unlocking new features and achievements.
This crochet sea turtle pattern is adorable and clearly explained! Perfect project for quick, soft, and squishy stuffies. Also, if you want to keep your mind sharp while crafting, check out these fun math games for a nice brain break!
I absolutely love how you’re using yarn to create such adorable sea turtles! Crocheting with Bernat Blanket Yarn is a great choice—so soft and cozy. Your project reminds me of how rewarding it is to craft something unique. If you’re looking for inspiration, you might also enjoy using the Geometry Dash platform; it’s a fun way to challenge your creativity in different forms!
Awesome article! Thanks for posting it. Can’t wait to see more from you.
I’ve been enjoying Perler Bead Art more lately, especially when working with simple pixel-style designs https://www.pixel-beads.com/
Been messing around with different decks lately. Found a Riftbound deck builder that actually makes testing ideas way faster than I expected.https://www.riftbound-deck.org/
I like using this site as a quick check when something feels off during a Riftbound match.
https://playloltcg.help
“This thread about the character designs in Dandy’s World is fascinating! It’s incredible to see how the ‘Mascot Horror’ aesthetic is evolving so rapidly within the community. I’ve been following a few fan-made ‘Toon’ projects, and the visualization aspect is always what blows me away. I recently started using the Dandy’s World OC Maker (https://oc-maker.com/en/dandys-world-oc-maker) for some quick character concept renders and the speed is insane—it generates high-quality images in seconds. It’s been a huge help for visualizing my own OC ideas for my fanfics. Thanks for sharing this breakdown, definitely looking forward to seeing more updates
Fútbol Libre es utilizado por aficionados que desean seguir el fútbol de forma sencilla, rápida y con información verificada.
This Crochet Sea Turtle pattern is such a charming example of modern amigurumi design simple stitches, soft Bernat Blanket Yarn, and a finished plushie that’s both kid-friendly and Instagram-worthy. Projects like this highlight how DIY crafting, fiber art, and sustainable handmade gifts are trending again in 2026, especially as more creators share step-by-step crochet tutorials and free patterns online. The detailed instructions for the shell, flippers, and stuffing with poly-fil make it beginner-friendly while still appealing to advanced crocheters who love experimenting with texture and color palettes like Deep Sea and Smoky Green.
For crafters who enjoy relaxing with creative content, having a good entertainment setup also matters. While working on crochet projects, many people stream craft vlogs, YouTube tutorials, and lifestyle channels. That’s where Magis TV becomes a smart choice offering access to a wide range of TV channels, DIY shows, and creative content all in one place. If you enjoy pairing your crochet sessions with inspiring videos or background entertainment, you can explore more on magistv.bio for a seamless streaming experience.
Handmade toys, eco-friendly gifts, and slow crafting are here to stay and combining them with the right digital entertainment makes the process even more enjoyable.
Pelota Libre es un nombre habitual en el ámbito deportivo online. Pelota TV y Pelota Libre TV ofrecen información relevante sobre fútbol.
Your sea turtle project sounds delightful! While I stitch, I like to relax with games like null’s brawl скачать on my phone. Your creative use of extra yarn is so inspiring
Creative crafting lover who relaxes with mobile gaming while stitching yarn projects. I also explore fun titles like null’s brawl скачать and share simple hobby inspiration online with friends worldwide.
I really enjoyed how clearly this crochet sea turtle pattern is explained. Even though there are a few detailed steps, the instructions feel manageable when taken one row at a time. I’ve made amigurumi before, and I appreciate when designers anticipate where people might get confused. This feels like a project you can work on slowly and still enjoy the process without constantly second-guessing yourself
Watching sports on KoooraLive is easy thanks to its well-organized structure and stable playback. Finding ongoing and upcoming matches doesn’t take much effort. A dependable site for online sports streaming.
KoooraTV provides a clean interface that makes watching live sports straightforward. Streams play smoothly, and content is well arranged. KoooraTV is a solid option for sports fans.
Futbollibre es una plataforma popular para ver fútbol en vivo, partidos de hoy, ligas internacionales, copas y clásicos. Usuarios buscan dónde ver fútbol online, transmisiones en directo, horarios, canales y juegos en vivo fácil.
Thank you for this well-written and informative post. The way you explained the Big Mumbai Login process is very clear and easy to follow. It’s especially helpful for new users who often face confusion while logging in. This guide answers common questions and saves a lot of time. Really appreciate the effort you put into sharing such useful information. Keep up the great work!
This article about the Jalwa Game is very informative and easy to follow. The Jalwa Login steps are explained clearly for beginners. I also liked how you described Big Mumbai and Big Mumbai Login in simple terms. Including Tiranga Game, Ok Win, and Okwin Login adds more depth to the blog. I strongly recommend this useful guide to anyone interested.
What a clever way to use extra green blanket yarn! I agree that Bernat Blanket Yarn makes the best squishy stuffies. Using the “Deep Sea” color for the shell is such a fitting touch. These sea turtles look like such a fun and quick project to stitch up!
Amazing blog! The information shared here is practical and easy to understand. I appreciate how well everything is structured. It’s always great to find trustworthy content like this. Along with reading helpful blogs, I also recommend trying Okwin Gaming for an exciting online gaming experience with smooth performance and reliable features.
Great article and thanks for the useful information. I enjoyed reading your blog because it is simple, clear, and very informative. Your content always helps readers learn something new. I would also suggest trying Okwin Lottery for those interested in online lottery games. It provides an enjoyable and user-friendly experience. Looking forward to more amazing posts from you.
Thank you so much for informtional content
Thank you for this valuable and informative blog. The details shared here are very helpful and easy to understand. I would also like to recommend PM Jan Dhan Yojana, which has played a big role in improving financial inclusion across India. It helps people open zero-balance bank accounts and access important banking benefits. Everyone should know about PM Jan Dhan Yojana and take advantage of this government scheme.
After trying shoes from on cloud mexico , I can confidently say that the quality stands out. The lightweight sole and soft cushioning reduce foot strain during long hours of walking. I also appreciate the stylish designs that match both sports and casual outfits. It’s great to see such high-quality products easily available for customers in Mexico.
on cloud mexico delivers a smooth and comfortable walking experience. The cushioning system is soft yet responsive, providing excellent shock absorption. I enjoy wearing them for long hours without discomfort. Their stylish design and durable materials make them a reliable choice for anyone seeking premium shoes in Mexico.
HiAnime is a free anime streaming website where users can watch the latest and classic anime series online in HD quality. With a massive library of subbed and dubbed anime, fast streaming servers, and a user-friendly interface, HiAnime makes it easy to enjoy popular titles across action, romance, fantasy, and more.
This is such a cool idea, turning something as basic as plastic bottles into decorative lights is honestly pretty satisfying. I like that it’s not just creative but also eco-friendly. Definitely feels like a fun weekend project to try.
I tried the shell pattern from your pic and it actually made the whole turtle look so much more 3D — I usually struggle with texture!
I made this little crochet sea turtle last weekend and it turned out so cute — the way you explain the shell stitches made it actually easy to follow!
Stuffing the head and shell as you go was a game-changer for me; my turtle ended up nice and squishy, just like you said
haha also didn’t expect the flippers and tail to not need stuffing — I usually overstuff amigurumi parts without thinking. kinda curious if leaving them flat makes the turtle sit nicer when it’s finished.
This pattern is adorable, and you’re so right about Bernat Blanket yarn—it makes everything feel so much squishier and works up lightning fast! I’ve been making a few of these lately to keep my hands busy while I brainstorm new audio projects for my own tool, https://aimusicapi.ai. It’s the perfect relaxing craft to balance out a day of coding. Thanks for sharing such a clear tutorial!
“This is such a cute and creative project! I love how clearly you explained each step, it makes the pattern easy to follow even for beginners. The use of Bernat Blanket Yarn is a great choice – the turtle looks so soft and cuddly. Definitely excited to try making one soon. Thanks for sharing!” nulls brawl ipa
This sea turtle crochet pattern is absolutely adorable and very well explained! I love how you broke down each part step by step—it makes it so easy to follow, even for beginners. The tips about arranging the flippers and using the back loops for stitching the shell together are really helpful. I can’t wait to try making one myself, and I love that it’s a great way to use leftover yarn. Thank you for sharing such a fun and creative project! nulls brawl
I love seeing your sea turtles come to life with Bernat Blanket Yarn! The softness really makes them cozy and charming. It’s amazing how crafting sparks creativity, much like playing google minesweeper , where strategy and patience meet fun. Trying new platforms like Geometry Dash can also inspire unique ideas in your crochet projects. Keep exploring different creative outlets they all feed your imagination and make each handmade piece even more special.
Null’s Brawl is a feature-rich private server designed for players who want full access to everything Brawl Stars has to offer. From unlimited gems and coins to instantly unlocked brawlers and skins, it removes the usual in-game restrictions and lets you enjoy complete freedom. The server is frequently updated with new content, including the latest characters, modes, and improvements, ensuring a smooth and engaging gameplay experience. Whether you’re testing strategies or just playing for fun, you can download Nulls Brawl and dive into a limitless version of the game today.
It’s so clever how you repurposed the ‘too much green colored blanket yarn’ into these adorable sea turtles! That’s a great way to turn an over-order into something wonderful. And using Bernat Blanket Yarn really does make for some soft, squishy stuffies.
It’s so clever how you repurposed the ‘too much green colored blanket yarn’ into these adorable sea turtles! That’s a great way to turn an over-order into something wonderful. And using Bernat Blanket Yarn really does make for some soft, squishy stuffies I found this especially useful.!
It’s so clever how you repurposed the excess green blanket yarn into these adorable sea turtles! That’s definitely thinking outside the box, and the results are fantastic.
It’s so clever how you turned having too much green blanket yarn into a whole new project! I know that feeling when you’ve over-ordered, and this turtle is such a delightful solution.
It’s so clever how you turned having too much green blanket yarn into a whole new project! I know that feeling when you’ve over-ordered, and this turtle is such a delightful solution Appreciate the practical breakdown here.!
It’s always great when a project can tackle a stash problem! Using up “too much green colored blanket yarn” to create these sea turtles is such a clever idea. They turned out really cute.
It’s always great when a project can tackle a stash problem! Using up “too much green colored blanket yarn” to create these sea turtles is such a clever idea. They turned out really cute I found this especially useful.!
It’s so interesting to hear how the idea for these sea turtles came about from having “too much green colored blanket yarn.” It’s a great example of how unexpected situations can lead to really creative projects!
It’s so interesting to hear how the idea for these sea turtles came about from having “too much green colored blanket yarn.” It’s a great example of how unexpected situations can lead to really creative projects I found this especially useful.!
It’s always great when a project can tackle a stash problem! I chuckled at the thought of having “too much green colored blanket yarn.” These sea turtles are such a charming way to use it up.
I’m kind of obsessed with how soft and squishy this looks with Bernat Blanket Yarn, and the 10×10-inch size makes it feel like such a satisfying little weekend project. The tip about using the unused back loops of round 7 and stuffing as you go was especially helpful. Some crochet patterns take Wacky Steps, but this one feels cute, clear, and totally doable.
monopoly go gratis würfel täglich kostenlos 25 are a fantastic daily treat that keeps the game exciting and helps you progress without spending anything. Enjoy these free dice every day from trusted sources and roll your way to even more fun and rewards!
test soy atractivo para las mujeres is a popular search for people curious about their appeal, and sites like testdebelleza.com make it fun by offering quick AI-based insights into facial features and attractiveness.
Free undress ai is a controversial trend people search out of curiosity, but it’s important to be mindful of privacy and ethical concerns when using AI tools.
Unbeatable sale prices on Tennis On Cloud — the perfect time to upgrade your footwear.
Omg those look so squishy! I usually play coreball https://coreball-2.com to unwind and clear my head between rows when I’m working on a big project. That Deep Sea color is just perfect for a turtle, and I love the idea of using up extra blanket yarn for stuffies.
I honestly ordered way too much green yarn for a project last month, so finding this sea turtle pattern feels like fate! Can’t wait to clear out some of my stash this weekend.
I like that the flippers don’t need stuffing. I’ve made a few plushies where the tiny pieces became the most annoying part, so this pattern feels a lot more manageable for a weekend project.
I’ve mostly crocheted blankets and scarves, but this pattern makes the whole plushie process look less intimidating. The repeating stitches and simple shape seem beginner-friendly without looking too basic.
Gimy電影,小鴨影音
I love this sea turtle pattern! The use of Bernat Blanket yarn sounds perfect for a soft, squishy toy. Thanks for sharing the detailed instructions.