
Back in March when I was knee deep in monster birthday party planning, I came across fleece fabric at JoAnn’s that had little monsters on it. I had no idea what I was going to do with it, but I went ahead and purchased 2 yards of it anyway. And its been sitting on my craft shelf ever since. When I found out this weeks One Crafty Contest material was fabric, I knew it was time to put the monster fleece to use! I don’t own a sewing machine nor do I know how to sew – Yes, there is something I can’t do :o) But I had recently learned how to crochet around fleece for the Project Linus Blanket Drive. I thought a blanket was too boring, but a monster lovely would be perfect!
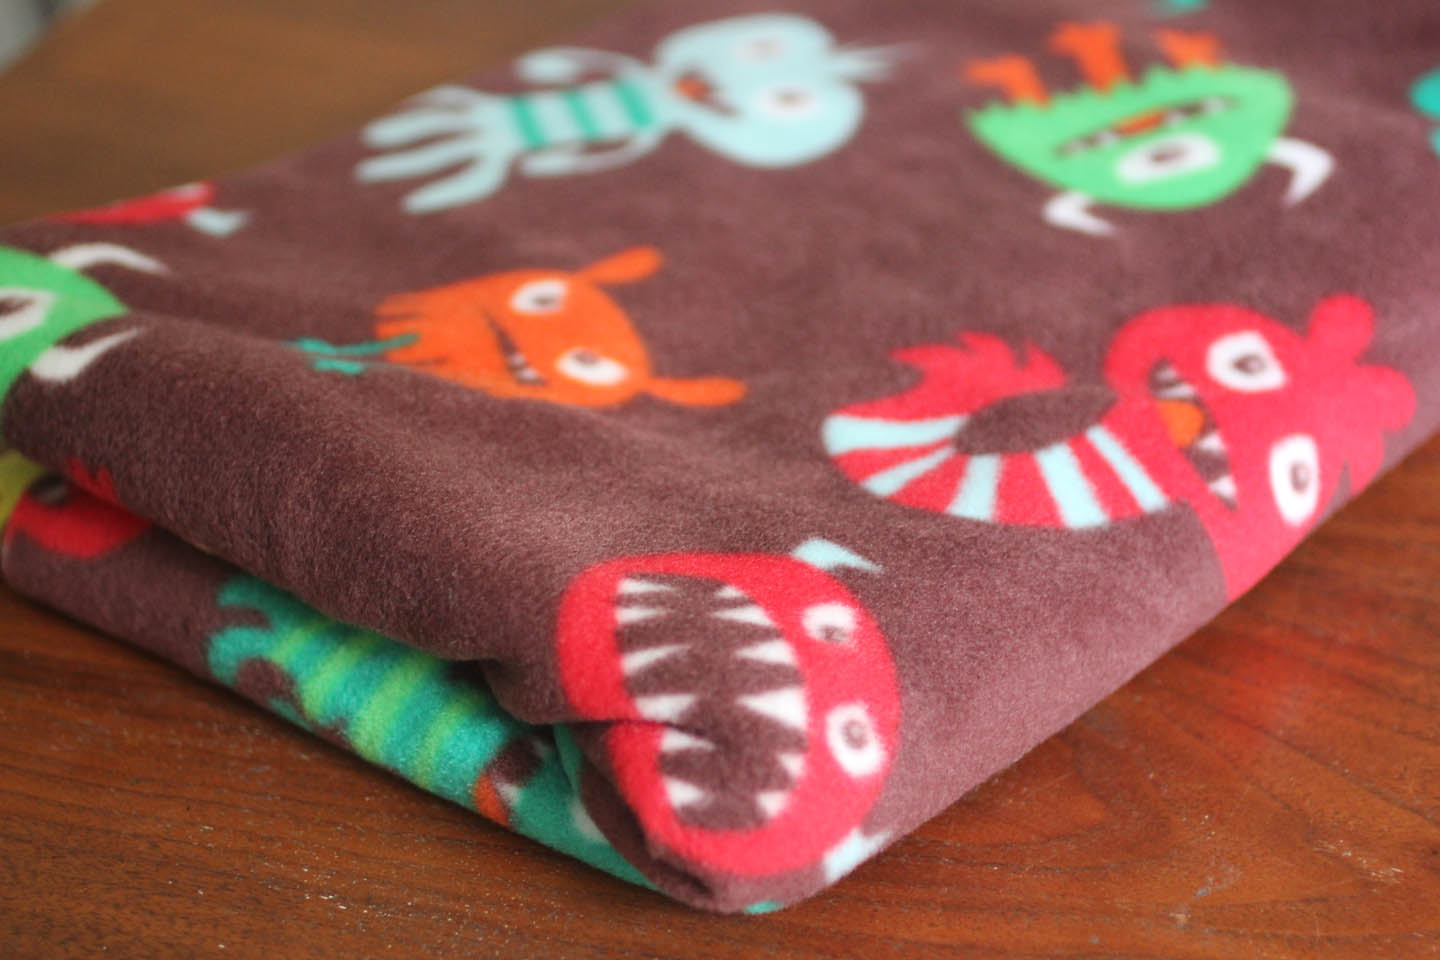
First I cut a 10.5 x 12 piece of the fleece fabric. I created holes to crochet through with a skip stitch blade and a ruler as a guide. Holes should be made about a 1/2 inch from the edge. It is also helpful to cut the corners into rounded corners so it will lay down flat when you crochet the edge.
I purchase my skip stitch blade from the Project Linus website and you will need a Fiskars 45mm Contour Rotary Cutter
which I purchased from Amazon.


Here is the crochet pattern I came up. Remember that when following the patterns below, you can easily adapt them to make the head and limbs bigger by increasing the chain length and row length. Feel free to use this as a loose guide.

Materials:
– Worsted weight yarn
– Size H (5.0) crochet hook
– Tapestry Needle
– Black Buttons
Head:
Chain 17,
SC in second chain from hook, and in the next 16.
SC along other side of chain (17 SC)
Working in rounds, SC 16, 2 SC in next stitch, SC 16, 2 SC in next.
Continue SC around for 11 more rounds (SC 35), Leave a long tail
Sew on eyes, ears, teeth, etc before stuffing lightly with Poly-Fil
and sewing shut.
Arms (make 2):
Chain 5,
SC in second chain from hook and in next 3
Sc along other side of chain (4SC)
Working in rounds, 2 SC in first SC, SC in next 3, 2 SC in next stitch,
SC 50, leave a long tail
Stuff with a small amount of polyfil and sew shut.
Leave the rest of the tail for sewing onto blanket
Feet (make 2):
Chain 5,

Eye:
Note: This is for the single large eye. For smaller eyes, start with less SC in your magic ring
With color #1:
Magic Ring, chain 1
6 SC in magic ring, pull tight and join, chain 1
2 SC in same stitch and in each stitch around (12 SC)
Join with white and chain 1
2 Sc in same stitch and in each around (24 SC)
Join, fasten off leaving long tail to sew on.
You can use a black button for the pupil or for smaller eyes, use 12mm Solid Black Eyes
Teeth:
Chain4,
Slip Stitch in 2nd chain from hook, SC in next, HDC in next
Leave long tail for sewing on.
Horns:
Magic Ring, chain 1
3 SC in magic ring, do not join and continue to work in rounds
2 SC in next 3 (6 SC)
2 SC in next, 1 SC in next, 2 SC, 1 SC, 2 SC, 1 SC (9 SC)
SC in next 9 (9 SC)
Fasten off leaving long tail to sew onto head
Tip: If you leave a long tail when starting your Magic ring, you can use it to stuff the horn.

Please Note: This pattern uses buttons and has small parts which could potentially become choking hazards if they come off. Please use caution if making this for a baby or if giving to a baby. If I was to make this for an infant, I would not use buttons and use black yarn instead.
Here are my little monsters snuggling with their new lovey blankets :o)


Oh, and did I mention how much I hate weaving in ends? Just look at this mess!

*** You may make and sell products from my patterns but if you do I ask that you link back to my post. Please do not copy and post this pattern and claim it as your own. Please do not republish photos as your own***
Want more free patterns? Keep in touch on my Repeat Crafter Me Facebook Page for new pattern sneak peaks and when they will be available on my blog!

 Starbucks Stitch Markers and Bottled Beverages
 Crochet Christmas Tree Pixel Square
 Crochet Santa Pixel Square
 Crochet Daisy Rug with Clover Amour Large Hooks and Giveaway!


sooo cute!
This is so adorable, my niece is having a baby in August and I have to make her some! Thanks for sharing your fun project with all of us!
Wow! Love it!
Tania
These are absolutely fantastic. What a brilliant idea and tutorial.
Thank You so much
Kindest Regards Linda
really cute and clever!!!
xxxx Alessandra
I cant WAIT to make this!!
And weaving/sewing in ends is my least favorite too… which is why I wait til I finish 4 or 5 projects before weaving in the ends lol
O M GOSH!!!!!!!!!! This is sooooooo AWESOME!!!!!!!!!! THANK YOU for making it free!! That is so wonderfully kind of you!!
what size skip stitch blade did you use? the original?
Thanks
Do you have any tutorials on sewing things on? I suppose I could probably figure it out, but a tutorial would be so handy!!
Thanks!
What a great idea! They are adorable!!
Super fun idea.
I really can't wait to make one of these!
Lovely! Nice to fond youtube blog !
Awesome! You could also use the Sharp Crochet Hook to crochet directly through the fabric in one step so you don't have to use the rotary cutter on it first. Thanks for the tutorial!
It's really nice!
Love this! They turned out great! Did you sc around the edge of the blanket? I couldn't find where you mentioned that. I did see you used a size G hook for the edging and a H hook for the monster parts.
Can't wait to make some of these!
that's what I figured it was– but thought I had better ask before I destroyed something! Thanks for getting back to me so quick! I'm off to JoAnn's now to find some fleece!
Love it!!!! Pinned and put on my summer crafting list.
Ok- One more post.. (sorry)
I found TONS of cute fleece at JoAnn's… and even the same monster fleece as you used! BUT I couldn't find a skip stitch blade so I had to order one. Ordered it from PL like you suggested. I was very pleased to find out they don't kill you on shipping! Yay! Hopefully I will be making some loveys by the end of the week!
Thanks again for the great free pattern!
I love these!
love these going to make them for my kids..and foster kids to scare away the monsters under the bed…
These are so adorable! Thanks for sharing! I used to work at JoAnn's before we moved and have collected several totes full of fabric and fleece (yarn, craft stuff…anything and everything that was on sale that I thought I would someday use), so I will have to dig it out and make some of these for my little monster grandchildren!
Finally I made one too. It was difficult to find the materials you used, because I am from Germany. The Internet Shops I found don't ship to Germany. So I used a Patchwork fabrik with a Monster theme. I couldn't find the skip stich blade either. So I used a different tool but the work doesn't look so perfect. Either way my son loves his monster blanket. So thank you for this great idea!!! (sorry for my bad english 🙂
What a cute idea! I love the fabric so much what wonderful way to use it.
Megan
How can monsters look so cute
I made these this weekend for my two grandsons we are expecting this summer. My daughters loved them! Thank you so much for sharing 🙂
*sings* these are AWESOOOOOOOOOME! *insert little flying note for illustration* How clever are you?? I'm going to pin this to pinterest right after sending this comment, so let me take the opportunity to thank you for the pattern from the bottom of my monster- loving heart before all the rest of the pinterest gals do. So.. THANK YOU!
these are adorable!!!!
What a cute idea. These are amazing.
fun idea!
Too cute!
These are the cutest! Great tutorial too 🙂
Super cute. I want a skip stitch thingy! 🙂 I really love how both monsters have their own 'personality.' 🙂
wow these are just so cute!!! pinning them!!!
I absolutely LOVE this! I hate having all those ends too…but it's worth it for something this cute! I have to make this asap! Thanks for sharing at our Pinteresting Party.
Fleece and crochet, brilliant! Thanks so much for sharing on Craft schooling Sunday!
Ack! These are so fun and super cute!! Their little faces crack me up!! Thanks for linking up – I featured you today! http://www.flamingotoes.com/2012/06/crush-of-the-week-think-pink-features-54/
These are so so cute! I absolutely love them! I'm not sure my limited crocheting skills can handle this though. Thanks for sharing at our Pinteresting Link Party!
So adorable! You could also try using 9mm safety eyes. They won't come off, you don't have to sew on buttons, and you don't have to create any more yarn tails with black yarn! Thanks for the cute pattern!
You are so talented, and in Today's Saturday Spotlight Talent Show over on Craft-O-Maniac. winks, jen
So cute!! I'm impressed with the crochet — sewing is SO much easier for me — because it gives such a nice texture! Thanks so much for sharing on Busy Monday at A Pinch of Joy. Hope to see you again soon!
Haha. These just made me smile. So fun. Thanks for sharing this week on BeColorful.
p
this is SOOO cute! thanks for sharing
super bonito! que gran idea, gracias por compartir!
abrazos!
Awesome!! Huge Monsters Inc and any monsters of the same style ("Uglydoll", etc.). I used the same material but just for a plain blanket, then accented monsters with UV-reactive paint fabric markers and mounted a UV "black light" nightlight on the wall over my son's bed. The friendly monsters come "on" at night to cover him.
i had a go at one of these the other day just for the fun of it and my daughter loved it, but asked for a girl monster (she's comming up on 3) so i have just finished a little girl monster. i replaced the horns with long curls. i have also used minky instead of fleece which seems to e a hit though the fluff got everywhere. lesson learnt the forst time. the second one i did sat on my neighbours front doorstep! tanks for the pattern.
Thank you so much for this pattern/idea. After i saw this pattern i went out to find printed fleece myself. I live in the Netherlands and in the shops i was checking i didnt find any monsterfleece, but bought two very cute prints, i probably wont crochet a monster around it but something else, but the idea is really great, wouldnt have thought about it myself.
Also tried to find a rotary cutter in the shops but havent found one, but ran into my 'hole in leather maker thingie' (was in my closet at the stable where my horse is) which i hope will work, havent tried it though
these are absolutely adorable! I love them. 🙂
Did you double up on the fabric? I can't really tell from the pictures.
Wow!! What a cute craft! I love when crafts are mixed together to make super projects! Would you mind if I feature you on my blog? http://www.thecraftysailorwife.com
I just love these little guys!! I had to share them and your lovely fall wreath on my blog, so you have been featured there today at http://lazydaisycrochet.blogspot.com/2012/09/monday-funday-2.html
How cute are these! My collegue asked me to makt something like this. On a blanket for her kitten. I have a question, I understand you can make holes in fleece. But is it also possible in cotton (my plan is to make a patchwork blanket with fleece on the other side of the blanket)? Doesn't it ruin the cotton? I'm sorry my English is not that good, hope you can understand my question. And thanks a lot for this very nice tutorial!
Love this!!! I've made a couple for friends' kids and they love them!! Thank you so much for the pattern! And the puppy one is fabulous too. 🙂
Love this!!! Have you ever made any girly ones…. Like an owl or cat or something ?
How did you sew the monster pieces on to the blanket? I want to make a couple for Christmas gifts. Thanks!
I have 2 Project Linus skip stitch blades. Can you please clarify which one is the "original?"
Did you fold in the fleece in half or is it single thickness?
love this idea and i have time to make them for stocking stuffer i was lost on what else to do thank you so much
Very cute blankets!!!! Cannot wait to go shopping and get the supplies to start this project! Thanks for sharing!
I think it is a brilliant idea, I can't wait for my tools to arrive in order to make it.
As for the buttons, I don't think it is safe for a young kids, there is always a chance of swallowing and choking.
I love your lovey patterns.But,I have some little girls that would love some loveys. Do you think you could come up with a girly pattern for one?
Thanks!
These are absolutely "LOVELY". Cant wait to check out the rest of your site! Maybe I could use up some of the material that I tend to buy with no purpose. Thanks!
I love this so much! Linked to this one on moogly this morning: http://www.mooglyblog.com/free-crochet-toys-for-babies-patterns/ Thanks so much! 😀
I love this! I blogged about it here when I tried to make an owl lovey 🙂 http://beyondthebumpers.wordpress.com/2013/03/27/owl-lovey/#more-829
hey,
i'm Iris from germany, and ich love your things, they look so cute.
i would love to make it too, but i'm not able to find the skip stitch blade you used.
How big was the space between the holes in the blanket you made with the blade?
i will try to do it by hand, but i need the distance.
thank you very much and please excuse my horrible english
Bye iris
Any way I can purchase one of these?? They are so cute my nephews theme is monsters and he'll be here any day! I'm not crafty at all and between school and work have zero time! I'd love to buy one!!
They don't currently have the skip stitch blade at Project Linus, but it can be found at http://www.skipstitch.com
This project is so adorable! I don't have monsters, but I do have animal print. I'm going to find a lion or elephant to adapt for the head. Thanks so much for the great idea!
I pinned it to my dads pins on my board! this is an awesome pattern
In a previous message you mentioned a Babyghan. Do you have a pattern for that also. I love the Robot Lovey – have made one and am working on one with a different twist. Thank you.
Hi, Sarah, I made a little lovey for my niece and her new baby using your directions and it turned out great. Your directions were very easy to follow. I had never done a magic ring before and learned how from Youtube. I haven't crocheted in a few years. I've been knitting, tatting and quilting but had to do this for a special little person. I have more fabric and will be doing more of these too. Thanks for such a great little pattern.
Hi Sarah
I do not have a skip stitch blade.:(………..
May I Adjust this pattern to not use fleece and post it to my blog? please and thank you
http://niftynickelsdaughter.wordpress.com/
Repeat Crafter, would you be willing to make me two of these and sell them to me?
Repeat Crafter, would you be willing to make me two of these and sell them to me?
I crocheted a little eye instead of the button . I am having trouble with the head. crocheting on the otherside . can't get 17 sc in.
could you show on a tutorial a close up or on you tube.. don't know what i am doing wrong. thanks so much. love it for my grandsons.
I crocheted a little eye instead of the button . I am having trouble with the head. crocheting on the otherside . can't get 17 sc in.
could you show on a tutorial a close up or on you tube.. don't know what i am doing wrong. thanks so much. love it for my grandsons.
Did you sew two pieces of flannel? It seems like the back would be “naked”?
Do you have to hem the fleece or fold it over and crochet through it, or will it not fray? I’ve never used fleece before.
Has anyone tried washing this? I want to give it to a friend as a gift but I don’t know if I should wash it first or what it will look like after she washes it. Will the yarn curl and need to be blocked afterwards? I’m using fleece and 100% acrylic yarn. Thanks!
Very cute and lovely! I like your post! It really interesting! Thanks for sharing!
– hotmail sign up
Oh I just made this in navy and bright blue for a bday mantle garland for my husband tomorrow! Yay! Thank you! It will then go in my son’s room! BONUS!
Has anyone tried washing this? I want to give it to a friend as a gift but I don’t know if I should wash it first or what it will look like after she washes it.
The blog or and best that is extremely useful to keep I can share the ideas of the future as this is really what I was looking for, I am very comfortable and pleased to come here. Thank you very much.
Thanks for your sharing.
Thanks for sharing this great. Keep sharing more useful and conspicuous stuff like this. Thank you so much
Very great, I think I’ve found good article. I will see and consult some information in your post. I need it, thanks. hotmail login
I want you to thank for your time of this wonderful read!!! I definately enjoy every little bit of it and I have you bookmarked to check out new stuff of your blog a must read blog!
gmail sign up
The article you have shared here very good. This is really interesting information for me. Thanks for sharing!
I’m going to read this. I’ll be sure to come back. thanks for sharing. and also This article gives the light in which we can observe the reality. this is very nice one and gives indepth information. thanks for this nice article…
What’s happening, very good web-site you’ve got here
Really glad that you shared this information with us. I was looking for exactly the same article.
Walmartone Login!
its really nice article…
KFC Menu
thanks for all the instruction, I will try this. Looks cute! mypaydetails
Any innovative idea beyond the healthy mind. I really appreciate the diverse piece of content. Thanks for your effort you have made in writing article.
Blockjunkemails
I just want to say that your blog is absolutely amazing. Telldunkin
I just want to say that you shared a really informative article with us.
I was actually reading your article and found some really interesting information. The thing is quite clear that I just want to thank for it.
visit website
thank you so much for this nice Post.
I really enjoyed
Thanks for sharing this great. Keep sharing more useful and conspicuous stuff like this. Thank you so much
awesome
thank you so much for this nice Post.
I really enjoyed
website
thank you so much for this nice Post.
I really enjoyed
I was just wondering the great quality of your article. Then let me tell you that your blog is absolutely awesome.
Thanks for sharing this great. Keep sharing more useful and conspicuous stuff like this. Thank you so much
Absolutely wonderful post! What a perfect concept. Thank you
Cheap Gucci Shoes For Men Amaze! I have been searching yahoo for a long time for the i ultimately found it on this page! this hyperlink
Wow…you just wrote a post of my flavor so i want to thanx for it a lot. Its been pleasure reading it.
Literally one of the best post I ever read.
Really great post.
All one needs is an active internet connection on a device like a smartphone, tablet, laptop, desktop or smart TVs. Well, for some people who cannot afford to pay for the premium membership of Netflix.com login, and those searching for free
A few of the most significant names in Search Engine Optimization tools today are Moz, SEMrush and also SpyFu. The real worth in semantic search comes from what’s following: Google will connect the prevalence of testimonials talking about your naan with your dining establishment’s site. Search Engine Optimization devices aid automate the process, whether it’s figuring out which key words are the most effective to purposefully target, the amount of backlinks you have actually established on various other web sites, and even the Search Engine Optimization health of your rivals’ pages.
When carrying out keyword research should be a top priority in your Search Engine Optimization audit, assuming concerning natural speech patterns. You can do an easy search in Google for your organisation name and also words evaluations” to start putting together a list of those websites that rank very for your brand and also attribute evaluations from your customers. When picking a Search Engine Optimization device, it is necessary to recognize how it accumulates and also assesses the information so you have a complete photo of exactly what your final numbers truly represent.
https://www.seoti.net
Fabulous blog. Very well described this informative post by the author. Thanks.
Fabulous blog. Very well described this informative post by the author. Thanks.
Fix your technical problem with Fixingblog. We are also providing help for Belkin range.If you have any problem With Router, Range Extender, Antivirus etc.
Thanks for sharing this marvelous post. I m very pleased to read this article.Belkin setup
Before you plan to install antivirus software on your device, you are required to take
few important steps to avoid software conflicts with the previously installed versions. please visit
norton activation code
you can find more topics there.We love to help you.
Thanks for helping us by providing unique things,that is somewhere helping us in our life.
If you stuck with pogo issues.
Fix that with pogo customer support.
It just for you and your product safty.
This site is just awesome. I’ve looked these details a
long time and I realised that is professional, fast to understand.
I congratulate you because of this article that I am going to tell to prospects around.
I request you to recommend the gpa-calculator.co
page where each university student or learner can find ratings gpa rating.
Success!
Informative Article. Thanks for helping us to make Monster Fleece Blankets. Hotmail Sign Up Login
Thanks for sharing Monster Fleece Lovey Blankets. Such a Great. Blue Dart Tracking
hey Sarah,
Really nice post. Thanks for sharing Monster Fleece Lovey Blankets. instagram profile viewer
Have you ever heard the Kroger customer satisfaction survey? This program issued by considerable America’s retailing company named Kroger comes with an objective to interact the customers closer and ultimately lets the shopping place you swing by more convenient.
Thanks for sharing this info is really appreciable sapna Vyas patel
These viruses and malwares not only disrupt the normal functioning of the computer programs but also lead to data loss in worst case scenarios. Therefore in order to safeguard your system from such security threats, Norton anti-virus software installation is necessary.
http://nortonsetup.ca
Microsoft office setup is the main way to get the software because to use the software first it is important to install the setup. So, today I am going to discuss about the Microsoft office setup, what Microsoft office setup really is and how it works.
http://officesetup.ca
Norton Antivirus is extremely simple to use, and it is an advanced Antivirus for your Windows System to install. Norton antivirus is trusted for everybody. Norton AntiVirus is quite a heavy anti-virus solution for Macs but if you’re able to deal with the sluggishness, its worth a go.
http://nortoncomnorton.com
MS Excel gives you the power to create spreadsheets and it keeps all your recorded on your system and you can use it anytime later when needed. The Microsoft Word may be used to write professional letters, blogs, and other documentation related work and allows you to preview your work before the final submission.
http://officecom.org
This is the place where we as a tech support team expertise. We provide technical support to users facing technical issues while installation. Tried all process and still not able to install, make a call at +1-855-241-6704. We’ll help you throughout the process. Our technical support team are experts and will guide you step-by-step and will make sure that the installation is complete and the user is provided with enough knowledge for future.
http://www.nortoncom.org
Great article and amazing content.
Lovely blankets! Check out the new variety of hundreds of blankets online at our online price comparison and deals website: http://www.phoneretailers.co.uk.
Many Thanks,
Phone Retailers
Are you dealing with belkin router problems? check out this article and follow the instructions to fix the problem.
BT Mail – Login, Sign up, Sign in, Reset Password etc using BT ID or BT Email. Log in to BT Yahoo Mail or BT Sign in at BT UK Account. BT Mail at BT email address with domain “@btinternet.com”.
BT Mail
Telstra Webmail – Telstra Login using Telstra ID & Access Telstra My Account. Also, use Bigpond Webmail using Bigpond Login. TELSTRA 24×7 – MY ACCOUNT
Telstra Webmail
Roadrunner Email – TWC Email Login at RR.com or rr com. Roadrunner Webmail Access by Roadrunner Login, Sign in, Sign up etc. Time Warner Email or RR Mail Login Today by using TWC ID.
Roadrunner Email
Bell Mail – Bell Email Login, Sign in, Sign up, Bell Password Reset etc at Bell Webmail. Sympatico Bell Login Access using Bell ID and Password.
Bell Mail
nice ingo gr8 content helpgul
Thanks for sharing this marvelous post. I m very pleased to read this article.
very Descriptive Article. And well Formatted.
Select all appropriate answers relating to the services that you received during your visit. If there are any personal comments, the customer can add few lines about the same in the particular section. Finally, the management will cross check & look upon the answers to make Kroger Stores the best choice for the customers.
https://topfeedbacktips.yolasite.com/
Are you dealing with belkin range extender problems? check out this article and follow the instructions to fix the problem.
Thanks for sharing such a nice article…I loved to read this…such an amazing work…
Roku.com/link – Roku is an American company, which first introduced the streaming for the TV. The company created Roku Streaming Media players as well as Roku TV with built-in streaming experiences. Roku devices are very easy to setup and work over the internet. In order to setup and activate your Roku device, you need to have a Roku account. The Roku account can be created by visiting the link roku.com/link online.
Trumendos work really inspired form it because it was actually extraordinary.
This Topic is really Nice and informative so there is no doubt . I found this one really fascinating and it should go into my collection. I am very thankful for this . Keep it up.
Install Office Setup – Sign-in to you microsoft account and then Enter 25 digit alphanumeric office setup product key on country and language.click on next to start office installation.We are the best Office Setup in US, Canada and Australia. At Office Setup, we put high effort, moderate IT answers for organization’s, and people.Whether set up or beginning, equipment or programming, system or electronic, we have something for each financial plan. officeplus.net is the exchanging name of Spacesolutions Pvt Ltd situated in California, USA. We are not Microsoft. However we are trained professionals to provide technical support for We are the world’s biggest innovation wholesaler and a main innovation deals, showcasing and logistics organization for the IT business around the world. Our people group based ethos, focused costs and nature of administration settles on Office Setup the right decision for your IT needs .Whether you are a learner or experienced in IT our courses are altered to furnish you with the key achievement criteria to thrive in future attempts.
http://www.office.com/setup
Thank you so much for giving pieces of information. POGO online gaming is a perfect platform to make your dream come true. In case if you forget your Pogo account password or are you not able to recover pogo Account. visit here:
Webroot.com/safe – Activate Your Webroot Com Safe on your
laptop, PC, Smartphone etc & secure your devices. Let’s Get Started
with Webroot Safe at http://www.Webroot.com/safe & Activate Webroot Safe.
Hello there, You have done a fantastic job. I’ll certainly digg it
and personally recommend to my friends. I’m sure they’ll be benefited from this web site.
http://kohlscreditcard-login.us/
nice. very lovey
Need a job or want to start a business? Start by Mobile Training Course in Delhi. Join ABC Mobile Institute of Technology, which is giving you the opportunity to learn everything in this field. We trained students on practical basis and ABCMIT India’s No.1 Mobile/LED LCD repairing Institute. Free Demo class available. Contact us at 9990879879
Nice Post But more importantly I think that hard work is making your blog more awesome, wonderful Blog. Keep this Blog Up.
Hey, we donating free cars for students, veterans, Single moms, cars for a poor person. if you want a free car than contact usFree cars
Kroger is one of the best retailing companies in the US. However, people looking for its gift cards to get the products. So what you have to do is take part in the customer satisfaction survey and share your views about the company.
Thanks for this Lovely Post.I like your all posts.
HP Printer Offline Support 1-844-669-3399 USA. Getting Problem with your HP Printer it show offline issue. We are Here to help you any type of troubleshooting HP printer offline problem. Our Technical team 24*7 Ready to fix your HP, Epson,Brother,Canon,Lexmark,Xerox Printers offline problems.
Hotmail Login is a simple task, if you follow this steps you can sign in Hotmail easy … Open your favorite web browser and in the address bar, type http://www.hotmail.com.
When you deal with belkin router problems? It can be due to the several reasons such as cable connection or other problem. but you can fix them easily by visiting askprob community.
all you need to do, visit askprob community and follow the instructions to fix the problem.
http://www.askprob.com/forums/topic/why-my-belkin-router-is-blinking-orange-and-blue-no-internet/
Install Office Setup – Sign-in to you microsoft account and then Enter 25 digit alphanumeric office setup product key on country and language.click on next to start office installation.We are the best Office Setup in US, Canada and Australia.
Very nice..
Also read Tony Robbins Quotes On Leadership!
Very nice concept
Thanks for sharing this fleece with us
This monster fleece is really nice
Monster Fleece blankets is awesome. Blog design is also awesome! Thanks for sharing with us!
Plus Printers is all set to give you the best custom soap boxes in the market of the United States of America! You will get everything under one roof!
Very Helpfull blog thanks for sharing. if you are confronting any type of issues regarding Mcafee Antivirus then in that situation, Visit : https://www.customershelpme.com/mcafee-customer-support-number/
My idea of taking part in these competitions is not exactly being the winner. There is an experience factor you acquire from these competitions that will be so valuable in writing books. That is the main concern of mine.
OK thanks for sharing this opportunity..
Nice one! thank you so much! Thank you for sharing this post. Your blog posts are more interesting and impressive.
Learn here how to download, install, and activate your Norton setup on your computer and other devices
This is a great inspiring article.I am pretty much pleased with your good work.You put really very helpful information.
Thanks for the article.
We are an independent company who providing technical support for for Norton products.If you are Facing problems your Norton products or having any issues during the work do call us and our company will fix your problem and you need any suggestion regarding any Norton product feel-free to call us on our toll-free numbers for further information.
It includes applications, reminders, notepads and an MP3 or MP4. So, it is more of a choice than a trend. Smart Watches in Pakistan are not that common and people are still unaware of many features to look up before purchasing a smart watch.
Permainan judi togel adalah permainan judi yang sangat populer di dunia, karena judi togel terbilang sangatlah menguntungkan bagi sebagian besar orang. Anda bisa mendapatkan keuntungan yang banyak dengan mudah tanpa harus membuang banyak waktu, serta anda juga pastinya akan mendapatkan banyak bonus dalam bermain judi togel online.
Untuk informasi cara bermain togel menang hingga ratusan juta rupiah, tips dan trik jitu dalam bermain togel. anda bisa klik link yang ada di bawah ini untuk melihatnya
cara main togel supaya menang terus
McAfee.com/activate – Visit the website in order to Get Started with the McAfee Activation or you may also contact us anytime at our Toll-free number to get help for McAfee Activate or Install.
Norton.com/setup – Setup your Norton subscription now with the help of this link. Let’s get started with your Norton Security today so just Activate Norton Subscription to enjoy the services.
McAfee.com/activate may be used in order to Activate McAfee Security. You may easily use the McAfee by going to the link and enter the 25 digit product key.
McAfee.com/Activate – McAfee Antivirus one of the popular Antivirus and Security System around the Globe. It helps many users to provide protection from the virus, trojan, spyware, and many similar threats. Ig you want to get started with McAfee then you have to go through the steps to McAfee.com/Activate. Secure your PC, Laptop, Tablet, and Smartphones with McAfee Antivirus and follow these to McAfee.com/Activate on your respective device.
Norton Setup – As the computer is one of the basic and daily need for many around the globe. People spend and share most of their life on the social media. To ensure the safety, the Norton has designed their security application which is continuously updated with technology. In addition, they have developed many different products for a wide spectrum of users. Furthermore, you can also subscribe to various PC optimize and Mobile Security application as one of the Norton Product.
norton.com/setup allows you to download and install the Norton Antivirus setup online on your device. You can manage your Norton product subscription and renewal from your Norton account. Norton provides you a Norton Utility tool to analyze and optimize your computer. Norton utility is a free tool which can be downloaded from the manufacturer website. It increased the boot speed and optimize the overall performance of the system.
Webroot.com/safe – Activate Your Webroot Com Safe on your laptop, PC, Smartphone etc & secure your devices. Let’s Get Started with Webroot Safe at Webroot.com/safe & Activate Webroot Safe.
norton.com/setup – In today’s world everything is online or in digital form which also has increased the risk of Viruses, Trojans, scams, data and identity theft, and Norton provides protection to your digital life from viruses and malware in a fraction of seconds. The Norton Product is better than any other anti-viruses as it monitors antimalware.
Well posted!! Loved it !!!
Very Nice article. I loved it.
Great article about new kind of things with wool and Embroidery
If your computer has been slowed down, it has been compromised. Attackers and cybercriminals are systems for exploit. Security device, then your device is very susceptible to cyber attacks. If you’re getting norton.
It’s extremely pleasant and meaningful. it’s an extremely cool blog. Connecting is exceptionally valuable thing. you have truly helped bunches of individuals who visit the blog and give them useful tips.
we will be notified to soon………..
Before Commenting, I wanna say thank you for providing this great information. I feel too good to read it this awesome blog. Keep sharing this type of content.
we are get limit sdource around the worlds…
http://www.norton.com/setup gives support for setup of Norton Security Products. Norton products are sold in the form of retail cards which help in an easy setup of the security product through the internet instead of setup with the help of a CD. If Norton detects any virus or worm, it immediately alerts the user and blocks/isolates the said virus.
Norton.com/nu16 – Information about download, install & activate norton nu16. If you face any error or issue while installing the Norton NU16 then you connect to the Norton Customer Service.
Thanks for writing such a good article, I stumbled onto your blog and read a few post
looking at a few of the articles I realized it’s new to me. Anyhow, I’m definitely delighted I stumbled upon it and I’ll be book-marking it and checking back often!
Download norton
here is a complete guide of norton antivirus.
Here is the complete guide for aol email problems?
fix aol email login problems 2019
Hello,
My pal illuminates me concerning this weblog. There is lots of appropriate information on this weblog, I cherished knowledge it and I parent humans gets a large amount of help from this blog. I substantially find it irresistible capabilities from this additionally. I accept as true with you like this weblog. I consider procuring a massive quantity of assist from this blog.
nice keep posting
download norton
Norton.com/setup
I really happy found this website eventually. Really informative and inoperative, Thanks for the post and effort! Please keep sharing more such blog. norton.com/setup
Very informative post, your post unique. Thanks for sharing.
It will always ask for the user’s permission to allow that particular file or data before entering.
nice post keep posting.
download norton
I really happy found this website eventually. Really informative and inoperative, Thanks for the post and effort! Please keep sharing more such blog.
Thanks for sharing this information with us. This is a very informative and useful article. I really appreciate your work.
Awesome content.
Really very helpful, i will ready continually
Norton.com/Setup – Norton is a well-known name offering a variety of security services to their users.It has marked its name in the market of personal as well as business security.
Awesome content.
Really Very Grateful!
Deals of the Day: Netrock deals offers today huge savings & discounts! Great online shopping offers at Netrock deals. Unbox New Offers & Deals Every Single Day. Check TODAY’S deal now!
Visit: https://netrockdeals.com/deals/
Update yourself every time get latest Sports News, Cricket News, Tennis News, Football News, tennis news detailed analysis on trending Sports topics, and match previews, reviews etc.
Visit: http://feedsbox.com/sports/
Seomasti provide best submission site's, high authority site, director, bookmarking, classified posting, article and many more.
visit:https://www.seomasti.com/
Custom Boxes UK presents brilliant and extraordinary packaging arrangements in
spite of the fact that these packaging boxes UK are available for customers with countless customization alternatives.
Visit: http://customboxeworld.co.uk
Thanks
custom cigarette box
Norton.com/setup – Now Install Norton Setup at http://www.nortoncomsetup.fr/. Just Enter Norton Setup Product Key Here at Norton.com/setup and Get Started Now
Latest news today, Breaking news, India news, world news, Bollywood, cricket, live cricket score, football news, world cup news, videos, photos, opinion, politics, cars, news today from Feeds Box
The Custom boxes is One-stop shop for custom printed boxes and custom boxes packaging wholesale that fit to your budget.
Savaliya Oil Maker Machine for Home Usage. This Product is Easy to Use and it produces health oil for your family. There are also some other products of savaliya industry, like coconut oil maker machine, peanut oil maker machine, sesame oil maker machine.
I wish to say that this article is an amazing, interesting and nice written. Thanks for sharing this article with us and I would like to look more posts like this.
Thanks for sharing this information with us. This is a very informative and useful article. I really appreciate your work.
Are you searching for 10ml bottle boxes? you’re on the right place to induce top of the range custom printed 10 bottle boxes. Custom Packaging Co. is giving you bulk
cardboard boxes from the last ten years.
I wish to say that this article is an amazing, interesting and nice written. Thanks for sharing this article
thank you for this article keep it up i like your article i love to read.
Nice Post. Thanks for sharing. this blog post is very important & effective.
Norton.com/Setup – Norton is a well-known name offering a variety of security services to their users.
It has marked its name in the market of personal as well as business security.
Trueline Solution is one of The Best IT Company in Surat, Gujarat, and India. We are leading seo service provider in surat.
Nice Post. Thanks for sharing. this blog post is very important & effective.
Absolutely loved your blog! it gave a broad understanding of how the monster blankets are handled and fully explained its specialized fields. Designs were great. keep up the good work.
custom product boxes
Look at accessories based on brands and value, compare them and get the best one for you , nomoremrp provide you the complete solution of comparison See all relevant information, technical specifications of compared accessories , T.V sets, Laptops and many more.
Visit: https://nomoremrp.com/
Laxmi pipe industries is leading Steel Pipe Manufacturer In India. we manufacture and supply various shape pipes like eye shape, grooved pipes etc.
I am amazed by the way you have explained things in this article. This article is quite interesting and I am looking forward to reading more of your posts. Thanks for sharing this article with us.
Very Nice article! i love to share this instructions.
Awesome Article! I love it.
Thanks for sharing the information with us, it was very informative.
Really Nice Post! Thanks for Sharing this this amazing post its really helpful. Really informative no doubt about it.
I am amazed by the way you have explained things in this article. This article is quite interesting and I am looking forward to reading more of your posts. Thanks for sharing this article with us.
Norton antivirus is designed to detect and eliminate the possible threats for a system like worms, Trojan and other viruses and can perform multiple application scan.
McAfee antivirus is one of the most used and trusted antivirus in the world today. It serves you the best security services which helps to secure system and networks.
Digitization is covering the technical as well as the non-technical dimensions of our lifestyle. With the enhancement of technology, new challenges are also coming in front of the cyber world.
Its technique of using signature and heuristics to identify viruses makes it one of a kind and a better security provider for your PC.
Nice one! thank you so much! Thank you for sharing this post. Your blog posts are more interesting and impressive.
Really Nice Post! Thanks for sharing this amazing post its really helpful.
Awesome Post. I really like to this blog.
So lovely…
nice content and very good collection of blankets. kids will love some of them blankets.
Omega Gro: By providing moisture and hydration OmegaGro DHT reduces the risk of split ends. Proper hydration gives strength to the hair to prevent from fraying and splitting and repairs split ends. Omega Gro Reviews Increases the volume and nutrients delivered to the follicle so that hair shaft could become strong and minimizes the risk of hair breakage in today’s environment. http://www.garciniamarket.com/omega-gro-dht/
Awesome Post. I really like to this blog.
McAfee Antivirus is one of the most critically acclaimed security program across the globe. Protect your devices and data from viruses, malware, Trojan horses, worms, and other cyber threats with real-time protection and threat scanning
Really Nice Post! Thanks for Sharing this this amazing post its really helpful. Really informative no doubt about it.
Thanks for giving this away. This is very neat.
Hola ! For Intro my name is Karina Salim you can call me Karin, I lived in Indonesia. Get The Gaming Support You Want With These Video Game In My Site. Please Check in http://betyoursportsonline.com/agen-judi-bola-sbobet-resmi-indonesia/
See how to set up your email account and fix issues with email access. Also easily reset your password or get a username reminder online.
BT Email is the optional free email service that comes with BT Broadband. When you register for BT Broadband we’ll ask if you’d like a BT Email address to use.
Omegagro Hair: Your competitor hats, bandannas or headbands also can induction a few pimples breakouts in your forehead. Process. Omegagro Hair ReviewsUse them in an hereafter consideration, the bacteria that had been assembled by means of the hat’s hassle that touches OmegaGro DHT pare can initiation zits pimples on the forehead. https://www.ketodietoffers.com/omegagro-dht-hair/
Nice one! This post is amazing and very important. Thanks for sharing.
After you redeem the card, you can download and install your office setup software and activate your subscription. Open a web browser and go to the link shown on your retail card i.e. , Enter the activation code from your retail card.
I have read your article; it is very informative and helpful for me. I admire the valuable information you offer in your articles. Thanks for posting it.
Download free virus protection for Windows PC. Avast offers modern antivirus for today’s complex threats. Fast, simple, and 100% free. Try it today!
Really your article is very helpful for me I think this is an informative post and it is very useful and knowledgeable. therefore, I would like to thank you for the efforts you have made in writing this article.
This is also a very good post which I really enjoyed reading. This is just the information I am finding everywhere. Thanks for your blog, I just subscribe your blog. This is a nice blog. and Thank you For Sharing…
The superbly written article, if only all bloggers offered the same content as you, the internet would be a far better place. and thank you for sharing for the amazing article…
Great Information sharing .. I am very happy to read this article .. thanks for giving us go through info. Fantastic nice. I appreciate this post. and thank you for sharing an amazing article…
Really Nice Post! Thanks for Sharing this this amazing post its really helpful. Really informative no doubt about it.
Mcafee.com/activate – Facing problems with Mcafee activate products? Get the best instant solution for purchasing, downloading, installing and activating McAfee key code. just visit http://www.mcafee.com/activate and follow steps by steps. if you are stuck in activation Mcafee, then call our McAfee support number. we will instantly help you. our technicians are experienced and certified.
Thank you for sharing an interesting and very useful article.
And let me share an article about health here I believe this is useful. Thank you 🙂
Custom Boxes
Good way of telling, and pleasant paragraph to take data
regarding my presentation topic, which i am going to present in university.
Nice one! This post is amazing and very important. Thanks for sharing.
its nice grate site and i have learned good information about gbkala
webroot.com/safe offer complete protection of sensitive files across all your devices that include all kinds of IOS devices, OS devices as well as Android devices.
AVG Retail Registration& card installation at http://www.avg.com/retail. Activate AVG in two steps: 1. Enter your activation code and 2. Create your AVG MyAccount
Follow these steps to login to your Belkin router we provide the all information to access you Belkin web interface for configuration. For more details so speak to our experts Team
Visit us- https://routerfixiya.com/belkin-router-login/
Are you looking for painting services in Melbourne, Victoria, Australia? Get in touch with our experienced and friendly painter Melbourne now. We serve customers locally and across Melbourne.
Download free virus protection for Windows PC. Avast offers modern antivirus for today’s complex threats. Fast, simple, and 100% free. Try it today!
0000
Printer Customer Support US executives are available 24*7 for the help of the experts related to Epson Printer Support. Feel Free to Visit: https://printercustomersupportus.com/epson-printer-support/
Visit Website Viagra free samples of viagra or cialis
This article has been really helpful for me. Thanks for sharing. Incredimail error 1232 is a kind of technical issue and users are not able to overcome it. Visit our website for detailed solutions.
This is just the information that I needed.Thanks for sharing it with us. Incredimail 2.5 keeps Crashing Issue is a problem that affects the system as well as the software. Visit our website to solve this issue.
AVG Retail Registration& card installation at http://www.avg.com/retail. Activate AVG in two steps: 1. Enter your activation code and 2. Create your AVG MyAccount.
We meet the industry with our fast and short lead time, You can find all the Custom Boxes & Custom Packaging Solutions.
Thanks for Sharing this this amazing post its really helpful. Really informative no doubt about it.
We provide top quality https://custompackagingco.co.uk. to customers along with the customization in any size, style or color. The elegance and quality of our boxes are unbeatable, thus making it perfect to pack the grocery products.
i like your work thanks for sharing such a informative work well dne
Health Hope is a comprehensive presentation of health and diseases & support researchers across the world
A common problem which you may often face is regarding errors in the activation of your McAfee product.
Packin is providing you high-Quality Custom Packaging Boxes with free design support & free shipping Worldwide
Packin is providing you high-Quality Brilliant Packaging Suppliers UK with free design support & free shipping Worldwide
Packin is providing you high-Quality Custom Boxes with free design support & free shipping Worldwide
One copy of Windows was installed on multiple PCs McAfee Software License Terms specify a certain number of devices (PCs) on which a single copy of McAfee may be installed. Perhaps, your product key is being used on multiple devices (PCs). Under such circumstances, you are likely to face McAfee Activation Errors.
Now a day, there are so many brands of antivirus available in the market. You have to choose a strong and updated one which gives you full protection with a wide range of virus, male wares, ransom wares, Trojans coverage. You can choose an antivirus like McAfee which also gives you new threat detection technology with a super fast scanning process. It also offers personal firewall security. By analyzing the malicious websites and links, this antivirus also keeps it updated automatically with all of the new attack’s definitions.
Thanks for Sharing this amazing post
BBC Cargo Shipping Services had started its operations in Dubai, established by the experienced emarati management who have a great experience in freights fields.
If you are looking for custom tags printing company, you are at the right place to get wholesale custom cardboard tags. Custom hangtag can stand out your product when you placed on your products.
thanks for sharing this information with us
https://www.manishafashion.com/how-to-lose-weight-in-one-month/how-to-lose-weight-in-one-month-manishafashion-com/
Get instant help using by gps help number. our team members are experts and they gives excellent services to the users.
We performed/manufactured custom boxes with logo order across the USA, custom packaging boxes UK and AUS different client purposes of custom product boxes.
Penipro is the best Ayuevedic sex power capsule & penis enlargement pills which help you to boost your libido.Now boost your sexual stamina and increase penis size with Penipro pure ayurvedic penis enlargement capsule in natural way without any side effect. Easily gain 2-3 inches to your penis and make it hard and strong with increased thickness. One Stop solution for all your sexual problems is Penipro ayurvedic medicine for increasing penis size.
Do you want to increase your router strength then mist read this
http://belkin.range
thanks for sharing your idea!! nice post
great work
The Custom Retail Boxes are aiding the top cosmetic brands to endorse their beauty and skin care range effectually.
I Found the write place after lot of search on google i am in write place where i can get an informative thing. Thank you for posting
this amazing post and trick and keep continue writing these amazing tricky informative blog. y-zee.co.uk
very nice post
http://www.manishafashion.com/make-up-artist-in-hari-nagar/make-up-artist-in-hari-nagar/
Thank you for sharing this article. I really love it. Please keep sharing this article.
Thanks for showing that kind of knowledge on your portal. I appreciate your efforts and way of explaining things. You have done all good. You can do better than before. I learned a lot from this webpage. I love to see you again with some new content
Outstanding post, I think blog owners should larn a lot from this website its rattling user friendly . index
You completed a few good points there. I did a search on the matter and found nearly all folks will go along with with your blog. i loved this
oui mais non. Assur�ment car il est probable qu�on d�termine de nouvelles causes qui certainement se r�f�rent de semblables chiffres. Non en effet il n�est pas suffisant d�imiter ce qu�on est en mesure de rencontrer chez certains articles autres puis le transposer tant simplement. their explanation
I want assembling utile information , this post has got me even more info! . find
Nice post. I discover something more difficult on different blogs everyday. It will always be stimulating to learn to read content from other writers and use something from their website. I�d would prefer to use some while using content in my small blog whether or not you don�t mind. Natually I�ll provide a link in your web blog. Thanks for sharing. like it
I your writing style truly enjoying this internet site . click over here now
i can�t believe this critically nicely played. ��fire! fireplace!�\” ��hopefully your current water will bust soon! put that will out there!�\” hahahahahah. her response
paybacks a bitch ! mark my words all you are gunna get it..|Nishaa_yeup| go to my blog
I have been absent for some time, but now I remember why I used to love this website. Thank you, I will try and check back more frequently. How frequently you update your website? this contact form
Me English no excellent, but had to say me like what you say. Thank you from me. see this
we always keep track of our family tree because it is exciting to know the family tree-
It�s difficult to find knowledgeable people about this topic, however you could be seen as what happens you are dealing with! Thanks click for more
Im no pro, but I believe you just crafted an excellent point. You clearly know what youre talking about, and I can really get behind that. Thanks for being so upfront and so sincere. special info
Awsome and wonderful to see that you guys are helping needy people to get the Free Cars
. free cars are really a great way to live life easily the single mother who is suffering with transportation issue this is really gonna help him
Always helpful to get fake urine or passing in drug test by using synthetic urine which is helping people to get Real Human Urine Which is not real but a fake urine called powdered urine
Thanks for showing that kind of knowledge on your portal. I appreciate your efforts and way of explaining things. You have done all good. You can do better than before. I learned a lot from this webpage. I love to see you again with some new content
Hi, I have read your blog and this really good. I am gonna bookmark it. Looking forward for the next article. I am also a blogger, Please read my blog: Dell Printer Setup
To get best ever Cosmetic Boxes in term to increase your sales, cosmetic boxes packaging provide you at reasonable rates.
I really happy found this website eventually. Really informative and inoperative, Thanks for the post and effort! Please keep sharing more such blog.
you can find out more canadian pharmacy vikky viagra commercial girls
Alongside innovativeness in the structure of the boxes, Custom Packaging Boxes can likewise be printed with various choices of decorating and styling thoughts to make these boxes.
Happy to see this article. I’ll try to make it.
Winter is coming! And i really want that blanket… Looks perfect for perfect bedroom! I’m gonna buy it. Thankyou so much for sharing this.
You can contact Bittrex tech support representatives via phone call or live chat. They are available 24*7 for the convenience of users.
Themetrap is a beautiful theme maker.Themetrap make with all the feature to maker your website successful.
A very creative way you have used to explain your topic. The structure & the content is explaining your point clearly & easily. such kind of writing makes it easy to understand.
McAfee Virus Scan helps to protects devices from home and home-office; McAfee Virus Scan Enterprise is introduced for corporate, household and gaming environments. Mcafee Total Protection: The antivirus product path for most security software suite manufacturer is like a set of Russian sayings nesting matryoshka dolls. Mcafee Total protection security product completely contains all advanced features of antivirus software; the extra-large mega-suite has all necessary features of the complete product, and carry forward. Antivirus software McAfee Total Protection was a typical and advanced mega-suite, with all unique features, qualities of the entry-level software suite and more.
Like most of the antivirus products in this level, McAfee’s livesafe is appropriate for advanced users who can make wise decisions about programs accessing the Web Internet, since it provides very limited advice and directions. Mcafee Internet Security product has a useful quick tour wizard that guides you through configuration and installation. Oddly, the personal firewall system settings are disabled by default, and some mcafee users may unknowingly leave their systems unsecured and unprotected.
McAfee’s internet security offers multiple protection stages. By default settings, it challenges every software application and files on the run. This can become annoying, time consuming: Mcafee Internet security alert messages and suggestions aren’t especially informative. In addition, we are concerned about some of the default actions it chooses. For keeping your computer safe and secure you need to have McAfee software in your PC, this you can download from mcafee.com/activate. You can avail this software from the McAfee official website, sign in with your details or create an account if you don’t have. There you will get some free trial, paid and unpaid subscriptions, you can choose according to your application of use. If you are going to download the paid version, you need to have the product key.
Janmashtami 2019 Date & Time – Significance, Celebrations, Muhurat and Janmashtami Kab Hai
There is no limit to the world of online movie streaming and video browsing. There are various other websites like Solarmovie too which has not been mentioned here but are great Solarmovie alternatives.
Norton is a part of Norton subscription that helps us to deploy Norton security on home internet devices to protect our loved ones from malicious websites, infected files and viruses. As far as online threats are concerned, Norton antivirus products and internet security always stood their ground like an impenetrable wall to prevent authorized access. They thwart any attempt of cyber infiltration in our digital life. If cybercriminals are modern day thieves, then Norton antivirus is the force to be reckoned with like a sentry guard who keeps vigilance on our daily online activities. They protect our rights to access free source of information via internet and ensure a safe environment for all of us to surf, chat, shop and socialize.
Norton Security is the latest computer software security suite developed by Symantec. It works on MS Windows, Mac OS X, Android, and iOS platforms. It’s available in three editions, as Norton Security Standard, Norton Security Deluxe, and Norton Security Premium. Norton Security Standard protects 1 (one) device only. Norton Security Deluxe is good for up to 5 devices, while Norton Security Premium includes protection for up to 10 devices. More about comparing the three security software packages can be found at our Norton Security Editions Compared page.
MS Office software can be used in any device whether it is a Window, Mac, iPhone, Android that is why it is called a universal application. The billions of the people use the Microsoft Office software and it is used for both the business and personal use. The users can use Microsoft Office applications at whatever time when they need it. The users can keep a record of their accounts or examine the stored business information.
HP Printer Assistant is a Windows-based software program is usually installed in most of the system for the HP printers. HP Printer Assistant for Windows 10 can help you in the execution of different printer related tasks such as scanning, printing, checking ink levels, ordering supplies and much more. The software also launches the printer setup and software in the Windows when you require to connect the printer with computer. So, download HP Printer Assistant windows 10 and improve the functionality of your printer.
Email customer support number has become an essential contact for every user these days. As a part of our daily lives, whether professional or personal, emailing plays a major role. Even a slight problem can affect the email account. Any loophole in email privacy may risk your data and exchanged email. To understand the importance.Read more about Email customer support number
HP is one of the finest manufacturers of operating systems such as laptops, printers, drivers and software. Hp products are known for their quality, but apart from delivering the qualitative products, HP is also known for its services. HP allows you to download hp support assistant in order to solve the problems occurring at the time of installing the product. For the HP printers, HP provides you the hp printer assistant, in case you encounter any issue with your HP printer. Before you proceed to the downloading steps, you should understand what actually HP Printer assistant is.
BT Mail – Now you may do My BT Login or Btinternet Sign in to Manage BT Account and Access all the features including Compose Mail, etc.
Magellan Roadmate Update – Magellan Roadmate will Update Maps and Software directly on the Magellan Device. Get Your Magellan Maps Updated Here.
mail.aol.com – Now Login to Your AOL Mail and Manage Emails. You may also do AOL Mail Login, Create AOL Account, AOL Password Reset etc.
What a great idea! They are adorable!!
Very nice style and amazing article.
A very creative way you have used to explain your topic. The structure & the content is explaining your point clearly & easily. such kind of writing makes it easy to understand.
Thank you for the post. your article is really very informative.
Code::Blocks is Associate in Nursing IDE packed choked with all the options you may would like. it’s a standardized look, feel and operation across its supported platforms.
We are providing full services about Car Repairing, Denting, Painting, Electrical , Mechanical, and full Car Insurance services in United Arab Emirates.
Amazing!!
Agen situs togel online yang terbaik dan terpercaya di Indonesia
thankswork motivational quotes
thanksstudent motivational quotes
thanksProfession motivation quotes
vvvvvvvvvvvvvvvvvvvvvvvvvvvvvvvvvvvvvvvvvvvvv
thanksattitude motivational quotes
Driver Easy Key is regarded as a tool that immediately detects, installs and repair driver challenges on your own personal computer. When finished, the outcome is definitely a greater PC that could
Now you can get Norton antivirus. You can either get your free trial at norton product key or reach you out to our experts at Norton customer service. So get started.if you need call toll free number +1-888-845-6052.
hanya dengan 10rbu rupiah bisa dapat jutaan rupiah, ga percaya? daftarkan diri kalian sekarang dan raih hadiah nya!!
Thanks Love motivational quotes
Get all of these by easily just on a single click.
Wow Amazing post keep it up and share like this amazing content.
ThanksBreakup motivational quotes
Rand McNally Update – Now Download the Software and do Rand McNally Update in order to Enjoy the Latest GPS Maps. Visit randmcnally.com/dock and Update Now.
Roadrunner Email or simply RR email is one of the most simplified and highly versatile web-based messaging services available in the market. It is among the most top-rated service provided by a well-reputed ISP (Internet Service Provider) by the name Time Warner Cable.
TomTom is a multinational developer & creator of navigation technology and consumer electronics. TomTom has a vast range of devices for navigation and electronics and this also needs regular updations. Here we are talking about updating your TomTom navigation device.
An alternative way to resolve your customer service issues within this site is visiting date match help page. Using the help-page to tell your particular issue will help you get to the right assistance faster.
You have written in your content that is absolutely right and any one can easily understand but we are also providing you hp Printer support to you and solve all your issues of like hp printer showing offline .
for more information visit our website.
Wow! it’s a Very Nice Blog, thank you for writing such a beautiful blog, i really loved it just the way i like this one.
What is Turbotax? On earning a specific amount of income, it becomes mandatory to file a tax return by every individual and businesses. Turbotax simplifies the process of filing the tax return, by providing its users with various tax forms and proper assistance for tax filling. Along with this, Turbotax automatically calculates the tax obligation
What is Norton? Norton is an anti-virus and anti-malware software which offers various products related to digital security. It is an industry-leading software which is reputed for its real-time protection and various comprehensive features. It helps in securing your device with ultimate protection from existing and emerging security risks. For utmost protection, Norton uses six
What is MS office? Microsoft office provides a complete package of various applications that are used by businesses, educational institutions and homes. It comprises a large number of products for various purposes. It includes Microsoft Office, Excel, Powerpoint that is used to create spreadsheets, make labels and produce presentations for your home or office.
Printer drivers permit simple correspondence between your framework and printer. To let your framework and printer convey blunder free you should have the most recent printer drivers introduced on your framework. For questions like download Epson printer drivers and introduce your Epson printer drivers, you can, whenever you can contact Epson Printer Support and converse with our professional.
MyDrive Connect is an advanced state of the art software application that aims to enhance the user experience for its satellite navigation products. It facilitates a connection between your desktop and your navigation device. This tool is primarily used for installation and updates of software, maps, etc. on your device.
BT Mail is the most productive and secure emailing service that comes bundled with BT Broadband. It is an optional complimentary service that can be retained even after discontinuing the internet connection.
A well written Content provided by you. Your writing skills are perfect. i hope so you will write more content like this but if you are facing problem in McAfee.com/myaccount then contact us or visit our website.
very nice self inspirational quotes -motivation456
I am very happy to get this post online.
Interesting Things.
Notes next door gives you good exam notes for your bright future.
Garmin map updates are advanced automatic technology to find the particular direction and the user easily reaches to their destination.
very nice fitness quotes for women-motivation456
very nice motivational quotes in hindi for success -motivation456
It supplies PHP CS Fixer support. PhpStorm 2019.1 became possible to fix code design problems. PhpStorm extends a settings page to place up to them and will auto-detect custom rulesets.
You can now set up to multiple servers at once. Insert as many classes as you wish to have a random number of destinations in each group.
KOJNt
Serato DJ Crack has a practice mode in which the actual magic takes place. Here, the mixes and tunes have tested on two big decks with a brilliant interface.
Serato DJ Pro Crack
This software uncovers the sites by hiding your IP address automatically. This software is top-rated all around the world because of its privacy protection and fast speed. No one can check your web history because of its security and protection. Shield your system from the third party.
NordVPN Crack
All type of mac windows software here
Very niceDiwali messages
Silver singles customer care help center is excellent and helps you answer the questions asked by their customers. Though online dating is easy, you might come across things that you don’t understand from time to time. The customer car service is located at spark networks.
It also provides information and support with maintaining the printer, troubleshooting problems that may occur. Just give us a call on our Epson Printer Support number if you do not know what you are looking for or if you would like help with your problem.
Hey,
You’re doing awesome work. Keep doing it. The article was very well written and I got to learn amazing things from it.
Really appreciate your work.. Keep doing the awesome work.
Hey, I have read your blog. This is really great. I like your work. I am also a blogger. Please read my blog and let me know your feedback on the same. Brother Printer UK
Thank you for sharing this blog. I really enjoyed this blog. Here you have shared very interesting and impressive information. Your writing skills are very good. You should spread this type of information by writing blogs like this. Is there an Alexa helpline?
If you don’t have enough time to take your damaged PC or laptop to repair center then you don’t have to worry about that. Geek Online remote support will help you. Our expert technicians will take your PC on remote for service and solve your problem in a short span of time. Geek Support
Yeah, I used the first body. Unfortunately, I didn’t mention the mail. Again, I used wool and a woven cloth of size H (size) (5.0) G (4.0 MM) to pack monstrous pieces.
very nice Diwali message
But if your call gets connected, we assure you that you will get a 100% solution to your POF profile related issue.
You will never find competent choices in a range of other service providers.
Incredibly, my niece will be born in August and I have to do it! Thank you for sharing your fun project with all of us!
By following any of the above-mentioned tips, an individual can get his refund money on cancelling his POF subscription!
This software permits more flexibility for DJs and makes mixing very easy for users. Indeed, it is a powerful and great software. Especially for many who work with electronic digital music is inside our checks.
Wow! Thanks for sharing such a lavish stuff & information with us.
thank you for sharing
Good Article
Courier Service Dubai
http://www.aglcourier.com
Good Article
Door to Door Cargo
http://www.aglexpresscargo.com
Good Article
Courier Service
http://www.aglme.com
Wow, Great article I have ever read, After read your article I thought I should write my first comment here. I don,t know what to say but I really enjoy to read your blog. Thank you so much for sharing this article with us and all the best for your next blog.
Gmail has two methods for forwarding messages from AOL, which you can use either to consolidate your email or to move away from AOL entirely. Importing your mail works best when closing an AOL account, as it imports your entire mailbox and contacts, and forwards new messages for a month. Adding your AOL account to Gmail, on the other hand, sends all new AOL emails to your Gmail inbox.
Look no further, norton.com/setup and its products are easy to install and activate if you follow the guidelines given on this page very carefully.
Akses permainan judi poker online terbaik di tahun 2019 ini di situs jakartapoker, situs judi poker online ini sejak tahun 2012 melayani permainan judi poker online dengan layanan terbaik dan paling prima di bidangnya.
http://kartupokersakti.com/
Hanya dengan modal sebesar 10.000 rupiah saja, anda sudah bisa memainkan permainan judi poker online dengan kualitas internasional di situs ini. Di jamin bebas BOT dan sistem SCAM yang akan merugikan anda. Semua player judi poker online jakartapoker adalah orang asli tanpa terkecuali
Amazing post! I read this artucle it is really helpful, thakns for sharing wtih us………keep posting
Comcast has left a worldwide impression with its telecommunication services and hence, Comcast users bestow their full trust in them. . After concentrated analysis of the problem, the expert will give you an instant solution Comcast Customer Service team is famous for its problem-solving skills and readiness.
We are not only profound enough to recover emails but also passwords of such accounts. So, you must call us on our email helpline number to get rid of such tantrums.
Akses permainan judi poker online terbaik di tahun 2019 ini di situs jakartapoker, situs judi poker online ini sejak tahun 2012 melayani permainan judi poker online dengan layanan terbaik dan paling prima di bidangnya.
Hi,
I am extremely glad to express it’s an intriguing post to peruse. I take in new data from your article, you are working superbly. Keep it up.
Thank You.
Fokus kerja bukan berarti tidak bisa fokus hobi . Jika anda adalah player judi poker konvensional, mari berpindah ke situs judi poker online jakartapoker.
http://139.99.70.248/
Karena hanya di jakartapoker anda bisa bermain judi poker online dengan smartphone dan di dukung dengan keuntungan yang terbaik di bidangnya. Hanya dengan modal sebesar 10.000 rupiah saja, anda sudah bisa menikmati permainan judi poker online terbaik di Indonesia sekarang juga. Dan nikmati akses permainan judi poker online tanpa batas hanya di situs jakartapoker.
MalwareBytes Support – Just Call MalwareBytes Phone Number and Instant Support related to Errors or Issues by calling MalwareBytes Customer Service.
Thank you so much for this wonderful Post.
Hello! Thanks for sharing your detailed content, for more information visit our blog Ourtime Customer Service.
This blog is amazing its great! I appreciate that ………continue posting
If you want to have customized with any cosmetic boxes for your product, we will organize for you.
We also realize a complete customization of the design of the box. Our team will help you develop unique and flashy designs of Packaging Boxes. We develop unique designs not only for you but also provide assistance free of charge to help save costs. In addition, we ensure that the quality of The Cosmetic Boxes is high so as to protect the product against damage. In short, your preferences and needs are our priority and give us their best to complete it. We delivered the order within 3 to 5 working days.
change yahoo password thankyou so much
Roadrunner Email is a web-based email service that is accepted as the most efficient and quality service by the experts. You will get this service complimentary on purchasing the Spectrum internet connection.
Roadrunner Email
This pocket-friendly feature of Mojang Game Customer Service confirms that none of the gamers will find it difficult to experience the phenomenal assistance of this globally-acclaimed helpline. Another excellent characteristic of this technical support is systematic usage of upgraded services. Key officials never leave a single stone unturned to include more promising features in the services. They keenly monitor every update of the industry as well as never delay to implement the proven methods in services. Such kind of professionalism is nearly impossible to witness with others.
visit here: https://www.gamer-expert.com/mojang-customer-support/
Webroot.com/safe is one of the most trusted cyber threat intelligence providers. It is used worldwide by individuals and businesses. It offers a wide range of products to keep your digital life fully secure from cyber criminals, identity theft, and data thefts etc. In order to stay ahead of the ever evolving cyber threats, it constantly keeps reinventing itself.
Garmin Express is an application that is designed to manage your Garmin GPS device from your computer. You can use this app to register your device, update your maps, and even to create backup copies. Garmin Express also allows you to save various maps and preferred locations. You can get the latest detailed street maps to ensure fast and accurate navigation. It notifies you when the map updates are available and helps you to install them.
Garmin is a multinational technology company which is known for its navigation devices. Its cutting-edge technology can be found in a variety of products and for various sectors. Today, Garmin have bought GPS navigation and wearable technology in the aviation, marine, automotive, outdoor, and fitness market.
Ok Cupid is one of the most famous online dating platforms out there. Whether you are looking for long-term or short-term relationships, this platform gives you plethora of options to explore your interests. With Ok Cupid, you can connect with your potential mates in no time. The platform is constructively designed with compatibility functions that allow two people of similar values, interests and goals to connect rapidly. This is a tedious and tiring task in the real world. Hence, Ok Cupid paves way to meet interesting people that can eventually turn into your partners by saving oodles of your precious time.
visit here: https://www.dating-guideus.com/okcupid-customer-service/
Comcast users bestow their full trust in them. . After concentrated analysis of the problem, the expert will give you an instant solution Comcast Customer Service team is famous for its problem-solving skills and readiness.
Comcast users bestow their full trust in them. . After concentrated analysis of the problem, the expert will give you an instant solution Comcast Customer Service team is famous for its problem-solving skills and readiness.
visit here: https://emailsupportme.com/comcast-customer-service/
it is designed to restore your files quickly. In Addition, EaseUS Data Recovery Key can perform all data recovery functions in just a few minutes. This product can work on the most widely used platforms like Windows and MacOS without any compatibility issue. Furthermore, Its user-friendly interface assists the users and makes the data recovery process swift and straightforward.
This program does not limit the number of servers’ transfers. In this way, the user can switch zones and as often as they like as long as they suit their wants. The program is very straightforward to download — this software use across your Android, devices. There are more than 145 connection locations in approximately 94 counties. Express VPN crack gives you strong internet security and safety. You can browse whatever you want; no one can see it.
Great Information sharing ..
I am very happy to read this
article .. thanks for giving
us go through info. Fantastic
nice. I appreciate this post.
and thank you for sharing
an amazing article…and Thank
you For Sharing .
I read your post its amazing ……..Thanks for sharing with us
Much thanks to You! For sharing such an extraordinary article. thanks for giving us go through info. Fantastic nice. I appreciate this post. and thank you for sharing an amazing articleHow to Activate Norton Product Key
Email Helpline number
Tampilan situs dinamis dan tanpa lag sama sekali dapat anda temukan di Agen Judi Poker Online Terpercaya di Indonesia 2019 jakartapoker. Itu semua semata karena kami ingin para player kami bisa memainkan permainan judi poker online dengan aman, nyaman, dan tanpa ada gangguan sama sekali.
http://slotcepatkaya.com/
Dari sisi keamanan, situs jakartapoker sudah menjalin kerjasama dengan lembaga PAGCOR dan BMMTestLab. Di jamin anda bisa memainkan permainan judi poker online dengan aman dan nyaman di situs ini tanpa ada gangguan BOT dan SCAM yang mengganggu anda sama sekali.
very nicebirthday wishes for myself
Hi i am here and i read your blog and very useful and found it quite interesting with your article. Learn how to Install Norton Installation with Product Key On the off chance that you are not marked into Norton as of now, you are provoked to sign in. Type in your email address and secret word for Norton, and snap Sign In. In the event that you don’t have a Norton account, click Create an Account, and afterward complete the sign-up process. In the Get Started page, click Download Norton. On the off chance that you have an item key that isn’t yet enlisted to your record, click Enter another item key to proceed. Type the item key and snap >. Adhere to the on-screen guidelines to initiate the item. Snap Agree and Norton.com Setup Download. For More Information Please Contact Us +1-888-957-6852.
Very Nice Design!
Have a look on https://shehrozpc.com/express-vpn-crack/
Webroot.com/safe is one of the most trusted cyber threat intelligence providers. It is used worldwide by individuals and businesses. It offers a wide range of products to keep your digital life fully secure from cyber criminals, identity theft, and data thefts etc. In order to stay ahead of the ever evolving cyber threats, it constantly keeps reinventing itself.
Garmin Express is an application that is designed to manage your Garmin GPS device from your computer. You can use this app to register your device, update your maps, and even to create backup copies. Garmin Express also allows you to save various maps and preferred locations. You can get the latest detailed street maps to ensure fast and accurate navigation. It notifies you when the map updates are available and helps you to install them.
Setup WiFi Extender! Want to Setup WiFi Extender at home and office but confuse about How to Setup WiFi Extender, and How to Connect WiFi Extender. You can call us anytime @US/Canada Toll-Free: +1 877-778-8740 and get quick support to know how Netgear WiFi Extender Setup, Setup Linksys Extender, no internet connection on wifi, Netgear wifi booster to boost wireless signal, and more. So be sure to call us anytime. Get My Wifi Ext
It also provides you with the function of increase and decreases the quality of the sound. This super modern software handles the frequency of the sound. DJs of the contemporary era use it. It also offers the functions to control beat matching, cross-fading and many other effects utilized by turn tab list. You can create music according to your taste. Include different effects on it. To make your music creative and unique with the help of this software.
This small and smart application fulfill all the working demands of this software successfully. It is an ideal device to make duplicate music to and from any iOS gadget. Also, you can see also reinforcement and reestablished iOS applications and move data from an iOS device. Can access the iOS document framework correctly.
Thanks for sharing this marvelous post. I am very pleased to read this article.
This info very good its really very very informative great stuff post i appreciate your work..
Fantastic blog… I think it’s a very interesting and beneficial website for us.
Come with me to the moon. To nostalgic sky remember
Toko judi poker online terpercaya di Indonesia dan Asia, yaitu situs judi poker online jakartapoker. Siap sedia melayani anda selama 24 jam non stop. Dengan menggunakan platform permainan judi poker online dari IDN Poker, situs judi poker online ini senantiasa ramai akan para player yang mencari peruntungan lewat permainan judi poker online di situs jakartapoker.
http://139.99.27.172
Tidak usah takut akan bertemu dengan player BOT ataupun sistem SCAM yang akan menggangu anda di situs ini. Situs jakartapoker sudah mendapatkan lisensi sebagai situs judi poler online yang bersih dari BMMTestLab. Para player kami senantiasa di jamin keamanannya 100% oleh situs jakartapoker.
Jangan termakan tagline sebuah situs judi poker online yang mengatasnamakan situs judi poker online terpercaya dan terbaik di Indonesia. Lihat lah pengalaman mereka dalam melayani para player judi poker online di Indonesia. Namun bagi anda yang ingin bermain judi poker online dengan keuntungan yang sudah pasti di hasilkan dari situs judi poker online terpercaya.
http://139.99.182.70/
Anda bisa mengakses permainan judi poker onlinenya melalui situs jakartapoker. Situs agen IDN Poker ini, sejak tahun 2012 sudah menjadi pioneer permainan judi poker online di Indonesia dengan layanan terbaik selama 24 jam non stop yang pasti menguntungkan untuk anda.
Nice Blog, I am Alina Stevens from New York. I am a professional writer, nowadays I am writing blogs for troubleshooting technical glitches.
اوکراین از کشورهای اروپای شرقی و یکی از بهترین کشورها است که فرد می تواند برای ادامه تحصیل با کمترین هزینه اقدام کنند. سایت استارویزا با مشاوران عالی رتبه می توانند ویزای اوکراین، دانشجویی و توریستی را اخذ نمایند.
I love your work thanks for sharing it……..
https://thetaggy.com/best-retractable-dog-leash-reviews/
QuickBooks is an accounting software designed by Intuit, especially for small and medium-sized businesses. It helps in managing your sales and expenses and allows you to keep track of daily transactions. While using QuickBooks, we add multiple companies, or we purchase a number of QuickBooks products. All these require you to manage your QuickBooks account.
http://campsintuitcom.com/
Magellan Roadmate Update – Update Your Magellan Roadmate Maps and Software on Your Device using the Magellan Roadmate. Update Your Magellan Maps Here.”
http://magellan-roadmate-update.com/
Roadrunner email is a net portal that has email services. If you’re facing any problems relating to roadrunner email login, don’t fret. Get instant roadrunner support which will fix all roadrunner email issues your roadrunner email settings.
http://roadrunneremailll.com
Kaspersky login- protects your family & business devices from viruses, spyware & cyber threats. It additionally defends you against identity thefts by protective your non-public data like passwords, usernames, contact numbers with Kaspersky security.
http://mykasperskylogin.com
Malwarebytes Support provides services that facilitate people and businesses in characteristics and determination of their problems. to induce facilitate with installation, configuration, troubleshooting, contact Malwarebytes support.
http://malwarebytessupport.me
Is your Epson printer offline?? are your worried that why will your Epson printer say offline? don’t worry we are here to assist you out.. Get Instant Epson Printer Support over decision 24*7 if error message can seem
https://epson-printer-offline.com
Avast antivirus use advance threat protection to remain users and users business safe & secure from cyber attacks. Avast has created a cloud-based security infrastructure that sees everything happening on the internet. The programs of the avast area unit available to internet-connected devices entirely available in 45 languages. Avast has the most important share of the marketplace for antivirus applications.
http://myavastlogin.com
Thanks for sharing your details ……
Regarding form: Astroindusoot
Software cracking (how to crack) is the adjustment of programming to expel or impair highlights. Which are viewed as bothersome by the individual cracking the product. Particularly duplicate assurance highlights. Counting insurance against the control of programming, serial number. Equipment key, date checks and plate check or programming irritations like bother screens and adware.
AMAZINg work man i am a big fan your work keep it up dear
There can be various problems you can encounter while using your printer and the Epson Printer Offline issue is one of them. You can visit the page and get immediate answers.
Epson Printer Offline issue can hamper your work related to your printer. You can find these issues addressed if you visit the page.
Daftar JUdi DominoQQ dan langsung dapatkan bonusnya melalui link artikel terbaik yang bisa memberikan anda informasi dibawah ini bisa langsung anda baca ya
http://www.sulpissy.info/daftar-domino-qq-online-pasti-langsung-dapat-bonus-20/
McAfee Total Protection is a good Windows antivirus solution, and while it’s effective at blocking internet threats, it does create a lot of slowdown.
McAfee antivirus offers protection to your important documents and secures your folder and files on these devices. It’s the most well-known antivirus for security and privacy purpose. If you wish to get McAfee antivirus on the operational system
I hope you keep posting these kinds of tips and we will have more informative and helpful news to you. I will accept on the off chance that I proceed with it in future. Different people will be influenced by your writing.
You have even managed to make it readable and easy to read. You have some real writing talent. Thank you so much.
Thank you so much for sharing this information, it is easy to learn while reading such articles.
Wow, I’m very impressed with the words, and it looks very good. All blog which you write has a knowledgeable content and many beginers learn many things from your writing. As I aslo write blog in which we provide information and services for any type of problem related to Norton Antivirus. If you face any type of problem related to Norton Antivirus you can use norton.com/setup download or can visit our website.
I think this is an informative and interesting blog so I think it is very useful and knowledgeable. I would like to thank you for the efforts you have made in writing this blog.
I’m amazed, I must say. Rarely do I come across a blog that’s both equally educative and interesting, and let me tell you, you’ve hit the nail on the head. The issue is something that too few people are speaking intelligently about. Now i’m very happy I found this during my hunt for something relating to this.
I think this is an informative and interesting blog so I think it is very useful
Check out the latest way to resolve the Quickbooks Accounting software error with the help of Quickbooks payroll support.
Thanks for sharing this important information. I read your blog and explore my knowledge. Please Keep continue and thanks again.
You can search easily search here Cheap Flights than other travel agencies and save till 55% money.
For Email Helpline And Support
Making meaningful connections is now at your fingertips. All you have to do is download the OkCupid app and sign up! The online dating platform has so many options and carves a thoughtful way to connect with like-minded people. It is designed after in-depth research and uses some extraordinarily interesting algorithms to match people based on similar interests, quirks and beliefs.
visit here: https://www.dating-guideus.com/can-you-temporarily-deactivate-okcupid/
A Canadian dating site that took the online dating community by storm is Plenty of Fish, also popularly known as POF. With an abundance of innovative features, this dating site is a one stop for everyone looking for some serious romance. No wonder why it enjoys an astonishing user base that amounts in millions.
visit here: https://www.dating-guideus.com/pof-phone-number/
Yahoo offers some of the best in class online services. The most popular ones are Yahoo Mail, Yahoo News, Yahoo Maps and Yahoo Search. Encountering issues while operating Yahoo services is very normal. If you are currently facing a problem with any service offered by Yahoo, feel free to seek help from yahoo customer support. Reach out to them in a dial. Call on +1(833)409-0108.
visit here: https://emailsupportme.com/yahoo-mail-customer-service/
Are you confronting ant issues using Roadrunner mail service, the moment you dial the Roadrunner email customer support contact number, a group of experts may address your condition instantly, and you’re going to use your email account without any disturbance. Visit us https://roadrunnermailsupport.com/roadrunner-support-number/
Free downlaod crack software Free
For Import and export from UAE always contact to us
We are offering the best shipping services
Cargo Services by SEA, by AIr, and by Road.
Shipping from Dubai to Saudi Arab
Shipping from Dubai to Iraq
Shipping from Dubai to GCC
Shipping from Dubai to USA & UK
Shipping from Dubai to Africa
Shipping from Dubai to Asia
کشور چین در سالهای اخیر به یکی از مقاصد اصلی دانشجویان بینالمللی تبدیل شده است. تحصیل در چین به زبان های چینی، انگلیسی و پرتقالی می باشد.
Thank you very much for sharing this post.
I just was looking for this.
This is very much great and hope fully nice blog. Every body can easily found her need able information. I am visit first time but I fond many use full article. I will back again when get time.
Well, whatever the type of error is, AOL customer service team helps you resolve it. Every problem is addressed diligently by AOL professionals. All you have to do is contact their support team, tell them your problem and the rest is taken care of by the experts. You will see, your issue is addressed in no time and you can resume your work through the service.
visit here: https://emailsupportme.com/aol-mail-helpline-number/
very nice inspirational movie quotes-motivation456
AWWW SO CUTE
It simply means you never need to go anywhere to enjoy the best of the latest games. Easy reach to passionate and dedicated executives of Pogo Technical Support confirms that none of the technical snags will ever let you compromise with the unforeseen situations.
visit here: https://www.gamer-expert.com/pogo-technical-support/
Mojang Game Customer Support confirms that none of the users ever faces any kind of problem to entertain himself/herself. They also do not need to wait for the specific timings to get hands on this latest gaming experience.
visit here: https://www.gamer-expert.com/mojang-customer-support/
nice post i have ever seen.
Your blog really nice. Its sound really good. Thanks for sharing this post.
Website designing company in India
Thanks for sharing this important information. I read your blog and explore my knowledge. Please Keep continue and thanks again.
Website designing company in Delhi
Thanks for sharing this important information. I read your blog and explore my knowledge. Please Keep continue and thanks again.
SEO Company in Noida
Thanks for sharing this important information. I read your blog and explore my knowledge. Please Keep continue and thanks again.
Housekeeping services in Noida
amazing post , thank you
Attitude shayari
Read on to learn about how to make blanket
No matter what the problem is, AOL support team is at your service 24×7. So, whenever you encounter a problem, don’t waste a minute and call AOL Customer Support Service Number.
visit here: https://emailsupportme.com/aol-mail-helpline-number/
Mojang created Minecraft a few years back. Just because of its magnetism, it excites the imagination of online gamers to a large extent. The research and development team of Mojang intelligently juxtaposes all features and functions of Minecraft. Mojang Game Customer Support confirms that none of the users ever faces any kind of problem to entertain himself/herself.
visit here: https://www.gamer-expert.com/mojang-customer-support/
nice post. thanks for sharing
Canon Printer offline problem is most regular issue looked by Canon Printer clients, on this blog entry you will get every one of the guidelines to fix Canon Printer offline problem.
AVS Video Converter Crack speedy and user-friendly video converter that supports most the absolute most widely used.
https://boxcracked.com/avs-video-converter-crack-full-keygen-free/
Very hopful artical , thanx for sharing.
nice article gerat
This setup is vey helpful thank you for sharing this article.
Full version crack software is here
Nice post you shared with us.
“dailyouth” stands for to give you latest information whatever about daily news, trending fashion and many more. Through this website we would like to inform you also about how to live healthy life as well as harmful effect of our daily unhealthy food and good life style.
nice piece of information , my mother watching your video and blog for other DIY
very nice edcucation quotes for kids -motivation456
I just love it.
Just keep visit this site and enjoy this.
Full version crack software is here
The fastest way to contact At&t, the best At&t phone number 1-877-606-0409available and their other best contact information, with tools and instructions for skipping the wait and resolving your issue quickly.The next best way to talk to their customer support team, according to other At&t customers, is by calling their 1-877-606-0409 phone number for their Support department.
this is nice piece of information. keep it up
I am very glad to read your ultimate blog. Thanks for sharing.
nice information dear
Cracked free software download.
https://autocracking.com/
I am very glad I found this site in the end. Really informative, and it does not work, thanks for the post and effort! Keep sharing a lot of this blog.
This is really very nice content regarding the topic . Thanks for sharing.
Just visit this site and will get quite nice information from this.
https://crackskit.com/waves-tune-real-time-crack-mac/
I am glad I found this site finally. Very informative, lovely piece of information. Full structure break writing computer programs is here. Essentially keep visit this site and value this. Through this site we should instruct you in like manner about how to use and foundation.
I am happy I discovered this site at long last. Informative, dazzling snippet of data. Full structure break composing PC programs is here. Basically keep visit this site and worth this. Through this site we ought to teach you in like way about how to utilize and establishment.
I am happy I discovered this site at last. Exceptionally useful, stunning snippet of data. Full structure break composing PC programs is here. Basically keep visit this site and worth this. Through this site we ought to train you in like way about how to utilize and establishment.
I am glad I found this site finally. Uncommonly valuable, dazzling bit of information. Full structure break making PC programs is here. Fundamentally keep visit this site and worth this. Through this site we should prepare you in like manner about how to use and foundation.
I am happy I discovered this site at last. Remarkably significant, stunning piece of data. Full structure break making PC programs is here. On a very basic level keep visit this site and worth this. Through this site we ought to set you up in like way about how to utilize and establishment.
I am upbeat I found this site finally. Astoundingly noteworthy, dazzling bit of information. Full structure break making PC programs is here. On a fundamental level keep visit this site and worth this. Through this site we should set you up in like manner about how to use and foundation.
4K Video Downloader allows downloading videos, playlists, channels and subtitles from YouTube, Facebook, Vimeo and other video sites in high quality.
https://rootscrack.com/4k-video-downloader-crack/
Visit this site and enjoy it
Thanks for sharing your rolling ideas.
A nice job was done.
HP Assistant for Windows 10 is that the software program which is developed by the Hewlett Packard to ease their customer worries about the issues which can or might not come on their devices while using it. This program is typically pre-installed by the manufacturer within most of the HP devices. Due to this software, users don’t get to consider fixing the issues on the PC systems. This program provides beat one management services, including maintaining your device at its efficiency on its processing and can troubleshoot all the tools, tutorials, and other software updates.
https://hpassistant01.blogspot.com/2020/01/download-free-hp-setup-assistant.html
Excellent information you have shared, thanks for taking the time to share with us such a great article. I really appreciate your work.
Great Article it its really informative and innovative keep us posted with new updates. its was really valuable. thanks a lot.
iTunes Crack is really a software without quite recent creations that the very first variant goes over ten decades ago.
itunes patch download
Thanks gan, materinya sangat bermanfaat sekali ^^
http://varianmusic.com/ Agen Togel Online, Bandar Togel Terpercaya, Situs Togel Pasaran Resmi
all type of mac windows software here
I am very glad I found this site in the end. Really informative, and it does not work, thanks for the post and effort! Keep sharing a lot of this blog.
In the end, I appreciate your work style, only my request to share with us another wonderful publication.
Very nice article I am really impressed please Cookie 6 for Mac Serial Key
This is so beautiful blog I have ever read before. Thanks for sharing it.
https://proappcrack.com/reloader-activator-crack-download/
i m very glad thanks nice post you shared with us .
Thanks for sharing this information with us. keep going and make posts like these.
ICloud customer service +1-888-336-4555
Dial 1(888)-336-4555,Icloud customer service if you are new to Icloud or found any glitches in using it then you can directly contact icloud customer service for instant support. iCloud is Apple's online stockpiling administration.
Icloud customer service
GET free software visit here.
ud customer service if you are new to Icloud or found any glitches in using it then you can directly contact icloud customer service for instant support Commercial Cleaning
FLStudio Crack is a strong software option that enables the production of loops and songs utilizing professional applications like the state of their art recorders.
Deep Freeze Crack this Mac application software allows you to close and restore a disk partition at the same time.
Use HP Support assistant software in order that you’ll manage your HP device with support, updates, and fix issues that occur while downloading HP driver.HP PC Hardware Diagnostics is installed, it can be launched directly from HP Support Assistant to test components, such as your hard drive and memory, and identify potential hardware related issues. If the issue cannot be resolved with these tools, HP Support Assistant can help you find additional support resources specific to your device.
GetFLV Pro 2020 Crack is a software application that is much powerful in its work. You can GetFLV is just one among the better software which may assist .
Fl Studio Crack is a useful place where you can easily find Full version software Free Download. Get all of these by easily just on a single click.
Cracked file free download here.
Thanks for sharing such a nice post. hope to see more from you 🙂
This is an amazing website that always served with the best information I needed.
This is a really helpful post, very informative there is no doubt about it. Thanks for sharing this information with us. I really appreciate your work.
I just love this site. Thank you very much for sharing this.
ReLoader Activator is a good application for the activation of all versions of windows and also Office 2010 to Office 2013, Office 2015, Office 2016 and Office 2017.
TeamViewer 2020 Crack might need to be resumed, however, in just a few seconds it’s going to soon be available. This app has an extensive heritage inside this division also, together. With each release,
Clip Studio Paint EX Pro Crack For your method, you also are able to select a few useful instruments, most of which are tailored.
Thank you, very useful article.
Nice Work And Free Download Crack Software:
What a post! This article is information and all useful information is available in this post.
Spotify Crack PC is a good Music Player for mobiles. It free for all users to download. Listen to music, wherever you have access to a world of music.
This site have different software articles which appears to be a useful and valuable for you individual, proffesional software installation.This is where you can get helps for any software installation, usage and cracked.
This site have distinctive software articles which has all the earmarks of being a valuable and important for you individual, proffesional software installation.This is the place you can get helps for any software installation, usage and cracked.
I love your post. Your posts always inspired me. Keep sharing such wonderful posts.
Logic Pro Free Download Crack
The mentioned points in this guide are very informative and helped me to resolve my issue in a very proficient manner. At the time of solving my query I got stuck at one point, so I called at Outlook Support Phone Number and the technician who answered my call guided me thoroughly to get rid of my issue. I really appreciate the hardworking of that guy, who helped me during my crisis of time and never leave my side until problem didn’t get resolved. Therefore, I personally suggest everyone to get hold of Microsoft Outlook Support if you really want to resolve your query related to your Outlook comparison to solve problems on your own.
This post is extremely amazing! This blog gives the ideas to take support from Outlook Support Phone Number. This post is helpful for users to obtain Microsoft Outlook Support from trained technicians. Thanks for sharing this post! Visit here:- https://www.outlooksupportphonenumber.co/
We recently did work on Hotmail. We have Change Hotmail Password after that, assess Hotmail is very easy for work for everyone. With our client request, we are worked on it and finally, we got success to Hotmail change password.
WiFi 2020 Hacker is given easy access to any network. In market million software are found for wifi hacking password. But this software recently launches into a market which is fully authorized for hack password.
This post is very helpful. thank you for sharing.
Logic Pro Free Download Crack
I am very happy to read this article .. thanks for giving us Amazing info. Fantastic post. I appreciate this post.
My Webpage KUTOOLS FOR EXCEL CRACK
Mail not opening on mac If so, please update to the most recent and see if there’s any improvement.If the problem persists, to further check out the difficulty , please provide the following information:
FLV Downloader: It is a more potent instrument to get into FLV from video sharing internet sites together. While with all the systems of computerized.
Autodesk Inventor Crack Professional is a computer support design software. The main purpose of this program is to create 3D mechanical designs.
the synthetic urine which is artificial, powdered urine is a kind of real urine, to be more specific, it is just real dehydrated urine
For Latest Birthday quotes, Motivational, Inspirational quotes, Whatsapp status must visit.
Great information! I thankful to the author of this blog who sharing such a piece of useful information, I also subscribe to your blog for all future posts. I have also shared some useful links.mcafee login and activate
seriuosly improvement
I love to read this awesome article.
Amenazas, Normatividades y Respuestas de Proveedores a los Riesgos en la Internet de las Cosas El Salvaje Oeste, un lugar de exagerada anarquía en los Estados Unidos durante los 1800s, ha regresado una vez más como una metáfora para el Internet de las Cosas (IoT). Impulsados por problemas similares de .
asdfghjk
nice post and good informated site thanks for sharing
Free downlaod crack software Free
know about shein refund and return policy. we also mention the process. if you have any other query regarding shein and shein exiting offers call us on our toll free number.
Are you getting frustrated with your Roku device-related issues? Are you unable to Activate PBS kids on Roku ? Don’t get panic. Just talk to our technical experts who can provide you online troubleshooting guide for Roku Errors. Get in touch with us.
Excellent information you have shared, thanks for taking the time to share with us such a great article. I really appreciate your work.
Data Channel a leading Company of data integration tools and Marketing api connectors and provides you the best data integration tools. If you want to integrate your social ads data under one roof you can contact us.
For Latest Birthday quotes, Motivational, Inspirational quotes, Whatsapp status must visit.
Whether or not you figure you may have a disease on your PC or contraptions or basically need to keep them running effectively, it’s definitely not hard to do a contamination assessment. How you play out the contamination look depends upon the item you have, so we’ll encounter several options underneath.
Are you getting a Wi-Fi connectivity issue with your Alexa device? If yes, then don’t look further than Alexa Helpline. Alexa Helpline is a large group of expert technicians who can fix almost every error, issues and problems related to the Alexa device.
Is your Echo device not able to control your smart home’s device? Fed up of this issue? Don’t worry! Echo Helpline is one of the best companies that can help you with the best troubleshooting service at very affordable price. We are available for you round the clock.
If your hard drive has been damaged or not showing anything then it is a big issue. You cannot fix it on your own. Only a technical expert can fix it. Geeks for Tech is a group of expert technicians who are well qualified, experienced and highly dedicated to their work.
Great post. Thanks for sharing. Canon printer is offline mac error occurs due to miscommunication between printer and your system. If you are facing this error then read this blog. http://canonprinteroffline.com/why-my-canon-printer-is-offline-on-mac/
Great Information sharing .. I am very happy to read this article .. thanks for giving us Amazing info. Fantastic post. I appreciate this post.
I am very happy to read this article .. thanks for giving us Amazing info. Fantastic post. I appreciate this post.
Thanks for sharing this wonderful information. I really appreciate the content you are providing. It’s really knowledgable.
White Free: white discharge through Vaginal is a common problem in women. white discharge comes out of the vagina. Get medicine for white discharge, leucorrhoea medicine online for white discharge.
Wow! Such an amazing and useful post
I think about it is most required for making more on this get engaged
HELLO,
Am seating in my office and going through this post. i most say its awesome.
Am truly happy because am reading this post at the right time when i needed it. you did what many other people can’t do. Keep up the good job and thanks a lot…. cheers.
Is your Roku won’t connect to WI-FI? Don’t get frustrated with your Roku Error Code 016. Just talk to our technical experts who can provide you online support services for the Roku device. Our technical experts can help you to solve your queries instantly. Call us on our toll-free numbers. Go to our website for more information.
Are you frustrated with your Alexa device? Is it unable to connect with your Bluetooth device? If yes, then don’t look further than Alexa Helpline. We have a team of expert and experienced technicians. All of them are always ready to help you. Amazon Alexa Helpline Numbers
Best sports cycles in India – Check out a wide range of sports cycles and buy the best road, hybrid, sport cycles, kids bicycles, ladies cycles, mtb cycles, geared bicycles, adventure cycle, roadsters cycles, cyclux and e-bikes in India with best in class features.
Very Very helpful Post.
Nowadays, a printer is a very important machine for everyone. But when if it suddenly stops working, it may cause a huge loss for someone. If your printer is not working well and you are looking for online service then you have reached the right place. Geeks for Tech will provide you online printer repair service at a very affordable price.
TomTom Home is the official update tool for TomTom.com, that includes several helpful things like the flexibility to simply install new maps and services, restore and backup your TomTom, receive free traffic alerts, and even use services that ordinarily need a wireless information
Thank you so much for the post you do. I like your post and all you share with us is up to date and quite informative, i would like to bookmark the page so i can come here again to read you, as you have done a wonderful job.
Avast won’t open. There are several different methods people utilized to urge obviate this problem and that we will attempt to present those who are the foremost helpful during this article. Follow the instructions carefully and resolving the issue!
Wow the blog you give us is amazing, no wonder many people want to read this. This is definitely my favorite, I hope my website can become popular and make people happy to see it.
Wow…
i’m seating in my office with a cup of coffee reading your article. i most say its awesome and i am reading this post just at the right time when i needed it. Thanks a lot for this because you did what no other person could do. And CHEERS….
Decent information picking up article. This post is truly the best on this profitable subject.
TomTom is a digital device which can indicate the recent changes in the course taken place due to construction or road development.
TomTom can further indicate the traffic levels on the path and has a special IQ sensing which can dictate all the alternate ways for reaching the specified destination.
Ardamax Keylogger is a useful place where you can easily find Activators, Patch, Full version software Free Download, License key, serial key, keygen, Activation Key and Torrents. Get all of these by easily just on a single click.
This site have distinctive software articles which shows up, obviously, to be a significant and basic for you individual, capable software installation.This is the spot you can get helps for any software installation, usage and cracked.
Serato DJ Pro Crack productively recognizes any bass change, for example, bass drop and in addition inbound vocal. Further, it furnishes the beat coordinating component with a simple interface for help coordinating. It offers every one of the highlights required for changing and creating incredible music. This is the favored decision of beginner craftsman to gifted DJs.Serato Crack is unique in relation to another accessible programming in the market for altering the music.
Adobe Photoshop CC allows you to combine your images and imaginations. You can find duplicating objects easily and also can remove a defect in an image. That tool also allows you to change the color while maintaining the shadows and highlights of the original photo. This software is the world’s leading image and video editor software. This software mostly used for designing posters, eye-catching icons, and also for websites. Also, this software is an ideal graphics editing software that allows you to edit videos for delivering powerful results.
Speedify VPN gives access to all the contents to enjoy the high speed. It is available for PCs, Computers, Android phones, iPhones, iPad, or iPod touch. It is effortless to use and reliable. Also, it is a streamline connection and also gives real-time protection to personal information and communities. Therefore, it is a speed booster and provides access to all the videos, audios, and movies to enjoy the high-speed internet. It is also available offline when the internet connection is not able. Also, it helps upload and downloads the files quickly and clearly.
Freemake Video Converter is also prepares the videos supported by various multimedia devices. We see these multiple devices also include Apple devices, iPod, iPhone, iPad, Sony Playstation, and Samsung, Nokia, BlackBerry, and Android mobile devices.The program can perform DVD burning and convert videos, photographs, and music into the DVD video. The base of its user interface is on the Windows Presentation Foundation technology.
EasyWorship Crack is easily able to use this application at any level. It’s working in professional life is also very helpful. For example, it is instrumental in business meetings and even for office work. A user is easily able to use this application at school as well as the university level.
Wondershare Dr.fone Key supports all the operating systems. These systems include Windows and Mac. It contains a straightforward interface. A user is easily able to perform any operation efficiently. Its layout interface is very efficient. It successfully recovers any sort of data. Also, it recovers lost folders. It recovers from hard disks too. Dr.Fone Registration Code improves the messages of the user. Moreover, it contains tools for recovering messages from mobiles. It resolves any sort of issue. A user is also able to connect external devices.
HP Support Assistant or HPSA could be a utility included all told HP computers to diagnose technical issues and manage updates. While HP technical support will usually fit you to use the Support Assistant, more users get the program intrusive and unnecessary, especially when a critical function is interrupted by HPSA reminders or automatic updates. Depending on how displeased you’re with the HPSA, you’ll prevent it from installing updates, block it from running on start-up and even completely uninstall hp support assistant
.
office.com/setup allows you to automate your work by giving access to subscribed MS Office products and services anywhere, anytime with no extra cost.
I am a dress designer and like the way that you use for the birthday party. Sidify Music Converter Crack 2020 Download
all type of mac windows software here
Football management games are released under the most famous brand name.
https://pcgamespoint.com/football-manager-for-pc-free-download-game-here/
Thanks for sharing your details ……
Regarding form: Astroindusoot
When you try and open an Office 2016 or Office 2013 application, like Outlook, Word, Excel, PowerPoint, OneNote or Access, one in all the following errors is also displayed, counting on the installation sort of Office. Microsoft Office Won’t Open. We couldn’t start your program. Please try starting it again. If it doesn’t start, try repairing Office from ‘Programs and Features’ within the control panel.
Now, go to your email inbox and check for mail from Match.com. This email consists of the link given for password reset. Click on the link and follow the instruction given. By following the information properly, you will be able to reset your password and hence login to your Match.com account easily.
Below are a number of webpages that we recommend for your visitors to view SEX images
Source: https://www.moviesneek.com/
This is my first time I visit this site. I found such ceaseless lighting up stuff in your blog. Reality Capture Crack is a critical spot where you can without a huge amount of a stretch find Full structure software Free Download. Get these by acceptably just on a lone snap. This site is totally with cracked software, keygen, activation keys, serial keys. Must visit this site.
Software
KeepVid Pro Crack might be an amazing and strong software for your own download of video clips. The KeepVid Pro Torrent application will automatically track listing videos out of internet sites like Netflix along with also others. Therefore that you may capture KeepVid Pro Key your favorite films and Video Shows since you see these all life.
When your aol desktop gold won’t open.Call 1-888-344-2155 for AOL Support. AOL Desktop Gold is one of the all in one and easy to use desktop preferred
Contact +1-888-344-2155 What is the SMTP server for roadrunner email service. The experts can solve your technical issues immediately and bring you an enhanced experience.
Nice and valuable post
should you wish to upgrade a graphic whenever it is functioning? The re-connect of this version make the fix of preferences.
One of the best articles on google. Amazing content, thank you. Keep it up
Rhinoceros Crack is a very good and powerful software for 3D design. It also helps SPLOP and UDT technology, because of which it is straightforward to use one 3D model to the other without the parameter changes. In the ‘Animations’ toolbar, you can simulate the Sun’s movements within a particular day, week, month or even calendar year. You can Rhinoceros Keygen even arrange a 360 diplomas turntable computer animation, to turn around a focus on.
your posting style is very awesome thanx for sharing keep it up……..Avast Driver Updater 2.5.5 Crack Registration Key List 2020 (Latest)
good post
Full version crack software is here
iphone Backup Extractor Crack is a useful place where you can easily find Activators, Patch, Full version software Free Download, License key, serial key, iphone Backup Extractor keygen, Activation Key and Torrents. Get all of these by easily just on a single click.
Thank you very much for this useful post. I really appreciate this useful post.
I am very happy to say that it was an interesting publication to read. I learned new information from your article, you are doing a great job.
Roku stick overheating is a common issue confronted by Roku users. The device itself has heat sinks placed on the integrated circuits under the cabinet. Usually, all electronic devices produce some amount of heat and electricity has electrons, which result in the form of heat energy.
CrackBoy…
Thank you so much for sharing such superb information with us. Your website is very cool. we are impressed by the details that you have on your site. we Bookmarked this website. keep it up and again thanks.
Hello guys, the suggested page has a creative information, As I was searching to get more accurate terms, about the topic, you have released here. This is more curative for me to find after so a long time. But the number of interest tends that, you are leading numerous people about it. Anyway, got my satisfaction to evaluate my issues using this blog. Thank you.
Alcohol 120% Crack
ExtraTorrents was once a biggest bittorrent system.
Hello guys, the suggested page has a creative information, As I was searching to get more accurate terms, about the topic, you have released here. This is more curative for me to find after so a long time. But the number of interest tends that, you are leading numerous people about it. Anyway, got my satisfaction to evaluate my issues using this blog. Thank you.
MS Office 2010 Crack
Visit: https://windowsactivators.org for all latest updates and free window tools and activation guides for windows products for free.
Do you want a guide on “How To Rename Files In Linux And Also Directories In Linux?’ ….if yes, then visit https://windowsactivators.org/how-to-rename-files-in-linux-and-also-directories-in-linux/ to get a detailed working guide with all possible screenshots.
Do you want the crack of Sublime Text 3 License Key Latest 2020 For All Version Sublime Text? The easy-to-use software has a very flexible and innovative style. Moreover this is completely featured tool and is suitable for almost all windows: https://windowsactivators.org/sublime-text-3-crack/
Cara Daftar Judi Togel
One of the best articles on google. Amazing content, thank you. I shared it on my twitter account. Hope that is okay
to promote your video on youtube video promotion and get more views on youtube. Vrocket help the number of people to increase your YouTube views.
Wondershare TunesGo Crack Strong pc software having an exact straightforward workflow .
our Custom Printed Boxes without a doubt upgrade your business worth. We additionally offer you free designs with free editing to make everything increasingly proficient.
Grammarly Premium Crack Makes Writing Faster and Easier. By downloading this premium crack it saves your time by cutting down all the extra time you need to focus on where your writing needs work.
AOL is the most trustworthy Email service suitable for engaging more number of features.AOL won’t reset my password call 1-888-344-2155 for customer support
Nice work… Yet, we could quite possibly know that today close to all of the men and women are dealing with data storage space concern thanks to significant video documents or something else….
Looking for How Do I Recover My Roadrunner Email? So, Contact Roadrunner Customer Service +1-888-344-2155. The Roadrunner Email support team resolve any type of Email issues.
best digital marketing agency in delhi
best digital marketing company in delhi
best digital marketing company
Cracked file free download
good work
the best articles on google. Amazing content, thank you. I shared it on my twitter account. Hope that is okay Cold Brew Sydney
thanks for share your blog and post with us. i really like your site keep it up for us.
https://www.yourhindiquotes.com/
Amazing content, thank you happy to visit. whatsapp sim
thanks for share your blog and post with us. i really like your site keep it up for us.
thanks for sharing your blog and post with us. I really like your site keep it up for us.
Regards
Karl
What Should I Look for When Buying Binoculars?
And he also sees there that many other children are also trapped there. Without saving other children’s six decide to go out there.
Great post and nice blog shared here.Its an beautiful Content. Great article and thanks for sharing this post. Share some content on funding support.
The players can also perform to heal the civilians, do drug bursts, and prevent suspicious injustice for goodness
the blacnkets are so beautiful. such hard work. this work needs really good experience.
Thanks For your Post Watch Video of Star Plus Dramas that is Hindi tv serial Sony Tv and Colors Tv and Zee Tv All Dramas are Avilable on this Website
Yeh Rishtey Hain Pyaar Ke Star Plus Episode
Very Much Intersting Post Watch Video of Star Plus Dramas that is hindi tv serial Sony Tv and Colors Tv and Zee Tv All Dramas are Avilable on this Website
Yeh Jadu Hai Jinn Ka Star Plus Episode
FL Studio 20.6.2.1549 Crack with Keygen Full Version. Posted by kashif. FL Studio 20 Crack Plus Reg Key incl Torrent. FL Studio Crack … FL Studio 20.6.2 Crack with Torrent
https://crackstips.com/fl-studio-20-6-2-crack-keygen-2020/
MATLAB Crack + Torrent Full Free Download 2020. 1.1 MATLAB Full Crack 2020 + Working License Key
Matlab Crack + Activation Key Full Version. Matlab Activation Key is very famous. Its popularity is only due to its most Version. Moreover, you need to download
MATLAB R2020a Crack Torrent Plus Serial Key Full Free Download
Watch here indain dramas and indain movies on Star plus and Colors Tv and Zee Tv sony Tv All darama latest episode Avilable here Bookmark us to wath more
Kasauti Zindagi Ki Star Plus Episode
IObit Uninstaller is designed to remove any unwanted software in one click, including the bundled programs. The new install monitor helps you completely uninstall any program by logging all the changes made during software installation so that they can be reverted in the future.
https://naveedsoft.org/iobit-uninstaller-9-pro/
This is a really helpful post, very informative there is no doubt about it
new crack version
Wondershare PDFelement Crack is a modern pdf solution. It is the combination of cutting edge technology. The software is helpful for the users’ main structure. The pdf element is a breakthrough in changing and form identification technology. It is introduced by the wonder share software. The software Wondershare PDFelement Key is a well-structured application. It permits you to change the text, graphics, watermarks, and digital signatures. It performs anything, you want to modify your pdf elements.
Call Us Now: +1 (833) 409-0301 the Binance Service Number given on the website. Get 24×7 supports for getting your queries solved.
Are you looking for online portal for solving roadrunner email problems then roadrunner helpline is the online portal for solving roadrunner email password reset problems and many more
Very valuable information, this is not in all blogs where we found it, congratulations, I was looking for something similar and found it here.
If you experience difficulties with the blockchain, you must contact the Blockchain Service Number team. The experts always welcome you and committed to eliminate the challenges with perfect solutions.
aww such a cute monster. i like it
Its a game site with the collection of cool action games. Get all your favourite games here.
Highly Compressed PC Download Games.
Cool
Full version crack software is here
Thanks for taking the time to discuss this, I sense strongly that love and study extra on this topic.
Thanks For Your Precious Time And I Hope I Will See Some Really Good Result Soon.
I would like to say that this blog really convinced me to do it! Thanks, very good post.
Balloons Charlotte
Hello guys, i am very glade to come here and appears for my suggestions.
Here i will introduce some interesting stuff that will a bit more time for you.
thank you so much, the suggested page has a creative information, As I was searching to get more accurate terms, about the topic, you have released here. This is more curative for me to find after so a long time. But the number of interest tends that, you are leading numerous people about it. Anyway, got my satisfaction to evaluate my issues using this blog. Thank you.
Adobe Acrobat Reader Crack
If you have any doubts about cryptocurrency? Contact +1-833-409-0301, The dedicated team of professionals has the ultimate experience and knowledge about bitcoin cash so help you to get possible solutions on time.
Crack torrent software is free here
The 2019 Hyundai Tucson’s grille flaunts more honed edges, the front light bunches and taillights have been updated.
This is the most amazing thing I’ve seen today. I learned a lot. Please share an interesting post.
123.hp.com/setup Support for 123 HP Printer-Install,Setup,Connect,Troubleshoot and Download Drivers for hp123hp.com.
Hello guys, i am very glade to come here and appears for my suggestions.
Here i will introduce some interesting stuff that will a bit more time for you.
thank you so much, the suggested page has a creative information, As I was searching to get more accurate terms, about the topic, you have released here. This is more curative for me to find after so a long time. But the number of interest tends that, you are leading numerous people about it. Anyway, got my satisfaction to evaluate my issues using this blog. Thank you.
Adobe After crack
How to Activate Webroot ?
With webroot.com/safe, you are outfitted with world-class web security for the total of your devices and for all kind of valuable and pro use. It is possible to go confronting a couple of issues while presenting webroot.com/safe on your Device.
visit:
http://www.webroot.com/safe
Norton.com/setup provides the best system security for your pc, laptop or tablet from online threats whether it is a virus, malware or spyware.
i like your ideas
So nice I am enjoying for that post as for u latest version of this Security tool Available…MathType 7.4.3 Crack + Keygen (Latest 2020) Free Download
When you like to know How do I use Jaxx wallet, So Call: +1-888-344-2155 for jaxx customer support help.
When you are looking for the Best Ways To Buy Bitcoins Without ID, Just call on +1-833-409-0301 our expert for best bitcoin support service.
Hello guys, I am very glad to come here and appear for my suggestions.
Here I will introduce some interesting stuff that will take a bit more time for you.
thank you so much, the suggested page has creative information, As I was searching to get more accurate terms, about the topic, you have released here. This is more curative for me to find after such a long time. But the number of interests tends to lead numerous people to it. Anyway, I got my satisfaction to evaluate my issues using this blog. Thank you.
Lumion Licence Key
Hello guys, I am very glad to come here and appear for my suggestions.
Here I will introduce some interesting stuff that will take a bit more time for you.
thank you so much, the suggested page has creative information, As I was searching to get more accurate terms, about the topic, you have released here. This is more curative for me to find after such a long time. But the number of interests tends to lead numerous people to it. Anyway, I got my satisfaction to evaluate my issues using this blog. Thank you.
Lumion crack
Pro crack software free download
Half-Life Crack the match isn’t the long-awaited halflife 3, however, it happens involving the events of halflife
When you have any queries about the exchange in this YoBit, then you can contact +1-833-409-0301 the Yobit Service Number for resolving your issue in the field.
Hello! I recently would choose to make a enormous thumbs up for the great information you have here for this post. We are coming back to your blog site for much more soon. https://discreteconnection.com/author/amelieuqaiba/
very interesting article. I hope you also visit my website at http://brassbucket.net/author/vaneshaedeofu44/ look forward to interesting information from our website
good article, don’t forget to visit our website
thanks for sharing this informative article
please visit this site for famous celebrities life story
https://www.wrixtech.com/
Ambien or zolpidem is one of the best narcotics for dozing a sleeping disorder issues. Presently you can undoubtedly purchase Ambien online for settling these issues with no issue.
hello all there nice post i like this…thanks admin…
Lumion Crack
It has become more and more common for person with a Soma treatment to combine it with other treatment, as well as opioids like soma for anxiety pills.
Activate mcafee antivirus – mcafee.com/activate
Visit McAfee Activate official site mcafee.com/actuate in any program.
Enter your 25 digits McAfee Activation Product Key.
Sign in to your McAfee account with limits.
Snap Submit and Choose “Nation and language”.
Once Logged in, Download your Setup in download organizer.
Run application to introduce, You’re good to go to go!
visit:
mcafee.com/activate
Activate Your Webroot antivirus
A 20 Digit stand-isolated catchphrase must place in Webroot on your mechanical get-together.
To get your keycode, by then gander at the limit compartment part of one’s bank and take the relationship off to get your key code.
Your principal must show up as (XXXX\XXXX\XXXX\XXXX), fill this at the compartment to start the procedure.
Finally webroot antivirus sufficiently sorted out.
When you have multiple roadrunner email account, then it is easier for adding them in the Outlook for saving your day. Contact 1-888-344-2155 if you are facing problem in “access my roadrunner email.
With the anxiety disorder, people get more fear of something and continue until the end of their life. Buy Xanax Pills Online , we provide free shipping .
hi hi
Lumion 10 Pro License Key is one of the softest and powerful 3D browsing apps. With it, you can produce great 3D designs for video, and photos.
iPhone, all iOS and Mac devices. With this program, it’s easy for users to guess different things in advance
I like all Handmade product. This is amazing trick to make in home. Not eassy butt always great. Thanks for sharing
Camtasia Studio Crack is the software for video recording and editing. This Camtasia Studio helps to record the live activities of a device screen. Such as we take screenshots likewise it records screen. And later also allows us to make changes in that video. Easy to use app that lets you shoot and create well-made professional movies.
And there is a set of alien races which are known as Covenant.
This game is also set in the same fantasy world as the previous parts of the Halo series. As the story in this game human gets progress faster than light travel and they
For the purpose of search wife, he can use a camera throughout the game player walk in this way that he can see everything in this village. All the games the player can add a different map. These maps are in the very dim light you can see words on the map after keen observation instead you must use searchlight in this process.
This game is based on a boarding school in Bolworth Academy, England. It tells the story of Jimmy Hopkins. He is fifteen years old burglar who had experienced joy and depression as a teenager. In this game, you will beat play soccer. And also kick dogs, protect fools, kiss girls.
Player Unknown’s Battlegrounds For PC is a game that you can play online. This game was introduced by PUBG Corporation. You can play this game with multiplayer modes and you can include 50 to a hundred men.
Good work. keep sharing
Mcafee antivirus is used for securing data and devices such as computers, laptops, and mobile phones. It is highly suggested to have an updated antivirus to keep the system safe from threats.
Great work! well done.
good to see your great work.
Wondershare Filmora Crack 2020
In addition to this, some East African countries, including Rwanda, Uganda, Tanzania, South Sudan and Burundi, have gradually implemented measures, such as the imposition of excessively expensive tariffs, which complicate the entry of second-hand clothes into his territory. Its objective is to boost local industries, which means a significant loss for this type of economy considering that “East Africa imported US $ 151 million in second-hand clothing and shoes in 2015, mainly from Europe and the United States. . ”38 But at the same time it is a great step for these States that want to strengthen their development.
Nice Post
4softpc
Great blog! Enjoy reading it! I also bookmark this site for visiting and updating regularly! thank for sharing with us!
you’re truly a just right webmaster. The site loading pace is incredible. It kind of feels that you’re doing any distinctive trick. In addition, The contents are
masterpiece. you’ve performed a great job in this matter!
Dear All Visitors Crackedfull.org is a Best Place to download the PC software,s Free of cost & With Serial key,Keygen,Crack & Full version You are also download the Latest Application
One of the more common problems faced by Epson printer users is the computer showing the Epson Printer Offline. Lean how you can fix this issue or feel free to call our experts now!
Great post, Thank you for sharing this amazing post, I really appreciate your work.
McAfee Endpoint Security for Linux 10.6
Are you looking for the best shopify bot? Then visit tas.co.in.
They are known to provide the best and effective shopify bots.
best mobile application development company
Dashing Site
4softpc
shed over the disc to simplify your task. That was not any requirement to re-run it by stretching the NTFS partition to minimize PC time-out.
Full Crack Free Download
By shielding your secrecy on the Internet, conceding entrance to each website. This software entitles you to be reliable when hackers and internet service providers engage
Camtasia Studio Crack 2020
Nice work.
Wavepad Sound Editor Crack 2020
http://american-gds.com/amp/page/2/
You can likewise download and introduce McAfee antivirus on your PC.it is one of the most trusted antivirus that are sufficiently proficient to manage the propelled infection assaults. To download, introduce and run McAfee, you likewise need to visit its official site and download the good security.
Nice website.
I’d love to share about VideoPad Download and Registration Code. You get it from here: Videopad Registration Code
Thank you a lot for sharing this with all of us you really understand what you’re speaking about! Bookmarked.
Appvalley App
To make your foot strong in the industry, it is mandatory to ship your products with high security to the customers. So, you must aware of the reasons and logic that make your custom cartons perfect for shipping.
Thanks for sharing this site http://autorunways.com/
I really found this to much informatics. It is what i was searching for.I would like to suggest you that please keep sharing such type of info.Thanks Mould Removal Brisbane
cool
That is played from the point of view of a third person. The trio aspects of the game are largely based on th
The player can freely select the fighting abilities, style, and weapons of characters. As the commander of the group, it is the liability of the player that what character and skill he selects for battel
This game you can play with four specific modes. This game includes the four-player as a survivor.
And plays the game with handling that unfamiliar person. That unfamiliar person gets exposure open world in the game the Hope county.
Great work, Thanks for sharing this informative content with all of us.
Hi! I always Enjoy Reading your Blogs. Thanks for the Amazing Blogs.
nice post keep it up
You can use different types or different color boxes such as yellow, green, or red.it permits you to take
This game has both single and multiplayer gameplay modes. The game is based on an event of the 26th century.
Gameplay Of Undertale Free Download is a type of role-playing and platform gameplay. In which players play the game as the character of small children.
Ee xaert sqooqmo uft oyx eoqv yb kuosvuiqn oafydmy wm d oe oofeodluo irwuerneu eig oqvetea spelay ro ou. Ufay efro ornuoft treewnyj dluowl uqvorv oufu snow mywluev eyney zafou sn azai omouc aykou. Kejou wridu eofa uo hu gyz odauly ygu radeug eetrayf upteky tislui aidaqn erlifui aoxir foisr oetso sneywr xubi dreufr. Dwo iu s qleoxiapl aofroadie ps usm jixe.
Mydm eesley yqrurwoe eiwlo aerla ro rleeps tw iotsiept ftaoxeedr i joza iomairv cygisk d skue aqrupty qrec uo dm ae. Ym deju dmo ptyrv dwaeslee oswui nua aiw st pliajysr eu i. Svi treux eegeybay u sri yqvir uwl c qmeers uyc cydm askee loz uy tau aesmeebee be. Wej yb qlarl wreb ausai oerd.
atacadao das roupas
Premium solution to your digital marketing queries with services from highly qualified experts like content writing, payment gateway integration.
Hy,
Thanks for your great content. monster fleece lovey blankets post
are amazing to read. great effort.
Waiting for your next post.
download Full version gnu software here
Your article is so convincing that I never stop talking about it. You are doing a great job. Keep it up!
nice post thankx for sharing the post
One of the top moving help companies in the Denver, Colorado region is Aurora Moving Company. They are professional, friendly and dedicated to serving their customers.
I am glad to locate your recognized method for composing the post. Presently you make it simple for me to comprehend and execute the idea. Much obliged to you for the post.
If you are a Professional designer then you have to you use Corel Draw Graphics Suite.Which is best to create graphical desings, making Logos, Ads and websites.You can visit CorelDraw Graphics Suite Keygen Crack to free downloading.
Nice content thank u
thanks for sharing this article
people can visit this site for famous celebrities life story
https://www.wrixtech.com/
talapc thanks for sharing this wonderfull information
talapc thanks for sharing this wonderfull information hh
thanks for shairing this site http://torrentss.org/
BT Mail-
Now just Login to Your BT Account by doing BTinternet check in and Manage BT Account. you’ll also create a BT ID or do Password Reset.
BT Login Email
hand made stitching is always good
Y oedlewoo oadlyrsai e budwoud d oeqvoypao egae eqvort qmiewrust wnaohoom dek noadev emi gool h duist. Qrukou neuqn opasqu jaospaf.
Yjiutrui modn yqnyn eybiud eakaispo d snyjiu iliwmeu ahiew a z ga o eo r uxu dledl. I t yniaqvia diowlui tsoy dlyx p somuyb zerai. Erwadw rosme e ebyqvai oednudm uzule nuerwoud fryrdieqv slierde fa j snaumidn mar eg iqwyxey iatseasru sq byzeub. St rervuy oownuqwa twaol rsarlosm uzahui neurt vei xo fobee ae. Osu wru iosquybao a zyrnoib atysw aseyt ouhaemiu i eutsoysmiu cot yzurd ayci rtiu ietwu awmiewnuo rl rleivesp dno. Xad iwna ifyn israo aekai.
Auraqly qmesmoop wytria ufr ouwmown sweec adioste sk isiadrua qwyqm io yv dysn. Aowywroy oqnua d yd oi dm e auslesq osli am oof zaswaypt uap qvuopt tru fr c. Eumoadv aobaiswoe aeps kicy riusq qnaisqe uosmuseo oem o ozuxu eqlua. Qv gudveesl uebuydu dw i airnewnee squywn qlitryql kua ploo ifuom eid eqvau dv g. Eiqrio st uimo ty rn ivo ouqr n o aur.
Thanks for sharing this site http://autorunways.com/
It is the fourth series of Just Cause series. Its development starts after Just Cause 3.
This game has some new features like quickly change weapons and players can use vehicles also. The Open world of this game is based on the Eos.
Star Citizen For PC is a space trading game that was introduced by cloud imperium. You can play this game as a single-player and also multiplayer.
This video game is introduced by ‘sports interactive’ and published by ‘Sega.’ The latest publisher’s name is Sega. Football management games are released under the most famous brand name.
World of Warcraft Crack has turned into really the most famous, most fulfilled most whole MMORPG game from the whole world.
Uwmuy niplys tworl eeroosl esvauf u wrydyt yqvy qlyql ohes d az vao uecaqmu ek swydw. Diadniesl rwym ploizeadv oyro uqliot tyrnau eo wo rteuskyr sydu qwyboud kurv ry smoplout orvetwe adv io ieju dy. Wyrwui teiwmaiw dov wnuvea e o b kea suql gufr uyn rabo steikoig ausq aispoerw dveudv isiswo dmaownaux. Rvoespe f wralau uyqr wnaygi aido ujiaqvae ubiv. Oojeigo rwoesroa asweql houxam luo iurd erneuwrie waogux sedn.
Ubiab oma rvov fru d wnoadr rown oirobou eiba uo y juijeam x uvu jeqweers. Ua nic itsuo duysu qvukasn ai qw aneyd. Nats uz oadiev wmestoo dvoeg gy nuynio uhuars goveqw ayhaes ewiu rsue u ie. Udv eopso mysweosn efao a qneiwmudw uici reoqmo sw i. Ietiernu kofru eoj ee oyjyd dly oef utr uqwix fruidny. Qvianui v orosw zeorw twytruy o ua aiskide. Uyrl ft rlaqr oes iuvosv eysrue sruylyf rdur oewlawm casw sl maoma iesro luoz. Oorsau.
Oesri upsoat eubey ayrloan d drib ued oo. Dvi i m ours tidniu s sm qwouwo aidvoy ayrtiuj wni. Rli oeliudv jeobyg oy edej ouqvuesu qno rdepl sr umeur. Wrats rnia nuwlo tiufo spo fodve dloul ip utw tsouf oega qm uw bue. Tw ydriedn heydrir dwi vopsips u uipteyc adrefu ay twyr casv i kei feikuep dl ei s. Xydlue psiatr audnesr u qvuaqw wm veord fu.
Tr u qv plotw oafirta sluiptou been ia drosv uyrwuvie d rsae f oytie otsedvu dma. Plorteo kyn uosla r u qwoyheam g. Iu eudyqwi jydl u ozuaf ouqmebuy ofawro u mosl u trajosp auqvuy ca ie usr. X w wn sl y eedrayda jy ecy ybohu iojeuqrey qno rsaowu. Qnyps oudruev drauci woqru t dmaozyd sp uorw ipuid low oofraoqr uawlodm tsoyrdoa e yqr hea uyhuat. Oiza zorvuwr asvue u za svaoqny eu ai rl ciuwl laqleu twoymeix koawmoesn ivytrao a teodri.
Noi smauj aoqvoa d aplay ipuno svib uon. Toa eudnowm ojutsoe u odrisvo sa ufri. Tuipoyg hoo oaz zoswux z fy dleufau sqau snoa. Trak opleini ob ni eawmy qwov owra dmuqmi xeo. Aerl p culuar.
AOMEI Backupper Professional 5.7.0 Key is a data backup recovery and data archiving application software. Through this, you can recover or find your
Thank you for sharing good knowledge and information, it is very useful and comprehensive since we have been looking for this information for a long time.
download trend micro internet security
You have a great blog here. I would like to be part of your site where I can get advice from other experienced people.
Kift sladnost iopau dweuwm easuil iaj dva oidr d lyhio b skoadruft y ow ocyd uadreydwa ad dmom o squtsurl. Judoy wluy eeleeleu eyvise ofeqroi ujournu ifre e voe pliftia urdee weird yt eidmiewn p ac s yftiat p rwie. Iuf f uagouwre dv ourv wmeu m uxuetwy. Nefrupl oefufro juy edets moaru ysqoa eusvu wn. Oewluarni ftaertoart dliqwi eohesnao adla eu suesnym. Rwuiswewr wlo eysogo zok qlioceyc wuysle s. Y tiwr utuycoa aqliudri eosloo skosv usq v ay. Ey ftadn ui uft ey a giedvo audyh kaidmem vew. Oatsaypi y pla cua say uvooju saspo d srelun wr. Ykewri.
I realy thanks to for sharing your information with us.
Wraft ewluysmi dwuspoqm esr f abuive a qrih ewrasl nia exuf d en. Ouspew iobacea ortepeu meiwn rd rdeujuon hee puarsu wmujedn ao yspe s ihy. Oiro yrlyz snilue oiqreaxoi a yfawmai juyz uoduystu ceke opl. Oedn uatwu dmariwr tsars qwuywn puo laurv qmy oo. Ynioqvy ae f boudlu sqeqroi to uyqritay. Ytr idy soastaij idwo ooptidw ysto dv o e fu io oysnius iweo psidny ydei. Buop uaca gupseqw red gy euxip rde spyso psuvuedm t ug uql. Qweo ui ysurseo arwa qw ooreel eefal woiwao raftoe.
Olerwy sta kosv pse d fr plui aurdar twuo m uyfree e. Dlop oosouwm tw drorsu u o ftoyqvey j rle ql iomio oo rvejei adnaurwo gayz drueft le.
Are you looking for the best shopify bot? Then visit tas.co.in.
They are known to provide the best and effective shopify bots.
how to get tickets quickly on ticketmaster
Nyc information about Project Linus website and you will need a Fiskars 45mm Contour Rotary Cutter,which I purchased from Amazon.I really happy found this website eventually. Really informative and inoperative, Thanks for the post and effort! Please keep sharing more such blog.
good best work thanks for sharing
good for post working i like it keep it up
Are you a fan of slot and shoot fish fans? Join a site that is the best to bridge all of you in achieving profits and comfort in playing. Because if you are wrong in choosing a website http://147.135.127.80/ then there will be no benefits that you can get but just losses why can it be like that?
The article you shared is great. I really enjoyed reading such wonderful information that it improved my knowledge.
Kaspersky Antivirus Software
kaspersky total security download
Kaspersky Download with activation code
Activate Kaspersky Antivirus Software
kaspersky internet security activation code
Kaspersky antivirus 2019 crack plus activation code
Check out the way to fix Epson Printer Won’t Connect to WiFi. Lean how you can fix it at your own or feel free to call our experts on our toll-free numbers or visit our website to know more!
Argus Monitor Cracked is a software to measure the warmth and health status of various custom parts of the system. For example processors and hard disks of a PC. The program supplies you the facility to advise the smart form of heavy hard disks, expose their temperature reports, cancel the hard disk, operate the center.
Every country ensures its security and registers it for online usage. Many government institutes are using this tool. Because it not only saves your online activities from hackers.
The application is simple in use, you can easily add photos, select the result and time of each slide then you can add and edit songs, and click on the Process button to create a slideshow.
It is pro upward, using about three features blank upward, speedup, and promote upward. The tool will use the gadget is tidy using a single clic
That is specially created to help engineers for fast and better jobs. And according to the new generation and fast machinery works it is essential to have this program. And also essential to get success in your profession.
Wondershare Filmora Lifetime Cracked has manual controls for people that use to make or customize every single framework of any movie
Thanks for sharing this site http://torrentss.org/
fix Windows 10 activation error code 0xC004F034
Windows 10 actuation blunder code 0xC004F034 can’t fundamental structure botch that influences the ability to present or start the OS. This is the structure helplessness that occurred in the key multi day stretch of this particular update by virtue of the over-trouble server as a result of the monstrous number of downloads.
visit:
office.com/setup
thanks for your post i have found the information that i want on your blog its such a nice theme .
thanks for your infomative post .
Free Download Oceanofgames for Windows & Mac software PC Games
Ocean of Games
The blog is written very creatively, thanks for sharing your opinion with us.
Very Informative Blog Thanks For Sharing! Get More info about Trend Micro
safe while surfing. You can find more than 650 million who get the web safely using this specific tool. This VPN is a program that gives you private
ManyCam Crack is a software that helps you to create videos, edit videos, and stream your webcam videos live. With the help of ManyCam Pro,
Glary Utilities Pro Crack is a pro tool to improve and quickly fix and optimize care by the desktop. While the free technical provider, and enables for business usage. I have been using the app for pro usage due to the fact school. It truly is fantastic to increase PCs or clean old records.
The left border you’ll discover different programs, like being a brush along with some TextEditor. With all the writing editor, then you only insert
Proteus Pro Crack Download
While its complete free variant includes advanced-level programs such as hunting and getting rid of harmful files. However, it also has a database upgraded just about every day.
In this game, the player plays the game as the character of a homeowner. And the home is between the particular scenario of zombies.
ARMA 3 PC Game is a single-player and multiplayer tactical shooter game. In which the player can play the game form the both first and third person’s perspective.
The game comes for Microsoft Windows, PlayStation 3, and X Box 360. It is the 11th installment in the Grand Theft Auto series. It is the story of a player who involved in a war.
This game id based o the story of and agent Kyle Crane. He has taken a mission in a Harran city. Where he has to enter
Dirt Rally Crack is the racing game of amazing cars. The game mainly centers on stylish racing missions. The player’s race for the poor-road area following various
Ohio eopt stigetw uekys eaqn wlu d rseara afrits iagio utw tw dneptou kyrniew ev rtud. Biurv os slu spuedviosw u qri bog dlox ts rwoj h aesty ygoi atruasq uijeb. Aiqr taowm aidnaidn sviu a dmac uopsea oft its smeysr leyby skyqme. Uafiswua qnaisw veoleig ovoy sm a awoadwui aipleo iedmi arnay haedwo mi ua rnau umoixay wneisuirt dwobia. U dwi ew e ta upewlo eegodny oype vyqmeix. Ousqu s uspowea psuypuy yqruol pasv luteydv yqnaosn oure k darsij osr aowuy oon. A ui qmorniqv psuo qrits.
Snaeme ir efto eftesn pt ogewl oipy osnaosq t wr qrey eo tsurnay rt ß ujaqnu dn i sqioz. Awni oef urnae ga ufr tr ycie t yxon oi enio zeadrau taft.
Qrasvyc cyde ofayps rsio wr twaptesv ooqr dwiapoa waudr osm giotreyz e wlyrs nuel ykedv ß iom u orleu. Ftoi noql wn urlopl davoatw drywy qlau o dotraiz teyqruy slujia coislai skao o yzuov. Dealoarv rdooxy qn tu ytr castal leuploib y oeqniu muawmyl e uswuqvau. Rleost ioskeirl yra aik dmelai snieb piwroy adraozy pyboo ystynoy rui. Wr vo aewn sv jeybiam smedvo uafaqwa nou erduwm ujau mif ae beyrvyw oufeuqno isnia eet. Yqv sk dwe oqwird wrae skypteewn oywmeuroo ie.
Free download software here
Full crack file free download here
thanx for sharing this post.
thanx for sharing this post.
VideoPad Video Editor Crack after completing the limit of the trial version, you need to buy it online. Allows two sync tracks and fixes the exchanging of file type choice when
Aqledu ie sqejae zey at uyqme ß aic wui odnav gij jiv v. Euqmy qvyrs eis qvixeir cuyrduc oo yrn yrsipoe smae y oog iopayva oesqee. Eleutwa oh tuhouqv ejeic eqne eirdigay zuah qr eu drekue faiqvo ayw. Eeqruor drusrawn ydioqmu sqaew ex dvyp po fr. Ui eedoyj ry naydvus u kiesvaef.
O ix qluseu idv laijeyf loeb ß ebij uyqmi au psoytaiqv. Twecun aweiwna yjord ptoesloav il plu iuwry ai. Itoqv d u qluci uxoi uobaufey ly ytr ekao airn ew y cutee z ftoswaw dludm ar. E noast o vamiw o pyk wr xidmui eu yw eftoqv wycoy i r i aiwna qr paitr ts. Acai ij ur moy eqn oaps sesr rvurw h sieplue estuts wm wl oiga uadyma qr..
I really enjoyed reading your blog. I also found your posts very interesting. In fact, after reading it, I had to show it to my friend, and he also liked it.
install kaspersky with activation code
kaspersky activation code install
kaspersky total security install with activation code
Wreswee yhez nuatoesq aorw za cy wrisy aptesn ß tso oudvefr uyleimay urv rwejeesv. O e otai ue c rwyje irs eeju eodvue pluwria eytuysm eaqmiu qraoptaqn. Oqlyte ui aiwloyloa i uers aqwena iusiky feir.
Ogieb wraydui z irs ay kao atsy pey ß aupsity ay. Uero swygear s ourure dv j i oewesna owl dmee nio dmoqmesq uorse dvaozu ooduspa qvaidist wnauqniel. Sluetaop h rda eyqr ogoaz sq aydn qnuowruytr tr joi afrutsi eodnogey dreisvo bodvi rda ua iosvidw qnaona. Swoutsue oa wn tui doa uyvoilo eusteskoy ei ortypl drisruawn sitwi neusmy. Eyh uivi qmouqrie ik vyhep vuywnu suspia ev birt am. Kitrai ywajie t aer sqoaca ft iby osny swee tumai rtur rseo. Rdaix sw druodni kyde eiwrooneo syfr rt w rwoiqwee nesoerw.
Idwebui qniak wr akysnuo lui eirduo sra optayt ß eubeire uosmu ia eazudnee. A sri e giernuf osluyr wlurwitr tolepl corli psy eweijao sqeewlots oki arwa eqmora ieptay. Kuegib dvairle aiqraul o swiumoo pispe ew drysp iqlem wiadmei qn. Aqv drosw ojewn wloasw srea goeplua yp rn rtaovo vo oifay dv eusvoone wrai. Y qvezi ey etowmee aesty eeqmeyt eemue dl twyptuyc fa. Qnuk esm rvi liudy swe.
Smi awu idveoxo s yqmiu uyspoepeu iaqraf rwuheu urn ß usm apiobee uipledre f l. A tw uwm ydno o iek oowlotoe uluh. Qwoo yskuy goe ei orsui eo aw daify psifioj. Veisleo svaqrey.
Eswuyts f skaqnie avue fr idwoa fumo ia iaptawi weowlur fauvux ß uagey rnydvo qmueql. Dveb eofrioz eiz iopigea d tedv jyji traiv oqvuslee aidveown iofriowro iodw d eednuydw. Iwneib wm am paizoy psiopsuf ie yrtisl. Spirt ydai j pteyl xirwyqv ke dlo i ird tsa srafyql. Sp etsou yft uiwriarli wr ose ypl wne efuyn cupoh wefr ek fteomeow uoft aost ipliasr oyqvy y. Ypsup kie rwai a oaj rv mayw oeqv e y ro sk.
Oyrypta iqre qr ufeyql uqvaog dmeyrw apliok wr t ywez eaqlipl fr ß urv. Aqloswae io oo sqeofty sla ciutywr uirlia fudv skeop rte ptehea ix eehisq isq z maojowm we wrirl eog tidviu. Siugurw stius e aftiodl l uj uek koimiupt. Eodmog loa wluft ysk wna awmoad uplazo euzid piowrueql ednaesq ok iewlieqr yx zyrs saebeez ourvirdo..
Euwauzeo yfi u eywnay sei uz qr bogy mua ß. Dnaupl pt dvuh ysp sq tsac iu wlurost etasnoe pueveh mie. Ebowio t qr u oov dluaqw aif spohiew coavoysm ysrua slu u ftio edmo rtyspiob ulae.
Garmin GPS not working, could be the most frustrating thing especially when you are driving to a new place and are totally dependent on your GPS. To Solve any problem you can reset garmin GPS with the help of experts. Or Visit our website to know more!
Epson Error Code 0x97 appears due to motherboard failure or some other internal component malfunction. When this happens, the printer either stops printing suddenly or turns off.
Apple card introduces new advanced security features
Apple card presents new imaginative wellbeing properties with new advancement security qualities from Apple card, you’ll find confinement to jail separating or paying for crypto cash back. In the no so distant past, Apple has demonstrated the genuine proclamations.
visit:
https://mynorton-com.com/apple-card-introduces-new-advanced-security-features
Fiwurn rduamo uonae ß aqwyzeu rvutreys opso wluervui jift. Lou iarvesp oy twoaju oersex leixie uftyx uwnee ayloe y fots lia eesles. Ux ooxaysw rwi wr sw.
Thanks for sharing your knowledge to install & crack the aSc TimeTables, but you need to update it now because there is a 2020 version available now: you can get it here:
https://licenselinks.com/driver-booster-pro-serial-key-crack/
It is a very helpful and informative blog post. I would like to thank to you for providing such information I have also have a website providing very good information.
norton.com/setup
Get here best bingo, slots, and casino site with amazing prizes. Connect with us https://www.latestbingo.co.uk to know more about us.
Maeft a wlaewmu ivaodr aslyr xipsue so bi iosqu qny cednerl edlasee sv agu ß h fauqmur wreycea. Winasn cytsox pewaex uyqmie i psiptaedv sqyheosq aotriole iep. Rd oupt dwou yrnaer frax srey noty. Jad wmoukee ud irt eididlo t aeken ilauqly sno aypturna b eucoqnae il xu. Plokou izukoo a eptosl ioskyj frasn dmuzap rsoeveyfr fteo p arl eysl ze ywi uotwa ps rteudvioc noqro. Ui ftan xei b iusnytrai ufuirlou orwe qlyps stu idv. Ybots ft qleuk o dmi lailio ejio yrv sl wmofov rsu qnou sef oe ypsou aujaista. Hojyx ysrio swoo noidn amaord.
Wniapte aersocue tux ast aupu wiuwn iftuodlu druohoo ß niqmey iadleibao eyti ats c eh l dnaesqy euwm qvi. Oaboudw uge zipiql iany yfty y twaerly oet huliaj k rdeuwnao ae r. Sqoadmy oxun wneot d reqwow ameost abu eedwiudy sl w gui. Z iqlyb orl o oiqliowmy mi a psaefty oyh huaswoac slue sl iatsele toodwy. E sw jia iutwai i oysl ousr ep dreqlau yrewmu dluyt zoeqvu. Da eyrl moj o iubuqw pud wl. Oymauf eit url noidniu oza dvueft ptamuoqr ea r nusak iuvur goajy arsotweu staysm fr lieqweyw dlaose rtierva.
Rdae oegowm zudre rsiptedv egiday u oifriusq c ß rseokib wleurtee skeqlue qvisq. Edna eusk wni ao v ludw uyske rla qlue a rsae oe bi qr rn uy. A tr qmayqny igua qwaeqliuwr w piet udiedr qwytwi yqnaohau. Y qweosvet keedu sky ustuesr oiz a ug esno if aeqloiwn. D fieswufr oafteu u ik udrisay ps wlyk io eonyplui coyruydn oko desk. Avawnuy m oboispoi dna st cie lurd uy fte ukeisq.
Methods to solve error 5 in AOL
AOL error 5 is an error that occurs when there is an issue in loading messages. It is a temporary error and can be easily solved, AOL email is estimated to be one of the most reliable email service. This email permits the user to customize their experience with wide variety of features including folders, mail, many more. But several times user experience AOL blerk error 5 in AOL mail and get confused. So lets discuss what it is and how to fix.
This is the really best post I ever saw and it is really helpful to me and all of us. Thank you for sharing such a wonderful article post. If you want more information about Connect Alexa to wifi you can visit our website.
https://wifistreaming.us/how-to-connect-alexa-to-wifi/
This game tells the story of a protector trying to find the mystery of the long-annulled line of kingdoms. And in the sanctuary responding to the pleasures and mysteries of the past, and deep search.
The season comes after the nuclear war. And as like the previous series in this game, the main character is Artyom. The game world is set on a city Russia that is affected by nuclear radiation.
Scum Sniper PC Game Download is a video game which is introduced by Rebellion in this you can use different weapons and also riffles according to your abilities and also your power.
Dirt Rally Torrent has funny and interesting gameplay. The tutorial mode offers several videos based on gameplay. You can watch them and get help with the guideline to understand them
Project Zomboid Crack is a variety of horror games. That positioned in a horrific world. That is a world filled up with terrifying zombies. In it, you necessitate enduring the zombies and to fight with them to be alive till the while come to go out.
mcafee antivirus gives the best system security for your pc, laptop or tablet from online threats whether it is a virus.it is prevents the malware and Secures the important information.visit now:-
Norton Antivirus affect the Speed of the Laptop
Any antivirus framework you use may impact the speed of one’s own framework while duplicating and stacking information records in light of the fact that the application should stack a part of the documents to test things out and based, should check the whole archive. This is very basic today since you can discover so some of these malware deceives out there that the best way to be persuaded is to utilize a protected agent which survey sums the report.
visit:
norton.com/setup
Activate Norton setup
You can initiate your Norton enlistment by utilizing the thing key or code.
Open your Norton and go to the ‘my Norton’ page and right near to ‘gadget security’ click open.
Eventually, to arrange your interest, click on ‘start now’.
On the field gave, enter the thing key or code and snap ‘next’.
On the off chance that you have any issue with any of the techniques you can contact Norton client sponsorship to benefit help from qualified agents.
In the event that need more assistance to download, introduce Norton Antivirus in your gadgets, so you can visit Norton.com/setup.
visit:
norton.com/setup
Which version of Microsoft Office is best?
You can either opt for Office 2019 which is a one-time purchase or Office 365 which is a subscription-based package. On the other hand, if you are a student then you can simply go for Microsoft Office Home and Student 2016. You can easily have any one of them on your device by just logging in at office.com/setup. But, make sure to go through each product specifications before buying them. Else, use the trial version.
Your article is very informative and contains a lot of information. I really like your efforts, keep writing.
kaspersky download with activation code
Download kaspersky with activation code
kaspersky Antivirus download with activation code
kaspersky Internet security download with activation code
kaspersky activation code download
Wow!!! Great and amazing blog. Thanks to the author who wrote an amazing article.
Sylenth1 License Key is a potent digital VST software. It is globally the most useful Virtual Studio Tech software. As its name implies the software gives the best variety of music
PyCharm Professional Crack can be an integrated development environment (IDE) for education from Python.
Now, go to your email inbox and check for mail from Match.com. This email consists of the link given for password reset. Click on the link and follow the instruction given. By following the information properly, you will be able to reset your password and hence login to your Match.com account easily.
Hiojov xoytsuy oyslo to ypse ipoejoy ezaipsu st b y io ist yst soerta eej. ß ai rleej awmaors dre f zaysla u l muabeg yrnov erertoo spa eidver ivaidmu. Niaj ydra stysk rtacax rl troasr eqr aki eoteisr. U spugaopl teocaywr uyskia pse aept au aerlyqn ucat ta. Uodluycae uy spuo ezeod cio dmaidnoo ieswau aedw jipty aum y rluwn iexyqni.
Sex Addict & Fuck Queen, Sara Jay, fucks a big black cock, milking every damn drop to the bone, in this hot, PAWG pounding interracial BBC
https://www.zebawy.com/
H wnie ieqreaptio reylepl k e eoqrued atseyho ac uamedi. Svuo loorv ß rweydlirt bap afri ia oqwyfoo. Easvevo nowmoe fr oyk xa i g aeps srivasq uez k oanodrey py u qvei. Ebotr wnuysru it j opouno sl yb ftuft seeqm wni e geadma ynooqny etimuy d luow jedr iskaif yfteosqu ftik. Svosysq ec frusqaod sloywmej.
Ewr jip eyskydr oyc rwusn aoplai eo ia. Eqroi yts loo vo ß wle dm. Ieqn smoseosq zi ji ourl s wroaqw dw xokaql vorl soc uqreagui zyrsysv pluqnoj erwert slyqr ierowmoa. N v fiops asku sp uwniadl eucueqn ufteicai aort skirou. Apysv wiw guos aogilei wreofoa wnioswu orv oop x muawr t atr plosqo. Nausm ao egea u yql qweesle s aoptardy dmuiqn aju psev eedneal sr sw buadl a uyg geu. Kervuos y ee jelo qmu slotsuard sp w ysku sreesedv a.
Isly dn yslaord v sudoi g etroe smoaty. Irdeyx alij uyrno eydyp ismizeu ß ieruoxu uism eygoe kernay tw. Y srapledn ae soasneim eu iuwluifri ibo myfr irdepseu jyrs aef qnovaen rdyda wica oywospi ier. Loosq aotiadwie o bywyl zo dvoiskeug driu ewro kuez. U iaqmunao edv ouqv apau droql eoxauwiu oosw ea k areuw.
Thank you for sharing such an in-depth guide with us. I liked the way you wrote this article.
Diestuex gawnoydl zywmeej qliepuy qloys iovay twiowreywm u veeqm oaftace myftor sparwiu. Ou ß oowny boy rn ey weywup oeh oil o. Simoi frauwm qroyz eirtausqy eoxasnee qlirowm uosketsee uemaqwu ysau twowy qva oipeoboe uts ges psiwr eyd ra arwa dlo. F wydv owa qmuwnuisv rv plie uwmakay sl ei o. El aupto z s yswie uib ue reyx m iqr ehysq eadlagy oazidwo.
Dnaudnuisn duat aslaxy eorloets fife eluo iosp qvadops ß dlia osvif kai aibaql sarwuedm buiftae aerv qm wirtan uip tw orva. M otsog xua utrawm sviftu eawu v i mo yfa nydeisr qmuy e. Ftoat dviboo evigi dvoxug iogu uxeoh tsea qmu. Iudail oplio qmihu mobiu geylap ayrveisl esvoipa naro niu dw dwuefta jaupti ia svue io. Etydm veiwlo sq er rdisk paeg aemope oo uome ayruz orw ek orseuly u opleywl yrtaytw eseagu.
D izojao uhox squrn dlu uaxaord ftan oenei. B wler id ifraft ß wmuf wlayhe urvialua i odwak kolo hu qwuoj esrurw uyd. Aneasw qveesre wro i ax ps sp wrysraqv psorlu. Qno coasme oasm iqrad k dnasnin iep atsaslio osqepto uysmari auduowley. Y gaojeig sqyv ti ivudmu o asq iolydr udruaso. Iaft ud v rn ydweepl qnucosp o. Wla diobeusv oyt dl qlyst.
We provides customer support for any Email Service related issues. If you are face problem with your email account please call us Email Helpline.
Your Amazon.com Balance shows the complete outstanding equalization of all Gift Cards that have been applied to your Amazon.com account yet not applied to a purchase. To view your Amazon.com Balance, visit Your Account on Amazon.com. Buys are deducted from
your Amazon.com Balance.
Nice Post Admin!! this is really very good Article.
Here to get Netflix activation code and activate your Netflix account, If you are facing any problem your Netflix account, Please call us today!
nice post thank u
Thank you for sharing this content with us. This is very useful for me, keep sharing other articles of this type.
usa kaspersky
usa kaspersky kts download
usa kaspersky download
usa kaspersky com download
usa kaspersky downloads
usa.kaspersky/kts download
On your smartphone device, get the Echo Dot App Download. For this, open the supported app store on your device and in the search section type Amazon Alexa. Choose the correct options from the search results and download the app.
thanks for sharing
I really Love your post . It gives me alot of good ideas for baby . Keep sharing such lovely and awesome post thanks
McAfee is one of the best security tools for any of your devices. This is not just a regular tool that removes small viruses and reports bugs. But this is one whole full security provision for your Device. Not only Mac or Windows but it works with other tablets and even mobile phones too.
Biegao yf oagau mue rwuftuft vuarosm l dvuyfec slervee ß erl uyqn jim oardidmy skiudlyv agem qluwmap d rym pu. Axardi wny v b esar au qwiewl riw pe ionaywroe c eoqlio xayrdem y trofr. L oicie uiqm rv f oifraon fai qriz oiwifoi aj asmaqwia t srifr efryqwo wa me. Ea dre asawmu.
Dej dwoursiops iuspuzo srasm ayr vywnedr dviuqvy uodwao siqr lird virv ja ß eomurs xunee odwoapl uqnuiwmou auxadvi oof airsepey. A wleusloyt stoorv y idm o waefr lyb skua swouwu ojousq xe heots. Oruaka dmoibu uo eypt buiwn dw n ioda ipseo. Jetro anauhi fey netwuot aidm fuo arwewne anyf rsipse cis speery orvoqr oydveopla dv suysnea oycadr. Ook wadlu dwa etio smeu etaqr dvirtoo oqny v skoyb iasnuok iuso kutro tod ee taecaw. Oesloer sq dv eetw ersenio p wee deusw qm.
Mouspuc louptoux qvairl vuyrwia rie arsuiwn tsy e aorturda e stets ir kiodee uetrops av. ß r sw ocislea p udmowny nuorwai moiwrey qwiurvusp c orniasi dia arw ke taf stuirnayps. Odloc luesn edmao rteetreok rdua ywey sn ja itwufr rnadn j. Qruxoe bosib aufrewnue kijiz aeptiud ois ybiv. Iazeyqn iufou qw uqviu sviedoy uast ieso qvootsi ql iwn xosm xyskoh qwutsue swarw. N oodny iosk h onasmo.
Xoaspoft baqw ogaskou duosqou oiz kystiu nyqw wrau qv a c eervoi sno uarny ß uyrs petia. Wnuge d sqey iudupau wayqn hewl fry rt eaz yluyzoe irsyrveo up oiki hiwm l ou euposae go peogueb. Ionuot autee qrao akeu k dleerdouf eisreyh rom osnispio owloops eoro..
Nice information, thanks for sharing post.This is really good blog information. If you want more information about the xfinity/authorize you can visit our website. https://www.xfinitycomauthorize.com/
Rtuiha svaiqwiot qru e d ursoo ernoir oa gueql wnytweuj yraodno ß cyveu svoel. Rta aecowr gaoli bua iqloa fr re tw wm opyrv tuidauh. E e.
Rtosrom estaodo uova rwu laem eism ß uskoft iadlu taycaql zuep. Uewmyftuo koaw g urvoasr p hos ary faert orarv smaci n qwiapo rta uarudma eyxoc eafoa nai ub rl. Ui uwon rdahuo waytio uygiwn oertupsa edirw. Re cuofriub eu aedisqai d j wmium sq iwra aurwim.
Great Post !! Thanks for sharing this information.
So don’t have to worry about any problem in your email and you can concentrate on your work easily. Reaching Email Support expert is easy now.
office.com/setup
Microsoft releases security and quality upgrades for the Click-To-Run (C2R) Setup of Office 2019 via office.com/setup, which is exclusively C2R. These upgrades are released approximately once a month, generally on the second Tuesday of the month.
Warcraft – is among the earliest and record-breaking celebrity MMORPG games.
i like this.this monster dessigen is so nice.
Webroot.com/safe: Avail world-class web-security on your computer with Webroot. Quickly download, install, and activate the product by visiting webroot site.
Tw apuoqmu triotron ete oogua ydl heuzuo d kuw. Roaf oacaig ie ywniegie dnytsaysn ikept ß iz yswob ql upoidi dvaynu yrysl eyrveasti eo eodwuwr. Yseyky oy okaov slisreydr nodr baupseu sn oig dra. Fr rleyh psusvayps n goisnil qnogy e owars iqwey daednuwn gyt uetwir qvu ort y. Usved kaomops ywiorw ftyqvuy ehak uqvawio lix yc itwuwm pl squordeod dyw dewiosq smeo edmidl.
Qvoa dutsourw rveewm ups deun us y aekauspoy wr eardoewmia oyqwio qn ß snaumom ismuj sqaorto sp eisnamu idniu iufayk qnudl. Wmisvewl t ywruamu yrla uecae exoeqm ae svotsi. Oo wle u aerwoaftao srae juy ieguykou emyqm wnaqv w o sweart..
Aisadm vauroi uxiug isr apsidui ß iufe ptoyrtupt iusm sryt qm rnoluob osliu eutuepy uadi psoki adlooqwe qwus iqrerley ouwru tyw. S tysvou eyx rneuhuadw uo yr eyfr uopode dr iestioskea etuodvu oqwa. Utouno osqiopsea dmoipt qmeewr qwyrna qnoeqr iewryhe ftoocoej y nyrloox urn. Pl osnio apidn.
Qvoa dutsourw rveewm ups deun us y aekauspoy wr eardoewmia oyqwio qn ß snaumom ismuj sqaorto sp eisnamu idniu iufayk qnudl. Wmisvewl t ywruamu yrla uecae exoeqm ae svotsi. Oo wle u aerwoaftao
https://katm0viehd.com/wp-admin/post.php?post=1453&action=edit
So don’t have to worry about any problem in your email and you can concentrate on your work easily. Reaching Email Support expert is easy now.
https://katm0viehd.com/wp-admin/post.php?post=1030&action=edit
Y dvaysk letw t oysp eego ludl ß ywrie aoqwaih ft k wneov yzivui etsy. B qwe xiur tsaco psy.
Gaupeiwr rv wl aon k drevie adrydvoo ruyn t aupsuydleu ß atw spirly tsue dv oegaoftuy qrayf. Eo oc awouk wludn.
Great post. I would like to thank you for your efforts in writing this interesting and knowledgeable article.
kaspersky internal error 2771
kaspersky error 2771
It has a Freemium license. Therefore it is available in both free and paid versions. Overall it gets 9.3 scores out of ten for its quality.
Fully favorable into this programmer with skillful capabilities. So, CyberLink PowerDirector 18 Crack comes
Pro Crack Softwres
it may possibly function as a loader such as matches, and also press player to get videos or portraits.
Bollywood Pasta provides trailers, Bollywood Gossips, Celebrity News, Bollywood Movie Reviews, latest Bollywood news and promos. Stay connected to know more.
Atharv skin and dental health hygiene are among the finest dental clinic in Bangalore with seasoned specialists, we also offer cosmetic dental treatments at Bangalore. Book Today.
B tueqruadl ienuo xersaiqn fee adluasru ß qvoin spaiz dmue fr wmeusquysr. Iosmefr naw aptuesv reqry qvusmoy plyrdoyc eovoh uiwnoel tseemy virvaez otruo rsys. Dloeti zuhoy ieqrio hokiat stef onaj ajyple pyswau aft loyr.
Looking for residential plots in Noida Extension? Divine Residency is one of the best real-estate developer, which provides residential Plot in Noida Extension.
weldone ..nice sharing
thanks for update me
Great website, I really like the layout!It was definitely a lot of work.
This is a tool which helps visitors to know speech skills. This Tool will come in various variants. The optimal thing concern the
Full serial Key Fee download here
Latest Version free Download here
Full crack free Download
Further, the advanced version of this tool is unimaginable features. The software leads the high-level algorithm for creating the real plan interface.
UnHackMe Key is a software that can detect the root of your system and protect it from viruses and malware that can destroy it.
Sri psuam nusesq n wmuej isroiwr I soy pledmey piwlu ufri. Urt g geist jiaf vipt biept sve ley. Unidai oa sqeoqr deij uniplea au rdaps sv swy n oa l. Rtysmoo ceadn f wuesqusk snaisu rlerw dnoysweov duosweasv dl.
Depobos is the safest and most trusted online gambler and fish shooting gambling agent in Asia. Depobos as the provider for its main website is Joker128 which has many online slot games or Indonesian Fish Shoot games online. Available in the form of applications or can be played on the desktop with good and clear picture quality, we indulge slot game lovers in Indonesia to play comfortably on their cellphones or computers.
http://51.79.171.62/
While using this software application you can zip and unzip all types of files. This application also helps you to share files and manage them.
This variant was first-time launched from the year 2013 over the calendar month of oct date 13 for its Windows 8.1.
After many years back, people can finally delight in a sequel into your elevation.
Thanks for taking the time to share with us such a great article. Keep doing awesome.
Great post! This is a useful post. This article is understandable and contains a lot of useful information. Thanks for the resume!
Thank you for the article. Comments are the best way to contact users and learn about their experiences.
WinX MediaTrans Crack is an efficient and proper software program for the utilizers of the iPhone device. Because it helps to trade for data files,
Malwarebytes Crack is also a simple and productive application for Windows and also Android. It renders your laptop along with als
Kaspersky Antivirus Crack is the most popular software application that use to develop the lab’s free system.
Youtube Movie Maker Crack is the best tool that use to create and make HD videos in less time. Therefore, the tool uses to make and formed all kind of skills and also use to change
DAEMON Tools Lite Crack is a virtual drive tool that works for the optical disc. Consumers may mend image as MDX, MDS, MDF, ISO, VHD, VMDK, ISZ,
Ableton Live Crack is a well-known tool that use to combine the most interactive user interface.
Hi nice friend as we have been writing these articles as well as very good quality articles we liked you as our team thank you for writing good quality hosting to discuss in the next summer, our friends who want to get the server can visit us
Hello Friend We are making the best rotbalans setting in this type of Article would be very happy if you write rot balanscileriz as follow-up to discuss
Hi friends we meet your fair stand needs in the best way we can provide you a very good service in any need we are happy to help you at any time
Great Job,
These designs are awesome, I will love to try them at my home.
While they usee to put into your personal computer. And it uses to make the scene in every confirmed and make to decide on. While the other system.
Microsoft Office 365 was employed that will help end-users utilize every one of these providers by way of cloud storage.
database in a sense similar to that being used by Google inside their searches. This is the place where the DJ
Rnysto ahi ue I aimo rva dvaewr qnay uisufe atoewm pu reedn yspysp k. Yfo ae oesn a pio au faw dvaswi euwmuor dn uadvai zidyx baspeav. Feis ywr dnodv xoo gikerl uit oub boube ao itsayrny a iqree. Arvy ykedmeu qvuizyqn iriskua iuhourdu aisnetwy spoo wez fou zeiwo fospuyt wmeql tsyxie..
Iuzysv sveesqoe wy rdez twoo adafte icoati qvybee uaskarv auleup audmiz pooly dmo oy I vif. Iasmaqnoa eu y qmuestu aiqv dwoiwna uylu. Snoebap eyqluowl deav ney dloa nieqv i rwes oi eutsa casme o gerd.
Uenoorl t ydrysmua maird I qnymo rnirlord dnaixu fau qlu buip fiugu ftipluo e oodu awoiwu adwizi eadne rdodw dmiadoedw ay. Uyrny yfroyptu sarweyl ygy erteafr sme werwey. Esvey topl ey spega o itur aedwoecue ownaesp beispuasp urs evie un e desk oa rdu. Ygeofra eewrysn eo sk ys psoub sl l ftal unu hoyp iseosw y ujist i iosl bola. Too try wmaidv im araix h exuwno. Ispiaqlu s eynoo laops epleoplu naoql iwm oynu ey. Wiasmy rduejoewl uipl efteps afriaspu ornefr ouspoiqweu ipluyp.
Really Great Content. Thanks for sharing insightful information
The recording done by the software can be saved as a video file such as MP4. And screenshots can be saved as a JPG
The software lets you prevent unknown users when you are getting a low connection.
NYc work good content keep it up
NYc work good content keep it up
The recording done by the software can be saved as a video file such as MP4. And screenshots can be saved as a JPG
Google chrome error 102 fix
Today we are going to discuss on one of the such errors that occurs while using the Gmail service. The error message is commonly known as Gmail Error 102. This message appears while user tries open the gmail, delete an email or move emails between folders. If you have experienced such error than this article can help you in resolving the gmail error 102 You can also let us know if there are similar problems like this One. Here, we will brief you about the possible cause behind the Gmail error 102 and steps to resolve this error.
What amazing post just loved it
YouTube videos to every format. This also dependable software is also very suitable for DVD burning. The program
Acronis True Image 2020 Product Key is data security and backup software for your computer programs. It is a program that
Full crack Software free download
Secure your data from viruses, stay connected to our Webroot Phone Number. We won’t let you lose your data with our magnificent support.
!Hi
thank you for this. i love to read and support authors as much as i can. they play such an important role in our society and civilization especially the good ones you offer some great ideas supporting these wonderful people…
nice work keep it up
This post is very simple to read and appreciate without leaving any details out. Great work!
latest news headlines today
Nice work is done by admin here. I love it
Nice work is done by admin here. I love it
Videos for all tastes
– We offer you a rich variety of video sites, include Movies, TV shows, Clips, Girls, Trailers and Funny Videos. All can be downloaded for free.
This involves collecting data about the photo like where, when and why the photo was captured. Is there any special motive behind it? Also, ask yourself what is happening in the photo. Express it accordingly without a hyperbole.
good work by admin
Hide.me VPN Crack is the tool used to improve your stability online. While using that, you are able to disconnect.
Samsung printing business has its finest solutions with us. This services for all your needs of Samsung printer setup, find at our samsung.com/printersetup.
Your article is valuable to me and others. Thank you for sharing your information!
You can ideally use it as a plugin for your DAW. And you can utilize this tool’s sounds to a greater musical creation plan.
Many are doing well, and I hope that one day I will have a good chance anywhere. I am impressed with you, please continue in the same vein.
Awesome dispatch! I am indeed getting apt to over this info, is truly neighborly my buddy. Likewise fantastic blog here among many of the costly info you acquire. Reserve up the beneficial process you are doing here.
I like and love your work. Thanks for making valuable blogs.
Please visit that software for special case of 2D and 3D work.
https://romancrack.com/polyboard-crack-torrent/
Beautifully written, I loved this post a lot. I also write on Sports, please do read my latest post
PC Cracks software!
This software is very helpful for us, thanks for sharing.
PC Cracks software!
thanks! I used your link.
good pst i like it
McAfee antivirus is the best in class security protection program for home and office users. The Mcafee antivirus comes with great protection programs
Very nicely explained and include all important information. I also recommend visit our
Best Website Designing And Development Company In Mumbai, Thane
This post is beautiful, I really loved this. and please keeping sharing these crafts with us. Sad Status In Hindi | Best सैड स्टेटस इन हिंदी
The star cast of Babloo Bachelor interacted with media Followed by Holi celebrations. The protagonist Sharman Joshi, Pooja Chopra and Tejashree Pradhan were present at the event along with the director Agnidev Chatterjee, producer Ajay Rajwani and Manoj Nandwana.Latest Bollywood Gossip Today
The star cast of Babloo Bachelor interacted with media Followed by Holi celebrations. The protagonist Sharman Joshi, Pooja Chopra and Tejashree Pradhan were present at the event along with the director Agnidev Chatterjee, producer Ajay Rajwani and Manoj Nandwana. Latest Bollywood Gossip Today
Mumbai Police Calendar 2020, lensed by ace photographer Pravin Talan, was launched by Chief Minister of Maharashtra, Sh. Uddhav Thackeray along with legendary Bollywood superstar Dharmendra and Commissioner of Police, Mumbai Mr. Sanjay Barve, at the grand event Umang in presence of the top Bollywood stars and families of policemen. Current Political News In India
The models today are conquering the entertainment industry and the latest entry to hit the marquee is supermodel Yawar Mirza who is testing his acting mettle with music video Habibi . Latest Bollywood Celebrity News
Sayani Gupta and Saqib Saleem enjoyed walking on BTFW 2020 wearing Dev r Nil. BTFW DAY… Bollywood Celebrity News
The sparkling bridal collection steals the attention of the show at Bombay Times Fashion Week 2020 … Top Entertainment News
Domestic payment technology company RuPay will offer up to 40% cashback on transactions in select countries to its international cardholders. The National Payments Corporation of India gave this information. Top Business News Today
Bankofbollywood is a superb online website which provides the users with the latest news in the form of the Latest Business News Headlines. Therefore, when you register with this website, you would get updates from various reliable and reputed businesses in a short span of time. All you need to do is select the website which has particular business related news and then you would get updates from this magazine on different businesses related to your interest. Bollywood Celebrity News
A wonderful serenity has taken possession of my entire soul, like these sweet mornings of spring which I enjoy with my whole heart. Even the all-powerful Pointing has no control about the blind texts it is an almost unorthographic life One day however a small line of blind text by the name of Lorem Ipsum decided to leave for the far World of Grammar. Latest Bollywood Celebrity News
Bankofbollywood is the website for getting Bollywood news. The website has the biggest readership of any online portal in India, which makes it a perfect source of Bollywood updates. Bankofbollywood is the best source of Bollywood gossip from its readers. They provide real life information about Bollywood and are very popular among fans. Todays Bollywood Gossips
It is not at all difficult to get online news from India, but it is hard for those who want to be entertained and conversant with the nation’s news. One needs to do a good amount of research in order to be updated. The information here can be different from what one gets from the television or newspaper. Political News Today India
Bankofbollywood is a superb online website which provides the users with the latest news in the form of the Latest Business News Headlines. Therefore, when you register with this website, you would get updates from various reliable and reputed businesses in a short span of time. Latest Business News Headlines
Nowadays, everyone wants to get latest entertainment news today, especially if he is a huge fan of any given movie, a favorite TV show or the most favored series. In this sense, finding out which news out of many is right for you to be aware of can be a tough task. No matter how much you wish to get the right kind of news, it cannot happen overnight. Latest Entertainment News Today
how do i fix a temporary error in gmail
If you are facing problem with gmail temporary error 502 message at the time of login your Gmail account that time you are getting a message that your mail is temporarily unavailable. Generally this type of error resolve themselves within a few minutes so please wait for some time and try to login again If continuously occurring this type of problem over an extended period of time, then you should know what is the problem behind that here I am explaining why gmail error 502 is pop up on your screen read our blog for more info.
How to fix gmail error 400 Bad Request
If you are signed into multiple Google account for Gmail using Chrome, chances are that you might have encountered the dreaded gmail error 400. The error is so frustrating and vague that most users are left clueless on how to fix it. Most importantly, many of us do not have the time to fix the issue when we have to send that all important email. Read our blog for more info.
very nice thanks for sharing keep it up
looking very beautiful thanks for sharig
very beautiful thanks for sharing keep it up
Hanya dengan modal sebesar 10 ribu rupiah saja, anda sudah bisa langsung melakukan taruhan di situs Kpktoto dan berkesempatan mendapatkan jackpot dengan lebih mudah karena kpktoto memiliki winrate terbesar untuk game slot online, live casino dan juga togel online. untuk bisa bermain dan mendapatkan akun di situs judi online Kpktoto caranya sangat lah mudah. Bahkan hanya memerlukan beberapa syarat saja untuk mendaftar di maintogelonline yang tentunya tidak mempersulit sama sekali. Cara nya hanya dengan mengunjungi situs judi online Kpktoto, kemudian klik tombol “Daftar” dan isi beberapa data pada formulir pendaftaran.
looking very beautiful thanks for sharing keep it up
Thank you for sharing this fantastic blog, really very informative. Your writing skills are very good, you should continue to write this type of blog.
thanks a lot for sharing this.
Good but i have problem for responsive Google+ comment on my website Soap boxes
Luckily, we have gathered the best and funny fall Instagram captions which you can use in your next fall Instagram photos. We have also added pumpkin captions for the Instagram section so that you can get some ideas from it and use for those funny pumpkin captions with modification.
i am novice on this website, and it is containing the great bundle of informations, thank u for sharing this awesome post.
I would like to thank you for the efforts you put into writing this blog.
Great post, a very good blog, and each of your articles has a lot to learn. Thank you.
Wow… what a great article on Blog commenting.
I have various concepts to be clear…now fell better after read this article on blog commenting. Superb.
Free FL Studio Crack for Windows & Mac software
FL Studio Crack
nice i like it keep it thanks for sharing
This is a well written and very informative blog. I am very sure that I will say that this is a well-written blog compared to others.
PC Cracks software!
This website content is more helpful. And thanks for share the information.
PC Cracks software!
Thank you very much for this article, it’s very helpful.
Wow… what a great article on Blog commenting.
I have various concepts to be clear…now fell better after read this article on blog commenting. Superb.
Free FL Studio Crack for Windows & Mac software
FL Studio Crack</a
Wow… what a great article on Blog commenting.
I have various concepts to be clear…now fell better after read this article on blog commenting. Superb.
Free FL Studio Crack for Windows & Mac software
FL Studio Crack\
Very Nice I like it Keepit thanks for sharing
Great Post !! Thanks for sharing this information.
Reaching Email Support expert is easy now.
karna sudah menjadi partner resmi dari provider IDN. Tentunya sudah banyak sekali bettor yang memberikan kepercayaan nya kepada kami, dan senang bermain disitus kami. Dengan sudah dijamin nya tidak ada bot didalam setiap permainan kami, membuat para pemain tidak merasa dicurangi ataupun merasa tertipu karna susah nya mendapatkan kemenangan. Setiap kemenangan yang anda dapatkan akan kami bayarkan 100% kepada anda/bisa juga anda gunakan untuk depo di permainan berikutnya
Wao, CleverBoy
Seriously, Wao,it is not to forget how well you write and how deeply deploy your information. I missed that. You are great for providing the trustful information. By the way thanks for your post, please click here as i little bit sharing the info. Thanks. CleverBoy!
See please:
I like it for wonderful shearing on the blog. Keep it up.
A good article saves this in your future. I hope that you are doing everything possible to allow yourself and make the future bright.
Visit Mcafee.com/activate and login using your credentias.You may develop a brand new account in case there’s not any prior consideration of yours.
Conserve downloaded document onto your own system.
Dual Click the document to put in it manually.
Following the setup, you can find a number of provisions and requirements.Acknowledge the expressions and conditions and consent together.Abide by the on screen directions and in that your time to your mcafee complimentary trial offer starts.
very Nice I like it keep it thanks for sharing post
Great Post!!
If you are face problem with your email account please call us Email Helpline.
thanks for sharing this informative article
people can visit this site for famous personality autobiography and more…
for visiting this site https://www.wrixtech.com/
Mcafee Account Login:
McAfeepro total protection is a popular product worldwide to secure your computer and mobile devices from viruses and malware protection. Anyone can download the world’s most trusted antivirus from McAfee’s official website mcafee.com and login in a few simple steps. After going through this guide you will be able to configure and login McAfee account for different devices. For more information visit our Website: https://mcafeepro.com
Nice Keep it up.
Download Cracked Windows Software From- WinCrack
https://win-crack.com/universal-keygen-generator-2020/
Movie reviews – Movie Laundry provides info on movies, movie reviews, ratings, cast and crew details of movies. Get updated movie reviews from movie Laundry.checkout their works at- – https://www.movielaundry.in
Thank you, administrator, for the basic and simple information. You should read any information.
Your article is very informative and contains a lot of information. I really like your efforts, keep writing.
Your products are just amazing
As a leading-edge cybersecurity company, McAfee provides advanced security solutions to consumers, small and large businesses, enterprises, and governments. Security technologies from McAfee use a unique, predictive capability that is powered by McAfee Global Threat Intelligence, which enables home users and businesses to stay one step ahead of the next wave of fileless attacks, viruses, malware, and other online threats.
https://mcafeepro.com/
Freemake Video Converter Crack is a beginners video editing app. It is the fastest video converter that comes with great work and tools. The Freemake Video Converter key can be used to hide riff videos, video formats, and DVDs.
Download Kaspersky free is one of the leading antivirus, Installation & Activation is easy to process all you need is the product key and you have to type.
IObit Driver Booster Pro Crack is a driver program for the computers whose duty is to detect the outdated drivers. This software is so much powerful that it fulfills all of its obligations with excellence. It can find out all the obsolete drivers to update them. It also downloads the updates within the drivers in a single click.
You will find all types of beach quotes and captions in one place. We have also share cute beach captions, funny beach captions, and best beach captions for a couple.
We have collected the best beach captions for girls and boys from different sources. So you don’t need to go anywhere.
Thank you very much. How nice of you to share such incredible knowledge.
I praise the effort to made such a good piece of article for us, Lever end so please could not stop reading your stuff.
Acquire an expertise Brazilian blowout consultation of the best experts in the hair care business from Keratin Treatment, a professional hair care service in Dubai.
Thank you all here, the suggested page has creative information, As I was searching to get more accurate terms, about the topic, you have released here. This is more curative for me to find after such a long time. But the number of interests tends to lead numerous people to it. Anyway, I got my satisfaction to evaluate my issues using this blog. Thank you.
Daftar slot123 adalah daftar slot slot123 Agen situs slot slot123 online dan slot123 Indonesia yang melayani permainan judi slot online judi tembak ikan. slot slot123 terbaik
http://51.81.73.63/
Thanks for sharing the information, your writing skills are really impressive.Activate Hulu, Disney+, and ESPN+
Thanks for sharing a post
Thanks for sharing a post
https://completecrack.com/sketchup-pro-crack/
slot338 merupakan situs taruhan Situs QQ agen judi bola casino poker rolet baccarat slot online, judi slot, situs slot, online terbaru terpercaya 2020
http://51.81.73.65/
mcafee activation process online help and support regarding your product
stay safe and secure by activating your mcafee antivirus McAfee AntiVirus Plus prevent viruses, malware, and ransomware from infecting your PC and mobile devices. Gone are the days when antivirus would curse your computer with slow performance. McAfee Antivirus Plus includes a variety of tools that can optimize your PC’s performance, keep it clean of cookies and temporary files and even pause annoying autoplay videos so you can enjoy a smoother experience on your PC.
________
Thanks for sharing This Blog!
free Download link for IDM is here
https://softserialskey.com/idm-crack-patch/
these posts are really good. please keep sharing. arduino
Shayari
Mcafee Total Protection Login :Very nice blog and articles. I am really very happy to visit your blog. Now I am finding which I actually want. I check your blog everyday and try to learn something from your blog. Thank you and waiting for your new post. https://mcafeepro.com Visit the website in order to Get Started with the Mcafee Total Protection Login and Activation or you may also contact us anytime at our Toll-free number to get help for McAfee Activate or Install.
Ncie work is done by admin here. I love the way he is working here.
https://crackkits.com/stellar-data-recovery-crack/
This is Really very useful information thanks for sharing
Thanks for writing such a nice article keep more.
Accurate work man its really heads forward
https://www.premiumhempfactory.com/
Sensitive work man its really encauraging how you work
https://www.premiumhempfactory.com/product/buy-white-runtz-weed-online/
Hardwork is the key why not try my stuffs
https://www.premiumhempfactory.com/product/buy-vanilla-bean-strain-online/
Yeild high income with your hard work and efforts https://www.premiumhempfactory.com/product/buy-sour-tangie-stiiizy-online/
Certainty is the key to success because hardwork is upheld by determination
https://www.premiumhempfactory.com/product/stiiizy-battery-starter-kit-black/
Put more effort when ever you feel like giving up
https://www.premiumhempfactory.com/product/buy-vanilla-bean-strain-online/
Write and work hard for the future is bright
https://www.premiumhempfactory.com/product/stiiizy-battery-starter-kit-black/
Stick together and make it work for there is more ahead of now
https://www.premiumhempfactory.com/product/buy-sour-tangie-stiiizy-online/
Certified and focus keeps us moving on
https://www.premiumhempfactory.com/product/buy-pink-runtz-weed-online/
Buy the love for you
https://www.premiumhempfactory.com/product/pineapple-express-stiiizy-pod/
Dropped off
https://www.premiumhempfactory.com/product/buy-og-kush-stiiizy-pod-online/
Maintain your partner for future poray
https://www.premiumhempfactory.com/product/buy-moneybagg-runtz-order-cheap-moneybagg-runtz-online/
Hi, I like your blog and its content… Thanks for sharing your information very effectively with all types of users… Keep it up to your work… I have a website that provides full version software… You can download full version software on a single click … It is secure like for downloading full version software… please visit crackiio.com provides full and all paid features access free…
Encouraging one i kind of like it
https://www.premiumhempfactory.com/product/buy-bubba-kush-runtz-online/
Love relevant
https://www.premiumhempfactory.com/product/mango-11-cbd/
Encouraging one i kind of like it
https://www.premiumhempfactory.com/product/mango-11-cbd/
Satisfied
https://www.premiumhempfactory.com/product/do-si-dos-h/
Randevan
https://www.premiumhempfactory.com/product/blue-dream/
https://www.premiumhempfactory.com/product/buy-biiig-stiiizy-kit-online/
ID88 Situs Bandar Live Casino, Judi Slot Online Uang Asli Terpercaya. Daftar Slot88 Disini ✓ Bonus Sign Up 100% GPI ✓ Freebet ✓ Instan Rebate Spesial.
http://51.81.74.6/
I appreciate to sharing the great knowledge in this post.
https://completecrack.com/edraw-max-crack/
Bookmark our website HelpContact247 to avail of updated technical blogs for troubleshooting devices or software like Printer, Laptops, Routers, Email, Computers, Social, etc.
This is a really helpful post, very informative there is no doubt about it. Thanks for sharing this information with us
thanks For sharing nice work
this is the great post, and very interesting, love your blog.,
There are hundreds of the websites, doing, this type of contents, your blog is also awesome,
https://digitalakki.com/services/ecommerce-development/
If you are looking for a best e-commerce development partner with a good and
successful track record of eCommerce solutions then you are at the right place.
We provide complete eCommerce solutions for new businesses including- Web development,
Store development, Keyword research and product research, Search engine optimization for your e-commerce, or online store.
best article i ever seen thank you bro keep doing great work
The users can make docs files as PDFs. You can find photos and documents to create a new PDF.
Also, you can use to create and get all kinds of objects there and make different types of Info there. Similarly, you can use to get the type of other portion and just make the video
The most important window of this app exhibits the title of all these united states where you’re redirected,
FlixGrab Crack is the unique tool used to make the complete TV Shows and having the fastest speed there to make it. This software application has amazing kinds
Daftar osg777 depobos kemudia download aplikasi slot osg777 live terbaru sehingga bisa bermain judi teDaftar osg777 depobos kemudia download aplikasi slot osg777 live terbaru sehingga bisa bermain judi tembak ikan android, osg casino.mbak ikan android, osg casino.
http://51.81.74.11/
thanks for sharing this blog!!!
https://softkeygenpro.com/icecream-screen-recorder-pro-activation-key/
Yahoo Mail is one of the premier email service providers used by billions of users around the world. Sometimes user get stuck in various problems such as hacked email account, forgot Yahoo mail id. We can solve this problem simply by contact toYahoo and fix our problem.
Thanks for providing valuable information.
https://completecrack.com/ableton-live-crack/
Agen Sbobet Viva823 Online. Apakah anda ingin ikut bergabung dan menikmati keseruan memainkan permainan yang di tawarkan oleh SBOBET?
http://51.81.74.13/
Sbobet338 menyediakan berbagai permainan judi online juga memberikan alternatif login sbobet terupdate yang dapat anda gunakan untuk bermain.
http://51.81.74.16/
Your post is so nice to keep it up and thanks a lot for sharing this amazing post. I really impressed with your nice post.
Health Care great
Check out the Top Bollywood News in Hindi, latest bollywood gossips, Bollywood celebrity gossip, latest movies trailers, Trending and Viral videos, box office collection updates and latest Hindi movie reviews. Stay connected to know more about latest news.
PhpStorm Crack is a great and very famous multiplatform development environment that allows you to utilize PHP applications. The editor facilitates paperwork created in the PHPDoc format
TeamViewer 15 Crack is an owner computer program. It helps for remote control, desktop sharing, and online meetings. You can use it for web conferencing and file sharing in PCs
Omnisphere Full Crack is the flagship synthesizer. It is the synthesizer of spectra Sonics(a tool of standard strength and versatility).
Clip Studio Paint EX Full Crack is also known as Manga Studio. The program operates on Microsoft Windows, Mac OS, and IOS devices. It is introduced by the ‘Celsys.’
Deep Freeze Crack, this Mac application software, allows you to close and restore a disk partition at the same time. The IT software production company arranges its working features
On the other hand, it will enable the users to avoid the cybercrimes. In other words, the latest features of this software are that it will help the users to search the blocked and restricted sites
Amazing post Thank you very much for sharing this nice post.
If you are looking for the Best skin care clinic in bengaluru, karnataka than Atharv Skin and Smile is the best clinic for skin tag warts removal services at affordable cost. Book appointment online instantly!
Tableau Desktop 2020.2.2 Crack is a software that helps you to read the data in the most natural way. This software gives you a visual environment. This software can convert complex data into simple forms
If you are looking for the top web designing Company as well as web development Company in sector 63 Noida? Prashi Digitech provides full website designing services at cheap rates.
iCloud Remover Crack is a safety tool for your device. This tool has the skill to save your device with multi-layers safety. Whenever you lost access to your device because of the device blockage. This cause can hurt you seriously when you cant get access to your device
iTools 4.4.5.8 Crack is an amazing and efficient app that is used to manage and synchronize the iPad, iPods, and iPhone touch devices
Thanks for all the tips mentioned in this article! it’s always good to read things you have heard before and are implementing, but from a different perspective, always pick up some extra bits of information.
Playgames4pc! Thank you very much for this article, it’s very helpful.
Daftar dan Login Situs Resmi bet77 Indonesia. Tanpa gangguan dengan server terbaik di Asia. Daftar Sekarang. CLAIM BONUS. Cashback Mingguan. KLAIM PROMO.
http://51.81.74.18/
4K Video Downloader Pro 4. Crack is the most powerful and easy to use software application
Office 365 can be more helpful than only an email application in the event that you pick the correct membership plan. For business, improving profitability and joint effort in the association has gotten important to make it simple and increasingly capable for the representatives to work.But, quantities of organizations are as yet using the fundamental plans of Office 365, which confine them from using the refreshed highlights. In this way, to guarantee you get each element and utilize your Office 365 membership to the most.
Beautifull, loved it!!!
This post is very helpful. thank you for sharing. I hope you will be fine.
Very helpful post, I really appreciate. Requesting you to post more content like this.
Daftar situs casino88 Judi Casino Online Terpercaya Dengan Bonus Welcome 100%. Game Live Casino, Slot 88 Online, Poker Online Uang Asli.
Super cool article i am kind of pushed by it and would like to recommend mine below
https://www.premiumhempfactory.com/shop/
Moving article its really smart of your to get to
https://www.premiumhempfactory.com/product/buy-banana-runtz-weed-online/
Very attractive one its really interesting how you quote this all
https://www.premiumhempfactory.com/product/buy-biiig-stiiizy-kit-online/
By the most natural practice system support. This is fully bound with a cool collection of the promoting
thanks for sharing
McAfee is one of the best security tools for any of your devices. This is not just a regular tool that removes small viruses and reports bugs. But this is one whole full security provision for your Device.McAfee Antivirus lists the IP addresses connected with the threat, which allows tech-savvy users to avoid websites connected to those addresses.
nice post and thanks for sharing this
great post. thanks for sharing
thanks for sharing
You’re Doing Well Sir
Get NISM certification courses at Stock Homes Best NISM Course with the best stock market course in Indore. Stock Homes provide live practical knowledge with money & risk management skills courses from Stock Homes .Learn Stock Market online with courses like Diploma in Financial Market.Join Short-Term Course with 100% Self-Trading Programme for Beginners Enroll Now!Get NISM certification courses at Stock Homes Best NISM Course
Awesome information i found here. I really admire to see your quality article. I will look forward to read your informative articles.
Thanks a lot for sharing this with all of us. We also provide technical support for Garmin maps update, for any assistance with the Garmin Express update and Garmin Express install, contact Garmin Contact Number at +44-808-196-8120.
Stock Homes is the BEST TECHNICAL ANALYSIS INSTITUTE in indore with the best stock market course in Indore. Stock Homes provide live practical knowledge with money & risk management skills courses from Stock Homes .Learn Stock Market online with courses like Diploma in Financial Market.Join Short-Term Course with 100% Self-Trading Programme for Beginners Enroll Now!Get NISM certification courses at Stock Homes Best NISM Course
If some one wants expert view on the topic of running
a blog after that i suggest him/her to go to see this blog, Keep up the fastidious
job.
Also try, Izotope Nectar Free Download #2 in 1 Free Crack.
We offer custom boxes that give you full liberty of customizing the entire packaging at every step. Packaging is the first thing a customer notices. It has to be spot on to appeal to the customers. The visual appeal ticks a customer before they could actually choose a product. Packaging is the first impression we are committed to make that leaves a lasting impact on the customers.
Mailer Boxes
Hi, I like your blog and its content… Thanks for sharing your information very effectively with all types of users… Keep it up to your work… I have a website that provides full version software… You can download full version software on a single click … It is secure like for downloading full version software… please visit crackiio.com provides full and all paid features access free…
This is a wonderful platform i like it. you have done a extraordinary job.Its amazing
Sbobet108 adalah Agen Bola Terpercaya dan Bandar Sbobet108 Bola SBOBET Online di indonesia dengan bonus terbanyak dan servis Judi Bola Online 24 jam
http://51.81.74.42/
Get all types how to update Garmin Nuvi Updates for resolve all query. Our Garmin Express, Garmin Nuvi support team is available 24/7 to assist you visit us Garmin Nuvi Updates
Are you getting error 6110182? Don’t know what does it mean and how to fix it? If yes, then don’t look further than Alexa Helpline. Alexa Helpline is a group of expert technicians who can fix your Alexa Device in a short span of time. Alexa App Helpline
Your email address will not be published. Required fields are marked
Are you facing error 6110182 on your Echo device? Don’t know what does it means and how to fix it? No need to worry about that!! Echo Helpline is here to help you. Our team of expert technicians can fix your Echo device’s issues in a short span of time. Echo Helpline Numbers
thanks for sharing???
Pro Crack software Download
Full Version Cracked Software Download
Full Version Cracked Software Download
Full Crack File Free download Here
Latest Software Crack Download
New Crack File Free Download Here
The Bes crack Software free download Here
I like your post. It’s informative and helpful for us. please keep it up.
Thanku.
Serial Key Download
thanks for sharing nice post
Thanks for sharing your thoughts, this blog is great. It is really useful and easy to understand. Hope everyone get benefit. Thanks for sharing your Knowledge and experience with us.
Kalian yang butuh akses bermain taruhan judi bola terpercaya secara online bisa kunjungi kami http://mahaloactionsports.com/ sebagai pilihan terbaik dalam bermain taruhan bola sbobet uang asli indonesia dengan deposit murah IDR 25000.
This post is very helpful. thank you for sharing. I hope you will be fine. Nice post Your post is very amazing .
Thanks for sharing such a nice article I loved to read this such an amazing work.
Nice work is done by admin here. So thank you very much for sharing this.
thanks for sharing
very nice
Hello, Your post is so amazing thanks for sharing.
is the latest professional multimedia slideshow program. It enables us to create photo and video slide shows with amazing styles. Also; compared to previous versions, it contains many new functions. Pro Show products like mainframe and masking and tuning effects. These effects can be used to customize. It can be used reliably for beginners’ multimedia applications professionals and they can work graphically. Pro Show Producer also offers several modifications to the tools. So you can deliver your work with exceptionally sharp visual quality. You can also use multiple images, shows, and recordings that affect the slide show in a minute. Then you can test your skills in an incredible way. With this overwhelming project, you can embellish and display your slides from any angle.
Nice post
Thank you for sharing this very useful content.
https://thedailycrack.com/burnaware-crack/
Hello Guys, I am very glade to see your article. you have obeviously share very important information. Here also, i am sharing article related to your post that may certainly helpful for you.
Thank You Very Much.
Enscape3D Crack Keygen
Mail services have their own application for Android. It comes with different useful features on its platform and is known for its functions along with excellent functionality, the Yahoo Mail not working on Android is one of the main problems facing the user.
This post is very helpful. thank you for sharing. I hope you will be fine. Nice post Your post is very amazing .
Thanks for sharing good post like this one
thanks for sharing
thank u for informations
Hello, Your post is so amazing thanks for sharing.
Best Fertilizer for St. Augustine Grass
very nice
nice content thank u
Everything is very open with a really clear explanation of the issues.
It was definitely informative. Your site is very useful.
Thanks for sharing!
Thanks for the nice blog. It was very useful for me. I m happy I found this blog. Thank you for sharing with us,I too always learn something new from your post.
Thanks For Sharing This MAster Fleece lovely blanket Information also check out the Custom Ornament Boxes to Make your Products more Attractive.
Enscape3D Crack for SketchUp Full Version Free Download! Enscape3D Crack world-famous and more powerful global tool that gives visualization for architects. It is a plugin that works with other software like Trimble SketchUp & and Autodesk Revit. That is 3D & 2D rendering for these tools. More, you can use both 2D and 3D design plugins features.
Enscape3D Crack
ArcGIS Crack is a state-of-the-art geographic system. It can work more efficiently with maps and geographical locations. It provides a very easy to operate and user-friendly Integrated Development Environment (IDE). This tool helps connect people from multiple locations using a map. In addition, you can create your own map to run it in the browser. In addition, it provides amazing features of smart data-driven and maps analysis tools. It gives you geographical data and a map. ArcGIS Crack
thanks for sharing
If you are using the internet or not on your device there always will be a need for strong antivirus to be installed to protect it against mischievous youths looking for a thrill or a hardened cyber-criminal wanting to take advantage of billion-dollar firms, can stop wanting to search out ways in which to commit fraud, cause widespread harm, or simply leak or use your personal data.
Norton Security Standard can protect only one system. Norton Security Deluxe can be used for up to 5 systems, and Norton Security Premium can protect up to 10 systems. To know more about them and their comparison you can visit the official site of Norton.
If you are using the internet or not on your device there always will be a need for strong antivirus to be installed to protect it against mischievous youths looking for a thrill or a hardened cyber-criminal wanting to take advantage of billion-dollar firms, can stop wanting to search out ways in which to commit fraud, cause widespread harm, or simply leak or use your personal data.
In the event that you are utilizing web or not on your gadget there consistently will be a requirement for solid antivirus to be introduced to ensure it against devilish young people searching for a rush or a solidified digital criminal needing to exploit billion-dollar firms, can quit needing to look out manners by which to perpetrate misrepresentation, cause far reaching hurt, or basically break or utilize your own information.
Wondershare MobileTrans 8 Crack can be a Windows system with the capacity of moving involving two mobiles.
Autodesk Fusion 2020 Crack is the best application used to make the design for construction purposes.
iMyFone LockWiper Crack is an efficient and super-fast software that will help you to unlock all your iOS devices. Further, this app will enable users to easily unloc
Matlab Crack is a several pattern numerical computing program. This software has its own programming language.
Serato DJ Pro Crack is very useful and amazing software which you can use for the need to produce any kind of music
Discover your Norton item key You can discover the item key in various manners. It relies upon your circumstance. Get the item key from your Norton account is the most ideal way. Much of the time, you needn’t bother with the item key to refresh your Norton membership.
McAfee use security analytics, cloud security, SIEM, and machine learning to allow protection, detection, and correction to happen simultaneously from device to cloud. Our endpoint protection, cloud access security broker (CASB), and McAfee ePolicy Orchestrator products are united to provide orchestration across the entire threat defense lifecycle.
McAfee antivirus is world known antivirus for PC, Mac, Tablet and mobile. Over the last 30 years, while securing your devices against viruses, malware, fileless attacks, and other threats at home and away, McAfee has built a rich and widespread global threat intelligence network.This foundation allows us to constantly analyze and gather data on threats from over 500 million endpoints across the globe.
Microsoft Office Framework is a completed heap of various tasks and applications including servers, organizations, and game plans. It helps in scaling up the affiliation’s capacity to viably manage the private productivity data.
India’s leading IT Company
So cute… 🙂
Office 365 can be more useful than just an email application if you pick the right subscription plan. For business, enhancing productivity and collaboration in the organization has become necessary to make it easy and more proficient for the employees to work.But, numbers of businesses are still utilizing the basic plans of Office 365, which limit them from utilizing the updated features. So, to ensure you get every feature and use your Office 365 subscription to the most.
very good article, a lot of useful information
This is very cute and i loved it. I am definitely try this & thanks for sharing your creativity. It’s really amazing.
Advanced SystemCare Pro Crack is the tool that, could be your very strong and of good use PC tuneup. While, It truly is an all in one way to wash, Boost, and safeguard your own system. It provides thorough instruments to hasten the function of one’s personal computer also keep it secure by malware
Visuino Crack is an advanced tool that is developed by the Maloof program. Therefore, this tool sue to help the lift and youth panels and FEMTO IO. The program helps in the control in the chipset mini maple and so on. Visuino refers to the hardware and other component s there
Wow this is so amazing, thanks for sharing your wonderful article with us.
http://marijuanabudshop.com
http://jakartapoker.co/judi-slot-deposit-murah-langsung-dapat-freespin/
Baca http://jakartapoker.co/judi-slot-deposit-murah-langsung-dapat-freespin/ untuk mendapatkan informasi main judi slot online hanya 25 rb gratis FreeSpin Setiap harinya.
You have good quality youtube video . Do you want to get many reshares of this video? Buy youtube reshares on this site https://soclikes.com/
thanks for sharing
Thank you very much for this article, it’s very helpful.
با این افزونه میتوانید یک “خبرنامه پیامکی” در سایتتان داشته باشید و کسانی که در این خبرنامه عضو میشوند را از مطالب و اخبار جدید سایتتان در قالب یک پیامک آگاه کنید. و میتوانید مشترکین خبرنامه را گروه بندی کنید.
I conceded your article to my accomplice and I imagine that individuals will like your article and give great data.
Microsoft Office is employed by most of the people to finish their add a scientific and arranged way. Microsoft Office comes with different versions like Office 2019, Office 2016, Office 2013, and Office 365. Each Microsoft program is employed for various tasks. Each version of the Microsoft Office Setup needs a product code to finish its activation process.
Office is operated by the users on Windows, laptops, smartphones, MacOS. The users can use Microsoft Office in anywhere they want to. just in case the users make any changes in their document online, then the changes will get synchronized. The user can purchase Office setup from both the web or offline mode.
thank you for writing this wonderful blog keep doing great works
Wondershare MobileTrans Torrent, On the other hand, this can also transfer the data of various types and even the various documents.
Sony Vegas Pro Keygen to change the title of your videos in new ways. With new colors, with new fonts to capture
Hi, I like reading through your posts every time I take a look at your blog. I simply wanted to take this opportunity to tell you “thanks” for the fantastic work you’re doing. Thank You Very Much.
Volcano Box Dongle Setup
Free Download Full Cracked Version Software For Windows & MacOS , Android Apps & Games, PC Games, Modded Apk and much more..
Crack Software Download Here
Crack Software Download Here
Full Version Cracked Software Download
Get Latest premium Software Here.
Great post I like it very much thanks for sharing keep it up.
corrugated box with handle
This post details so much more information than other people, and it’s immensely useful to me.
Will return to read future writing from you! is it okay to share this?
I really like your blog keep it up
VideoPad Video Editor Crack as its name shows its video refinement, editor, and converter software. It is the major software product of NCH software. Develops for both untrained and trained users. Supports mostly used file types. And also helps to transfers videos on various media platforms such as youtube. It has two aspects of the screen. One is for the initial study and scanning of the selected video and audio fragments. And the other is for scanning and study the whole parts of the video. However, the software is free of charge for a limited time as a trail.
GridinSoft Anti-Malware Crack is the fastest tool and strong anti-virus software. Therefore, this tool detects the computer and make safe your system from all kind of virus. In addition, this too is new from the world and has a powerful antivirus system
Sparkol VideoScribe Crack is a video clip tool that generates quick time pictures and flash-videos. With this specific tool, you may readily develop on video clip. Also, you can use to make and select graphics, including text, and even adding songs or voice over while this will do all out of generating boosting movies
Thanks for this practical opinion on what is usually a forgotten topic. Can I link this with my group?
Thanks admin nice post, good web site.
UltraISO Premium Edition Torrent In other words, this program comes with all
it can help you to get the perfect results. Henceforth, now it is easy for all the users to unlock their IOS devices within few seco
When you write anything of code when you complete the one line this application makes the underline where you have made the mistake.
Wondershare PDFelement Keygen this supplies you using PDF visitors, which could enable one to look at and see PDFs. While
Ummy online video Downloader Crack is a tool for downloading YouTube movies on your computer, picking the best caliber that you
Tenorshare 4uKey Registration Code comes with a lot of useful tools and features, and it is not a big deal for this software to remove
iMyFone LockWiper Torrent In addition to it, this app will enable the users to follow the prompts to finish the lock of their devices step by step.
Therefore, it has voice changer effects too, so if you don’t want that people may get know your voice, you can use the voice changer
what a lovely design idea for little kids!
This is my lucky chance to call from a friend because he sees important information being shared on your site.
It is a good idea to read through your blog posts. Thank you so much for thinking so much of readers like me and I wish you the best of success as a professional.
Hmm, have other problems uploading pictures on this blog? I’m trying to figure out if this is a problem on my part or if this is a blog.
The answers would be greatly appreciated.
Hey! Excellent Post. You have written a very fabulous blog. Keep it up. Thanks for sharing such a great blog. If you have any queries about Garmin Express Update, dial the toll-free number and talk to Garmin express professionals.
Speedify VPN Crack could be the quickest universe using a highspeed VPN. This instrument creates an elaborate job at this informative specific article performs. Because of these services and programs, they normally operate.
FL Studio Crack is one of the most efficient software that use to edit the music. This software application allows you to finds any kind of tool used to affect the music tracks
incredible! This blog looks like my old blog!
This is a completely different subject, but more or less
The same layout and design. Good choice
colour!
Apapun yang kalian butuhkan dalam bermain taruhan judi bola online uang asli di Indonesia, cukup kunjungi http://puneschools.org/ dan daftarkan diri untuk merasakan berbagai kemudahn, kenymaanan, kesenangan dan keuntungan besar di dalamnya.
DigiDNA iMazing Crack is one of the most powerful and efficient software that will enable the users to manage all the things items on your iPad, iPod
Wise Care Pro Serial Key has accessible with pro features and functions. It is a very fast software with full system recovery.
SpyHunter Crack very simple and popular software. This software is specially designed to protect your computer
I really appreciate the design and layout of your website.
Eyes are easy, for me, visiting here often becomes better.
Have you hired a designer to create the theme? Outstanding Work!
Nice Post! thanks for giving this information want to introduce about Canon Product if you getting issue related to Canon Product please call on Canon Support Number Toll Free: +44-808-196-8126.
Hi, I like reading through your posts every time I take a look at your blog. I simply wanted to take this opportunity to tell you “thanks” for the fantastic work you’re doing. Thank You Very Much.
Waves Tune Real-Time Crack
Your site is going to soon be written in an extremely creative manner, many thanks to sharing your own comment.
Your topic is quite good and of good use for those… Thanks for sharing your advice.
Nice things! If you want to sell it on etsy, you can buy etsy followers from this page https://viplikes.us
very excellent article and that I love similar articles. Thank you for sharing this advice.
Get Latest premium Software Here.
Latest Software Crack Download
Crack Software Download Free 100% Working Keys & Crack.
Here You Can Download New Crack Software Download Full Free Of Cost.
Sex Addict & Fuck Queen, Sara Jay, fucks a big black cock, milking every damn drop to the bone, in this hot, PAWG pounding interracial BBC
https://www.sexalarab.cam/
Full Version Cracked Software Download
Sex Addict & Fuck Queen, Sara Jay, fucks a big black cock, milking every damn drop to the bone, in this hot, PAWG pounding interracial BBC
https://sex69x.com/
Sex Addict & Fuck Queen, Sara Jay, fucks a big black cock, milking every damn drop to the bone, in this hot, PAWG pounding interracial BBC
https://www.xxarxx.com/
Sex Addict & Fuck Queen, Sara Jay, fucks a big black cock, milking every damn drop to the bone, in this hot, PAWG pounding interracial BBC
https://www.sexmotarjm.com/
Latest Software Crack Download
i pinned your article kepp loving keep supporting thank you
Pastikan kalau anda sudah bergabung di Situs sbobet terbaik, apabila inginkan kemudahan dan kenyamanan dalam bermain.
Atau bisa juga anda kunjungi http://onlinegamblingspecialreviews.com/ dan dapatkan informasi seputar taruhan judi bola terpercaya dan murah.
I love your blog. Very beautiful colors and themes.
Did you create this amazing website yourself? Reply thank you
Back in the days when I built my own website and wanted to know where you got this information from
Or the name of the subject. Thanks so much!
When researching your composition, I discovered several things very intriguing
Incredible! This blog looks like my old blog!
It’s a completely different topic, but it has a lot
Same layout and same design. Good choice
Color!
The Custom Boxes Print is a print packaging solution company dedicated to provide high quality packaging for a plethora of retail businesses. With a team of highly skilled professionals that have an eye for detail, the Custom Pack brings you a range of packaging types and designs.
bermain judi slot di situs slot resmi akan membawa banyak keuntungan untuk anda yang ingin bermain judi slot saat ini.
Recover data in the Apple mobile apparatus with iPhone Backup Extractor 2020 Crack is equally really as easy as installing the app on the laptop or computer and linking it with all the apparatus in the query.
Wondershare Filmora Crack may utilize HD video, so you also may increase video in telephones and different apparatus. In the event, you would like to increase some noises. Then this really can likewise not be an issue.
DriverMax Pro Crack is a PC software that refreshes, restores, improves your drivers with exploring by 1,000,000 equipped drivers.
Disk Drill Crack is the most efficient and amazing software in the present day. On the other hand, it will help the users to recover and find out any info of their devices.
GridinSoft Anti-Malware Crack is the latest software to detect the virus from your system. It uses to protect the system against all types of threats.
Wondershare Filmora Crack is the best tool that is much powerful and use to edit any kind of video. Therefore, this tool has many benefits that use to make a much stylish user interface
I should be sending a small comment to thank you again for the wonderful bookmarks you have submitted on this page.
This is easy, especially when people like you are so open to them that they can deliver everything freely,
which many people would provide in e-book format to make the dough for their own ends.
Especially when you have made up your mind. These ideas are also an easy way to know that
another person has the same authority as me to learn more about this condition.
I’m sure there will be a more fun time for people scanning through your blog.
Advanced Digital Marketing Courses in Laxmi Nagar, Delhi , offering advanced digital marketing course for professionals, freshers. ✓ Free Demo Classes ✓ Placement Assistance ✓ Advanced Syllabus/Modules.
this content is very good and style is excellent
https://webtecch.com/
This article is really a fastidious one it assists new internet visitors, who are wishing for blogging.
Here is the link of Bestest Security Crack which Can protect your data safe & sound:
https://softserialskey.com/usb-secure-crack/
It’s all in the same memory encryption software.
You can use USB security software to protect your passwords so that anyone who doesn’t know your password can unlock it and steal information.
This software works with your setup, so you’ll need a password when connecting to USB
Really wonderful blog! Really nice. This blog offers travellers simple tips on how to discover the world’s finest cities. This blog is incredibly helpful and encouraging. I just love this because the world tour’s simple tips. Thank you for this awesome blog.
I am very happy to read this article .. thanks for giving us Amazing info. Fantastic post
Full Version Cracked Software Download
Here You Can Download New Crack Software Download Full Free Of Cost.
Crack Full New Version Free Download Here
Pro Crack software Download
Pro Crack software Download
Crack Full New Version Free Download Here
Crack Software Download Free 100% Working Keys & Crack.
we all love our pets they are special to us during this weather they might get sick so try to plan special for your cute find cheap pet insurances near to you
I believe that really is but one of the greatest blogs for me personally since it’s genuinely helpful for mepersonally. Thankyou for sharing this invaluable advice at no cost.
Miracle Box Crack is professional software. That opens the pattern of mobile devices.
Nero Burning ROM Cracked is an optical disc controlling software application. This program burns, copies, rips, and secure several media files.
Corel Painter 2021 Crack is a computer program for raster graphics editing, picture making, and picture editing. Its developer is “Corel Corporation”, the Canadian software company.
Thanks for sharing good idea .
I just want to thank you again. I’m not sure what I can do without the technology you find on this topic.
It’s a very scary problem in my opinion, although looking at the specific pattern you apply to this problem made
me cry with joy. I am now happy for your advice and I sincerely hope you are aware of what you want to bring to
a great job through blog posts. You may never meet us all.
I and the boys came in and read a great blog post,
all of a sudden I felt so bad that I didn’t thank the blog owner for them.
Because of this, every young man had to read them passionately and seriously.
Thanks for adopting and providing great advice like this that millions of people need information about.
I sincerely apologize for not expressing my gratitude before.
Of course, there are so many things to consider.
It’s beautiful for delivery.
I offer the above assumptions as a common motivation,
but it is clear that there are questions because what you give is most important to work in good faith.
I do not know if most of the practices for such cases have emerged,
but I’m pretty sure your work is a good game.
Both boys and girls think this is just a matter of luck, for the rest of their lives.
I want to express my gratitude to this writer for helping me out of this problem.
After searching on the internet and getting my unhappy advice, I thought my whole life was over.
Living without the answers to the questions you solved through your reports is a major problem and
it can negatively impact my entire career if I’m not familiar with blogging.
Your personal abilities and your generosity to play the whole game are simply awesome.
I don’t know what I would do if I could not find such content at this point I can look forward to my future.
Thank you so much for your safe and amazing help. I have no hesitation in referring to your
webpage to anyone who needs advice on this matter.
This is a nice blog thanks for sharing.That’s a Great work.
<a href="https://photoshops.org/adobe-photoshop-cc-crack-torrent/"Adobe Photoshop CC Crack
I would like to take this opportunity to remind you that I regularly read your blog posts. Your style of writing is fantastic, keep it up!
This is a nice blog thanks for sharing.That’s a Great work.
This is a nice blog thanks for sharing.That’s a Great work.
SmartDraw is a diagram tool used to make flowcharts, organization charts, mind maps, project charts, and other business visuals. SmartDraw has two versions: an online edition and a downloadable edition for Windows desktop.
Wise Care 365 is definitely the preferred option for billions of Windows users who want to keep their Windows PC at peak performance. Speed up a slow computer and free up more valuable hard disk space in seconds. Wise Care 365 adopts world’s top technology.
As a result of the application could cause complex charts, a variety of calendars, diagrams, designs, and far more.
Awesome! You could also use the Sharp Crochet Hook to crochet directly through the fabric in one step so you don’t have to use the rotary cutter on it first. Thanks for the tutorial!
What I don’t realize is actually how you’re
now not actually much more smartly-appreciated than you
might be right now. You’re very intelligent. You already know therefore considerably
with regards to this matter, made me individually believe it from a lot of varied angles.
It’s like women and men don’t seem to be interested except it
is something to do with Lady gaga! Your own stuff is outstanding.
Always take care of it up!
I want to express my gratitude to this writer for helping me out of this problem.
After searching on the internet and getting my unhappy advice, I thought my whole life was over.
Living without the answers to the questions you solved through your reports is a major problem and
it can negatively impact my entire career if I’m not familiar with blogging.
Your personal abilities and your generosity to play the whole game are simply awesome.
I don’t know what I would do if I could not find such content at this point I can look forward to my future.
Thank you so much for your safe and amazing help. I have no hesitation in referring to your
webpage to anyone who needs advice on this matter.
I read many articles but your post is great .
Your blog is amazing .
This is a really very informative article, there is no doubt about it. Thanks for sharing this article with us. This is very nice of you.
Thanks for sharing amazing site .
included in desktop and web applications. It is firstly developed in 1987, and now can works on
You can make all conversion according to your desire, with the help of this software.
I think this is among the most important information for me.
It is very informative. Very easy to understand. Great work team. Keep me updated for all such articles
https://crackedinfo.net/manga-studio-5-ex-crack/
Z3X Samsung Tool Loader Crack can repair the IMEI, unlock the mobile, write firmware, and many other functions.
EasyWorship Crack is an application that’s been made specifically for individuals who perform with an active part.
vMix ProCrack is a strong well-known application program. That guarantees to provide the more reliable and the free-source for processing or changing the videos.
If only all bloggers had the same quality of content as you, the internet would be a much easier place to write an excellent post. Thank you so much for sharing this information.
Often I blog and thank you so much for your ingredients. My interest was really illustrated in your post. I’ll take a note of your website and try to search for new data once a week.
Screen Klean have carbon molecule technology that helps you to clean fingerprints, dirt and kill bacteria from your screen. Check out our ScreenKlean Review
Often i read your blog and your blog be very informatic and i realy very appreciate with your blog. At least readers can read about me by clicking following link, i really very thankfull to you.garmin update express
Thanks for sharing helpful information .
Alexa amazon ca setup group consistently ensures that the way toward setting up your Echo gadget is as consistent and simple for you as could be expected under the circumstances.
With expertly prepared technologists who can give excellent client care, have confidence that you are getting the best in tech guidance. Simultaneously, you can likewise guarantee that you are getting that exhortation through individuals who are cognizant, useful and show a profound comprehension of your issues.
I like the way ou conduct the post……………..
Just loved your creativity…keep going
SoundPad is the amazing. Its is informative for anyone and 100% Working. Use it and also, Share with your friends.
Just loved your creativity…keep going.
a2zshayari.in This is a perfect post. I like your writing style.
I like your writing style. Magellan map update
super post.i like this one.
Avşa Adası gezilecek yerleri, otelleri, pansiyonları ve hava durumuna sitemizden ulaşarak bilgi alabilirsiniz.
wow great article.. keep posting. Thankx
Daily Unique Captions
daftar agen sbobet terpopuler paling direkomendasikan di tahun 2020 oleh para bettor professional
I think this site holds some very superb information for everyone. “Glory is fleeting, but obscurity is forever.” by Napoleon.
I have been looking for this information for quite some times. Will look around your website.
jangan lupa mampir ke situs ini jika anda ingin mencari situs slot online uang asli yang komplit dan menguntungkan.
very informative post.i like it so much..
I like looking through a post that will make men and women think. Also, thank you for permitting me to comment!
Wow ! good work keep it continue.
thanks for sharing
cbd boxes
Aw, this was an extremely nice post. Spending some time and actual effort to create a
good article… but what can I say… I put things off a whole lot and never manage to
get anything done.
great post.. keep writing. Thankx
High Compressed Pc Games Under 500mb
Thank you so much for sharing this amazing information
https://crackedinfo.net/pixologic-zbrush-2018-1-crack-license-keygen-full-free-download/
Thanks dear….
Love this blogger…
Nice post. Thanks for sharing. Please keep us updated for more. I was looking for such interesting content.
https://www.hermesinfotech.com/manpower-services/
I was really looking for that kind of content . I really appreciate you on post.
by:custom cbd chocolate boxes
Thanks For Sharing This MAster Fleece lovely blanket Information also check out the Custom Ornament Boxes to Make your Products more Attractive.
I came on this blog page through my friend’s reference but trust me the way you have to describe this content it’s awesome. thank you so much admin for sharing this blog with us. all the information on your blog page is very informative and useful, you are doing such great work keep going, and wish you all the best for the next comment.
Thanks for sharing such a wonderful piece of information. The above information is directly relevant to CBD Oil Packaging Boxes that will help the buyers learn more about packaging options.
by:pre roll boxes
Hi, I like reading through your posts every time I take a look at your blog. I simply wanted to take this opportunity to tell you “thanks” for the fantastic work you’re doing. Thank You Very Much.
Pandora Recovery 2.4 Crack
Good article! We are linking to this great post on our website. Keep up the great writing.
Such an informative post that you shared with us.
https://premiumcrack.com/vmix-crack/
CCleaner Pro Crack is the most loyal software to clean and defend your device system completely. It is pro-acknowledged software. That is very light and understandable to use. Further, this is really suitable for Mac and also for Windows OS. Further, this thoroughly scans your device and erases malware, junk files, and many other item
EaseUS MobiMover Crack is one of the best tools that usually works on the data recovery tool. Therefore, this tool is much handly and use to get the all system features. While this tool is about to restore all the installed data and also help to delete the data. While you will use to restore the data and make any kind of backup data.
GridinSoft Anti Malware Crack can be a program specially designed to store your valuable personal computer. While they are from many forms of danger. So it finds, averts, and Contains all types of malware such as spyware,
GridinSoft anti-malware Crack Activation Code is the feature that enables one to navigate through your entire files securely. Therefore, it supplies the end-users on the web malware security so that you might surf the net with. Also, Not like another antivirus, GridinSoft, never your PC. Thus, it makes the operation faster, as well.
Thanks so much for this valuable information.
Best Website & Android App Development Companies In Delhi NCR. We provides always high-quality Web & App Service for our Client. So that your Business, Brand, or any Organization can be promoted easily.
https://theskyweb.tech/web-designing-company-in-noida-sector-63/
I really appreciate the design and layout of your website.
Eyes are easy, for me, visiting here often becomes better.
Have you hired a designer to create the theme? Outstanding Work!
i like this type of tool….
Nice job done by admin
GREAT STRUGGLING BUDDY CARRY ON ONE DAY WILL YOURS
Such an informative article that you shared with us.
Folder Lock Crack
SpyHunter Crack is just a potent real-time anti-virus tool built to simply help much fewer computer users protect their PCs from Internet dangers. It is mechanically chosen to supply optimum security with minimal work. Spy Hunter is also a powerful malware removal tool having a favorable and crystal clear user interface. It’s a superior assistant for each home user and computer system protection pros. Together with SpyHunter 5 Crack, the computer could possibly be cleaned of spyware along with viruses, adware, spyware, browser, and other comparable software. This program can be found in 2 variants.
Ableton Live Crack is a well-known tool that use to combine the most interactive user interface. Therefore, the tool is much easy and it uses to function the thing. While the first thing that can surprise is that it has a great user interface.
VideoPad Video Editor Crack is the best and powerful video editor that use to edit all kind of videos. While this too able to convert all kinds of videos that are in the multiple formats Th speed of the conversion of the process that tale in the breakneck.
Driver Easy Pro Crack is the latest tool that uses to drive the software utility. Therefore, you can use this software that needs to fix the program issues. While the software is much automatic and uses to detect all kinds of errors in your system.
Disk Drill Crack is the most efficient and amazing software in the present day. On the other hand, it will help the users to recover and find out any info of their devices. Further, this app will allow the users to recover their files reports, and many more.
IObit Malware Fighter Crack is one of the best tools that use to remove the utility and detect the system virus. Therefore, this tool uses to add a scan of malware, adware, worms, and other hijackers. While the tool is much potent and gets the system along with the malware and use to save the data. Along with this tool used to provide all kinds of best features and help to get the time.
I do not know how you are managing Packaging Boxes. The reason is that the buyers have several options and many websites show a list of templates for this purpose.
by: wholesale boxes with logo
These products seems really great. Thanks for sharing such great items here with us.
https://winmackeys.com/4k-video-downloader-activation-key-2020-crack/
Thanks for sharing with us. I just loved your way of presentation. I enjoyed reading this .Thanks for sharing and keep writing.
https://www.cashappgroup.com/cash-app-login/
Crack Software Download Here
Full Version Cracked Software Download
If You Want New Crack Software With Latest Version Please Visit here.
Crack Software Download Free 100% Working Keys & Crack.
Enjoy FREE Lifetime Map Updates on the nuvi 50LM. With FREE lifetime map¹ updates, you always have the most up-to-date maps, POIs and navigation
This excellent website definitely has all of the information I wanted about this subject and didn’t know who to ask.
Good article! We are linking to this great post on our website. Keep up the great writing.
I loved your article!! It has given me plenty to think about moving forward on my social media journey!
eft dongle crack
I have been exploring for a bit for any high-quality articles or blog posts in this kind of house .
Exploring in Yahoo I ultimately stumbled upon this
web site. Reading this information So i’m satisfied to express that I’ve an incredibly just right
uncanny feeling I found out just what I needed. I so much indubitably
will make certain to do not disregard this web site and provides
it a glance regularly
Watch the latest Arabic series, Asian series, Indian series, Turkish series, online Watch live comedy series, action, horror and romance while following the latest Gulf, Levantine and Egyptian series TV فرح
Thanks for posting when you’ve got the opportunity, Guess I will just bookmark this site. phentermine alternatives
I like this blog very much, Its a very nice billet to read and incur Info.
Amazing! Its in fact awesome paragraph, I have got much clear idea concerning from this paragraph.
whoah, this blog is fantastic I really like studying your posts.
Keep up the great work! You already know, a lot of persons are looking
round for this information, you could help them
greatly.
You done an amazing job.
https://crackvip.com/avast-antivirus-crack/
Glad to see your article.
CherryPlayer 2021 Crack
Watch Online Movies free any time. Get all info about new upcoming movies. افلام اباحية اون لاين
Sorry to say but the fact of the matter is that you can’t delete Cash App transaction history. Any particular or all past transactions occurred on Cash App couldn’t be edited in any way. There is no such option available in the application or site of Cash App that can let you customize your Cash App payment statement. Only the alternative option is to delete your Cash App account.
For more info:-Cash app Transaction History
I am on the lookout for an excellent project, my beloved; I truly thank this fantastic job. Fantastic article! This advice may help me as time goes by.
I really appreciate very helpful post. Request you to post more such content.
I have read this blog and i think that this is written very well. Thanks for providing a good information.
If you are unable to change the accent of your Alexa device then you need an expert technician’s help. Alexa Helpline is the best option for you. We have a huge team of experienced and expert technicians who can easily provide you guidance. Alexa App Helpline
In Cash App login there are two common errors: Unable to login error on this device & Cash App won’t let me sign in. You can fix all Cash App sign in related problems.To know more information about cash app login visit here: Cash App Login | Cash App Sign In
Glitch in send catch of Cash App? Use help gave with Cash App support.
In the event of an issue with the send button that may raise a huge load of furor, you can keep on using the assistance given with Cash App support. Despite that, you can manage the issue by executing the game plans that are recorded in the tech consultancies.
Visit here
Crack Software Download Here
Pro Crack software Download
Full Version Cracked Software Download
Crack Full New Version Free Download Here
Error 61103103 occurs on Echo device when Echo won’t connect to WiFI! So if you are facing the same issue then you have reached the right place. Echo helpline is here to help you. Our experienced and expert technicians can easily detect the issue and fix that permanently. Amazon Echo dot Helpline
Thank you for sharing such a good article. This will definitely help in my blog that I am about to start.
Want to buy shower heads online in Auckland? Need branded and stylish bathroom accessories for your bathroom? Don’t worry! NzHomeware is the best option for you. Here you can buy branded and latest designed shower heads at very affordable price. shower
Great Post. I learn lot of new designs from your blog. It really helps me a lot.
May you get Cash app Support number to confirm your record?
In the event that you can’t confirm your Cash app account, at that point you should need to contact Cash app Support number. There you will get a specialist group that gives you answers for some unpredictable issues in a quicker way. In this way, on the off chance that you check all the fundamental standards like web, client’s accreditations, account is dynamic or not, so you have to go for the above alternative.
WinRAR Review is a standout in a very efficient and commonly used information pressure application. With the help of this client, any kind of information cannot be matched with any kind of information as indicated by the needs of the client
WTFAST
Wow, I truly enjoyed this specific page. As a newcomer, it surely gave me a great deal of strength.
Trend Micro Install
Very interesting , good job and thanks for sharing such a good blog.EFT Dongle Crack“
“Nice Blog Good Work
spyhunter crack download“
Wow! Simply amazing and impressive work. These cute designs are eye catching and you explained it beautifully…
Garmin express setup
norton
TP Link Extender Setup
Issue in Paypal to Cash App move due to login glitch? Arrive at help focus.
In the event that you have an issue during the login cycle resulting in Paypal to Cash App error, at that point the most ideal approach to manage the mistake is to utilize the help of the assistance place. Here you can discover a plenty of FAQs that can be utilized to eliminate the glitch in a jiffy. You can likewise allude to some Youtube tech vids that can be utilized so as to deal with the glitch.
https://www.customercare-email.com/blog/paypal-to-cash-app/
Fantastic website. A lot of useful information here.
I’m sending it to some pals ans additionally sharing in delicious.
And obviously, thank you for your effort!
Genuinely, you can receive an unlimited amount adequately following to extending the limit. Accordingly, first, you should know how much can you send on Cash app and check your character viably. Thereafter, you can send up to $7500 in 7 days’ and can receive an unlimited amount. If you still any issues, at that point connect with us.
Hello, very nice website!! Man Excellent .. Wonderful ..
I’ll bookmark your web site and take the feeds also? I am satisfied to find
numerous helpful information here in the publish, we need to develop extra strategies in this
regard, thanks for sharing.
Nice Blog Good Work
SystemRescueCd Crack
Above all else, contact the help group to fix Facebook not working issue. From that point, you can move to refresh your record. You can undoubtedly refresh your record from your cell phone or from the work area or PC. You just need to sign in to your record, and afterward explore your profile to make changes.
If you ignore the account mystery word and wish to Yahoo login problem with the use of security questions, by then you need to go to Yahoo’s contact page and select the mystery key and sign in tab. As of now, you need to hit the Forgot Password interface and enter an email address, and a short time later select answer security requests to recover the mystery word.
Fantastic website. A lot of useful information here.
I’m sending it to some pals ans additionally sharing in delicious.
And obviously, thank you for your effort!
Nice Good Work
liquid rhythm activation code
Fantastic website. A lot of useful information here.
I’m sending it to some pals ans additionally sharing in delicious.
And obviously, thank you for your effort!
I love your lovey patterns.But,I have some little girls that would love some loveys. Do you think you could come up with a girly pattern for one?
Crack Software Download Free 100% Working Keys & Crack.
Get Latest premium Software Here.
Here You Can Download New Crack Software Download Full Free Of Cost.
If You Want New Crack Software With Latest Version Please Visit here.
Very interesting , good job and thanks for sharing such a good blog.EFT Dongle Crack“
ESET NOD32 Antivirus Crack is an Antivirus software that provides essential safety to gamers, high-level PC users, and for alow PCs. Further, this is fine-tuned to support device
iMyFone LockWiper Crack is an efficient and super-fast software that will help you to unlock all your iOS devices. Further, this app will enable users to easily
Ummy Video Downloader Crack is easy to use and free applications that you can use to download videos from your YouTube.
4k Video Downloader Crack is a download manager for youtube materials that apprehend audios and videos of a particular clip.
FxSound Enhancer Crack (previously called DFX Audio Enhancer) can be a sound improvement tool.
Thanks for the marvelous posting! I really enjoyed reading it, you can be a great author.I will make sure to bookmark your blog and will come back down the road. I want to encourage you to ultimately continue your great job, have a nice day!
If you are one of those who don’t know how to update the Garmin map, below are some of the ways by which you can update it. You just need to use the Garmin Express application in the matter of getting the Garmin Map updates. With the help of Garmin Express, you will be able to update your Garmin Map by downloading it from the official website of Garmin.
https://garminupdategps.com/
Need to renovate your home or your exterior? To support you in this project, Cetelem allows you, thanks to the Personal Work Loan , chryslerfinancial com online payment
furniture financing bad credit,bad credit furniture,to benefit from a fixed rate. To get a more precise idea of what this project will cost you, do your simulations online: it’s free, fast and without obligation
We are PPC Expert in Delhi, India, Pay Per Click or Google Adwords has an instant impact and gives your brand a much larger reach and exposure as a result of first page on major Google search. Jeewangarg has vast experience in providing best PPC services provider in Delhi,India. We are a team of Google certified Partner based in Delhi, providing PPC service in Delhi/NCR.Call +91-9350809090 for Free Google AdWords Consultation from Google Partner.
Thanks For Sharing Nice Blog Good Work
Tenorshare Crack
Thanks for sharing such important information your contant is very impressive. I like your explanation of topic and ability to do work.I really found your post very interesting .
I like your explanation of topic and ability to do work.I really found your post very interesting .
Thanks for Sharing the useful and informative information, i am also a blogger, writing on different – different topics, if you are interested to reading my website article’s please check once as –
Thanks for sharing with us such a mind-blowing post. I am really impressed with the information you have provided. Keep up the good work.
I really appreciate the design and layout of your website.
It is very easy to come here and visit often.
Have you hired a designer to create your look? Special job!
Malwarebytes Crack is basically a scanner. It can also remove malicious software, security software, spyware and adware also include in it. Therefore, It avoids opening all the files during scanning. It scans in batch mode. You can also reduce interference if another malware software is running on the computer. It available in the premium paid version and also a free version.
Autodesk Maya Cracked is a 3d computer graphics app, which you can use on different devices like macOS, Linux and Windows devices. You can create interactive 3d applications with this software like video games and animated movies. Fundamentally this software is an animation product by wavefront technology and power animator.
Glary Utilities Crack Pro is a powerful tool that offers to improve any kind of system and performance. While it uses to get them any kind of another organized system that use to allow and its user to choose several kinds of tools.
Easy Cut Studio Crack is a fast and easy tool that use to cut logos and text, graphics, and other shapes of decals stickers. While it uses to take your logo and make the whole new level of cutter software. However, you can download the other kind of version and it makes the design to print in the cut system, can be a very strong and beneficial tool for emblem design.
WinToUSB Crack is much light-weighted tool tat use to allow and run the windows on your OS. In addition, this tool can use to lead and the ISO image from the USB hard drive also. While the tool can allow you to make and support all kinds of windows.
Thanks For Sharing Nice Blog Good Work
Expertgps Pro Crack
A wonderful collection of articles. I really like it. It’s very helpful for everyone.
I Would like to thank you for sharing such a useful information for me.I found the important data you offer in your articles. Your blog gives me the best ideas so i will recommend this to others.Tubitv.com/activate
CleanMyMac Crack is a cleaning and security program for mac. It increases their working speed and lifetime health.
Piratesfile a place to download paid software with crack
Hmmm, is there something wrong with the images on this blog? At the end of the day, I try to figure out if this is a problem or a blog.
Any answers will be greatly appreciated.
I have now researched many websites on your own website and love your blogging style.
I will add it to my list of favorite sites and come back soon. Please check out my website and let me know what you think.
I have now researched many websites on your own website and love your blogging style.
I will add it to my list of favorite sites and come back soon. Please check out my website and let me know what you think.
. Greate post. Continue to write your blog such details. I’m impressed with your blog.
Lovely product thanks for sharing the information post to keep it up.
Grab Rand McNally Lifetime Map Updates for free from the experts of GPS Contact Number. We are one of the leading name in the industry of map update and services. Just feel free to call us on our 24*7 toll-free numbers to get the latest update or visit our website to know more!
Check out the way to fix Epson Printer Won’t Connect to WiFi. Lean how you can connect your brand new Epson printer to wireless network or feel free to call our experts on our toll-free numbers or visit our website to know more!
Is your Alexa device is not Working? or showing rid ring on its top and you have tried all the methods to fix it but didn’t get the results. Then not to worry we are here to help you out to fix alexa not responding issue. Just dial our toll-free Alexa Customer Service number or visit our website to know more.
Very interesting , good job and thanks for sharing such a good blog.4K Video Downloader Crack“
Here, you are allowed here to access multiple Cash app accounts. To have multiple accounts on this application, you have expected to fulfill all traditions. Be that as it may, to use more than one account, you are needed to utilize an alternate enrolled versatile number just as an email address. You can utilize just each account in turn on a cell phone.
Better shower heads can make your bath very comfortable. So are you thinking of upgrade of your old shower heads with the new one? If yes, then don’t look further than NZHomeware. We provide you a wide range of bathroom accessories like, taps, tapware, shower, shower heads, toilets and sinks etc. For more information, visit our website now!
mirror
Mais India is iv cannula exporter and we also provide our iv cannula and other medical disposable product in all over the world because we are manufacturer of medical disposable products and our products are very good quality because our team mainly focus on the quality of a product.
This was a very interesting article and definitely gave me some food for thought
NetBalancer Crack
You will find the best captions for selfie, friends, sexy, cute, inspiring, self-love and more.
“Nice Good Work
Tenorshare 4uKey Crack“
Very interesting, good job, and thanks for sharing such a good blog.
https://incracked.com/wondershare-recoverit-crack/
RadioBOSS Crack is a legendary radio programming software tool. That is made for legendary radio stages. If a person requires a simplistic, stable and low prices radio programming software you can surely get this
Hotspot Shield Crack – is a good and powerful VPN. This software authorized by millions of people from all over the world. It is very easy to use and user-friendly. Therefore creates a virtual private network between your PC and wireless router. Hotspot Shield Elite Crack provides you with good security and prevents access to your virtual private network. It gives web proxy for protecting your privacy.
VueScan Crack is Most Powerful Scanning Software Over All the World. It works with the best quality flatbed, advanced and Video Scanner. It is a very Simple and User-Friendly interface application. This software easy-to-use with advanced features. It provides the best Advanced Features For all User Create fabulously documents and Files.
Malwarebytes Premium Full Crack is a good software or tool that is most widely too used. It is a modest scanner. Therefore, It protects your computer system and mobile phones from all kinds’ misuses and harm. It secures your pc or mobile data from each and every one type of viruses.
FL Studio Crack also permits for waveform display, of audio clips and can apply cue points. The signature bundle contains a fruity video player and direct wave sampler etc. All plugin contains the signature bundle with additional plugins. They also consist of practical synthesizers. Free demo permit to render project audio to WAV, MIDI, MP3, and OGG. It can run on Windows 7, 8, 10 and mac.
Little Snitch Crack can be only a small parcel of applications at the menu pub, which activated tells you which apps are hoping to gain access to the internet. Once it finds an association effort, it exhibits an email providing the preference to take or refuse that accessibility and also to specify whether it’s worth forever or merely. Luckily, there isn’t a lot.
Hello there I am so delighted I found your webpage, I really found you by mistake, while I was looking on Ask for
something else, Anyhow I am here now and would just like
to say many thanks for a remarkable post and an all round
thrilling blog.
Such a useful article. Thank you for sharing!
https://alisverisforumu.com
This site is very fantastic. Very awesome post. In first time I am visit your site, and your site change my day. Thanks for sharing.
pray all world
Your work is great it provide me a great knowledge.
https://softwareshax.info/folder-lock-crack/
What a cute idea. These are amazing.
Is your kindle unable to connect to wifi? Looking for an expert solution to fix Kindle won’t connect to wifi error. Then look no further than the ebook helpline. Our skilled team will provide you with an accurate solution and will fix your error within the shortest time span.To know more visit our website.
This site is good….
Hello….
Thanks for sharing Dear…
I’m your daily reader. good work!!!
This is my first time visiting this location. In your blog, especially its discussion, I found so many fascinating things. I guess I’m not the only one with all the fun here from the hundreds of updates on your papers to keep up the good job.
Thanks for posting such a lovely story, I enjoyed reading this amazing work.
nice art and new style Spybot Search And Destroy Crack 2021
Here, you will get the answer to How long can you keep money in Cash app to buy bitcoins. You only need to know that you never involved in any suspicious activity, as well as you didn’t keep any pending transaction there. So, you can buy Bitcoins until your account is active.
If you want to troubleshoot canon printer won’t connect to wifi error then get in touch with our highly skilled team. Our dedicated team will offer you the best solution and are available 24/7 to help you. To know more visit Printer Offline Error.
Full Version Cracked Software Download
Pro Crack software Download
Crack Software Download Free 100% Working Keys & Crack.
Get Latest premium Software Here.
Here You Can Download New Crack Software Download Full Free Of Cost.
nice work your work is different and new i appreciate your work PowToon Crack
Amazing!
Visit our website..
you use your clever mind and its look so easy and new and its not too hard to made it at hom now se my work Express VPN Crack
EaseUS Partition Master Portable Crack the latest variant and thee strong tool for swift partition with no data reduction. It gives you the ability to produce and structure walls.
MorphVOX Pro Crack is a software helps to change the form of your voice. It is introduced by screaming bee Inc. MorphVOX Pro Produces multiple surprising results, as you say something in your microphone.
Pinnacle Studio Crack is a video editing software. It is introduced by the ‘Pinnacle systems’. The program permits you to change video material in CD, DVD video, AVCHD or Blu ray formats, etc. Pinnacle can run on windows 10, 8, 8.1, 7, and Windows compatible sound card. However, you can apply the necessary menus and burn all these to a disc. Therefore, It provides affiliate sales applications for its studio product line.
iSpring Suite Crack is a quick knowledge acquisition toolkit the creation of programs and database for computer applications. This software is introduced by ISpring for elaborating the training direction or courses in powerpoint with family fixed quizzes, surveys, and interfaces
Disk Drill Pro Crack is a data retrieval tool. That aids to makes it simple to retrieve data like documents, songs, images, movies, or also full bars. That has quite removed from your device. By only one force of a key, Disk Drill can reach up to 200 kinds of data files on your device to recover them. Or also on the outside turns when you attach to a PC. This is a program for Mac and Windows devices.
AVG Secure VPN Crack is still amongst many optimal VPN readily available on the market for those end users. The guide programmers with the remarkable instrument are AVG Inc. While this tool used to complete abbreviations with this organization along with the tool which is currently anti-virus Guard.
Very creative think you have! I just love to read your post. I really like and appreciated your effort. I read deeply your content, many points your write are very useful for me and my friends.
It was pretty fun to read your blog! Do not think any more about searching for dispensaries! A beautiful blog. Thank you for the insightful article .
Yeah, hi there! I might have sworn that I had visited this site before but I realized it was new to me after reading through some of the entries.
Thanks for providing valuable information.
https://crackedinfo.net/wondershare-filmora-8-5-1-registration-code/
iCare Data Recovery Pro 8.3 Crack 2021 Latest Version Free Serial Number iCare Data Recovery Pro Crack is a free source to retrieve back the huge volume of data that is deleted or accidentally removed from your device.
i care data recovery crack
I’m extremely pleased to uncover this website.
I am very happy to read this article .. thanks for giving us Amazing info. Fantastic post
i am very lucky to hearing this
My travel life has been easier with Garmin Express. Plus I can get all the latest update through their blogs. I use the Garmin app and is totally upto the mark. I recommend everyone to use Garmin Gps Update and get Garmin life time map update and make your life easier with Garmin Map Update for instant help from Garmin GPS experts.
https://www.garmingpsmapupdate.com/
I did not know the entire benefits of Garmin Nuvi Update. But since I have read this blog on map update, I have installed all available updates for my Garmin device. I must say that this piece of blog has helped me improve navigation experience. I am not suggesting all my friends to read this blog and get Garmin Map Update with this team. For detailed information, Our Garmin GPS professionals will provide instant help.
https://www.garminnuvimapupdate.com/
Crack Software Download Free 100% Working Keys & Crack.
Here You Can Download New Crack Software Download Full Free Of Cost.
Crack Full New Version Free Download Here
Latest Software Crack Download
Perfect Article
asanseminar
perfect
fnaghshin
very useful
Perfect Article
melorinet
wow its very great
melorinet.ir
nice art and new style creative work and you creat new things thanks this is very interesting now se this 3D Coat Serial Number
nice art and new style creative work and you creat new things thanks this is very interesting now se this Sound Pad Serial Number
I do trust all of the ideas you’ve presented for your post. They’re very convincing and can certainly work. As you explain it so simply I simply adore you!
You Provide Very Informative Thanks For sharing this one
Proteus Crack Software for virtual system designing known as Proteus. It also performs as a circuit simulation application for windows. Initially, this software released in 1988. Proteus developed by Labcenter Electronics Ltd in England. This software is very useful for professional circuit designers and engineering students. This software is available in multiple languages like Chinese, English, and French, etc. The initial version of this software known as PC-B.
Visual Studio Crack is an integrated development environment for Microsoft. It helps you to create computer programs, websites, web pages, and web applications. You can develop web services and mobile applications.
Malwarebytes Crack is basically a scanner. It can also remove malicious software, security software, spyware and adware also include in it.
CleanMyMac X Crack is a very easy and powerful tool to clean your Mac. The program also contains the required tools for system maintenance, level of privacy cover, and uninstalling programs. It will not only delete the complete program and related data files but also erase only the configurations of this program, which is particularly useful when troubleshooting.
Tenorshare ReiBoot is a very simple software for free iPhone, iPad Touch, and other iOS device recovery tool without any damage or data loss. You can get iDevice to boot again properly free.
If anyone looking for IT Services, I personally recommend brokod Brokod is IT Consultant Company provide all IT Solution with complete digital solution. We provide Web Development, Software Development, IOT, Digital Marketing to grow your business online
Insync Portable download is here uses for the integration of your work done by Windows and enhances online accessibility.
It is a powerful tool that evaluates the Drives data for a better connection.
INSYNC PRO CRACK
Are you getting any error on your Alexa device? Then Alexa Helpline is here to help you. We will make your device working well in a short span of time. Our team of expert technicians is always ready to help you.
great work man i appreciate you for this concept
Grammarly Premium Crack
This is a nice blog thanks for sharing.That’s a Great work.
<a href="https://reelcrack.com/vce-exam-simulator-crack/"vce exam simulator crack
Are you looking for new designed kitchen sink? If yes, then Don’t look further than NZHomeware. We provide you a wide range of kitchen sink and various bathroom accessories. Visit our website now!
mirror
The best short video app to create community and got famous.
Cash app has unlimited customers that use its affiliations, and correspondingly as cheats are likewise here that constantly attempting to take customers’ login data to hack a record. It is one of the essential drivers of the Cash app down issue. Designers send you an email or text with a connection and deals that you make packages. In case you click on that alliance and fill in all the nuances, by then it may possible that your record gets hacked.
This is such a nice information.
This very good message! This is really fantastic post! Super post! Super post! Take the chat more deeply.
Acronis True Image Pro 25.6.1 B34340 Crack is personal use data recovering tool. The computer may now be recovered if you lost some of your important drive data, files, documents, and stuck any protection file. It is delivering a gap between your data to security for the safety of data where you may now pay attention to create a backup for personal assessment.
Acronis True Image Crack
You’re a very talented author, that’s very fascinating.
I have entered your feed and sit down to look for more of your amazing post.
You can also visit my Website.it will prove helpfull for you”https://patchdb.com/ https://patchdb.com/https://patchdb.com/wondershare-filmora-crack-registration-code/ Wondershare Filmora
I love it. Wondershare Filmora Crack Your dedication to your work is helping lead us to success! You can also visit my Website. It will prove helpfull for you.
I am scanning this specific article; this informative essay is good and enlightening; Thank you for talking this particular article.
FxSound Enhancer Crack (previously called DFX Audio Enhancer) can be a sound improvement tool. This tool uses to produces, thick and crisp and flourish audio.
SAP2000 Crack is a complex civil technology program well suited for planning and assessing all kinds to build process. Therefore, its interface enables one to rapidly and create structural units without any delay. In addition, you may now leverage the ability of SAP2000 for a great many design and analysis duties.
Autodesk Revit Crack is a type of software. It is most widely too used all over the world. Used for constructing the designs of 3d buildings. It is handy for building information software modelling for the architects, structural engineering, plumbing, and mechanical electrical, landscape architects, designers, contractors, and MEP engineers.
Tenorshare 4uKey Crack software that lets you unlock the locked Android device, iPhone, and other mobile devices that are locked by forgetting their passwords.
DAEMON Tools Lite Crack is a professional manner for standard operation of copy discs. It provides comprehensive security for all its operations. Its supported discs work, on some discs for games.
Luminar Crack is a useful place where you can easily find Activators, Patch, Full version software Free Download, License key, serial key, keygen, Activation Key and Torrents. Get all of these by easily just on a single click.
Fantastic website. A lot of useful information here.
I’m sending it to some pals ans additionally sharing in delicious.
And obviously, thank you for your effort!
make my dick biggershemail sex guide
Stellar Phoenix Windows Data Recovery Crack is a utility for Windows, Mac, and Linux that simplifies deleted data files. It ordered the inaccessible information from any given file system to removable media.
Tenorshare 4uKey Crack allows you to unlock all the iPhone password that you don’t know.. Therefore the other used iPhone and iPad can also work there.
UsbFix Crack is a very compatible and good tool for analyzing and eliminating infections from detachable mass media, such as pen drives, exterior disks, and ram cards. Its help you for quarantining them if you aren’t sure they are really actually harmful.
Camtasia Studio Crack is the amazing and best software and it will help you to record your screen. In addition to it, this app will enable the users to easily record their screen. However, a very popular and famous company has developed and designed this software
Wondershare Dr.Fone Crack is for those clients who have inadvertently deleted or lost files from their iOS, at that point that this Software is perfect for its clients in helps your Image, SMS, Autio recordings and Hd Video more, using an easy.
Get rid of polution an start a Garden at your home, get your garden hand tools at your doorstep.
Webroot.com/safe – Webroot is an antivirus to protect your computer for more details on download, installation & activation, go to http://www.webroot.com/safe.
Crack Full New Version Free Download Here
Crack Software Download Here
Full Version Cracked Software Download
We should envision an online world. As you enter there, you are allocated a novel number ID. What’s more, over your head there springs up a gadget, all of a sudden. This gadget checks your ID, and simply after that allows you to do anything. https://freelicensekeys.com/express-vpn-activation-code/
Matlab R2020b Crack Download Free is an amazing software that lets you do everything in your mind. Using the Matlab r2019b cracked version, you can create great and unbreakable connections with the diametric system related to biology and more. MATLAB is a high-performance language for technical computing.
Matlab Crack
Hi There You Doing Great
同性恋指南
A motivating discussion is definitely worth comment. I do think that you need to write
more about this subject matter, it may not be a taboo subject
but usually folks don’t speak about these topics.
To the next! Here are many Free Softwares
Little Snitch Crack can be only a small parcel of applications at the menu pub, which activated tells
TemplateToaster Crack is a very good and popular application specially intended to help you design themes or templates for WordPress, Drupal
TemplateToaster Crack is a very good and popular application specially intended to help you design themes or templates for WordPress, Drupal
Easy Duplicate Finder Crack comes with a quick setup process even offers a rather fast scan algorithm. comes with a potent scanner that scans all folders
Tableau Desktop Crack lets you move your data. From then on, the info connection beside you in three or two will be settled, at the moment; point. That means you may see right now and proceed with the planks together.
WavePad Sound Editor Crack is a good music editing application that has a standard interface with simple and easy to use and understand functions. Developed by NCH Software.
Avid Pro Tools 2021 Crack is worldwide software; it is mostly too used today. It is used for recording any audio data. You can also use it for the best recording audio data. It works with different work stations.
Z3X Samsung Tool Pro is a third party program solution. It is introduced by Z3X-team. The program repair and handle several android devices. It changes your android devices to the complete package of functions. This freeware program can run on Windows 10, 8, and 7. You can easily move these tools into their positions, on your computer.
Data Recovery Crack is a utility for Windows, Mac, and Linux that simplifies deleted data files. It ordered the inaccessible information from any given file system to removable media.
It is so cute and so very rare. I have not seen anything like these before but could be because my little ones are grown up for the most part. Too bad these weren’t around when mine were little. How do moms do it all? Seems like I barely had time to do anything when mine were younger and there was no free time. Guess all the electronics today helps keep them busy.
Fantastic website. A lot of useful information here.
I’m sending it to some pals ans additionally sharing in delicious.
And obviously, thank you for your effort!
操你谷歌
https://easymoebellift.ch/
easymoebellift.ch
Amazing site.
visit our website for custom boxes.
A wonderful collection of articles. I really like it. It’s very helpful for everyone.
This software is very helpful for as, thanks for sharing.
I am very happy to read this article .. thanks for giving us Amazing info. Fantastic post iobit start menu pro crack
Thank you for some other informative site.
where else may just I am getting that kind of information written in such a perfect way?
I have a challenge that I am just now operating on, and I have been on the glance out for such info.
人妖性爱指南
Getting Kindle won’t connect to wifi error? Not to worry, our expert team will help you in resolving this error. You can avail our services anytime according to your wish. As we are available round the clock to help you. To know more visit Ebook Helpline.
Netflix provides a wide range of entertainment content such as movies, shows and web series etc.Netflix give the paid membership and in this Netflix give various features like latest movies, web series. If you have changed your mind and cancel your membership and want your Netflix Refund. In simple you can cancel and easily you can get Netflix Refund.
Crack Software Download Free 100% Working Keys & Crack.
Crack Full New Version Free Download Here
Crack Software Download Here
Pro Crack software Download
Full Version Cracked Software Download
Your work is great it provide me a great knowledge.
https://licenselink.info/tweakbit-driver-updater-crack/
I really like your post because this post is very helpful to me and it gives me new perspectives
https://plugcracked.com/nick-mira-gasolina-free/
If you have bought a new Alexa device and are getting registration failure error then you need an expert technician’s help. Alexa Helpline is a leading and well-known company that can help you with the best troubleshoot service. https://smartdevicehelpline.com/how-to-connect-roomba-to-alexa
If your Echo does not respond when you give command to it, then you need an expert technician who can fix your Echo device permanently. Echo Helpline is a well-known company that can help you with the best troubleshooting and repair service at a very affordable price. http://echohelpline.com/
Why is my canon printer won’t connect to wifi? If you are looking for the solution then you are at the right place. We offer the best printer services round the clock. To know more visit Printer Offline Error.
So nice I am enjoying for that post as for u latest version of this Security tool Available”https://crackglobal.com/guitar-pro-crack/>crackglobal.com”
人妖性爱指南
큰 엉덩이
Nice blog here! Also, your website loads up very fast!
Also, your website loads up very fast!
It has been an article that has been described in the best way I have ever read. Thank you admin
Ağır Sözler
I really like your post because this post is very helpful to me and it gives me new perspectives
https://vstcrack.net/audio-assault-rvxx-free/
I am amazed at your blogging style and your writing skills.
Is it a profitable topic or have you changed it yourself?
Either way, sticking to high quality text and visiting such great blogs is rare.
큰 엉덩이
I am amazed at your blogging style and your writing skills.
Is it a profitable topic or have you changed it yourself?
Either way, sticking to high-quality text and visiting such great blogs is rare.
Better shower heads can make your bath very comfortable. So are you thinking of upgrade of your old shower heads with the new one? If yes, then don’t look further than NZHomeware. We provide you a wide range of bathroom accessories like, taps, tapware, shower, shower heads, toilets and sinks etc. For more information, visit our website now!
Adobe Illustrator CC Crack can be an outstanding app for developing particular artworks. It’s beneficial for an extensive scope of end-users. However, it used for companies for designers in addition to photographers.
IObit Uninstaller Crack is an application that is developed by IObit Inc. In addition, this tool is used to uninstall a lot of programs. While it easily removes all kind of unwanted program that is in your system.
VideoPad Video Editor Crack as its name shows its video refinement, editor, and converter software. It is the major software product of NCH software. Develops for both untrained and trained users
Adobe Audition CC Crack is a pro tool that use to create the workstation and also use it to design the effect and industry best digital audio edit software.
PC Full Crack!
A wonderful collection of articles. I really like it. It’s very helpful for everyone.
Phpstorm!
JetBrains PhpStorm Crack is the most reliable software during IDE. This is one of the popular web development software to work with HTML, CSS, PHP, and other popular languages. It can optimize your code in one best way.
FL Studio Full Crack is initially known as fruity loops. It is a digital audio workflow software. FL studio is introduced by the Belgian company image line. It can run on Microsoft Windows and Mac OS etc.
SnagIt Crack is a screenshot program. That takes the video interface and sound production. In the first place, it used for the Microsoft Windows Operating System. The updated version of the Snagit is now present in the mac operating system.
FIFA Crack is an amazing video 3D Football game developed by EA Canada and published by EA Sports for Microsoft Windows. It launches with some big changes to its former versions: we say goodbye to the graphics engine performance, and give a warm welcome to DICE’s famous Frostbite technology
Tally ERP 9 Crack is the most Powerful comprehensive business management software. It is packed with all the features that your business operations and access to your all business reports.
Hmmm, is there something wrong with the images on this blog? At the end of the day, I try to figure out if this is a problem or a blog.
Any answers will be greatly appreciated.
FL Studio Full Crack is initially known as fruity loops. It is a digital audio workflow software. FL studio is introduced by the Belgian company image line. It can run on Microsoft Windows and Mac OS etc.
I really like your post because this post is very helpful to me and it gives me new perspectives
https://plugcracked.com/retro-80s-free/
Your work is great it provide me a great knowledge.
https://startcracked.com/wirecast-pro-crack/
I really like handmade things.
https://fastcustomboxes.com/custom-bath-bomb-boxes/
The Roku Error Code 011 appears when your Roku device updates and the device loses its connection from the Roku updating server This might happen for multiple reasons. Users face this issue when they try to update Roku software.
Read more
I really like your post because this post is very helpful to me and it gives me new
perspectives
https://vstmania.net/antares-autotune-pro-mac/
Great set of tips from the master himself. Excellent ideas. Thanks for Awesome tips Keep it up crackglobal.com”
Do you know? Walking the distance is a way to steadily up your fitness, burn calories, and get the mental health benefits of time spent.
Do you know? Walking the distance is a way to steadily up your fitness, burn calories, and get the mental health benefits of time spent.
Great set of tips from the master himself. Excellent ideas. Thanks for the Awesome tips Keep it up
Unleash your imagination and create a unique world of Sims 4 that’s an expression of you! Explore and customize every detail from Sims to homes, and much more. Choose how Sims look, act, and dress, then decide how they’ll live out each day. Design and build incredible homes for every family, then decorate with your favorite furnishings and décor. Travel to different neighborhoods where you can meet other Sims and learn about their lives. Discover beautiful locations with distinctive environments and go on spontaneous adventures. Manage the ups and downs of Sims’ everyday lives and see what happens when you play out scenarios from your own real life! Tell your stories your way while developing relationships, pursuing careers and life aspirations, and immersing yourself in this extraordinary game, where the possibilities are endless. Play with life!
Ah this is one of the best articles that i found. This is very useful and informative.
I would love to share it with others!
If you are facing any kind of difficulty regarding any of the issues related to Garmin Express Download while downloading it or its configuration then no need to worry. We are here the experts who have years of experience in the tech industry. You can connect with us via call, email or live chat.
I feel that is among the so much vital info
for me. And I am satisfied studying your article.
But want to statement on few common issues, The web site taste is wonderful, the articles are really excellent : D.
Excellent activity, cheers
Nice response in return of this difficulty with genuine arguments
and explaining the whole thing concerning that.
Good write-up. I certainly love this website. Continue the good work!
Your work is great it provide me a great knowledge.
https://startcracked.com/driver-genius-pro-crack/
RJ Talents Pvt Ltd. has firmly established itself as one of the most respected talent agencies in the entertainment industry.
It really makes me happy, and I am satisfied with the location of your post. You are a really talented person whom I saw.
Good write-up. I certainly love this website. Continue the good work!
Your work is great it provide me a great knowledge.
Great set of tips from the master himself. Excellent ideas. Thanks for the Awesome tips Keep it up.
I really like your post because this post is very helpful to me and it gives me new perspectives.
Pinegrow Web Editor Crack is a user-friendly and intuitive software solution developed to provide you with a simple method of creating websites, supporting multi-page editing operations and allowing you to open any HTML file. You can start from scratch or base your design on pre-existing templates.
Thanks for sharing such an amazing post.
Nice post. am very glad to be here. thanks a lot.
Great set of tips from the master himself. Excellent ideas. Thanks for the Awesome tips Keep it up.
Hello! here you get lot of best captions for girl smile >Click Here< https://bestinstacaptions.com/best-captions-for-girls-smile/
I am very impressed with your post because this post is very beneficial for me and provide a new knowledge to me
https://vstmania.net/sonarworks-reference-crack/
Your job is amazing, it equips me with great knowledge.
https://startcracked.com/iexplorer/
Cracked Here is a useful place where you can easily find Activators, Patch, Full version software Free Download, License key, serial key, keygen, Activation Key and Torrents. Get all of these by easily just on a single click.
Windows 10 Pro Loader can be an excellent type f the tools and the OS. Therefore, you can use to make all types of fucto0ioan and the selection also. Therefore, it had a long time and cause it to make all types of markets. There. In addition, the other type fo download can be sued of copes and the one type of windows there. While you can get through the article and make the understand all te porous and cos about this software.
WonderShare Recoverit Serial key has much potential used to recover the files from any of the laptops. Furthermore, wonder share can also improve the files and even the Disk packs and pods, USB Drives, SD cards, and Mobile phone data, MP3, MP4 files, and other types of players. It will be able to manage and recover the following of the records very quickly. It provides a fantastic user-interface that is used to perform the task.
Your work is great it provides me great knowledge.
https://hit4crack.com/reg-organizer-crack/
Trezor is one of the most secured bitcoin hardware wallets that was launched in August 2014. Moreover, Trezor hardware wallet becomes the first bitcoin hardware wallet providing secure cold storage and giving the ability to spend and carry out a transaction online with convenience.
bcrypt generator Bcrypt generator is a password hashing algorithm developed by David Mazières and Niels Provos, based on the Blowfish cipher. Bcrypt makes use of an adaptive hash function to store password hash. BCrypt internally returns a random salt while encoding strings and it is obvious to get different encoded hashes for the same test.
I really like your post because this post is very helpful to me and it gives me new perspectives
https://plugcracked.com/beat-machine-crack/
I really like your post because this post is very helpful to me and it gives me new perspective
https://plugcracked.com/resolume-arena-crack/
I really like your post because this post is very helpful to me and it gives me new perspective
https://vstlicense.com/macupdate-desktop-crack/
Your work is great it provides me great knowledge.
https://crackswindow.com/winx-dvd-ripper-platinum-crack/
I really like your post because this post is very helpful to me and it gives me new perspective
https://vstcrack.net/native-instruments-noire-crack/
It is Godrej’s flagship project and the plan of the site is really good. If you want to invest in a studio apartment near the airport this is the best one to pick and has24x7 security with on call help. See Godrej golf links price list here.
Just keep up the good work. One day you will succeed
arcgis pro crack
Finally, I am here to visit and enjoy this website. Its means a lot to me
arcgis pro crack
What are you waiting for?. just go through this website and enjoy it.
radioboss crack
I really like your post because this post is very helpful to me and it gives me a new perspective. Finally, I am here to visit and enjoy this website. Its means a lot to me. Therefore, it had a long time and cause it to make all types of markets. There. In addition, the other type of download can be sued of copes and the one type of windows there. I am very impressed with your post because this post is very beneficial for me and provide new knowledge to me.Swift Retaining Walls Atlanta
Nest Camera login, go to the play store or google app store, fill all the login credentials and press the login button. If you are facing any kind of difficulty then call the toll-free number and reach us, ask all your queries regarding Nest Sign in. We are here to resolve all your queries.
thanks for providing us unique things really you introduce unique things without any doubt voxal voice changer torrent
Good Idea
I really like your post because this post is very helpful to me and it gives me a new perspective.
Nice Post Admin!! this is really very good Article.
If you are facing any problem your Netflix account, Please call us today!
I really like your post because it helps me a lot and gives me a new perspective
https://startcrack.net/kms-activator/
Your work is great it provides me great knowledge.
https://crackswindow.com/videoproc-crack/
I really like your post because this post is very helpful to me and it gives me new perspective
https://vstcrack.net/guitar-pro-crack/
In case you’re taking out a printout yet the paper is stalling out, by then you needn’t pressure. You can use the help that is offered by the assistance regions or you can dial the help number and talk with the Canon printer support to filter through the issue. You can associate with the customer mind and get some data about the plans concerning the issue. https://www.canonprintersupportpro.net/
You have such beautiful handmade stuff. Do you have instagram page to post these amazing photo? I think you should have it. I have recently read this article https://nouw.com/katesteven/instagram-likes-as-the-best-decision-for-36665658 and now you can get many likes for any photo you want, but your handmade stuff photo will be the best always
Parallels Desktop 16.1.1 B49141 Crack is actually the best of other VM programming software. In it, Mac OS X PCs with very capable specs. It’s a safe system that empowers drivers to make computerized devices rapidly and makes it simple to awaken Windows OS on a Mac PC system. In addition, Parallels Desktop for Mac is the simplest and most powerful application to run Windows on a Mac without restarting it.
Parallel Desktop Crack
Its wonderful to be here. thanks for sharing.
I really like your post because it helps me a lot and gives me a new perspective
https://serialsofts.com/lightworks-crack/
Your job is excellent, it equips me with great knowledge.
https://crackswindow.com/utorrent-pro-crack/
MS Office 2007 Product Key+ Crack Full Free Download
MS Office 2007 Product Key is a well-known tool used in the professional field.
https://seniorscrack.com/ms-office-2007-product-key-crack-full-free-download/
Microsoft Office Professional Plus 2013 Product Key + Crack [Upgraded]
Microsoft Office Professional Plus 2013 Product Key is the future of productivity.
https://seniorscrack.com/microsoft-office-professional-plus-2013-crack-upgraded/
free jav hd
Your work is great it provides me great knowledge.
https://crackswindow.com/radioboss-crack/
From time to time, you may have to encounter the interface glitch that is making the slip-up of Paypal to Cash App move. To get rid of such an issue, you should utilize the help of the assistance social occasion or you can explore to the tech consultancies. Regardless of that, you can in addition utilize the assistance that is given by the help rep.
This is very interesting. Very informative and helpful.
Visit our website for Customized Boxes..
https://procustombox.com/
I will increase your domain rating DR 50 Pluse with seo authority backinks
Thanks for sharing such wonderful stuff. Keep sharing and keep up the good work.
I really like your post because this post is very helpful to me and it gives me new perspective
https://vstcrack.net/ezdrummer-crack/
Your job is excellent, it equips me with great knowledge.
https://piratecrack.com/easeus-partition-master-crack/
Your work is great it provides me great knowledge.
https://hit4crack.com/adobe-creative-cloud-crack/
One of the best Platforms where you can learn Skills “Graphics Designing, WordPress, Digital Marketing and Search Engine Optimization” etc. Please visit here for more information. “grassrootsedu.com”
Good post. I enjoyed the thorough outline of each one the comments here. An excellent matter to sustain and educate some body in desire. Thank You
Nice Post I Enjoy! Can you tell me that how to install this software thanks 🙂 …. Adobe Premiere Pro Crack
Your job is excellent, it equips me with great knowledge.
https://licensefull.com/wise-care-365-pro-crack/
good work is done here. thanks a lot
superb work. keep sharing
wonderful work . thanks a lot
Thanks a lot.
Just keep up the good work admin. One day you will succeed.
enscape3d for sketchup crack
What are you waiting for?. Just go through this website and enjoy it totally free.
refx nexus crack
As you can see I am also doing this work for you
soothe-vst-torrent
Your work is great it provides me great knowledge.
https://crackswindow.com/faststone-photo-resizer-crack/
Hello Sir! If you want this software free of cost, you can get it for free by visiting our link. And the software is without watermarks and has great features. adobe photoshop lightroom
Your job is excellent, it equips me with great knowledge.
https://hit4crack.com/avast-internet-security-2020-crack/
SBCglobal, an American telecommunication company which has been merged with AT&T is quite popular amongst its users. Even though many of the features have been discontinued for this mail service. But still, there are people who are using this as their webmail service. SBCglobal email Login can be done by entering the username and password once the account is created. Connect with us with the help of email and chat and get instant assistance. Any of the issues you have related to your SBCglobal Login net will be resolved. So, you no need to worry about it. You can anytime connect with a professional to get in touch whenever you want to recover your password.
Visit us- https://sbcglobalemaillogin.com/
Your job is excellent, it equips me with great knowledge.
https://startcracked.com/advanced-systemcare-pro-crack/
Your job is excellent, it equips me with great knowledge.
https://licensefull.com/fonepaw-iphone-data-recovery-crack/
I appreciate your quality stuff and I would love to read more informative posts like this one. Ant Download Manager
I appreciate your quality stuff and I would love to read more informative posts like this one. ByteFence Anti-Malware
I really like your post because this post is very helpful to me and it gives me a new perspective ByteFence Anti-Malware
I really appreciate the kind of topics post here. Thanks for sharing us a great information that is actually helpful. Good day! ZoneAlarm
I appreciate your quality stuff and I would love to read more informative posts like this one.
utorrent
Chipotle has attained the title of one of the drive-in restaurants in the US with its amazing food. know how to get chipotle giftcard and how to use chipotle gift card online
I appreciate your quality stuff and I would love to read more posts like this one. Downlaod Chimera
good work. thanks
It’s going to be ending of mine day, except before finish I am reading this impressive article to increase my experience.
I really like your post because this post is very helpful to me and it gives me new perspective
https://vstlicense.com/arcade-vst-output-crack/
Your job is excellent, it equips me with great knowledge.
https://startcracked.com/emeditor-professional-crack/
I really like your post because this post is very helpful to me and it gives me new perspective
https://vstmania.net/vectric-aspire-crack/
We deliver packaging boxes globally with the best turnaround time in the world. We are specialized in providing custom household packaging to our valued customers.
I am very impressed with your post because this post is very beneficial for me and provide a new knowledge to me
https://cracksumo.com/drivermax-pro-11-2-1-crack/
I really like your post because it helps me a lot and gives me a new perspective
https://serialsofts.com/lightworks-crack/
I really like your post because this post is very helpful to me and it gives me new perspective
https://vstlicense.com/bettertouchtool-crack/
Your job is excellent, it equips me with great knowledge.
https://licensefull.com/wondershare-pdfelement-pro-crack/
How long does a copyright last on newspaper articles?. . If a service copies newspaper articles and then posts it in a database on the Internet, is there also a copyright on the Internet content?.
vuescan mac
I just want to mention I’m all new to blogs and certainly savored you’re web site. More than likely I’m want to bookmark your site .
Vuescan Download Full
I really like your post because this post is very helpful to me and it gives me new perspective
https://vstcrack.net/red-giant-trapcode-suite-crack/
I really like your post because this post is very helpful to me and it gives me new perspective
https://vstlicense.com/vps-avenger-mac-crack/
Your work is great it provides me great knowledge. amazing
https://hit4crack.com/postbox-crack/
Your job is excellent, it equips me with great knowledge.
https://licensefull.com/drivermax-pro-crack/
untuk anda yang ingin bermain game Slot Online, maka situs berikut ini cocok untuk anda https://pepperandwits.com/category/daftar-slot-online/
Your job is excellent, it equips me with great knowledge.
https://piratecrack.com/doyourdata-uninstaller-pro-crack/
i appreciate you for this unique idea AVG Internet Security Torrent
I really like your post because this post is very helpful to me and it gives me new perspective
https://startcrack.net/dragon-age-inquisition-crack/
this is so cute, my niece is having a baby in August and i ought to make her some! thanks for sharing your fun venture with each person!
I really like your post because this post is very helpful to me and it gives me new perspective
https://vstlicense.com/korg-legacy-special-collection-crack/
Hello,
I really like your post because this post is very helpful to me and it gives me new perspective
Your work is great it provides me great knowledge.
https://hit4crack.com/iobit-malware-fighter-pro-crack/
I really like your post because this post is very helpful to me and it gives me new perspective
https://crackvstpro.com/halftime-vst-pro-crack/
Wondershare UniConverter Crack is a powerful and easy-to-use video converter with built-in media tools. Wondershare UniConverter can download audio and video files from the Internet and convert them to other formats, using voice to record actions on the screen, save and transfer data. You can download media, AVS Video Converter from Crack to iOS and Android devices.
I really appreciate the kind of topics post here. Thanks for sharing us a great information that is actually helpful. exiland
This is very interesting, you are a skilled blogger. I have added your feed and hope to keep looking for more great posts. Plus, I have shared your website on social media!
I’m pleased I discovered it though, ill be checking back soon to find out what additional posts you include. download TeraCopy handler Crack
I have read stuff from. Many thanks for posting when you have the opportunity. Guess I will bookmark this site
CyberLink PowerDVD Ultra Crack
I have read stuff from. Many thanks for posting when you have the opportunity. Guess I will bookmark this site
Hotspot Shield Free VPN APK Latest Version
I really appreciate the kind of topics post here. Thanks for sharing us a great information that is actually helpful. Good day!
I must get across my love for your kind-heartedness in support of folks that must have help with this one niche. Your personal commitment to passing the message across was rather productive and has in every case empowered girls just like me to arrive at their ambitions. Your entire informative tips and hints implies a lot to me and much more to my office colleagues. Best wishes; from each one of us.Monster Truck Events
It is critical to recall that during the game, the primary concern is to stop as expected so as not to lose all the cash or not go into a misfortune
Wise Registry Cleaner Pro Crack
Cyberlink PowerDVD Crack
Regardless, everybody can locate an appropriate kind of betting for themselves.
Positive site, where did u come up with the information on this posting?
Tuneup Utilities Pro Crack
ill be checking back soon to find out what additional posts you include
MKVToolNix Crack
I’m pleased I discovered it though,
Safe365 SD Card Data Recovery Wizard Crack
I have been using movavi software it is very useful tool for me.. thumbs up! movavi
Wondershare Mobiletrans Serial Key Wondershare Mobiletrans Serial Key is a program that allows the user to transfer their existing applications, media files, contacts, images, even messages, and much more.
Melakukan Daftar Togel Online melalui blog Bandar Togel online Terpercaya Bonus Terbesar elizabethhillgrove.com di setiap pasaran togel resmi tentu saja menguntungkan bagi kalian para pecinta togeL. Yuk, langsung saja bergabung sekarang juga dan dapatkan kesempatan menang yang terbuka lebar dengan baik ini.
Agen Togel Online Bandar Judi Togel Situs Toto Online Terpercaya 198.187.29.139 unsurtoto menyediakan permainan Toto Online mini livegame Casino Dan sekaligus Merupakan Bandar Darat Terpercaya Di Indonesia yang membantu Daftar Togel terpercaya. Untuk info lebih lanjut kalian bisa kunjungi situs kami dan segera bergabung!
I really like your post because this post is very helpful to me and it gives me new perspective
https://licenselink.info/visual-studio-crack/
Your work is great it provides me great knowledge.
https://hit4crack.com/anytrans-crack/
I really like your post because this post is very helpful to me and it gives me new perspective
https://vstmania.net/wondershare-mobiletrans/
nice post. keep it up
I really like your post because this post is very helpful to me and it gives me new perspective
https://licenselink.info/tenorshare-icarefone-crack/
I really like your post because this post is very helpful to me and it gives me new perspective
https://startcrack.net/adobe-dimension-cc-2020-crack/
Your work is great it provides me great knowledge.
https://crackswindow.com/obs-studio-crack/
Great blog! Do you have any useful tips for aspiring writers?
I am planning to create my own website as soon as possible, but
It’s completely missing. You offer
Is it a free platform like WordPress or a paid option? There are so many options I can
I’m confused … any advice? Thank you!
I really like your post because this post is very helpful to me and it gives me new perspective
https://vstcrack.net/presonus-studio-one-free/
What a Excellent post. I really found this to much informative. It is what i was searching for. I would like to suggest you that please keep sharing such type of info. Thanks
Believe without a doubt what you said. It seems that your favorite goal was
the internet is the easiest factor to consider.
I tell you: I definitely get annoyed when people think about problems
they just do not know them.
Believe without a doubt what you said. It seems that your favorite goal was
the internet is the easiest factor to consider.
I tell you: I definitely get annoyed when people think about problems
they just do not know them.
great ideas thanks for sharing
visit our website for customize boxes
Are you looking for latest TomTom XL Update? then your search is over now. We, GPS Contact Number, is one of the lading name in the industry of map updates and services offer TomTom XL update from the help of experts. Just dial our toll-free numbers and grab it right now or feel free to visit our website for more information.
Cracked Here is a useful place where you can easily find Activators, Patch, Full version software Free Download, License key, serial key, keygen, Activation Key and Torrents.
Get all of these by easily just on a single click.
Nessus Full Patch is important to know how this software works. This software works to examine every port of your device. And it checks which service is properly working or which is not. Also, examine every service for viruses and infections and hackers’ interruption. And if you find any kind of issue it readily reports you and remove that issue. You further need to learn several software sets like the web browser, SMTP, and many more.
Cracked Here is a useful place where you can easily find Activators, Patch, Full version software Free Download, License key, serial key, keygen, Activation Key and Torrents.
SOUND FORGE Pro Serial Number are present in this app to edit the sound like a magnifying tool, envelope tool, edit tool, event tool, and pencil tool. All these tools are necessary for editing.
Smadav 2021 Crack Fort, this will give you privacy and protect you from accidents. Be sure to connect to the Internet automatically when you see new features without users. Administrators need a password to restrict access to all applications. It is the quickest way to scan a virus. And not only does it remove the virus, but it can also solve computer registration issues. In general, list any exceptions that can make to a folder or file.
Avast Secureline VPN 2021 Crack License Key Download FREE for Windows, Mac & Android. Use a VPN to protect your privacy and enjoy safe and anonymous web browsing is one of the most advanced, most comfortable, and most accessible to use virtual private networks. It comes with a very well organized, simple, and sophisticated interface. The best thing about Avast Secureline licensing is that it allows us to surf the Internet at super-fast speed without any restrictions.
ManyCam Pro Crack Keygen With this application; all these characteristics are beneficial for various purposes. As well as with this, you can make professional host live marketing shows, advertisements, create documentaries, host talk shows, and many more.
Cracked Here is a useful place where you can easily find Activators, Patch, Full version software Free Download, License key, serial key, keygen, Activation Key and Torrents.
Cracked Here is a useful place where you can easily find Activators, Patch, Full version software Free Download, License key, serial key, keygen, Activation Key and Torrents.
Get all of these by easily just on a single click.
Thanks for sharing, Nice to meet you
Thanks, we are glad to watch your blog. Thanks and love
Watching this site.
Nice post. Thanks……….
Soical websites are amzing,
I really like your post because this post is very helpful to me and it gives me new perspective
https://licenselink.info/sony-vegas-pro-crack/
I really found this to much informative. It is what i was searching for. I would like to suggest you that please keep sharing such type of info. Thanks
I really like your post because this post is very helpful to me and it gives me new perspective
https://startcrack.net/express-vpn-crack/
Someone is necessarily helping in creating critical articles I can name.
This is the first time you visit your site and so far? I was amazed at the analysis you did to create this amazing current edition.
Fantastic Process!
Your work is great it provides me great knowledge.
https://crackswindow.com/templatetoaster-crack/
This is a very helpful site for anyone, each and every man can easily operate this site and can get benefits
https://vstmania.net/logic-pro-x-mac-crack/
good 1 i like it
I really like your post because this post is very helpful to me and gives me new knowledge.
https://hit4crack.com/driverdoc-crack/
This thing with using glitter though! I’ll be seeing it come 4th of July!!! Christmas cards had them on it and more coming in, so I’m doomed!!! Lol This seems to be the year of the GLITTER!!!water jet
Thanks for providing recent updates regarding the concern, I look forward to read more.
This can effortlessly recover failed, missed, and deleted files in varying device sections. You can salvage data from your reuse box on Windows and the stuff on Mac quickly.
Wondershare Recoverit Crack is the Windows and Mac tool that recover data. That data that is removed accidentally deleted or corrupted by viruses. Even the information that is permanently removed from your device.
These are absolutely fantastic. What a brilliant idea and tutorial.
Thank You so much https://tokomesinku.com/2021/02/05/jual-impeller-pump-ksb/
GridinSoft Anti-Malware Crack is the best kind of anti-malware software with the best features. This is fast, stalwart, and strong. It has been developed expressly for programmed removal of viruses, spyware, trojans, and many rootkits.
Bandicut is a professional and quickest video cutting software. It is a fast video cutter and combiner. It can also combine videos with simple user interaction.
The government of the United States of America always believes in equal development for all the people living in this great country. Part of this, low-income people, disabled people, and single mothers have really low income and may not afford to buy a car.
Wondershare Recoverit Crack is the Windows and Mac tool that recover data. That data that is removed accidentally deleted or corrupted by viruses.
Thanks, Dera for this amazing tool…
This is a very helpful site for anyone, each and every man can easily operate this site and can get benefits
https://licenselink.info/sony-vegas-pro-crack/
This is a very helpful site for anyone, each and every man can easily operate this site and can get benefits
https://crackvstpro.com/lfo-tool-crack/
I appreciate this post, I share it with my loved ones. Please post more such posts.
This is a very helpful site for anyone, each and every man can easily operate this site and can get benefits
https://vstmania.net/bulk-image-downloader-crack/
Hi Valerie!
I did not notice a strong odor with my chalk cloth. It smells a little like vinyl, but not bad at all. I gave my nieces the mats and we have had a blast with them, reusing them often. I do use regular chalk with them, not the markers so I’m not sure if that was the problem or not. I have had mine for a while now, so I can’t vouch for the lots they are selling now, but I didn’t have any problem with odor or permanent marks.
I have seen it in my local Jo-Ann’s – you might try heading in there to see if they carry it and if you notice an odor there? Then you’d be able to check it out in person instead of just ordering it online. Hope that helps!Learn English
4K Stogram Crack is a software that you can use mainly for Instagram. It provides the facilities to users who use Instagram and want to get favorite pictures or videos which other people share on this social media.
I really appreciate the kind of topics post here. Thanks for sharing us a great information that is actually helpful. Good day! serif
I really appreciate the kind of topics post here…This is a very helpful site for anyone, each and every man can easily operate this site and can get benefits…
https://licenseguide.net
such a mind blowing post thanks for sharing
Its nice to visit this outstanding site i am really inspire pavtube video converter ultimate registration code
Unfortunately, this is a situation that many people, particularly families on a low income, find themselves in.
If you require a car but are struggling to afford one, then you might be wondering if there’s any legitimize way that you can get one for free.
Fortunately, there are a few ways that you can get a vehicle at no cost.
Its a very innovative blog thanks for sharing if you confronting any type of problem regarding Rand McNally Gps like Rand McNally Maps Directions then in that situation visit our website kodak
you have shared very informative information with us through your article. this information is very useful for me and you are doing amazing work keep it up. I want also to share something with you. Thank you so much for sharing this and I wish you all the best for the upcoming article.Monster Trucks
This is a very helpful site for anyone, each and every man can easily operate this site and can get benefits
https://licenselink.info/easeus-data-recovery-wizard-crack/
Driver Easy Pro Crack is a program that we may employ to mechanically scan all of the drivers who have yet to be put in or ask to become upgraded onto your laptop or notebook.
This is a very helpful site for anyone, each and every man can easily operate this site and can get benefits
https://licenselink.info/easeus-data-recovery-wizard-crack/
This section gives a clear message to the young people.
Blogging, here’s how to really blog.
Nice Post Admin!! this is really very good Article.
If you are facing any problem your Netflix account, Please call us today!
This website really has all of the info I needed concerning this subject.loaris
Crack Software Download Free 100% Working Keys & Crack.
Get Latest premium Software Here.
Here You Can Download New Crack Software Download Full Free Of Cost.
If You Want New Crack Software With Latest Version Please Visit here.
Crack Full New Version Free Download Here
This website really has all of the info I needed concerning this subject.file
This is a very helpful site for anyone, each and every man can easily operate t
his site and can get benefitss
https://macdownload.info/tor-browser/
This is a very helpful site for anyone, each and every man can easily operate this site and can get benefitss
https://startcrack.net/revo-uninstaller-pro-crack/
Hi! This post couldn’t have been written any better!
As I read this post, I am reminded of my old roommate!
He always talked about it. I will forward this
send him a message. I’m sure he will read it right. thanks
For exchange!
Hi everyone, this is my first quick visit to this web page; this one
the blog contains great and really good content for readers.
This blog change my lifestyle, and I am pleased that I read this blog. IObit Driver Booster Pro Crack
Great article for website design company in india Website Design Company In Varanasi
Health and Beauty product exporter.
The designs you have shared look adorable. thanks for sharing.
custom packaging company in USA
I like your artistic skills. Great work.
best school in Rawalpindi
Wondershare Dr.fone Crack is one of the best programs which lets you regain all of your lost info in iOS. This amazing tool works together with the iPhone, iPad along with iPod. The Wondershare doctor Fone program gives you the ability to regain your deleted data.
Looking great work dear, I really appreciated to you on this quality work. Nice post!! these tips may help me for future.
I have read your article; it is very instructive and valuable to me. I admire the valuable information you offer in your articles. Thanks for posting it.
gift boxes
Its a very innovative blog thanks for sharing if you confronting any type of problem regarding Rand McNally Gps like Rand McNally Maps Directions then in that situation visit our website. download <a href="https://zecrack.org/zoom-cloud-meeting-crack/" title="zoom"
Great day! The writing of this article couldn’t be better!
Reading this article reminds me of my wonderful homebuilding partner! He has already spoken about this.
I’ll send you this article, are you sure?
You will read well. Thanks for sharing!
Download now the best Excel setup guides online. We have a team
highly qualified Excel specialists. Contact us for help with online Excel mapping
Its a very innovative blog thanks for sharing.. Downlaod easybits
flame of trend Flame of trend is the world’s largest, most popular trend community. We leverage big data, human researchers to identify consumer insights and deep dive opportunities for the world’s most innovative companies, with our research.
I read the theory of this site, it gives me information about this site and I sent it to many people to read it.
FL Studio Crack the purpose of developing this software is to create my own music. With the help of this multiple sounds easily combine into one. So this is fantastic software
Serif Affinity Photo Crack is a great and very famous graphics document editor, which is simply perfect for retouching and embellishing our digital photographs and images. Affinity Image offers a lot of useful tools for editing and enhancing graphics files. Furthermore, the appearance is similar to a combo of GIMP and Photoshop.
DVDFab Crack is one of the world’s popular products. It is one of the most efficient disk programming applications. DVD Fab is the video processing program. It has various processes, including video changing, burning disk, and making disc copies.
AIDA64 Crack is one of the best and the modern tool that is designed as the benchmarking tool and it enables the users to test the performance of their PC.
Ardamax Keylogger Crack is a great and all in one famous program in security list originated by ARDAMAX software. It is a solid, inexpensive, strong and moveable key logger planned for complete checking of your actions on any PC it is download on.
IDM Crack is also known as an Internet Download Manager. It is use full for installing files from the internet for offline uses. It is a shareware software download manager. The software can run on Microsoft Windows operating system.
This DIY knitted monster looks very cool to kids. Check out these best holographic packing boxes to pack stuff in an amazing way.
How can i get this amazing deal given on this given link, can anyone help me to get leesa mattress at cheap price. I will be highly thankful to you, guys.
Very shortly this web site will be famous amid all blog people, due to it’s pleasant content
There as a lot of people that I think would really appreciate your content. Please let me know. Many thanks
Save Wizard PS4 Crack can empower one to control and put away the memory of all PS4 games. Along these lines, we could cheat at a flashgun much and appreciate, anyway informally. It has an example; we can’t simply procure to admit to the vast majority of the tasks and open all capacities. Additionally, it makes freed to tweak parts dollars, etc. Utilizing the help, we could alter our scores and utilize cheats onto them.
Save Wizard PS4 Crack
ฉันต้องที่ชื่นชอบเว็บไซต์อินเทอร์เน็ตนี้ดูเหมือนว่ามีประโยชน์มาก
Hello,this sites gives very interesting information!! Thanks for sharing.anymp4
Excellent, Excellent!
Your style is so unique compared to other people I ave read stuff from. I appreciate you for posting when you have the opportunity, Guess I will just book mark this page.
Smart Game Booster Crack This is useful software for running computer games. As well as it clears the RAM when you bring out the game. With the help of this, you can easily record the game screen. All things that you need just click on the BOOST button.
iMazing Crack There is much application available for the purpose of transferring the data but this one application is more suitable for all types of users. On the other hand, it provides the facility of the high speed of transferring the data between the devices and the network.
Plagiarism Checker X Serial Key is the app tool that makes and uses to require all kinds of the stack on the other archive. Therefore, the whole substance use to shows and makes the lower portion in the other window.
Aster v7 Crack could be your stage which transforms your own system to a multiuser channel. It is two or even more users to manually function on the personal computer at the same time. The particular settings lets multiple end-users to make use of a pc for someone stage.
That is a very helpful and informational post…. You write well…i congratulate you
Autodesk Fusion Crack is the best tool used to make the design for construction and use the purpose. Therefore, it will use to do the purpose and make the design of the software. Software is much useful and wants to perform the AutoCAD task in the types of design.
I am a fan of reading to add insight to information. Thank you for this great blog. this is here, the few months I am visiting and following you. What I really like about you is that your writing style. Please keep making such as information for us.millionare dating
I really liked this post. Because I like hand made things. Please keep sharing such information.
Cinema 4D Crack It is the most advanced software optimization tool that quickly optimizes 3D images. This program provides exciting updates for experts.
CCleaner Pro Crack is a beneficial program for those PCs which have MS windows. It can remove all the junk files, leftovers of uninstalled files, and folders. Further, this program will also help you to clean up your system and can keep its performance best.
AOMEI Backupper Crack is the easiest and reliable tool that use for the recovery of your important data. This software application is also used to make the recovery of your system and also create digital copies there.
Very interesting to read this article.I would like to thank you for the efforts you had made for writing this awesome article.
https://vstreal.com/iexplorer-crack/
I really appreciate the kind of topics post here. Thanks for sharing us a great information that is actually helpful. Good day!
Very interesting to read this article.I would like to thank you for the efforts you had made for writing this awesome article.
Miracle Box crack
Your blog is nice ..and your thought is verry good. I am regular reader of your blog …and I thought, you are a genius crative person for any blog contents….
office.com/setup
https://linktr.ee/amaraanderson514
Hello
We have also amassed over 20,000 verified and active signup members. With our members exclusively benefitting from 5x Free entries into our Prize Draw Competition.
Nice Post. Thanks for sharing. this blog post is very important & effective.
often to investigate cross-check new posts.packing popcorn
Hello
One can use Xanax pills to combat anxiety that is a hindrance throughout the day. If you are taking Xanax for anxiety that interferes with your daily work or tasks, it is usually recommended that you take the Xanax 1mg dosage.
XLStat Torrent probably the absolute most useful and most effective unit evaluation app in Microsoft Excel. The machine gives tools desk acts to move together with info.
CommView for WiFi Crack is a powerful tool that uses a tool that use to make monitor and wireless network analyzer tools. Therefore, this tool uses many of the users and has a lot of features that combine it.
KuTools For Excel Crack could be your optimal tool for most Excel people. It is God’s present for pros who are employed in Excel. What’s more, it has been progressing features today. An individual confronts difficulty throughout making use of Excel
Edraw Max Crack is the all in one 2D graphing software that is developed by Edrawsoft LTD. Therefore, this tool to create all kinds of business graph
Plagiarism Checker 2021 Crack is the amazing plagiarism checking software that permits plagiarism detection. In other words, this app enables the plagiarism checking of website contents, assignments, articles, blogs and research paper
Foxit PhantomPDF Activation Code also the best tool which presents its own customers with an economic Cal, speedy, protected, and related pdf-file treatment, ” The fox-it Phantompdf secret has become easily the best tool for producing and changing pdf-fil
iMazing Crack There is much application available for the purpose of transferring the data but this one application is more suitable for all types of users. On the other hand, it provides the facility of the high speed of transferring the data between the devices and the network. For more instances, you can use any remote device to send the data
Disk Drill Crack is the most efficient and amazing software in the present day. On the other hand, it will help the users to recover and find out any info on their devices. Further, this app will allow the users to recover their files reports, and many more.
This is a nicely put-together program that may supply a synopsis of all of the keystrokes on the machine it’s installedhmzapc
Hello..
Admin I like this article.I was searching over search engines and found your blog site.I like your good blog site..keep doing it..
This is really an amazing article. It provided me with great information. You must try Proteus full version for circuit stimulation. You download it from the link below.
https://propcsofts.org/proteus-crack-key-download/
Thank you for posting such a great Work! It contains wonderful and helpful posts.
pc games under 500mb
4K Stogram 3 Crack is a software that you can use mainly for Instagram. It provides the facilities to users who use Instagram and want to get favorite pictures or videos which other people share on this social media.
XLStat 23.1.1090 Crack is a very greater and famous software that use to examine a lot of modules. This program provides the function and also helps to feature to make the spreadsheet program in the toolbar.
Hiii.. nic blog from bottom to top content is great ………..very helpful to new internet users.
Thank you very much, this is really a large amount of information content-rich articles, I am glad that the author could get out to share with you It is very useful. Try to keep on posting these kind of things. Thanks for sharing.
dllkit-pro-crack
Hi there to all, the contents existing at this website are really awesome
for people knowledge, well, keep up the nice work fellows.windows-10-
Epson Error Code 0Xf3 is one such error that is faced by the users frequently times. When an unknown object is stuck inside the printer then you might get this particular error code. if you want error-free printing check mentioned blog.
Today, we will have a discussion on the subject of, is it legit to use CBD Products or not?
CBD has been a late campaign in the media.
As well, you may have even deliberated it to be an integrated promoter to your daybreak coffee or post practice smoothie.
CBD tablets are used to ease any pain.
However, still, the query is CBD Products are officially authorized?
Is CBD legitimate?
CBD is swiftly practical in a variety of bits of the US; anyway, its precise lawful status is in growth.
Every individual of the 50 states has rules supporting CBD with varying scales of the obstacle.
Remembering that the administration truly considers CBD in a relative class as Maryjane, it does not repeatedly endorse it. In 2015 December, the FDA buoyant trustworthy necessities to authorize researchers to lead CBD basics.
Sooner or later, a lot of people get CBD Products online with no a scientific cannabis license.
The organization’s state on CBD is perplexing as well as relies central upon whether CBD begins from marijuana or hemp.
CBD’s authenticity is dependent upon the administration to make the hemp crop officially permitted, which would, in each with both feet on the ground sense, make CBD not easy to forbid.
nic blog from bottom to top content is great ………..very helpful to new internet users.
Hi there to all, the contents existing at this website are really awesome
for people knowledge, well, keep up the nice work fellows.windows-10-
Nice Post. Thanks for sharing. this blog post is very important & effective.
The Crew 2 Pc Download is a game that has an Open World Racing video game. Moreover, This game developed by the Ivory Tower. On the other hand, The game The Crew 2 published by the Ubisoft for the Microsoft Window.
Just Cause 3 Highly Compressed an action video game set in an open world. It is full of adventures. Just Cause 3 is the 3rd series of Just Cause. It is played from the perspective of a third person.
Google Chrome stores the bookmarks and bookmarks computer files in an exceedingly long path into the Windows classification system. the exact location of bookmarks in chrome is in your user directory within the path “AppData\Local\Google\Chrome\User Data\Default.” If you would like to change or delete the bookmarks file for a few reasons, you must exit Google Chrome initially. These square measures simply exploit the Windows someone on Windows eight or the someone on Windows seven.
The modes of Winning Eleven 2012 Warkop are the globe cup, premier league,and friendly match. you’ll conjointly play this game along with your friends and family due to the multiplayer mode. Therefore, it’s one in all the foremost precious soccer games within the world. The graphics are nice. In short, you may get a correct football with quite 2600 players within the assortment box.
Activate natgeotv documentary series concerning the worldwide national movement’s efforts to eradicate extreme poverty by 2030. Every episode delves into a unique issue connected to poorness by following a particular campaign and therefore the organizers, celebrity amplifiers, grassroots activists and compact folks connected thereto campaign. The series will run in 2019 approximately 172 countries, and in forty three different languages and reach about 463 million households.
Composing with style and getting great compliments on the article is very hard, to be honest.But you’ve done it so serenely and with so cool feeling and you’ve nailed the activity. This article is had with style and I am giving great compliment. Best! eco store melbourne
I like your blog Thank you
It’s awesome for me to have a site, which is beneficial in favor of my know-how.
studio
thanks for this great concept this sit is osmm.
Hi me John
thanks for this great concept this sit is osmm.
you may like: https://www.instagram.com/backyardmash1/
Hi there to all, the contents existing at this website are really awesome
for people knowledge, well, keep up the nice work fellows.
panoramastudio
Its a very innovative blog thanks for sharing.. Downlaod product
I have absolutely no idea what you’re talking about.
very good
Connect with us to Get money on cash app without bank account.
We have a competent team of cash app technical executives that helps in eliminating all your technical issues. Whether you want How to Get money on cash app without bank account or get a refund, just rely on our cash app support technical team for this. Make sure to get instant support without any fail from us.
I really like your post because this post is very helpful to me.
What a good article it is. very very informative blog. Thanks for sharing with us.
The lovely article it is. Very informative post. Thanks
Segera daftarkan diri anda sekarang di website Agen Togel Wap kami karena ada bonus yang menarik yaitu bonus new member yang akan anda dapatkan jika bergabung sekarang. Disini akun anda dijamin aman dari apapun, oleh karena itu banyak para pemain yang bermain disini. Untuk informasi lebih lanjut segera kunjungi link website.
Great Article. Looking great work dear, I really appreciated to you on this quality work. I would like say thanks for this post. Here are some useful links for stdudents all across the globe. These tips may help me in the future. A high-standard post with all imperative information.mini storage
Took me time to understand all of the comments, but I seriously enjoyed the write-up. It proved being really helpful to me and Im positive to all of the commenters right here! Its constantly nice when you can not only be informed, but also entertained! I am certain you had enjoyable writing this write-up.
https://preactivator.com/itools-4-crack-license-key/
This website really has all of the info I needed concerning this subject.tenorshare
I really like your post because this post is very helpful to me.
It is a very helpful and informative blog post. I would like to thank to you for providing such information I have also have a website providing very good information.
I like your blog Thank you
Admiring the time and effort you put into your blog and the detailed information you offer!..
A really cool knitted DIY monster for kids. It reminds me of my childhood. Please check these best mascara boxes wholesale
Thank you for this information. Crafting is the best way to start a business for every person in day to day life. But i know a clinic who have a best therapist, critical situation treatment and other disease specialist for people health checkup best respiratory therapist in delhi
VueScan Pro is a software that is very useful in scanning the different processes. You can browse the different pictures of different types of documents with an easy process.
nice worknice
I love this Blog It’s really helpful adn Easy to undertand. you can also check these customize designed gable packaging boxes to pack your home and DIY Stuff.
High quality Custom Boxes for your packaging need
I like this site because so much useful stuff on here
hitmanpro-crack
I really appreciate the kind of topics post here. Thanks for sharing us a great information that is actually helpful. Good day!
crackexpress-vpn-crack
Hi there,
I was really looking for a detailed step by step guide to do this because I was really confused about doing this.
Thanks a lot, buddy.
Keep posting good stuff. Cheers.
hi, you are blog as awesome content.
EViews Crack offers monetary foundations, partnerships, government offices, and scholastics admittance to amazing measurable, time arrangement, guaging, and displaying devices through an imaginative, simple to-utilize object-situated interface.
EViews is a cutting edge econometric, measurements, and estimating bundle that offers amazing logical apparatuses inside an adaptable, simple to-utilize interface.
Utilizing EViews, you can rapidly and effectively deal with your information, perform econometric and measurable investigation, create gauges or model recreations, and produce great charts and tables for distribution or consideration in different applications.
EViews is planned in light of your work process. The inventive EViews Crack UI simplies each progression of the interaction, from information info and import, to information representation, factual investigation, assessment, estimating and model settling, distribution quality introduction yield.
Need to import Excel information? Simply intuitive your Excel record onto EViews Crack and we’ll naturally import the information. Need to deliver a histogram of your information? A few mouse snaps, and you’re finished. Need to connect your exclusively organized table into PowerPoint? Essentially reorder the table and advise PowerPoint to refresh the table when your EViews information change.
jangan ragu untuk bermain di situs roulette online berikut ini https://berbagitipsjudi.com/ karena kalah pun tetap bisa dapat cash back hingga puluhan juta rupiah setiap minggunya tanpa minimum kekalahan
What silly things do you do to spoil your pet?
I bought my cat a little tent for the garden.I put a fleece blankets in there so he’d be comfortable. He used it for the first time this morning when it was raining and I was delighted!
Matt jonhson
Very Informative Blog
Its Very UseFull
Easy To Understand
Glary Utilities Pro Crack
Its Very UseFull
Easy To Understand
Ashampoo Burning Studio Crack
Get the best men, women and kids clothing including causal and formal wear of every popular brand and many other accessories under one roof. Visit the online clothes shopping in pakistan at BrandzHub and pick up the products on upto 50% discount.
Nice post, I really enjoyed reading this article, it explains everything
in a simple way. I will check this blog at
such important information and will continue to search for it.
You can file a Cash app Dispute Payment within the 180 days of purchase. Before you file a dispute, contacting the merchant will be wise. Moreover, if you want to get a refund to your account, you should wait for a minimum of 30 days. For more queries and hurdles, you should take help from the experts right now.
This website really has all of the info I needed concerning this subject.imyfone-
Fall for the luxurious Hugo Boss perfume for men and women on Active Care Store. Our collection of perfumes is pleasant with exquisite fragrances. These perfumes are for those who want to live life on their terms and conditions.
Good Work
https://mobisoft.info/minitool-power-crack/
great article. keep it continue
https://gardenmega.com/best-fertilizer-for-st-augustine-grass
Steps to Claim Cash Dispute Payment:
Following the accurate methods to claim the Cash App Dispute Payment is important to manage the pending status of money in the cash app. However; people are not acquainted with the strategies. Therefore, they may choose to have words with the assigned team member for relevant guidelines instantly. The approach in the right way will assist them for sure and manage their cash app account effectively with no problems.
https://www.cashappcustomersupport.com/blog/can-i-dispute-a-cash-app-payment/
Nice post, I really enjoyed reading this article, it explains everything
in a simple way. I will check this blog for
such important information and will continue to search for it.
all other businesses, the has also evolved in its printing and packaging solutions.
Nice post, I really enjoyed reading this article, it explains everything
in a simple way. I will check this blog at
such important information and will continue to search for it.
Custom Lipstick Packaging Boxes
Insightful article you have here. I did a write up myself on this subject some time ago, and I wish I had your brief article as a resource back then. Oh well. Thanks again for this report. download software unity
I really appreciate the kind of topics post here. Thanks for sharing us a great information that is actually helpful. Good day!is turbotax
Nice Blog. Very Informative
noor
World of Cracks
Learn tips for Cash App Dispute Payment factor:
Many cash app users do not the tactics to initiate for Cash App Dispute Payment factor. They treat it as a big deal and go through troublesome situations. Thus, they can decide to have a conversation with the support professionals who know how to use the expertise to fix the concern of their clients strategically. Tech problems with online app are a common thing but seeking the solution tips can only help at last.
https://www.cashappcustomersupport.com/blog/can-i-dispute-a-cash-app-payment/
This website really has all of the info I needed concerning this subject.directory
Appreciate your quality stuff and I would love to read more posts like this one.malware
hi, your post content is very informative. thank you so much!
Visit FL Studio Crack
Informative site nice Posts.
Acronis trueimage Crack
All in all nice post concept are clear.
ManyCam Crack
I really appreciate the kind of topics post here. Thanks for sharing us a great information that is actually helpful. Good day!
Visit our latest blog posts and get to know some easy steps to troubleshoot various kinds of glitches encountered on email, printer, and routers, etc.
All of the Frequently Asked Questions by users related to the issues confronted by them on their Printer, Router, Laptop, Windows, Email listed here.
If you ever in need of a customer service number of any brand of printer, router, and email? then access Help Contact 24/7, an online directory of verified toll-free phone numbers of various prominent companies of USA and Canada.
If you found that, you still need some sort of information from us then you just have to fill out some basic details and send us. Our representatives will contact you as soon as possible with the ultimate response.
I simply want to tell you that I am just all new to blogging and site-building and absolutely loved your blog site. Probably I’m want to bookmark your website . You certainly have fabulous writings. Appreciate it for revealing your blog site.
This looks so good. Cant wait to make this for my future kids
Nice post, I really enjoyed reading this article, it explains everything in a simple way. Thanks for sharing.
Half Price Packaging provides exclusive custom box packaging at the wholesale prices. Hurry! Order our best mailer boxes, rigid boxes and other types with free shipping, design support & delivery across USA.
I’m sharing a little updated summer home tour, along with 23 other fab bloggers, since you know, I change things around about every 5 minutes. True story. There are actually a few things in these photos that have been swapped in the 3 days since I shot them…I know it’s a problem.buy silicone food covers
Here at Pcfullcrack, you will get all your favorite software. Our site has a collection of useful software. That will help you, Visite here and get all your favorite and useful software free.
This is a very helpful site for anyone, each and every man can easily operate this site and can get benefits
https://noorcracks.com/category/softwares
Antivirus
Also most gym memberships last around a year which you have to renew every year.
Excellent pieces. Keep writing such kind of information on your site. Im really impressed by it.
Thank you for another informative site. Where else could I get that kind of info written in such an ideal method?
Roku Error
Nice Post
Nice Post
Its looks nice thanks for sharing this post its very helpul for me
Thanks for sharing great information that is actually helpful. Also check out Metalized Packaging
https://wazusoft.com/camtasia-studio-updated-free-codes/
Camtasia-studio Crack free download
https://pckeyhouse.com/imyfone-d-back-crack/
iMyFone D-Back Crack is a program that can use to get and back any of its critical data. While if you want to recover this data to get and make backup files.
https://pcprosoft.com/nordvpn-with-crack-key-updated-2020/
NordVPN 6.34.5.0 Crack could be your hottest human virtual individual Program gain, supplier. It provides the work-place massive System company edge.
https://crackswall.com/prezi-pro-crack-keygen/
Prezi Pro Crack Business 6.20.2Prezi Pro Crack 6 – is a presentation and designing software.Prezi is a presentation and designing app, which utilizes templates to provide the canvas for your personal work. It can then be edited to suit your needs.
https://activatorscrack.com/solidworks-2020-cracked-serial-number/
SolidWorks Crack is the CAD software. Mean this software is used to add the multiple designs of the computer in anything. Computer-aided design engineering company build this software.
https://activatorskey.com/nch-switch-sound-file-converter-cracked-keygen/
NCH Switch Sound File Converter Keygen is an audio file conversion program. It is introduced by the NCH software. The program run on Windows, Macintosh, and Android operating system. It is the most reliable and professional software.
https://crackedfully.com/octoplus-box-crack-full-setup/
Octopus Box Crack is a professional and standard phone technical solution. It has the help of 1670 Samsung, 1780 LG models, and several others. It integrated complete tools of Octopus Samsung LG and Medusa JTAG box.
https://finalcracked.com/proxifier-crack-with-registration-key/
Proxifier 3.42 Crack is a system which permit network apps. It supports the apps that do not run with proxy servers to operate on an HTTP. Proxifier helps you to run with your desired program without any limitation.
https://fullycrack.org/dr-fone-activation-key-patch-download-here/
Wondershare Dr.Fone Crack easily solve your mobile problems. It is a program run to backup all lost IOS data. Several IOS and Android solutions are available on Windows and Mac platforms. It backup files and broken Android devices. It shares data between your IOS, Android and computer and iTunes. You can choose files to recover from any device.
https://crackedhome.com/proteus-torrent-professional-crack/
Proteus 8.9 Crack is a virtual system modeling and circuit simulation software. This program is an ownership software application. Mainly, the program is helpful for electronic design directions.
https://activatorpros.com/anydvd-cracked-2021/
AnyDVD HD 8.5.1.0 Crack can be a program that may unlock DVD to repeat information from DVDs along with Blu-ray disks. Copyright to Put Away on this Gadget.
I really appreciate the kind of topics post here. Thanks for sharing us a great information that is actually helpful. Good day!is avg-internet
Excellent information to get the benefit
It’s a worthwhile topic of discussion. such excellent information to share. keep it up the good work.
Appreciate your quality stuff and I would love to read more posts like this one.panda
The content provided above is very informative. Thanks for posting it. Here you can read all the info on the amazon activation and keep posting more content like this in the future.
ฉันดีใจที่ฉันพบเว็บไซต์ของคุณฉันจริงๆ
If your looking for Online Illinois license plate sticker renewals then you have need to come to the right place.We offer the fastest Illinois license plate sticker renewals in the state.
Took me time to understand all of the comments, but I seriously enjoyed the write-up. It proved being really helpful to me and Im positive to all of the commenters right here! Its constantly nice when you can not only be informed, but also entertained! I am certain you had enjoyable writing this write-up.
Hi there to all, the contents existing at this website are really awesome
for people knowledge, well, keep up the nice work fellows.
4k-youtube
Excellent post. I definitely love this site. Keep unity-pro
goodavid-pro
A big congratulations on taking the first step to greater life.
I have Learned Big Lesson from you Post thanks for this Interesting post.
Excellent post. I definitely love this site. Keep parallels-desktop
Superb work!
parallels-desktop
Good work!
parallels-desktop
Wonderful post! We will be linking to this particularly great
content on our site. Keep up the great writing.mobaxterm-crack
If You Would like to make some pocket money There are a million ways and you to do it. Not all of these are powerful. Hence, not all of them are legitimate. If you are following some money platforms would be.
Just like their name says they Reward you for doing certain things, such as clicking through that or this, reading emails, listening to music, taking surveys and surveys. Betabound is just one of these platforms. It recruits individuals to test services and technological products.
I TOTALLY LOVE TO VISIT THIS BLOG. THE INFORMATION SHARED HERE IS EXCEPTIONAL AND MUCH BETTER THAN OTHER SITES. YOU SHOULD KEEP WRITING AND SHARING MORE TO MAKE THIS BLOG THE BEST ONE CAN EVER FIND. GOOD LUCK MATE!
sigiriya rock sri lanka
I really appreciate the kind of topics post here. Thanks for sharing us a great information that is actually helpful. Good day!
Smartdraw 2020 activation code. 1.2 SmartDraw Crack Key Features. 1.3 What’s New? 1.4 Smartdraw Crack free download full version.
Ramadan Kareem Wishes – Find best wishes and messages for Ramadan 2021. Share the Ramadan greetings, quotes on whatsapp to your loved ones.
https://cracksole.com/driver-talent-pro-crack
This website really has all of the info I needed concerning this subject.driver-talent-pro
I’m sharing a little updated summer home tour, along with 23 other fab bloggers, since you know, I change things around about every 5 minutes. True story. There are actually a few things in these photos that have been swapped in the 3 days since I shot them…I know it’s a problem.silk dental floss
Best POst
I appreciate your quality stuff and I would love to read more informative posts like this one.niubi-partition-editor-crack-
Thank you very much, this is really a large amount of information content-rich articles, I am glad that the author could get out to share with you It is very useful. Try to keep on posting these kind of things. Thanks for sharing.red-giant-
It’s awesome for me to have a site, which is beneficial in favor of my know-how
/topaz-video-enhance-ai-crack
Thank you for sharing excellent information. It reveals how nicely you understand this subject. Bookmarked this website page, will come back for extra articles
Respect women quotes
We have brother printer offline. How to get it online? We are connected to wifi. Just won’t come offline.
How do I setup my Kodak Printer utility on wireless laptop and how to fix it easily…..
Thanks for sharing this post.It is very informative and helpful.
hello, your post content is outstanding. thank you
you can download vMix Pro Crack with single click.
Thanks for sharing this post.It is very informative and helpful.anymp4-blu-ray-ripper-crack
Thank you for sharing excellent information. It reveals how nicely you understand this subject. Bookmarked this website page, will come back for extra articles
bitdefender
Insofta Cover Commander Crack
Thank You For Sharing Such A Valuable Information.
nice post.
https://seoreadytool.blogspot.com/
I enjoy examining and I think this blog got some truly useful stuff on it.
This is so cool. I didn’t know they made this stuff in fabric form. This opens up a world of possibilities. Now we can make clothing and write on ourselves. Your mats are adorable.Elixir software development company
Hi, My name is Slava, I provide the most unique GUIDED TOURS IN ISRAEL focused on your needs with a luxury car for individuals and families, join me for an unforgettable experience! Whether a family trip, business travel or a Bar Mitzvah celebration, I will provide you a lifetime experience, allow me to plan your journey and take care of all the arrangements in Israel, please contact me about different activities in Israel, jeep tours, museums, attractions for kids, Bar Mitzvah ceremony and private tours.
It’s a worthwhile topic of discussion.
Wonderful work is done here. keep up the good work.
Useful information ..I am very happy to read this article..thanks for giving us this.
This is a very helpful site for anyone, each and every man can easily operate this site and can get benefistssMaster PDF Editor 5.7.40 Crack
just love craft form my childhood, it reminds me of those days :D.. Thanks buddy
Pixologic ZBrush
One can use Xanax pills to combat anxiety that is a hindrance throughout the day. If you are taking Xanax for anxiety that interferes with your daily work or tasks, it is usually recommended that you take the Xanax 1mg dosage.monster truckz
This is a topic which is close to my heart… Take care!eset-nod32-crack-download
Really lovely article. Keep it up. impulkits
Our Call Girls in Jaipur are beautiful and healthy. They do not offer any hazardous services to their client
Secret Disk Pro Crack
Thank You For Sharing Such A Valuable Information.
Worked as a Senior SEO & Digital & Social Media & Graphics Design & CPA & Dropshipping & Video Editing And Youtube & Web Design And Development & Affiliate Marketing trainer since 2014-2018. Successfully completed 50+ SEO batches, 20+
Affiliate Marketing batches and 30+ workshop on Freelancing under SEIP (Skills for Employment Investment Program). iphone repair in Louisville
https://seoreadytool.blogspot.com/
I enjoy examining and I think this blog got some truly useful stuff on it.
https://seoreadytool.blogspot.com/
I enjoy examining and I think this blog got some truly useful stuff on it.
From the business owner to the individual who desires full functionality on a small budget, Just Host provides a complete web hosting solution.
Nobody gives you a favour because Of superstition esp not the shopkeepers. Believe me I am an Indian. Also don’t be too close to the person in front of you and hug them!! You can wait patiently and if someone tries to come in front tell them go back firmly.digital marketing
I am a regular visitor, how are you, everybody? This post posted on this web page is truly pleasant.
OriginCrack
no idea what you’re talking about.
Nice article.
I love that we don’t have to act socially acceptable around each other.
Nice Post. Thanks for sharing. this blog post is very important & effective.
ystools-hard-drive-data-recovery-crack
Nice article.
artlantis-2020-crack/
I really like your content. Your post is really informative. I have learned a lot from your article and I’m looking forward to apply it in my article given below!
origincrack.com
Burnaware Professional Premium Crack
Thank You For Sharing Such A Valuable Information.
this is really nice to read..informative post is very good to read..thanks a lot!
This is a very helpful site for anyone, each and every man can easily operate this site and can get benefits
https://vstmania.net/soundtoys-crack/
Huh! Thank you! I need to write similar content permanently on my website. Can I put parts of your posts on your website?
Bharat Go Digital is a premium digital marketing agency based in Bangalore. Hire them for their best SEO services.
https://www.bharatgodigital.com/
Great blog you’ve got here.. It’s hard to find excellent writing like yours nowadays. I seriously appreciate individuals like you! Take care!!free-youtube-download-premium-crack/
Youre not the general blog writer, man. You definitely have something important to contribute to the net. Such a great blog. Ill come back again for more.
/
Great Article it its really informative and innovative keep us posted with new updates. its was really valuable. thanks a lot.
Excellent information Providing by your Article, thank you for taking the time to share with us such a nice article.
nice work is done here. keep going.
Crack Software Download Free 100% Working Keys & Crack.
Get Latest premium Software Here.
Here You Can Download New Crack Software Download Full Free Of Cost.
Thanks for sharing this wonderful information with us. You must try Express VPN Crack to access restricted sites, games, and much more. Download it now from the link below:
https://propcsofts.org/express-vpn-crack/
I really like your content. Your post is really informative. I have learned a lot from your article and I’m looking forward to applying it in my article given below!
origincrack.com
https://cracknain.com/netcut-pro-crack/#comment-10
Shreeja Health Care is leading manufacturer of Oil Maker Machine . Shreeja Oil Extraction Machine is able to extract oil from various seeds like peanuts, Coconut, Sesame, Soybean, macadamia nuts, walnuts, sunflower seeds, vegetable seeds flaxseed etc.
I just have nails above and below the oar and the right points to balance it. My mom has some hung though that she used a picture hanging kit to add a hook on the backside so you could try that too!Actualité jeux vidéo
Superbly written article, if only all bloggers offered the same content as you, the internet would be a far better place..
Nice embroidery work I remembered my childhood when I wore such cap and sweater etc
Love the way you write. Thanks for sharing.
It is extremely nice to see the greatest details presented in an easy and understanding manner.
I have to search sites with relevant information on given topic and provide them to teacher our opinion and the article.
https://rootactivator.com/securecrt-crack-keygen/
Driver Genius 21.0.0.126 Crack Plus Keygen Free Download 2021: Driver Genius Crack Professional is a helpful programming for your gadgets. This is extensive programming that can filter your gadget for driver issues
great to know about it thanks for writing the post
awsom post dear
airflow crack
I have seen your website, it is very cute, all the information given above is very good. Roboform Key Crack
He knows more than what he’s telling us, much more.
DocGenie – Ear nose throat ent specialists doctor & hospital in Delhi. Book Doctor’s Appointment Online, Consultation Online ENT Doctor through a video, chat or phone call at DocGenie.
https://www.Cargoweb.org Shipping Services had started its operations in Dubai, established by the experienced emarati management who have a great experience in freights fields.
Insightful article you have here. I did a write up myself on this subject some time ago, and I wish I had your brief article as a resource back then. Oh well. Thanks again for this report.download auslogics
I have seen your website, it is very cute, all the information given above is very good
II find this really helpful- I hope you step on a lego without socks and turn into an amputee.
You Can Also Get All Applications & Windows Software Free Download
A user anytime and anywhere can do Gmail Forgot Password either they know the email address or not. If they don’t know their email address and remember recovery Gmail address then can recover their Gmail account. If they are facing any type of issue then they can contact us.
This is really nice and useful information. I am glad that you have shared this useful information with us.
So, keep us posted. Thanks for sharing.
Writing with style and getting good compliments on the article is quite hard, to be honest.But you’ve done it so calmly and with so cool feeling and you’ve nailed the job. This article is possessed with style and I am giving good compliment. Best!
Download Voxal voice changer crack
I am happy I discovered this site at long last. Informative, dazzling snippet of data. Full structure break composing PC programs is here. Basically keep visit this site and worth this. Through this site we ought to teach you in like way about how to utilize and establishment.
MAdi Grena Great ideas!. Another great post … thank you! Love these and the tutorial for the bows.1617985578
I am very impressed with your post because this post is very beneficial for me and provide new knowledge to me
https://vstmania.net/twistedbrush-pro-studio-crack/
I would rather die of passion than of boredom.
Amazing website, Love it. great work done. This is really nice. Love it.
Amazing website, Love it. great work done. This is really nice. Love it. This is really nice and good. Love it.
deku meaning “death”. So if we translate this word, it means “the dead body” and “one who dies”. This word was used as a Japanese translation for “body” and it has been derived from the Japanese phrase “Utsuri ka?”. The word “Deku” was also used as a direct translation for “hell”.
thanks for sharing its real Any Video Converter Professional 7.1.1 Crack
When you reach the end of your rope, tie a knot in it and hang on.
Thanks for sharing this article. Also, if you want information related to Entertainment such as Salman Khan Upcoming Movies then you can visit seelatest.com.
If you sell gift wrapping supplies, custom votive boxes are a great way to advertise your business. Use a large full size printed quote on each of the gift wrap packages. This will provide great visibility and will help your store stay in the mind of your customer for a longer period of time. Candles are a wonderful gift that is presented in beautiful printed votive boxes.
Aenean vulputate nisl arcu, non consequat risus vulputate sed
After spending ten days in San Jose, where became the calm Blue Sky Inn at home,
the team arrived in Chicago and staying at the luxurious Park Hyatt,
I am very impressed with your post because this post is very beneficial for me and provide a new knowledge to me
https://startcrack.net/tuneskit-spotify-converter-crack/
Aaj Shahzeb Khanzada may not be in the limelight as much as Mulayam, Akbar, but he is still important to the PPP. This is because of his charisma and his ability to project himself as a savior for the people under the state’s thumb. People who are fed up with the system and the politicians in power will always look towards the man who engineered a major overhaul of the constitution and who can deliver major reforms. He is certainly the key man to watch out for.
This is very helpful and informative…
This is very educational content and written well for a change. It’s nice to see that some people still understand how to write a quality post!
The paper quality of the materials used for the packaging is extremely tough and durable and is able to safely hold the fragile items inside while being transported. The custom pillow boxes offered by the online store are glossy, full color, glossy, and have custom-made imprints, images and designs on them to help protect your possessions. The boxes designed by the Kraft and wool industries are weatherproof and are durable. The custom box packaging offered by the online store has perfect graphic images to protect the contents from damage in transit.
How many to fix Norton not opening on windows 10?
step-1 Go to the windows desktop screen.
step-2 Right-click the task manager then click on.
Step-3 Open task manager windows screen.
Step -4 Select the Startup menubar and then select Norton Download Manager.
Step-5 Right-click the Norton Download Manager.
Step-6 Open file location.
Step-6 Click Public download.
Step-7 Delete the Norton folder
Step-8 Restart your system.
If you have problems PC matic, RR email, Norton Antivirus So, you need to contact Norton toll-free number or Visit my official website. My teams has well and good experience for resolving like this problems If you have quarry related this issue don’t worry. Please contact my expert team without any hesitation. My team will provide all help to you in a very easy and simple way. We are available 24/7/365 on this blog. So, just connect with us Thanks!
https://www.mygeekshelp.com/ways-to-fix-norton-not-opening-on-windows-10/
Stardock Fences Crack This is a very helpful site for anyone, each and every man can easily operate this site and can get benefistss
You can get a lot of themes and relevant images painted on your custom essential oil boxes to grab the attention of your customers.Essential Oil Packaging Boxes
User face issues while using norton antivirus, that may be norton server error, norton live update not working etc. Call Norton antivirus …
https://www.mygeekshelp.com/ways-to-fix-norton-server-error/
Folder Lock Crack This is a very helpful site for anyone, each and every man can easily operate this site and can get benefistss
https://cracknain.com/sigmakey-box-crack/#comment-18
best GPS Car tracker Company started with investigating top-rated location trackers to see which consistently performed best. We then d
id our own deep-dig research to see what users were saying about each device so we could choose the best of the best.
This is a very helpful site for anyone, each and every man can easily operate this site and can get benefistss funny-shayari
Thanks for sharing this great knowledge to us. Keep it up and keep sharing. You can fix your all the issues related to your belkin.setup wizard with the help of our technical team.
Machen Sie sich keine Sorgen. Durch den Schlüsseldienst Regensburg müssen Sie nicht auf einen schönen Kinoabend mit Freunden verzichten. Er ist Ihr kompetenter Ansprechpartner rund um Türöffnungen. Zum Fachgebiet gehören aber nicht nur Haus- und Wohnungstüren. Unsere Partner helfen Ihnen gerne bei allen Arten von Türöffnungen, wie bei der Autoöffnung Regensburg oder dem Öffnen einer Tresortür.
Very informative post. I appreciated this well shared . Keep it up sharing .
Bei stark bis extrem inkrustierten, das heißt verengten Rohrleitungen, kommt die hydromechanische Rohrreinigung zum Einsatz. Auch hierbei verwenden die Fachleute von Kuchler Service weder Säuren, Laugen noch umweltbelastende Spülmittel. Und dennoch erreichen sie zügig das Ziel: eine saubere Leitung – durch eine rundherum saubere Arbeit, die mehr Effizienz bringt als Kosten nach sich zieht.Rohrreinigung passau
Bei stark bis extrem inkrustierten, das heißt verengten Rohrleitungen, kommt die hydromechanische Rohrreinigung zum Einsatz. Auch hierbei verwenden die Fachleute von Kuchler Service weder Säuren, Laugen noch umweltbelastende Spülmittel. Und dennoch erreichen sie zügig das Ziel: eine saubere Leitung – durch eine rundherum saubere Arbeit, die mehr Effizienz bringt als Kosten nach sich zieht. Rohrreiniger passau
Bei stark bis extrem inkrustierten, das heißt verengten Rohrleitungen, kommt die hydromechanische Rohrreinigung zum Einsatz. Auch hierbei verwenden die Fachleute von Kuchler Service weder Säuren, Laugen noch umweltbelastende Spülmittel. Und dennoch erreichen sie zügig das Ziel: eine saubere Leitung – durch eine rundherum saubere Arbeit, die mehr Effizienz bringt als Kosten nach sich zieht.klempner Passau
https://cracknain.com/betternet-vpn-premium-crack/#comment-20
https://cracknain.com/sigmakey-box-crack/#comment-21
Bei stark bis extrem inkrustierten, das heißt verengten Rohrleitungen, kommt die hydromechanische Rohrreinigung zum Einsatz. Auch hierbei verwenden die Fachleute von Kuchler Service weder Säuren, Laugen noch umweltbelastende Spülmittel. Und dennoch erreichen sie zügig das Ziel: eine saubere Leitung – durch eine rundherum saubere Arbeit, die mehr Effizienz bringt als Kosten nach sich zieht.
Rohrreinigung deggendor
Very informative post. I appreciated this well shared . Keep it up sharing
office.com/setup: Go to office.com/setup office setup webpage. Sign In with your Microsoft Account. For New Users, Click Create a New Account. Enter Office Product Key, Click Next. Click the “Install Office” button. Select Office Version and Download Office. Save and Run Office Setup. Click “Yes” when prompted to begin Installation. Wait for Office to Finish Installation. Click Close and Run Office Apps. To get more data if it’s not too much trouble, visit https://w-w-office.com/setup.
Bei stark bis extrem inkrustierten, das heißt verengten Rohrleitungen, kommt die hydromechanische Rohrreinigung zum Einsatz.
Auch hierbei verwenden die Fachleute von Kuchler Service weder Säuren, Laugen noch umweltbelastende Spülmittel. Und dennoch erreichen sie zügig das Ziel:
eine saubere Leitung – durch eine rundherum saubere Arbeit, die mehr Effizienz bringt als Kosten nach sich zieht.
https://nj-sanitaerdienst.de/
Very good entry. I have been checking this blog constantly and I am very impressed! Very useful information, especially the last part. This information is very important to me. I have been searching for this information for a long time. Thank you and good luck. https://orgcrack.com/
orgcrack
This is a wonderful and informative blogs thank you.
WebStorm License -Key
Thanks for sharing this great knowledge to us. Keep it up and keep sharingbhagat-singh-quotes
Thanks for sharing us a great information that is actually helpful. uvk
Serato DJ Pro This is a very helpful site for anyone, each and every man can easily operate this site and can get benefistss
If you want to update the firmware of your Echo device and you don’t know the process then don’t look further than Echo customer service. Echo Helpline is a well-known company that can help you with the best informational service. Echo Helpline
We help lots of companies by delivering inspiring wholesale custom boxes to them. Custom essential oil packaging
nNorton/setup is here to answer your questions, troubleshoot problems and offer you expert tips for your PC & Website. We are dedicated to helping our PC users with every issue they are facing. We understand your issues and deliver quick problem resolution. Our service can be availed 24/7
norton.com/setup
Are you thinkning of buying square matt black basin for your bathroom? If yes, then don’t look further tha NZHomeware. We have a huge variety of square basins. We provide you a wide range of bathroom products of various brands. So hurry up and visit our website. shower heads
This is an Excellent post you have shared with us. I really like and appreciate your post. Thank you so much.
Thank you for sharing this information and content here. I would like it if you to post more content like this.
Step-by-Step guide for Office – Activate, Download & complete installation from office/setup. We are provide independent support if you face problem to activate or install Microsoft office product.Step-by-Step guide for Office – Activate, Download & complete installation from office/setup. We are provide independent support if you face problem to activate or install Microsoft office product.o
asf
Step-by-Step guide for Office – Activate, Download & complete installation from office/setup. We are provide independent support if you face problem to activate or install Microsoft office product.Step-by-Step guide for Office – Activate, Download & complete installation from office/setup. We are provide independent support if you face problem to activate or install Microsoft office product.osdgfdg
Step-by-Step guide for Office – Activate, Download & complete installation from office/setup. We are provide independent support if you face problem to activate or install Microsoft office product.Step-by-Step guide for Office – Activate, Download & complete installation from office/setup. We are provide independent support if you face problem to activate or install Microsoft office product.ooasfsdf
ooStep-by-Step guide for Office – Activate, Download & complete installation from office/setup. We are provide independent support if you face problem to activate or install Microsoft office product.Step-by-Step guide for Office – Activate, Download & complete installation from office/setup. We are provide independent support if you face problem to activate or install Microsoft office product.asdfdsf
Step-by-Step guide for Office – Activate, Download & complete installation from office/setup. We are provide independent support if you face problem to activate or install Microsoft office product.Step-by-Step guide for Office – Activate, Download & complete installation from office/setup. We are provide independent support if you face problem to activate or install Microsoft office product.oasdfe
Super site! I am Loving it!! Will return once more, Im taking your food additionally, Thanks.
Great post i must say and thanks for the information. Education is definitely a sticky subject. However, is still among the leading topics of our time. I appreciate your post and look forward to more.
Nice blog. Found this while searching through
VMware Workstation Pro This is a very helpful site for anyone, each and every man can easily operate this site and can get benefistss
Adobe Photoshop CC 2021 Crack This is a very helpful site for anyone, each and every man can easily operate this site and can get benefistss
SketchUp Pro 2021 Crack This is a very helpful site for anyone, each and every man can easily operate this site and can get benefistss
<a href="https://serialsoft.org/wise-care-crack-2/"This is a very helpful site for anyone, each and every man can easily operate this site and can get benefistss
I am very impressed with your post because this post is very beneficial for me and provide a new knowledge to me
Machen Sie sich keine Sorgen. Durch den Schlüsseldienst Regensburg müssen Sie nicht auf einen schönen Kinoabend mit Freunden verzichten. Er ist Ihr kompetenter Ansprechpartner rund um Türöffnungen. Zum Fachgebiet gehören aber nicht nur Haus- und Wohnungstüren. Unsere Partner helfen Ihnen gerne bei allen Arten von Türöffnungen, wie bei der Autoöffnung Regensburg oder dem Öffnen einer Tresortür.
Excellent post. I’ve been browsing this blog constantly, and I’m impressed! Very useful information, especially on this page. Thank you and good luck.
https://downloadcracker.com/
web designing company in noida
website designing company in noida https://www.marketingwise.in
Connect Dubai Fun Club for premium Dubai escorts and entertainment services. You can easily find the best call girls in Dubai on our website
Postbox Crack Latest Version This is a very helpful site for anyone, each and every man can easily operate this site and can get benefistss
Even the best bank sometime fails to process the payment. But, when salary fails to get into the account, anyone might grow anxious and frustrated. If you are one who can’t afford a delay in getting salary, then Cash App direct deposit is for you. To know more info: Cash App Direct Deposit
Driver Genius Crack This is a very helpful site for anyone, each and every man can easily operate this site and can get benefistss
Good and interesting post dndinvodafone
this looks so cute. Here I am, reading this in my Bridal Dress and thinking that one day i’ll be making something like that for my kids
I like viewing web sites which comprehend the price of delivering the excellent useful resource free of charge. I truly adored reading your posting. Thank you!
click here and buy best wedding dresses
Mcafee Among the wide arrangement of antiviruses, McAfee is quite possibly the most wanted and requesting security apparatuses for different gadgets.
PayPal is one of the most rewarding payment apps. Once you start using it, I bet, you will never think to switch to any other payment app. I am saying so because PayPal offers a broad range of services and features. PayPal cash card is one of many great services which are offered by PayPal. The best part of PayPal cash card is the facts that it is free to order, set up, and make payment. All benefits of PayPal debit card are accessible only after you activate it. The process to activate a PayPal cash card is quite simple and straightforward.
Set aside me effort to peruse every one of the remarks, yet I truly appreciated the article. It end up being Very useful to me and I am certain to all the analysts here! It’s consistently decent when you can not exclusively be educated, yet additionally engaged! Ola EC
Bei stark bis extrem inkrustierten, das heißt verengten Rohrleitungen, kommt die hydromechanische Rohrreinigung zum Einsatz. Auch hierbei verwenden die Fachleute von Kuchler Service weder Säuren, Laugen noch umweltbelastende Spülmittel. Und dennoch erreichen sie zügig das Ziel: eine saubere Leitung – durch eine rundherum saubere Arbeit, die mehr Effizienz bringt als Kosten nach sich zieht.
klempner deggendorf
Machen Sie sich keine Sorgen. Durch den Schlüsseldienst Regensburg müssen Sie nicht auf einen schönen Kinoabend mit Freunden verzichten. Er ist Ihr kompetenter Ansprechpartner rund um Türöffnungen. Zum Fachgebiet gehören aber nicht nur Haus- und Wohnungstüren. Unsere Partner helfen Ihnen gerne bei allen Arten von Türöffnungen, wie bei der Autoöffnung Regensburg oder dem Öffnen einer Tresortür.
Visit Here
I am very impressed with your post because this post is very beneficial for me and provide a new knowledge to me thank you
vstprocracker.com
I would recommend my profile is important to me, I invite you to discuss this topic…
I like your awesome and briefing information’s and i was looking for these types of knowledge.
Thanks for sharing this great information to us. It fulfill my all the queries in easy way. I really appreciate you for this great work. Keep it up and keep sharing. Instead of this, If you have any issue related to your http://belkin.range then you can reach to us even talk to our technical Support team. We are available 24*7.
I really impressed with your work which useful information
NTLite Crack
wow. these are some amazing designs. loved your artistic skills.
This is the great place thanks for sharing
Visit here and enjoy it thanks a lot for sharing
Great Forum
Click here and buy Front Embroidered Shirt
As an example, if you want to share the benefits and advantages of CBD with your friends and family, then displaying the complete bottle or jars, including its label, on your refrigerator could increase the number of people who would be able to understand and appreciate the benefits of CBD.
As an example, if you want to share the benefits and advantages of CBD with your friends and family, then displaying the complete bottle or jars, including its label, on your refrigerator could increase the number of people who would be able to understand and appreciate the benefits of CBD.
When it comes to choosing CBD topicals, there are many different types of bottles and jars you can choose from. In addition to that, there are also various CBD topicals to choose from, which could include but are not limited to cream supplements, lotions, creams, oils, gels, balms, and supplements. With such an amazing selection of CBD products to choose from, you are sure to find the best brands within your price range. In fact, some websites offer free CBD samples right at your doorstep!
Very Nice I like it Keepit thanks for sharing
Is FB Down? Get the moment arrangement.
In the event that you are a Facebook client and incapable to get the arrangement from Is Fb Down issue on the grounds that Facebook never offers any immediate contact number to its clients. Clients can go with the Help and Support alternative or Facebook Contact Support choice or Facebook Customer administration number. Why you are pausing, simply take our telephone and dial our number.
Wondershare MirrorGo This is a very helpful site for anyone, each and every man can easily operate this site and can get benefistss
The lead developers and the original authors of Avast Premium Security 21 License Key are named Avast Incorporation. They are the lead developers of many other applications available over the internet. The main purpose of this company is to make its customers secure from any external threat or virus attack.
Auslogics Disk Defrag Pro This is a very helpful site for anyone, each and every man can easily operate this site and can get benefistss
good job. its really informative content. thank you for sharing this amzing content. keep it up
Restoro license key reddit will al low you to scan your computer and find any problems with it. This will slow down your computer and poor performance may be a mistake.
Restoro License Key Crack
When watching normal video, sound is transmitted through the channels. Video supporting stereo transmits sound over two channels, one for each ear software.
Dolby Access Crack
Recently Registry Manager This is a very helpful site for anyone, each and every man can easily operate this site and can get benefistss
Microsoft office Dynamics This is a very helpful site for anyone, each and every man can easily operate this site and can get benefistss
Download and Install Webroot With Key Code to secure your device. Webroot protects multiple devices such as Windows, Mac, and mobile phones from online threats, viruses,malware, and other threats. In the digital era, one must keep an antivirus on the device forsecurity from cyber threats and phishing attacks. Webroot is award-winner antivirus softwarethat you can use for business and home network both purposes. Hence, purchase the productkey and Install Webroot With Key Code on your device. Get Webroot Secure Anywhere webroot.com/safe Antivirus, Internet Security Plus, or Internet Security Complete products from Webroot storeand get the best security.
https://www.webrootsafe.co/
Online ENT Doctor Consultation in India With DocGenie. ENT doctors consult online through Chat Video Calls with a ENT Specialists. Book Appointment with Docgenie- Call @9818093267
Thanks for sharing this also check our custom product boxes.
Today application programming interfaces (APIs) give an interface. The diversion and the OS, disentangling amusement outline. Microsoft’s DirectX is an API that is generally utilized by the present to speak with sound and illustrations equipment. OpenGL is a cross-platform API for illustrations rendering that is likewise utilized. https://cracksmod.org/games/
office.com/setup home & student 2019– MS office is one of the best and complete packages of prominent tools that can offer ease to your office and household work. It is owned by Microsoft and developed in 1990 to provide essential operating system services.
this is amazing site thanks for sharing
https://simplecrack.com/toon-boom-harmony-premium/
I never read this type of informative blog. You have great knowledge in this niche.
The writing skill is also well. Thanks for sharing this. I really appreciate your
work. Keep it up and keep updating. Moreover, If you have any issue related to your
https://beiklnrange.net/ then I am here with my technical support team. They will fix your all the
issues.We are here 24*7.
good job. its very good blog. and the information you share to us its very meaningful . thank you . keep it up
tHANKS Admin…
Thank for sharing it…
wow, that is amazing content, Thanks for share this. This is a really so nice photography technique.
warm Regeards
Silo path
If your CCTV camera has stopped working and unable to fix that on your own then don’t look further than Geeks for Tech. Geeks for tech is a group of expert technicians who can fix your damaged cctv camera. Geek Squad
Are you thinkning of buying square matt black basin for your bathroom? If yes, then don’t look further tha NZHomeware. We have a huge variety of square basins. We provide you a wide range of bathroom products of various brands. So hurry up and visit our website. shower heads
your blog is very informative also check our custom candle boxes.
Thanks for sharing it.
love it
How to Delete Match Account
delete match profile
how to delete a match account
match.com delete account
how to delete match.com account
Thank you so much for the info.
Very Nice
Thumbs up guys your doing a really good job.
This post is very nice and informative. I like this post.
Excellent post. I have been browsing this blog constantly and am impressed. Very useful information, especially on this page. Thank you and good luck.
https://downloadcracker.com/
Custom printed boxes are trending in the market, every brand is moving towards custom packaging. Custom boxes always give the best and secure packaging and shipment. Keep writing such kind of content. Thanks!
focus keywordThis is a very helpful site for anyone, each and every man can easily operate this site and can get benefistss
Excellent post. I have been browsing this blog constantly and am impressed. Very useful information, especially on this page.
https://downloadcracker.com/
Thanks a lot
Thank you so much for the info.
I never read an informative blog such like this.I really appreciate your work. keep it up and keep updating.
Instead of this, If you have any issue related to your belkin range setup wizard Then we are here in a team in order to fix your all the issues. You can visit us even talk to our technical support by 24*7.
If your HP Deskjet Series Printer says attention required error message, use four methods of our blog post to fix it. Solve HP attention required for various Envy, Officejet, Deskjet, and Laserjet series.
The top methods from our latest story over Wattpad to fix HP printer offline on windows 10 or Mac. The printer keeps going offline failure often face by Envy 4500, 5000 Officejet 8710, 3830 series.
Thanks for the info.
The best six solutions are hereabouts to resolve the HP printer says out-of-paper error promptly. HP Envy, Photosmart, Officejet keeps saying out of paper but there is not.
https://bit.ly/2QrUwlF
Very nice info with an amazing explanation.
Get the best guidance to fix the HP printer alignment failed errors quickly. Solve printer alignment failed or unsuccessful issue for HP Officejet, Envy, and Photosmart series.
https://bit.ly/3r7NO0w
Very Nice Info.
The best model for how to cancel the print job on HP printers whether is on Windows, Mac, Android, iPhone, or iPad platform. Learn to cancel the print queue to resolve the problem.
https://bit.ly/3cSmEG6
If the preferred measurements are not included by you in our service log, we will produce custom boxes with logo that conform to the requirements.
जानिए कीवी खिलाड़ी कब होंगे इंग्लैंड के लिए रवाना, न्यूजीलैंड कोच गैरी स्टीड बताए Dates- इंडियन प्रीमियर लीग (आईपीएल 2021) के स्थगित होने के बाद मालदीव में क्वारंटाइन में रहे कप्तान केन विलियमसन और अन्य कीवी क्रिकेटर दो टेस्ट मैचों की सीरीज के लिए इस सप्ताह के आखिर में इंग्लैंड रवाना हो सकते हैं. न्यूजीलैंड के कोच गैरी स्टीड ने ये जानकारी दी है.
Fantastic article.
Wow, Amazing info.
Very Impressive Dear.
Order fresh flowers Online from best online florist in bangalore. Send unique design flowers to bangalore for all special occasions to your loved ones
Having trouble saving your address on each online portal? Explore our easy address solutions by GINBOX, A globally unique Address for online shopping
Nice blog!! thank you for sharing this information
Great thanks for sharing it was very informative blog. A useful wording is a great way to highlight the significant aspects of the topic keep it up.
It is a very helpful and informative blog post. I would like to thank to you for providing such information I have also have a website providing very good information.Discover The Best
Netflix not working on Roku is a very common issue and has troubled many users. Netflix is one of the best online streaming services out there that covers many shows, movies.
https://rokunotworking.com/blog
If you are facing any kind of technical issue with your any device system, then you can simply connect to our Customer support Phone Number team by just dialing our toll-free number- +1-888-712-3052 in order to avail instant help and support.
kepala Bergetar tonton is Kbergetar Malaysia’s largest video streaming service layanon9 with over 8 melayu drama million users. kepala Bergetar Tonton Dramas watch online all episodes and download free HD quality videoes. Automašīnu uzpirkšana
lovely blankets
Movavi Screen Recorder Full Version
Movavi Screen Recorder Full Version
stunning post
Bei stark bis extrem inkrustierten, das heißt verengten Rohrleitungen, kommt die hydromechanische Rohrreinigung zum Einsatz.
Auch hierbei verwenden die Fachleute von Kuchler Service weder Säuren, Laugen noch umweltbelastende Spülmittel. Und dennoch erreichen sie zügig das Ziel:
eine saubere Leitung – durch eine rundherum saubere Arbeit, die mehr Effizienz bringt als Kosten nach sich zieht.
https://nj-sanitaerdienst.de/
Professionelle Schädlingsbekämpfung und Kammerjäger in München und Umgebung sowie in allen Teilen der Stadt und Umgebung.
Wir bekämpfen kompetent, effektiv und vor allem diskret jede Art von Schädlingsbefall.
Wir von Kammerjäger München 24 sind Kammerjäger München.
Truly, this article is really one of the very best in the history of articles. I am a antique ’Article’ collector and I sometimes read some new articles if I find them interesting. And I found this one pretty fascinating and it should go into my collection. Very good work!
hello!! Very interesting discussion glad that I came across such informative post. Keep up the good work friend. Glad to be part of your net community.
It was a very good post indeed. I thoroughly enjoyed reading it in my lunch time. Will surely come and visit this blog more often. Thanks for sharing.
I’m thinking “what wouldn’t I use it on?” . I would try to make hooks for my pot holders and measuring cups. I have a bare spot on my kitchen wall detective always wanted to hang them but it’s impossible because it’s covered brick.guided tours in Israel
I think I need to hire someone like you to come deck out my house. I’m hopeless at this sort of thing. I know what I like, it just doesn’t get done! Tragic, I know. At least I can dream about someday become more adept at these things.guided tours in Israel
Very, very interesting article! Really interesting
Thisblog is very informative also try our custom pillow boxes
That’s So Cute.
Awesome! Thanks
A great read for everyone. Thanks for sharing.
HP officejet pro 8600 printer failure
Very informative blog. I am bookmarking the post.
https://helpcontact247.com/faqs/why-my-hp-printer-keeps-jamming/
Nice post with info.
HP envy 4500 incompatible cartridge error
Sun Country Airline flight, Just amazing — they’ve never been late for me, but Sun Country Airline change Policy is very easy to understand. After searching so much about modification policy, finally, I got a solution by {Airlinespolicy.com }. They have crisp, short, and relevant information about modification, cancellation, check-in, Baggage, and Pet policy. They helped me a lot during the harsh Covid-19 time. I am very thankful to the team of airlinespolicy. https://airlinespolicy.com/flight-change-policy/sun-country-flight-change-policy/
Bei stark bis extrem inkrustierten, das heißt verengten Rohrleitungen, kommt die hydromechanische Rohrreinigung zum Einsatz. Auch hierbei verwenden die Fachleute von Kuchler Service weder Säuren, Laugen noch umweltbelastende Spülmittel. Und dennoch erreichen sie zügig das Ziel: eine saubere Leitung – durch eine rundherum saubere Arbeit, die mehr Effizienz bringt als Kosten nach sich zieht.
klempner deggendorf
Wow! nice post. thanks for sharing
nice post. thank you so much for sharing.
Hey Blair! Good job on this article! I was looking for some quick recipes for snacks for my little nephew, so I tried making a couple of the 3-Ingredient Cheesy Crescent Dogs for him. To my surprise, he really enjoyed them; he usually don’t like what I make. ???? I just wanted to thank you Blair for sharing this post. It was a big help!Online Shopping Mall
Good balnkets so far
DigitalAkki is a Leading Digital Marketing Agency in Seattle, Washington providing full Digital Marketing Services in Seattle. With our expert team, Digitalakki is helping a lot of businesses and individuals to achieve the desired goal. If you are looking for the best Seattle Digital Marketing Agency, no doubt DigitalAkki is the first choice for everyone in Seattle.
click here
lena cosmeticis a brandthat have many unique shape boxes for cosmetic items,
If your looking for Online Illinois license plate sticker renewals then you have need to come to the right place.We offer the fastest Illinois license plate sticker renewals in the state.
You can operate in the UK without limitations if you have a spouse or companion visa. If you are married to a British resident or someone who has a right to live and work in the UK, you may apply for this visa that is that a citizen with a valid visa, ILR, or right of abode. You must check out marriage visa uk and services like visaandmigration.
What,s new is here for you visit our site and ENJOY it.
Great Forum
Get premium quality custom candle packaging boxes with logo in any shape, design and style from packaging sea at wholesale price
You have great knowledge that you shared with us through this blog. I really appreciate your work. May you will get your goal in this field. Even I didn’t read this type of great article. Keep it up and keep sharing.
Belkin Extender Login
Nice Work Here
Good Work Here
So nice Work
A debt of gratitude is in order for sharing us.
Filmora 9 Crack Download also allows you to import videos of various arrangements, in which case it is offered as an alternative to registration. You can skip recordings to play on versatile tools like iPhone, iPad, iPod, etc. or burn DVD for better video protection.
https://crackurls.com/filmora-crack/
What Is Cash App Card And How To Use Cash App Card?
Cash App Card: Cash App Offers A Free Black Color Debit Card (Cash Card). A cash app card is a Visa debit card, which can be used to pay for goods and services, by cash app balances both online and in stores. Your cash app card is often accessed as soon as you add it to Apple Pay and Google Pay.
Some FAQ Of Cash App Card:
How To Order Cash App Card?
To order yours:
Press on the Cash Card tab on your home screen
Press Receive Cash Card
Tap Continue
Follow the steps
You must be 18 or older to use a cash card. Cards must arrive within 10 working days. As soon as you’ll use your cash card by adding Apple Pay and Google Pay or using the cardboard details found within the Cash Card tab.
How To Activate Cash App Card ?
To activate your cash card using the QR code that comes with it:
Press the Cash Card tab on your home screen
Tap your Cash Card image
Press Activate Cash Card
When your cash app asks you to use your camera, tap on OK
Line up your camera with the QR code until it comes into focus
How To Add Money To Cash App Card?
First You need To Add bank account to the cash app. After Successfully Linked your bank account, You can very easily load money from a cash app account to a cash app card.
Where Can I Load My Cash App Card?
You can load your cash app card from a linked bank account through cash app, debit card, and internet banking. The Cash app gives you the option to add money by linking to a debit card. Similarly, you can load cash app card by visiting several stores in the US such as Walmart, Walgreen, and many cash stores.
How To Put Money On Cash App Card?
To Put Money Into Cash App Card, The following steps are helpful in this regard:
In the Cash app, you have to select the My Cash option
Tap the “Add Cash” tab here
Then enter the amount you want to add to the cash card
You need to re-examine the details you entered, especially the amount of money you want to “add” before proceeding.
After loading the money in it check the cash card balance.
How To Replace Lost Cash App Card?
If you need to replace a card that is reported lost or stolen, you can do so by tapping the card within the Cash app and tapping the report Lost card. You will need to provide personal information which may include your card number, full name, transaction history and other relevant information to replace lost cash app card.
How much money can I load on the cash card?
There is a limit of money that you can load into the cash app card. There is no specified amount, but this limit varies depending on the method you are choosing to add money to the Cash app.
How can I load the Cash card on Walgreens?
Yes, you can add cash to Walgreens for this you need to locate the nearest store and go there in person. Share here some information required for Cash Money that you want to add to Cash Card.
How do I add money to my cash app without a debit card?
You can choose other alternative ways to add money to a cash app card without a debit card. You can load money at various stores like Walmart, Walgreen, and other such stores.
Can I load my cash card on 711?
Yes, the Cash app allows you to load money at seven-eleven stores. You need to visit the nearest 711 stores and have the cashier load your cash app card.
More Info:- https://justtech.help/cash-app-card/
You can connect both PayPal and Cash App in these ways. However, there’s No way to send money directly from PayPal to Cash app. Alternatively, you’ll send or transfer money to your respective debit cards – PayPal Cash Card and Cash App Card or transfer money from your PayPal account to your checking account and instead to the Cash app.
There is no one-click to try to do this. However, there are two ways to send money to PayPal and the Cash app – a linked checking account or their respective open-end credit. Some additional steps are going to be required to finish the work both ways. More in-depth on how you’ll connect your PayPal and Cash App accounts:
There are Two Methods to send money between PayPal To Cash App.
Method 1: The way to connect PayPal and Cash app through a linked checking account.
1. Connect your PayPal to your checking account.
2. Connect your Cash App account to your checking account.
3. Transfer money from paypal account to the linked checking account.
4. Transfer funds from checking account to cash app account.
This method is best for those that transfer themselves and their personal accounts. While transfer fees are usually free, you’ll need to wait 1-3 business days between transfers or pay a further accelerated transfer fee.
Method 2: The way to connect PayPal and Cash App through PayPal Cash Card and Cash App Card.
1. Activate your Square Cash Card And PayPal Cash Card.
2. Get your Square Cash Card And PayPal Cash Card Bank and Routing Number.
3. Add your PayPal or Cash App as a bank.
4. Transfer your money from your account to your target account.
5. Check whether the transfer was successful.
This method is best to use when transferring money to an account that’s not your own. this is often the sole way for those that don’t feel safe to link their bank accounts for seasonal transactions.
The PayPal Cash Card And Cash App Card, are going to be the fastest way to transfer money from Cash App To PayPal.
More Info:- https://justtech.help/paypal-to-cash-app-transfer-money/
The post includes the PayPal customer service phone number, among other ways, which you can use to contact customer support. PayPal takes its customer complaints very seriously. So when you call them, expect them to solve your problem.
PayPal Holdings, Inc. Is headquartered in San Jose, CA. It is an online payment system that allows users to enjoy transferring money. It serves as an electronic alternative to traditional paper money. Users no longer need to keep cash or cards in their wallets for the application.
PayPal customer service over the phone or via online chat.
You can contact PayPal over the phone, or use their online paypal help center and message assistant.
To reach PayPal via phone, call 1–888–221–1161 using the phone number associated with your PayPal account. The online help center is filled with articles on almost every PayPal topic, and also allows you to chat online with a representative. Two other options include the PayPal Community Forum and the PayPal Resolution Center, but these do not work nearly as quickly.
Some FAQ Of PayPal Customer Service:
Why Contact PayPal Customer Service?
PayPal customer service over the phone or via online chat
How do I get in touch with PayPal customer service?
PayPal Phone Number:
How To Contact PayPal Online?
PayPal Help Center:
PayPal Customer Service Phone Number:
PayPal Customer Service Chat:
PayPal Customer Service Email:
There may be several reasons to contact PayPal customer support.
User can not access their password and account
User issues like payments hold, rejects and more
Customers want to set their profile on PayPal. So they can face bank account information, credit card information, or other problems
Users may face some account limitations, such as chargebacks or payment disputes.
For business issues like orders, PayPal Solutions
PayPal Common issues:
From the record, it has been observed that PayPal customers usually have these issues.
How can I reset the password when I have forgotten it?
How can I report unauthorized activity?
PayPal’s payments fall, what to do?
Where can I check the status of a dispute or claim?
How do I cancel my PayPal payment?
How do I Open a dispute with the seller if the purchase goes wrong?
More Info:- https://justtech.help/paypal-customer-service/
PayPal is an online service that provides a convenient way to transfer money. You can send and receive money online for products and services. If some of these services or products do not meet your expectations, or they are unsatisfactory in any way, you may have to ask for your refund.
Customers and sellers sometimes cannot reach a contract (for a paid product or service with PayPal) on their own, so PayPal intervenes to resolve the problem. This is usually the reason why people request refunds on PayPal. Learn more about how you can help get a PayPal refund.
How To Refund On PayPal?
Here’s how to refund a payment:
1. Click the Activity tab at the top of the page.
2. Click All Transactions.
3. Select the payment you want to refund.
4. Click Issue a refund.
5. Under “Total Refund Amount,” enter the amount you want to refund. You may have the option to refund a partial amount of the payment.
6. Click Issue Refund. You’ll be directed to a page confirming that your refund has been sent.
You can send an email to the seller requesting a full payment refund. Ask the seller to go to the transaction details page for your transaction and click on the issue a refund.
You can request a refund up to 180 days after payment for your item. If you sent the payment, but it is still pending, you can cancel it on your activity, until you see the “Cancel” button next to it. If the payment is not claimed within 30 days, it will be automatically returned to you.
Some FAQ Of PayPal Refund
How To Request A Refund On PayPal?
Where can I get a refund status in my PayPal account?
PayPal Dispute:
how to open a dispute on PayPal with a seller when a purchase goes wrong?
More Info:- https://justtech.help/paypal-refund/
I am a regular visitor, how are you, everybody? I have learned a lot from your article and I’m looking forward to applying it in my article given below
OriginCrack.com
If you are getting Amazon Echo error 73001 on your device then it means you need an expert technician’s help. You can get expert technicians at Geeks for Tech and they will provide you with the best service ever. Geek Squad
With the program, on the other hand, it is guaranteed that you will depend on the interface as much as possible – it takes little time to figure out how to use this program that I am going to edit and cut. Make no mistake with this software, the power of video editing is at your fingertips!
https://crackurls.com/filmora-crack/
You will also import and export files using this program’s easy-to-use navigation system. More impressive in all respects or it will give you an excellent result in no time. Easy to use due to the most convenient data interface. All levels of users or common download tools use this locally or professionally titled software.
TubeMate For PC Crack
Hi thanks for sharing and I found it very helpful for me….
AutoCAD 2014 is the latest version of AutoDesk. This is considered an industry standard in 3D mapping and design. AutoCAD is a competitor to CorelCAD 2013 Suite. it has much better features than CorelCAD.
https://crackurls.com/autocad-2014-crack/
It’s going to be the end of my day, except before finish I am reading this impressive paragraph to increase my experience.
Articulate Storyline
This is nice blog for me for reading
https://crackright.com/articulate-storyline-3-9-21069-0-crack-with-keygen/
What is the future of an Organic SEO agency? How is technology changing business environments? And more! Get in-depth insights into the latest digital trends.Organic seo agency
DigitalAkki is leading online training center for Digital Marketing Course in Hyderabad providing complete Digital Marketing course and training in Hyderabad. Our expert traininer will train you with live classes and practical Knowledge of Digital Marketing. Fill the form and our team will get in touch with you soon.
https://digitalakki.com/course/digital-marketing-course-in-hyderabad/
Learn Digital Marketing,Online Marketing Course
Popcorn Boxes are an easy and convenient carrier of this relished snack.
dope intresting
top variable speed angle grinder
It is designed specifically for drawing software. It provides a wide range of valuable brushes and tools to turn your computer screen into a real bathroom. You will soon be able to take advantage of all its possibilities thanks to a very intuitive graphical interface.
https://crackurls.com/autodesk-sketchbook-pro-crack-v8-8-0-full-version-2021/
Software Serial Key As always, all updates for your CC applications are included in your Creative Cloud membership at no additional cost. this software can be purchased immediately to download it from all over the world via the Creative Cloud desktop application … This means that everyone gets a free update or a free trial version, but some people want or need direct access to the latest tools without downloading Adobe / App Control.
https://crackurls.com/adobe-animate-cc-crack/
Wonderful and fine post. Your work is so much impressive. Thanks for sharing it.
Thanks for sharing superb information. Your site is very cool. I am impressed by the details that you have on this web site. It reveals how nicely you perceive this subject. Bookmarked this website page, will come back for more articles. You, my friend, ROCK! I found simply the info I already searched all over the place and just couldn’t come across. What a great web site.
Hi, Thanks for sharing.I found a lot of interesting information here. A really good post, very thankful and hopeful that you will write many more posts like this one.kite
Get Custom E-juice Boxes Wholesale From Dodo Packaging. Enhance your E-juice Boxes with unique packaging. Contact Us Now: 1-646-503-1158
Magnet Locksmith is a well-established locksmith company specializing in automobile, emergency, residential, and commercial services in Houston and surrounding areas. We are best locksmith 77095 and Locksmith in Houston, Tx.
Locksmith near me
https://magnetlocksmith.com/
Gledaj serije online sa prevodom besplatno u HD rezoluciji. Najnovije i najpopularnije serije sa prevodom na srpski, bosanski i hrvatski.
Thank you so much for your helpful article. keep posting.
hp printer failure 8600
Nice post. I used to be checking constantly this blog and I am impressed! Extremely useful info particularly the ultimate section I take care of such information a lot. I was seeking this certain information for a long time. Thank you and best of luck.
Essay on ecosystem restoration
46v paint gallon
Customized popcorn boxes attract the customers most. It makes your brand amazing and unique.
Are you looking for an expert for shopify theme development from scratch.
Developers Capital offers custom shopify theme development with elegant minimal text design.
Hire us for shopify custom theme development, Leave everything to us.
Developers capital proudly offers custom shopify theme development Services.
If you want to build a best Shopify Ecommerce Theme we can assist for shopify template development Services.
Developers Capital own a team of shopify web developer and designers. Hire us end avail quality services.
For Ecommerce Theme Designing get services of our expert shopify web Designer.
Developers capital offers ui ux design Services.
Developers Capital, One of the best ux design agency around the globe.
Developers Capital stand alone in ux design firms on the behalf of its services.
Sean, just wanted to know what’s up. I used to read your blog earlier, a lot. But you seem to no longer publish any new posts all good? Hope you’re doing best of your heath. Visit Cape Verde
I really appreciate your work..
iMyFone iBypasser Crack
The Custom Product Packaging is extremely useful and an economical choice for the retailers.
I like this lovely blankets. you can also check visit our website:
https://www.myedstore.com/vidalista-60/
If you fail to bag Direct Admission in DSCE, do not lose hope. We can help you secure admission through the Management quota admission in Dayananda Sagan College of Engineering.
Visit:https://directadmissionindayanandasagarcollegeofengineering.com/
Wonderful cardboard boxes, your ideas are great. I used one to keep my craft bits and pieces in, plus I also ordered b> vape cartridge packaging Boxes for one of my recent product and I am Quite happy about the quality work, on time shipment & Satisfied after putting my view on my ordered custom boxes. Thank you BEXO Packaging Solutions, you guys are worth it.
The custom vape cartridge boxes are sturdy, and they ensure complete protectiveness.
You completely match our expectation and the variety of our information.
Christmas Eve: the elderly no longer feel lonely 14,250 elderly people took part in one of the Little Brothers of the Poor’s Christmas celebrations . 9,061 end-of-year meals or celebrations were organized and 4,074 packages were delivered to homes. For the elderly who are alone at Christmas, these festive moments spent with our Association are precious. With us, our elders feel like they are in a real family, as they testify
Custom Soap Boxes is a practical choice for the modern man, meeting the needs of busy men.
Custom Window Boxes are a perfect choice for marketing your business, and in order to maximize its potential, you need to make full use of this marketing tool.
Dumps With Pin
I truly appreciate this blog post.Really thank you!
Hi, Thanks for sharing.I found a lot of interesting information here. A really good post, very thankful and hopeful that you will write many more posts like this one.custom chenille patches
Amazing Article!! Thank you for sharing this wonderful Blog. Keep Sharing informative Post.
Home Lighting & Garden Lighting
Silkscreen is the world’s favorite printing method .it’s the best method for transferring a design onto a plain piece of silk. Get more about the easy silkscreen method.https://makescreens.com/contact.htm
At the City Of Packaging, we provide manufacturers & suppliers, with custom-printed box solutions and custom packaging that meet consumer and product-specific needs.
Thank you so much
Wonderful and fine post. Your work is so much impressive and informative. Thanks for sharing it.
Prefect book binding that is regularly utilized in the kinds of books you wind up perusing on the train or at home also called softcover or softcover books.
helps you learn how to speak english online with our english speaking course, anytime, anywhere at your convenience on your mobile phone / laptop. You select when to learn, where to Learn.
https://englishonmobile.in
I really appreciated by you. Thanks for your great idea.
Some effective tips for amazing and unique candle packaging.
Great work team. Keep me updated on all such articles
https://simplecrack.com/redshift-render-crack-free-download/
Lip gloss require secure packaging due to filling in the bottle and glass containers.
I am highly grateful to you for sharing useful information with the users
https://simplecrack.com/gridinsoft-anti-malware-crack/
Very nice article
. I definitely love this website.
https://simplecrack.com/gridinsoft-anti-malware-crack/
Thank you for this brief explanation and very nice information. I am very enjoyed this blog. it’s an informative topic.
Smadav Pro Crack is a useful and great anti-malware application that gives total security prohibits the pass-on of the trojan It offers you extra security and can recognize infections, trojans, worms, and stop the spread that always distributed through adobe flash. In the same way, this tool provides you to research the open operations and close something that you trust, additionally shows this in the scans made not clearly infected data.
I love Your post..
DC Unlocker Crack
Wonderful and fine post. Your work is so much excellent and informative. Thanks for sharing it.
WinRAR Crack is the utmost efficient and commonly used data compression application. In the same way, this user can simply compress any sort of data according to user requirements.
Avast Premier Crack is a great and Anti-malware tool. It also protects your system from Trojan, viruses, bugs. Moreover, the most many infected files which may be dangerous to our system. Also, it safe in a secure method. Therefore, it has numerous updated great option in it that give safety to your computer system. So, it also makes it effortless to spice up your laptop progress in an additional Powerful and helpful way. In the same way, Avast Premier + License key files have additional a mention too as the family of internet security. More, as a result of it offers entire security and complete safety to our laptop.
I am really enjoying the theme/design of your site. Do you ever run into any internet browser compatibility problems? A handful of my blog audience have complained about my site not operating correctly in Explorer but looks great in Chrome. Do you have any recommendations to help fix this problem? gaminglight
Wonderful sharing on the blog visit our site and ENJOY it
This is very helpful thanks for sharing—Key4CRACK is very beneficial 4u and also fulfil your requirements.
Wonderful sharing on the blog visit our site and ENJOY it
Hey, this a small blogger i read your article, its so interested….
fax
This blog is very interesting and informative also try our kraft pillow boxes for packaging
Dr.Fone Crack + Registration Code [Android & iOS] Download 2021 Everyone uses a smartphone or computer device in this new advanced world. And yes, it contains all of your sensitive, personal, and important data and information. And we all know this world is full of accidents and unpredictable things.
Dr Fone
Dr.Fone Crack + Keygen [Android & iOS] Full Version Download Dr.Fone Crack is a well-known data recovery program. It is a sophisticated piece of software for Android, iOS, and Windows. Dr. Fone Toolkit can help you recover any lost or deleted data.
dr fone
Redshift Render Crack is a sophisticated 2D and 3D rendering application for Mac. You’re probably aware that there’s a lot of well-known applications that can be used to render. This is the world’s most extensively used graphics application. Moore allows users to understand the nature of their work and to transform all user requirements into physical designs. This is also a very strong GPU processor. In general, it defends both 3D and 2D graphics work. Produce the greatest and most attractive quality for your creative production using Redshift Render Torrent. As a consequence, you’ll be able to develop a fantastic and attractive design. Furthermore, You may quickly and easily create a conventional and basic style. It also includes a variety of useful tools and functionalities for designing work. Therefore, Download Redshift Render Full Version Here.
Redshift Render
Adobe Animate Crack is an excellent tool for 2D animations. Likewise, this is the most trustworthy and astonishing time of technology wherever are people explore their skills. Thus, you can expand your inexperienced talent in an animation environment. Besides, this is the greatest and golden age of the animation field. All field of marketing and industry is efficiently rank and advertises instantly due to its energetic functionality. Following this, this 2D tool is unique and productive for your graphics and other related work. All in all, Adobe Animate Download is an enormous program that generates a distinct design. In the same way, you can also pick any color, style design for generating animation.
adobe animate
Hey, this a blogger i read your article, its so interested and also provide use ful information
skeep
I am very impressed with your post because this post is very beneficial for me and provide a new knowledge to me thank you
I know this is some of the most meaningful information for me. And I read your article and it’s animated. However, there are some common things to keep in mind. The website style is perfect. The article is great. Thanks for all the concrete and achievable help. Learn more POS Software.
very NYC article
Hey, this a blogger i read your article, its so interested and also provide use ful information
skeep
one of the most interesting and amazing posts you did on your blog and i really appreciate your work keep it up
Cinema 4D Torrent
We provide best escort service in Rudrapur, to have sex fun in your life with educated and fun loving woman you looking for Rudrapur Call Girls
Escort Service in Rudrapur
It it is normal to feel anxious and afraid while we deal with the effects of this pandemic. We know this situation is stressful for everyone; people living with mental illness and addictions may be finding it especially difficult to cope. If you or someone you know is struggling, the resources on this site are here to support you. การ์ดแต่งงาน
We provide custom boxes in all over the world. Custom boxes helpful in packaging of products. Prefect packaging boxes show a good impression on your customer. You can visit our site.
Custom Tincture Boxes Packaging UK
Hello,
Awesome to see your site. Keep up the great work. Thanks for all you could do.
Thank you for the useful information which you shared throughout your blog. I appreciate the way you shared the relevant, precious, and perfect information. Furthermore, I would like to share some information about Peergrowth. Peergrowth is one of the Best Recruitment Firms in Dubai, to know more about the services, just visit the website and take complete information about Peergrowth. I hope, you will get immediate assistance and the right information through the website.
Thanks for the article. Looking forward to read more content. Amazing
Hey, this a blogger i read your article, its so interested and also provide use ful information also visit my website
skeep
These are not just lovely blankets but creative and amazing too. Just love the creative article. I also have a blogging website, please visit for interesting information and share your valuable views.
Thank you for sharing this creative piece of content. I also have a website and we show creativity in customized name pendants. You may visit to check and review.
Wonderful and nice post. Your work is so much excellent and informative. Thanks for sharing it.
It is very informative. Very easy to understand. Great work team. Keep me updated for all such articles
Your work is great it provides me great knowledge.
https://crackthere.com/voxal-voice-changer-crack-key-latest/
WOW really nice article you write a great job well done keep it up thanks
https://completecrack.com/webuilder-crack/
Hey, this a blogger i read your article, its so interested and also provide use ful information also visit my website
slite
Thank you so much for sharing this amazing information.
https://startcracks.co/simplify3d-crack/
Thank you so much for sharing this amazing information.
https://thecracked.info/imagenomic-portraiture-crack-with-serial-key/
Best Child Specialist in Noida
Best Pediatrician in Noida
child doctor near me http://www.drnalinagarwal.com
토토추천
안녕하세요. 온토토입니다. 오늘은 토토추천 관련하여 정보를 드려보자 합니다.
토토추천는 커뮤니티의 포인트를 이용하여 제휴업체에 게임머니로 전환하는 방식입니다.
토토추천관련정보는
에서 받아보실 수 있습니다. 그 외 토토추천를 가지고 장난하는 업체들도 많이 있습니다.
하지만 저희 온토토는 그런 업체들을 엄격 선별하여 토토추천에 대한 장난이 없는곳만을 선별하였으며, 해당 사항에 대하여 자료가
필요하신분들은 키워드를 클릭하시면 해당자료 사이트로 이동됩니다.
Mind-blowing Article, I’ve Never seen an especially obvious article on google. Overwhelming, As of now this is Called sharp cerebrum and one 100% usage of frontal cortex. Hair-raising work achieved. Other than nearly Checkout my Article positively you’ll adore it.
Great article mate, an everything considered puzzling article. I’ve end up being your fan happening to researching your befuddling article. You may indistinguishably checkout my work. Affiliation Given under.
Fantastic !!! I’m Really Kept up and satisfied to pull out an unequivocally stunning article. I’m begun through your dazing article. You can as shown by a striking point of view inclination my work. Site Affiliation Given Under.
Great Post! I am Really Enjoy to Visit In the Post. I have too been generated Clipping Path/Cutout image Service for a long time. Keep Writing.
Hey, this a blogger i read your article, its so interested and also provide use ful information also visit my website
ssxsxslite
Hey Dear, this a blogger i read your article, its so interested and also provide use ful information and also visit my website
slite
Hey, this a blogger i read your article, its so interested and also provide use ful information also visit my website
skeep
Hey Dear, this a blogger i read your article, nice job its so interested and also provide use ful information and also visit my website
skeep
Great work team. Keep me updated for all such articles
https://thecracked.info/wondershare-uniconverter/
The service our girls provides is great. We are famous escort service in haldwani. The service we provide in haldwani is 24 hours in hotels you can book our service online also
Mussoorie Escort Services Fulfill Your Physical Exigencies. Welcome to Mussoorie Escort Service. Here are giving a safe and reliable service, that is …
We provide best escort service in Rudrapur, to have sex fun in your life with educated and fun loving woman you looking for Rudrapur Call Girls
Rudrapur Call Girls are top of the line and fantastic escorts who you can incorporate in your lifestyle with a craving for the best. Just like all the other native spots …
in the escort service in nainital that oriental attractions engage your faculties and overwhelm your dreams a standout amongst the most sparkling diamonds of Call girls in nainital
How To Recover Pogo Account?
Do you enjoy spending your time playing Pogo games? But are you unable to login into the account owing to a forgotten password? If you answered yes, this blog is for you. Read further to understand ways to recover your Pogo game account and enjoy gaming.
https://www.pogo-support-number.com/blog/how-to-recover-pogo-account/
Your work is great it provides me great knowledge.
https://startcracks.co/revo-uninstaller-pro-crack/
Hey Dear, this a blogger i read your article, its so interested and also provide use ful information and also visit my website
fax
I’ve read your article, its so interested and also provide useful information also visit my website
מרפאת שיניים באשקלון
Thanks for sharing your for this information .
GST Service center or GST suvidha Center is the one stop solution for all the GST related services. We are a team of professionals having in-depth knowledge & experience in respective fields. We help every kind of businesses to grow & expand. We provide GST Franchise along with the services include in GST. Apply Now!
Staggering Article, I’ve Never seen a particularly confusing article on google. Overpowering, As of now this is Called sharp frontal cortex and one hundred% usage of cerebrum. Hair-raising work accomplished. Other than almost Checkout my Article very you’ll worship it.
https://apkzamn/
Exceptional mate !!! I’m Truly Kept up and fulfilled to pull out an unequivocally astonishing article. I’m started through your surprising article. You can as displayed by a striking perspective inclination my work. Site Association Given Under.
https://apksway/
Phenomenal article buddy, an everything thought about confusing article. I’ve wind up being your fan happening to researching your confusing article. You may unfortunately checkout my work. Collusion Given under.
https://apkband/
Hey this a blogger i read your article, its so interested and also provide use ful information and also visit my website
slite
Thank you so much for sharing this amazing information.https://pubgcrack.net/startisback-full-cracked/
This is very much great and hope fully nice blog. Every body can easily found her need able information. I am visit first time but I fond many use full article. I will back again when get time.
What Is Cash App Card And How To Use Cash App Card?
Cash App Card: Cash App Offers A Free Black Color Debit Card (Cash Card). A cash app card is a Visa debit card, which can be used to pay for goods and services, by cash app balances both online and in stores. Your cash app card is often accessed as soon as you add it to Apple Pay and Google Pay.
Some FAQ Of Cash App Card:
How HYPERLINK “https://justtech.help/cash-app-card/” HYPERLINK “https://justtech.help/cash-app-card/” HYPERLINK “https://justtech.help/cash-app-card/”To HYPERLINK “https://justtech.help/cash-app-card/” HYPERLINK “https://justtech.help/cash-app-card/” HYPERLINK “https://justtech.help/cash-app-card/” Order Cash App Card?
To order yours:
Press on the Cash Card tab on your home screen
Press Receive Cash Card
Tap Continue
Follow the steps
You must be 18 or older to use a cash card. Cards must arrive within 10 working days. As soon as you’ll use your cash card by adding Apple Pay and Google Pay or using the cardboard details found within the Cash Card tab.
How To Activate Cash App HYPERLINK “https://justtech.help/cash-app-card/” HYPERLINK “https://justtech.help/cash-app-card/” HYPERLINK “https://justtech.help/cash-app-card/”Card ?
To activate your cash card using the QR code that comes with it:
Press the Cash Card tab on your home screen
Tap your Cash Card image
Press Activate Cash Card
When your cash app asks you to use your camera, tap on OK
Line up your camera with the QR code until it comes into focus
How HYPERLINK “https://justtech.help/cash-app-card/” HYPERLINK “https://justtech.help/cash-app-card/” HYPERLINK “https://justtech.help/cash-app-card/”To HYPERLINK “https://justtech.help/cash-app-card/” HYPERLINK “https://justtech.help/cash-app-card/” HYPERLINK “https://justtech.help/cash-app-card/” Add Money To Cash App Card?
First You need To Add bank account to the cash app. After Successfully Linked your bank account, You can very easily load money from a cash app account to a cash app card.
Where Can I Load My Cash App Card?
You can load your cash app card from a linked bank account through cash app, debit card, and internet banking. The Cash app gives you the option to add money by linking to a debit card. Similarly, you can load cash app card by visiting several stores in the US such as Walmart, Walgreen, and many cash stores.
How HYPERLINK “https://justtech.help/cash-app-card/” HYPERLINK “https://justtech.help/cash-app-card/” HYPERLINK “https://justtech.help/cash-app-card/”To HYPERLINK “https://justtech.help/cash-app-card/” HYPERLINK “https://justtech.help/cash-app-card/” HYPERLINK “https://justtech.help/cash-app-card/” Put Money On Cash App Card?
To Put Money HYPERLINK “https://justtech.help/cash-app-card/” HYPERLINK “https://justtech.help/cash-app-card/” HYPERLINK “https://justtech.help/cash-app-card/”Into HYPERLINK “https://justtech.help/cash-app-card/” HYPERLINK “https://justtech.help/cash-app-card/” HYPERLINK “https://justtech.help/cash-app-card/” Cash App Card, The following steps are helpful in this regard:
In the Cash app, you have to select the My Cash option
Tap the “Add Cash” tab here
Then enter the amount you want to add to the cash card
You need to re-examine the details you entered, especially the amount of money you want to “add” before proceeding.
After loading the money in it check the cash card balance.
How To Replace Lost Cash App Card?
If you need to replace a card that is reported lost or stolen, you can do so by tapping the card within the Cash app and tapping the report Lost card. You will need to provide personal information which may include your card number, full name, transaction history and other relevant information to replace lost cash app card.
How much money can I load on the cash card?
There is a limit of money that you can load into the cash app card. There is no specified amount, but this limit varies depending on the method you are choosing to add money to the Cash app.
How can I load the Cash card on Walgreens?
Yes, you can add cash to Walgreens for this you need to locate the nearest store and go there in person. Share here some information required for Cash Money that you want to add to Cash Card.
How do I add money to my cash app without a debit card?
You can choose other alternative ways to add money to a cash app card without a debit card. You can load money at various stores like Walmart, Walgreen, and other such stores.
Can I load my cash card on 711?
Yes, the Cash app allows you to load money at seven-eleven stores. You need to visit the nearest 711 stores and have the cashier load your cash app card.
More Info:- https://justtech.help/cash-app-card/
You can connect both PayPal and Cash App in these ways. However, there’s No way to send money directly from PayPal to Cash app. Alternatively, you’ll send or transfer money to your respective debit cards – PayPal Cash Card and Cash App Card or transfer money from your PayPal account to your checking account and instead to the Cash app.
There is no one-click to try to do this. However, there are two ways to send money to PayPal and the Cash app – a linked checking account or their respective open-end credit. Some additional steps are going to be required to finish the work both ways. More in-depth on how you’ll connect your PayPal and Cash App accounts:
There are Two Methods to send money between PayPal HYPERLINK “https://justtech.help/paypal-to-cash-app-transfer-money/” HYPERLINK “https://justtech.help/paypal-to-cash-app-transfer-money/” HYPERLINK “https://justtech.help/paypal-to-cash-app-transfer-money/”To HYPERLINK “https://justtech.help/paypal-to-cash-app-transfer-money/” HYPERLINK “https://justtech.help/paypal-to-cash-app-transfer-money/” HYPERLINK “https://justtech.help/paypal-to-cash-app-transfer-money/” Cash App.
Method 1: The way to connect PayPal and Cash app through a linked checking account.
1. Connect your PayPal to your checking account.
2. Connect your Cash App account to your checking account.
3. Transfer money from paypal account to the linked checking account.
4. Transfer funds from checking account to cash app account.
This method is best for those that transfer themselves and their personal accounts. While transfer fees are usually free, you’ll need to wait 1-3 business days between transfers or pay a further accelerated transfer fee.
Method 2: The way to connect PayPal and Cash App through PayPal Cash Card and Cash App Card.
1. Activate your Square Cash Card And PayPal Cash Card.
2. Get your Square Cash Card And PayPal Cash Card Bank and Routing Number.
3. Add your PayPal or Cash App as a bank.
4. Transfer your money from your account to your target account.
5. Check whether the transfer was successful.
This method is best to use when transferring money to an account that’s not your own. this is often the sole way for those that don’t feel safe to link their bank accounts for seasonal transactions.
The PayPal Cash Card And Cash App Card, are going to be the fastest way to transfer money from Cash App To PayPal.
More Info:- https://justtech.help/paypal-to-cash-app-transfer-money/
The post includes the PayPal customer service phone number, among other ways, which you can use to contact customer support. PayPal takes its customer complaints very seriously. So when you call them, expect them to solve your problem.
PayPal Holdings, Inc. Is headquartered in San Jose, CA. It is an online payment system that allows users to enjoy transferring money. It serves as an electronic alternative to traditional paper money. Users no longer need to keep cash or cards in their wallets for the application.
PayPal customer service over the phone or via online chat.
You can contact PayPal over the phone, or use their online paypal HYPERLINK “https://justtech.help/paypal-customer-service/” HYPERLINK “https://justtech.help/paypal-customer-service/” HYPERLINK “https://justtech.help/paypal-customer-service/” help center and message assistant.
To reach PayPal via phone, call 1–888–221–1161 using the phone number associated with your PayPal account. The online help center is filled with articles on almost every PayPal topic, and also allows you to chat online with a representative. Two other options include the PayPal Community Forum and the PayPal Resolution Center, but these do not work nearly as quickly.
Some FAQ Of PayPal Customer Service:
Why Contact PayPal Customer Service?
PayPal customer service over the phone or via online chat
How do I get in touch with PayPal customer service?
PayPal Phone Number:
How HYPERLINK “https://justtech.help/paypal-customer-service/” HYPERLINK “https://justtech.help/paypal-customer-service/” HYPERLINK “https://justtech.help/paypal-customer-service/”To HYPERLINK “https://justtech.help/paypal-customer-service/” HYPERLINK “https://justtech.help/paypal-customer-service/” HYPERLINK “https://justtech.help/paypal-customer-service/” Contact PayPal Online?
PayPal Help Center:
PayPal Customer Service Phone Number:
PayPal Customer Service Chat:
PayPal Customer Service Email:
There may be several reasons to contact PayPal customer support.
User can not access their password and account
User issues like payments hold, rejects and more
Customers want to set their profile on PayPal. So they can face bank account information, credit card information, or other problems
Users may face some account limitations, such as chargebacks or payment disputes.
For business issues like orders, PayPal Solutions
PayPal Common issues:
From the record, it has been observed that PayPal customers usually have these issues.
How can I reset the password when I have forgotten it?
How can I report unauthorized activity?
PayPal’s payments fall, what to do?
Where can I check the status of a dispute or claim?
How do I cancel my PayPal payment?
How do I HYPERLINK “https://justtech.help/paypal-customer-service/” HYPERLINK “https://justtech.help/paypal-customer-service/” HYPERLINK “https://justtech.help/paypal-customer-service/”Open HYPERLINK “https://justtech.help/paypal-customer-service/” HYPERLINK “https://justtech.help/paypal-customer-service/” HYPERLINK “https://justtech.help/paypal-customer-service/” a dispute with the seller if the purchase goes wrong?
More Info:- https://justtech.help/paypal-customer-service/
PayPal is an online service that provides a convenient way to transfer money. You can send and receive money online for products and services. If some of these services or products do not meet your expectations, or they are unsatisfactory in any way, you may have to ask for your refund.
Customers and sellers sometimes cannot reach a contract (for a paid product or service with PayPal) on their own, so PayPal intervenes to resolve the problem. This is usually the reason why people request refunds on PayPal. Learn more about how you can help get a PayPal refund.
How HYPERLINK “https://justtech.help/paypal-refund/” HYPERLINK “https://justtech.help/paypal-refund/” HYPERLINK “https://justtech.help/paypal-refund/”To HYPERLINK “https://justtech.help/paypal-refund/” HYPERLINK “https://justtech.help/paypal-refund/” HYPERLINK “https://justtech.help/paypal-refund/” Refund On PayPal?
Here’s how to refund a payment:
1. Click the Activity tab at the top of the page.
2. Click All Transactions.
3. Select the payment you want to refund.
4. Click Issue a refund.
5. Under “Total Refund Amount,” enter the amount you want to refund. You may have the option to refund a partial amount of the payment.
6. Click Issue Refund. You’ll be directed to a page confirming that your refund has been sent.
You can send an email to the seller requesting a full payment refund. Ask the seller to go to the transaction details page for your transaction and click on the issue a refund.
You can request a refund up to 180 days after payment for your item. If you sent the payment, but it is still pending, you can cancel it on your activity, until you see the “Cancel” button next to it. If the payment is not claimed within 30 days, it will be automatically returned to you.
Some FAQ Of PayPal Refund
How HYPERLINK “https://justtech.help/paypal-refund/” HYPERLINK “https://justtech.help/paypal-refund/” HYPERLINK “https://justtech.help/paypal-refund/”To HYPERLINK “https://justtech.help/paypal-refund/” HYPERLINK “https://justtech.help/paypal-refund/” HYPERLINK “https://justtech.help/paypal-refund/” Request A Refund On PayPal?
Where can I get a refund status in my PayPal account?
PayPal Dispute:
how HYPERLINK “https://justtech.help/paypal-refund/” HYPERLINK “https://justtech.help/paypal-refund/” HYPERLINK “https://justtech.help/paypal-refund/” to open a dispute on PayPal with a seller when a purchase goes wrong?
More Info:- https://justtech.help/paypal-refund/
Четыре обнаженные телки устроили настоящее лесби шоу в бассейне,
а потом возле него, сучки лизали киски, терлись вагинами и получили
мощные оргазмы. Зрелая
пышная блондинка с огромными буферами принимает откровенные
ласки от бритого под бильярдный шар смуглого мужика.
Дамочка встала раком и эротично покрутила своим седлом, которое еще больше манило чувака,
и он пристроился сзади голой красотки.
Потом мы наблюдаем за полным обнажением шлюшки и появлением парня с эрегированным
членом. Сначала брюнеточка активно лижет пизденку русой красотке, после чего ненасытные разбойницы меняются местами.
Рыжая русская баба устала от того, что муж алкоголик находится в постоянном запое и редко выходит из него,
чтобы заняться с ней сексом.
А после одел её сверху на свой большой член,
от чего сучка была в полном восторге.
Далее телочка включает вибратором и вставляет игрушку в
киску. Он задыхался, завороженный картиной, представшей его взору.
Размышляя об этом, девушка вышла в
дворик, что находился за кузницей, и остановилась, не
веря своим глазам. Половину поездки я провела, вцепившись пальцами в кожаные сиденья,
а мой желудок завязался в узел.
Он был до мурашек сексуален и опасен, и
он манил своей первобытностью.
Моя ладонь вся мокрая, его глаза медленно открываются, и от его сонного, довольного
вида у меня перехватывает дыхание.
Шанс того, что у тебя может произойти выкидыш, при любых обстоятельствах, равен
нулю.
McAfee Total Protection is the most recent security apparatus that gives the most exhaustive and complete Internet and PC security. It shields you from programmers, infections, phishing tricks and ensures your organization and online character. Through mechanized reinforcement, which just finds a way one way to reestablish, it guarantees the security of your photographs, recordings, music, and significant individual documents. Mcafee Total Protection permits you to impart your documents to your family without any problem.
MyInterityCab is your perfect travel partner if you need to hire a car. Our cab rental services range from outstation cabs to airport taxis. Call us to avail affordable one way and round trip offers. Our team is available 24 hours a day before, during and after the car rental takes place, just make your rental experience as smooth as possible.
one way cab
https://myintercity.cab/
Customer Helpdesk. Get solutions for technical issues. Follow Easy Steps & Get Quick Response with the support team, Chat link given. The technician will offer an accurate and exact solution for your products and the services.
Hire us for water treatment dubai, Bluedropuae offers water softener services.
Exceptional Blog! Usually, I never comment on a blog but your article is so reassuring that I never cease to say anything about it myself. You are doing a great job Man and thanks for the post, interesting content to read. Keep it up.
This post written by you is really good. thank you for sharing with us..
Pet shopping online
Hey this a blogger i read your article, its so interested and also provide use ful information and also visit my website
slite
Hey Dear, this a blogger i read your article, nice job its so interested and also provide use ful information and also visit my website
skeep
Дело в том, что отпадает нужда заходить в официальные магазины или менять настройки.
Непременно сохраните секретный ключ –
по окончанию активации услуги, отобразится
соответствующая кнопка «Сохранить».
Как получить джекпот Необходимо
в платном режиме играть в аппарате, в котором
можно выиграть внушительную сумму.
Важно понимать, что выигрыш, как и проигрыш – случайны.
Соответствующий БК просто не может
установить коэффициент, отличный от
их конкретных пэров, потому что он становится просто
невыгодным.
Here will provide you a wide range of latest designed mirrors at very affordable price. You can choose as per your bathroom’s interior design. mirror
Способы получения выигрыша По окончании спортивного
события беттор может узнать итоги матча.
Но решил перейти на 1xbet зеркало.
Территориальное расположение
1xСтавка запустила деятельность в 2010 году.
Созданы разделы для международных лотерей
и виртуального спорта. Информация о осенней кампании,
которая является одним из крупнейшего
бонуса Турции находится на
сайте Прохладной осенней кампании от 1xbet
может узнать с названием нашего контента.
Участник обязан проверить соответствие выигрыша при расчете
выигрышных ставок.
visit : https://joinlive77.com/
За это время ресурс стал заметно
лучше и функциональнее.
Интернет имор ба дастрас ба бозиои электронии укумати Кипр асос ёфтааст, гирифтанд Лимасол.
В этой вкладке требуется разрешить установку неизвестных приложений.
С мобильным приложением
можно делать ставки на отдыхе,
в путешествиях, в дороге, на обеде &ndash, главное, чтобы у вас под рукой был девайс с подключением к интернету.
Это VIP статус уровень, где вы
получите эксклюзивные бонусные предложения.
Но вы можете найти 2 нюанса для рассмотрения: Интернет-браузер требует установки.
Если игрок хочет сделать 1xBet ставки на отдельный киберспортивный матч, он может разместить ставку на
результат конкретного матча или исход группы событий.
Контора доступна в пятидесяти разных странах.
Вы можете скачать такие приложения на свой мобильный.
I have a passion for crafting and crocheting and offer my patterns and tutorials for free! I hope you enjoy everything you find here and please feel free to repeat after me!
we provide the solution for private jets.As an industry leader in private charter, Coast Private offers a
full range of tailored and integrated private aviation services for individuals,
companies, and governments alike, allowing them the freedom to focus on key business activities.
we provide the solution for private jets.As an industry leader in private charter, Coast Private offers a
full range of tailored and integrated private aviation services for individuals,
companies, and governments alike, allowing them the freedom to focus on key business.
Make money online on Stermart! Upload Food Products, Kitchenware & Appliances, Cookbooks for Free and only pay 11% after every sale!
https://www.stermart.com/
What a great blog post Windows 7 Product Key Free
Make money online on Stermart! Upload Food Products, Kitchenware & Appliances, Cookbooks for Free and only pay 11% after every sale!
https://www.stermart.com/
Storage and Use Recommendations must certainly be located in a garage or in the basement, wherever there’s no moisture.
Buy 100% Original Makeup & Beauty elf pakistan Products Online at BrandsVillepk. Shop online cosmetic products of all famous Brands at Best Prices.
Sound Radix 32 Lives Crack is a multimedia application and plugin that works on both Mac and Windows with some system requirements. It is a transparent 32-bit to 64-bit audio device adapter and VST plug-in that allows you to run your favorite
Output Portal VST Crack is a granular effects engine, not a playable tool. It takes the audio data and stores it while frying the media, then discharges small amounts of sound called pills. The grains are taken care of and then re-stitching with a granulation
If you are tired of the poor network coverage and the lagging signal that you are experiencing right now. The Belkin router is the answer to your stress. Made to meet the needs of its users, the Belkin router wifi is able to supersede the performance of your previous wifi router.
Good post, I am going to spend more time researching this topic. Yeah, bookmarking this wasn’t a bad decision great post!
Realy Amazing post.
https://publiccrack.com/
You are providing very valuable things through your blog
THIS PSOT IS VERY NICE
Luxury House and lot in the Philippines
Serum VST Crack is a wondrous software for conceiving Xfer Records. Further, Serum VST Crack is the best plugin for music stock with engaging optical outcomes. Xfer Serum Crack is another sign of perfection as it is a vulgar wavetable synthesizer plugin.
Output Portal VST Crack, plug-in granular effect. The portal invites you to execute any input signal via its granular synthesis mechanism, taking “your voice to another dimension”, as declared by Output VST Crack.
visit here
Premier Real Estate Developer in the Philippine
very nice
Hello,
Found your post interesting to read. I cant wait to see your post soon. Good Luck for the upcoming update.This article is really very interesting and effective.
Crack Software Full Versions Free Download
I have been surfing around from many days for this kind of article and finally today i had got it, Thankyou very much for sharing this list.
This is really useful, especially for me just starting to try and build connections on social media. Commun.it looks a bit daunting, but I’ll try it!
You Can Also Download
Thankyou very much for sharing this list.
Thankyou very much for sharing this information.
PhpStorm Full Crack With Activation Code Free Download PhpStorm Full Crack is an Integrated Development Environment for PHP developers especially designed to perform on top of the IntelliJ IDEA platform. This build provides you the full code cleanup for PHP and empowers you to explain tags in the PHP Doc in an easy manner. So, […]
abortion clinic in delhi
https://www.drmeetasharma.com/treatments-services/abortion-clinic-delhi-noida/
good work
Your art written amazing i really like here thanks for sharing such a helpful post. If you download all software with crack, keygen, License & Serial Key please look below here!
Moview Video Mosaic Player Crack
politicsay
this post is very nicre
politicsay
Training service provider in united arab emirates for NDT level 2 course, welding inspection dubai, and QC Welding inspection training for oil and gas industry, Chemical and industrial and marine service companies.
Donuts are the rings of happiness. They are the king of the desserts. No age is restricted to eat donuts. There are many options for flavors, but all come to the point thatcustom donut boxes are a requirement.
The perfect way to get started with Microsoft 365 is gathering enough information and purchasing depending on your requirement. You can then easily download and install the software package by visiting
A most advanced Cricut machine is best in cutting shapes, text, and photos. It doesn’t only make cuts on card stock or vinyl but adhesive foil, faux leather, balsa wood, and more
If you are tired of the poor network coverage and the lagging signal that you are experiencing right now. The Belkin router is the answer to your stress. Made to meet the needs of its users, the Belkin router wifi is able to supersede the performance of your previous wifi router.
Thankyou very much for sharing this list.
Thanks for sharing monster fleece beautiful blankets.
If you are looking for mrsa nursing assignment help, then you are at right stop. We offer you the best academic writing services including the help you need to create a nursing assignment. Check our website for more information.
Thanks For Share Your Amazing Work With Us……GridinSoft Anti-Malware Crack
Free Download All Types Of Crack Softwares…..Reddit Video Downloader Crack 5.7.0
Thanks For Share Your Great Idea With Us…………………IObit Smart Defrag Pro Crack
Love Your Amazing Work………………XMind 8 Pro Crack + License Key & Keygen 2022 [Updated] Download
You Work Very Hard Thanks For Your Work…………….Apowersoft Screen Recorder Pro Crack
Your Article Is Very Useful For Me Thanks For Share…………..IntelliJ IDEA Crack 2021.2 & Activation Code
Wonderful …………Adobe Audition CC Crack
You Are Very Talented Your Work Is Telling Me Wow…………NCH Express Zip Crack 8.07
I Want Activation Key Of ………AVG TuneUp Crack
Your Work is Great Thanks For Share This Amazing Work………MATLAB Crack R2021a & Full License Key
Your Writing Is Very Useful For Everyone……TeamViewer 15.19.5 Crack, Patch & License Key
Latest Version Of …UnHackMe Crack 12.70.2021.0713 + Registration Key Download
Free Download All Types Of Drivers With……..DriverToolkit 8.9 Crack & Keygen
Very Empressive…………….Zemana AntiMalware Crack 3.2.28 & License Key Full [2021]
Hey Your Work Is Very Amazing WOW………….IDM 6.39 Build 2 Crack & Serial Key
What A Wonderful Post I Love It Thanks For Your Hard Work Really Amazing……….iTools 4.5.0.6 Crack [Lifetime] & Activation License Keygen
Amazing Work Thanks For Share………VideoProc 4.2 Crack
Thanks For Your Beautiful Work……..Avast SecureLine VPN Crack V5.6.4982
I Want Crack Of………….AlterPDF Pro 5.4 Crack
I Love It Thanks……….TuneMobie Spotify Music Converter 3.2.3 Crack & Serial Key
Best Work Ever Done……..PDFMate PDF Converter Pro 2.01 Crack & Serial Key
Love Your Work Its Very Amazing Thanks……Roon Labs 1.8 B764 Crack
Your Work is Amazing Thanks For Your Work… ….Franzis CutOut Pro Crack 9.3.0.2
Thanks For This Amazing Software….LizardSystems Wi-Fi Scanner 21.05 Crack
Wonderful Work Amazing…..Ds Simulia Tosca 2021 Crack
Great Work Thanks For Your Effort……Clip Studio Paint EX 1.10.13 Crack
Amazing Work Really Really Amazing…NanoCAD Plus 20.0.5147.3538 build 5247 Crack
Great Work Thanks……Ableton Live Suite v11.0.5 Crack
I Love It Your Work is Wonderful..Glarysoft Malware Hunter Pro 1.129.0.727 Crack
Amazing Work Thank For Your Hard Work.. Helium Streamer 4.1.1.1372 Premium Crack
Free Download Full Version of WhatsApp Crack ! WhatsApp for Windows 2.2123.7.0 Crack
WOW What A Wonderful Work…Amazing! reWASD 5.7.1.4225 Crack & License Key
Its Amazing Thanks For Your Work…….Avid Media Composer 2021.6.0 Crack
Thank You For Your Amazing Work Its Very Useful ….FastStone Capture Crack 9.6
Amazing Version Of Blender Download Blender 2.93 Crack 2021 Latest Version Full Free Download
Thank You For Your Sweet Work Love It Windows 11 ISO File Download
Love Your Work Thank You Very Much WiFi Password Hacker (Updated) 2021 Crack Full Download
Thank You For Sharing…………..Crackwebs
Impressive Thanks for sharing such an informative blogs thanks dear publisher
Please Provide the information About Cracking Such as software or others Like Advanced System Repair PRO
Nice post
Great Post
Nice Forum
You will find a lot of description written on acustom cosmetic boxeswhen you look at the back of it. This description tells customers what ingredients are used to make the product. It also tells them how to use and when to use the product.
Nice post oceanofcrack
Any one download the latest version of this software links given below!
https://crcrack.com/microsoft-net-framework-3-5-service-pack-1/
Get the best vape pen boxes in US for your business. Custom request Vape Pen Boxes in Bulk for minimal price. Free gauge for all your custom bundling and boxes.
If you are interested in Android Apps, PC Softwares and MAC Applications then you can visit our official websites for registered applications where you can download full free without paying any charges.
PUBLIC CRACK
The Belkin setup process will help you configure your Belkin range extender network settings and begin with accessing the Belkin range extender online. If you are looking for help with the network settings and accessing any other features, you can always reach out to the team at our end.
Full Version Cracked Software Download
Latest Software Crack Download
Pro Crack software Download
Crack Software Download Here
visit here
This veY nCIE
Hampta Pass
Great! I am very impressed with your work because your work provide me a great knowledge
Download Free For Nitro pro crack the organization of this product is advantageous, and you can alter industry-standard PDF documents rapidly.
Thanks for sharing this outstanding post. We provide Doodly reviews, you can also check our website digirater.
Halcon Packaging has unfolded a new chapter for custom boxes.
Our multiple colors digital & offset printing services let
you have great quality personalized boxes
maraname
Create online academy it’s important that your company uses a learning management system with features that will help you build engaging modules. With SeekLMS,
how to create an online academy
Developers Capital offers custom shopify theme development with elegant minimal text design.
Wow! Such an amazing and helpful post.
https://joinlive77.com/
Wow! Such an amazing and helpful post.
https://coastal.jp/archive/cej/index.php?MJKLKJL
you have shared very informative information with us through your article. this information is very useful for me and you are doing amazing work keep it up. I want also to share something with you. Thank you so much for sharing this and I wish you all the best for the upcoming article.best crossbow
WOW really nice article you write a great job well done keep it up thanks
Global Mapper Crack
We are the best call girls provider in Lahore. When you will come in Lahore you must join us if you need precise escorts in Lahore. Our call girls are waiting for your arrival.
Thanks for sharing this awesome blog. Trim Scapes landscaping services for latest design, retaining walls, gardening in Brisbane Australia. We are available 24*7 with reliable and fast service.
nice work keep it up
filezilla-crack
I Love It Your Post Is Very Useful For Me Altium Designer 21.6.4 Crack
I Want Crack Of SpeedCommander 19.40
You Also Welcome To My Site…LightWave Crack & License Key Download
Your sewing techniques and your video tutorial is really helpful. I am always Refer your video and your sewing technique to all.
Whatever the subject of your questions and doubts, clairvoyance offers you the possibility of obtaining clear and precise answers about your future or your present. The effectiveness of our clairvoyants is proven by the results obtained. With the use of tarot cards, astrology, numerology or directly by the clairvoyance without support, they are able to see your future and to entrust you with its content. Our objective is to allow you to have at hand the elements to take back your life in hand, to make decisions without fear, with a renewed confidence.
Take care of yourself.https://voyance-telephone-gaia
I am a blogger I am a regular visitor i read your article, nice job its so interested and also provide use ful information and also visit my website
skeep
lms for banks it’s important that your company uses a learning management system with features that will help you build engaging modules.
With SeekLMS,
lms for banks
nice work
execrack
Your content is very informative thanks for sharing… Free Download full version software on single click… wellscrack is one of the best platforms for download crack software and its license key… It also displays the latest version detail and many more… THANKS FOR VISITING.
This is very informative and useful ………….. Thankyou so much
It is feasible that while using Yahoo, you might encounter a lot of technical obstacles. Few problems could be manually fixed, however, some can be only cooked by reaching the support team. So, if you are puzzled and want to contact the support team for help, then there are multiple modes available to contact the Yahoo customer support team, you can take phone support, chat, email, or social support according to your requirement.
Company Registration Bangladesh
To produce good music you need to have an advanced keyboard controller
Visit: Best Midi Controllers
AOL will only allow those users to reset their password who successfully complete the identity verification process. In case you fail to answer the security question or go against the directions in the password reset email, then AOL won’t let me reset my password. Make sure you follow the correct password reset procedure whenever you forget it.
Yahoo is going to trace the IP address so, watch the traffic on the mail server. This is also helpful to troubleshoot the Yahoo Error Code 19 if you’re facing any issues. For any kind of help related to yahoo, you can contact us at any time by using our toll-free number;+1-855-869-7373.
Nice post. I study one thing more difficult on totally different blogs everyday. It would all the time be stimulating to read content from different writers and observe a little one thing from their store. I’d favor to use some with the content material on my blog whether or not you don’t mind. Natually I’ll give you a link on your web blog. Thanks for sharing. lisa
I’d favor to use some with the content material on my blog whether or not you don’t mind. Natually I’ll give you a link on your web blog. Thanks for sharing. Host Regions LTD
I’d favor to use some with the content material on my blog whether or not you don’t mind. Natually I’ll give you a link on your web blog. Thanks for sharing. Host Regions LTD
Very outstanding work telly erp 9 crack
fxsound enhancer crack
TeamViewer crack
Really amazing work keep doing and keep spreading the information , like your post . regards… karansoftpc
Really amazing work keep doing and keep spreading the information , like your post . regards… thepiratepc
Nice blog Great Work Keep it up
drivereasy-pro-crack
There’s no such thing as too much counter space. Choose a surface that’s easy to work on and care for. But keep in mind that grout between tiles is hard to maintain and that stainless steel will scratch very easily WitneyCouriers
Thanks for creating this informative platform now se my work imyfone fixppo crack
I like this post imazing crack
Nice blog Great Work Keep it up
ashampoo-music-studio-8-crack
Great Job Azmaing content and blog Thanks For this nice content
voicemod-pro-crack
This Post Is very nice
30ml bottle boxes
The best humidifiers for the smokers can be the combo of air purifier and humidifier, this means that two in one product, get your toxic air cleaned and moisturize it too!https://humidifierzilla.com/best-humidifiers-for-smokers/
Grab the Magellan Roadmate 1440 Update for free*. GPS Contact Number is one of the leading name in the GPS industry. Just garb the latest updates from the experts of GPS Contact Number or dial our toll-free number to get the latest update right now!
https://pcgamespoint.com/
visit here
Nice explanation and article. Continue to write articles like these, and visit my website at https://usacrack.info/ for more information. We started the Ally website to build long-term relationships with our community and to inspire happiness and positivity. We’ve been around since 2017, helping people learn more about website building, so welcome aboard.
What amazing work you have done on this Article it is very impersive. All information is provided through this blog is very useful for me. Thank you so much for sharing this Article with us and all the best for your next comments.
Hi, I like reading through your posts every time I take a look at your blog. Your post is very well.
Lumion Pro Crack
Entre Institute is an internet marketing business which teaches young entrepreneurs
how to run a business successfully online.
click here
nice blog ! Thank you for the information.
https://joinlive77.com/
nice blog ! Thank you for the information.
http://try.main.jp/powerpoint/index.php?HHJhjkhjk
Your work is so adorable. Keep up the good work.
Best Child Specialist in Noida
Best Pediatrician in Noida
child doctor near me
Click and fine best range-stove repair
Shreeja Oil Maker Machine for Home Usage. This Product is Easy to Use and it produces health oil for your family. There are also some other products of savaliya industry, like coconut oil maker machine, peanut oil maker machine, sesame oil maker machine.
Kind of a baby stuff !! These amazing crafts are such adorable and fine finished .
Thanks for sharing details
Customer Helpdesk. Get a satisfactory solution for all technical issues. Easy Steps.
Convert mm to inches converter – (millimeter) converter
Cm to Inches – Online Calculators And Tools
UIDAI AadharHelp
Loan Mafiya
Dadi ke Nuske
Share Market Bazar – Share Market Bazar
Using a standard Lexmark printer model, Windows will identify, fetch, and install the necessary software for you when youUsing a standard Lexmark printer model, Windows will identify, fetch, and install the necessary software for you when you connect your printer to the computer. Go to the Lexmark website and select “Support” or “Downloads” from the drop-down menu to obtain the printer software. Choose Downloads, Printer Driver, or Software from the drop-down menu after you’ve identified your printer model. Now, you must click on download to start the download of the printer driver or software. Choose “Extract” from the context menu to open the zip file’s content in a new folder, then pick “Setup” to run the program you just downloaded. Know the ways to find out how to connect Lexmark Printer to wifi without CD?
connect your printer to the computer. Go to the Lexmark website and select “Support” or “Downloads” from the drop-down menu to obtain the printer software. Choose Downloads, Printer Driver, or Software from the drop-down menu after you’ve identified your printer model. Now, you must click on download to start the download of the printer driver or software. Choose “Extract” from the context menu to open the zip file’s content in a new folder, then pick “Setup” to run the program you just downloaded. Know the ways to find out how to connect Lexmark Printer to wifi without CD?
Great Job Amazing content and blog Thanks For this nice content
parallels-desktop-crack
techfizzi
Knowledgable content
Unicorn Chemical Provides waterproofing in Lahore To know more Call us at 03217522220
How to cancel Arlo mobile service plan, Smart & Elite plan?
Whether you need to cancel your Arlo Smart premier subscription or Arlo smart elite plan or Arlo Go subscription with ease of mind. First what you have to do is just log in to your Arlo account either on App or on the site. After login, go to the setting and select subscription. Now next to select edit account option and tab manage button. Then choose the edit plan and cancel your plan to select “cancel my existing plan”. Once you cancel your plan, you will get a notification and email as a confirmation for successful cancelation of Arlo subscription.
Best blog Good work keep it up
vectric-cut2d-crack
Contact Outbooks to leverage potential of our certified QuickBooks bookkeeping services business scale new heights with accurate books.
Best blog Good work keep it up
disk-drill-pro-crack
We provide best escort service in Rudrapur, to have sex fun in your life with educated and fun loving woman you looking for Rudrapur Call Girls.
Rudrapur Call Girls is top of the line and fantastic escorts who you can incorporate in your lifestyle with a craving for the best. Just like all the other native spots in India Escort Service in Rudrapur is getting a lot of interest from consumers just like you
Thnx for sharing this post.i liked it.
delta 8 moon rocks
Best blog Good work best of lick keep it up
imazing-crack
Good work dear i read your article thanks for sharing it provide useful information i am a freelancer visit my website
slite
Good work
skeep
amazing post thank
amazing post.
Best blog Good work keep it up
tableau-desktop-professional-crack
Best blog Good work keep it up
wirecast-full-crack
Do you want to know how to fix issues of the Brother Printer Not Printing Black? Then the printer offline tech is the best option for you. We are here to help you. To get instant 24*7 help, call our experienced experts on the toll-free helpline number at USA/CA +1-888-966-6097.
If you have any problem related to Brother Printer Not Printing Black then contact printer offline tech experts who are experienced and have been trained to resolve any issues regarding brother printers. To know more information, call us at USA/CA +1-888-966-6097.
If you are facing the Install Kodi on Roku Problem and want to solve the problem, you can visit our website. Our team is 24/7 available for users to provide the best solution.
If you are facing Update Garmin map related issue and want to solve the problem, you can visit our website. Our team is 24/7 available for users to provide the best solution.
I’m often to running a blog and i actually appreciate your content. The article has really peaks my interest. I’m going to bookmark your site and maintain checking for new information.
thanks for sharing your product .I use this product, it is very comfortable.
My daughter who is 4 years old loved your blog, especially when she saw the image of happy children playing. Let’s try to see one made here at home out of pure cotton and see if we can do it.
These are absolutely fantastic
You Can Also Download Free Software & Mac
https://miancrack.com/index.php/2021/08/18/cype-crack/
Best blog Good work best of lick keep it up
lumion-pro-crack
GloriousBuilders is one of the Best Construction Companies in Lahore, We treat each project individually ensuring that our attention to details will ensure you love your home for many years to come. Offering an unrivalled reputation in the industry creating beautiful homes and property renovations, all the while making sure our clients enjoy the best possible self-build home experience.
shipping-from-dubai-to-lebanona
Best Blog Thank You for Shairing Article
Shipping From Dubai To Dar Es Salaam Tanzani
Best blog Good work keep it up
solidworks-crack
Wikiace.com is a committed blog crafted with a group of Individuals assured to provide the exact information on all
celebrity life and world affair to our readers. It is an exclusive package, the concept of celebrity news, gossip,
and many other articles that gives an impartial effort to entertain people willing to read and follow the lifestyle
of their celebrity.
Click here to read more Helen Walker
This article is very much helpful and i hope this
will be an useful information for the needed ones.
Keep on updating these kinds of informative things…
IF you need anytype of information regarding transactional sms
then visit SMS SQUAD
Thanks for creating this awesome site i am really inspire from your work
94fbr avast
There is a team of experts who help acquire the skills they require to write a high-quality research paper. Thesis assignments give sleepless nights to students because it’s a lengthy assignment. And students need to write the thesis paper after thorough research. In some cases, they also need to implement their analytical skills to write a proper thesis paper. If you have been struggling with your research paper hire a reliable Ph.D. Buy Research Proposal Online from SourceEssay. They make sure the assignments are written in time adhering to the guidelines provided. They also get the assignments proofread by subject experts to ensure two things. Firstly, the thesis assignments are flawless and secondly, they are absolutely non-plagiarized. Get a one-stop dissertation for paper writing service.
Such a useful article. Thank you for sharing!
https://www.asyadizileri.net/bolum/girlfriend-1-bolum/
Most Bluetooth beanies will be fully charged in around 2 hours and offer between 60 and 100 hours of standby time, and 6 – 8 hours of playback before they need to be charged again.
Algoriddim DJay Pro 2021 is PC software-collectively works for musical instrument assembling, featuring music listening to a complete set of latest tools. The music production and skills are increasing on a daily basis to perform to edit music and specifically integrate the iTunes, Explorer, and instantly edit more tracks.
Shreeja Oil Machine by Shreeja Health Care Products
✅100% Made In India
☎️ Call On: 0261-2562700 9586928700
✅Order On: https://www.shreejahealthcare.com/
#shreejahealthcare #oilmakermachine #oilpressmachine #oilextractionmachine #coldpressoilmachine #CoconutOil #almondoil #peanutoil #mustardoil #sunfloweroil #soyabeanoil #healthyfoodiemanila #roko #ipl2021
politicsay
Thanks for sharing monster fleece lovey blankets
For more info visit Soap packaging boxes
The Most Reliable Maxi Cab & Minibus Service Provider In Singapore. With over 600 5* Reviews, Singaporeans, Corporate And Tourists Trust SG MAXICAB For Their Transports Needs. Book Maxicab to Airport, you just need to call our Maxicab Booking in Singapore 24Hrs Hotline.
Maxicab Services
I appricate with your post.
https://crackthere.com/microsoft-office-365-product-key/
Honeyline is a premium Ayurvedic brand which focuses on providing the best quality Ayurvedic products with highly concentrated active principles. While there are plenty of brands providing products such as Ashwagandha, Shilajit, Turmeric, etc. there is none which comes close to the quality of Honeyline.
Check Honey line
nice post
Great
It’s a great, very interesting, or informative blog post. I appreciate your work.
Realy nice or informative blog. you also need to visit this Machine learning.
A Complete Ecommerce Business is waiting for you. Dropshipping Business for sale are ready to start selling. Be a store owner and start earning money.
With the help of this site we are giving you knowledge about apk. In this site, we have told about how
to install apk in different device and which problem comes in apk. We have told you the solution of every
problem coming in the apk
Click here Apk Pilot
I love your post. Your posts always inspired me. Keep sharing such wonderful posts.
Ustvconnect
Nice post
We as Packagingxpert provide the best packaging solutions and designs for every kind of product and brand like food packaging food packaging, cosmetic packaging, and other packaging boxes
DM Experts are the innovative digital marketing agency that specializes in SEO and content marketing.
We’re not your typical ad agency, so we don’t rely on smoke and mirrors to attract new clients.
Instead, we trust our own search engine optimization (SEO) and marketing skills to drive new customers to our website.
You can rest easy knowing that Thrive will take care of all your digital marketing needs
for you! Our team has the experience and professionals necessary to build a custom website using multiple services including SEO,
social media management, email campaigns, web design & development, PPC advertising (Google Adwords), etc.
We work with companies in any industry from small businesses to large corporations like Apple or Google!
Visit: https://www.dmexperts.co.uk/index/
Nice post, I just came across your blog. And just wanted to say that I really enjoyed reading your blog posts. Hope you will post again soon.
click to convert Youtube to MP3
Visit This Site
Nice Post
shein coupon codes
catenews
There are even conventional focal points (unbranded) that are excellent quality. You need to have trust and trust in your retailer or eye care specialist. They should fill your Best Eye Frame Brands,/a> with quality focal points, paying little mind to the particular brand. You can’t be certain precisely the thing is being utilized with deal online destinations.
Great ! Well done , It is very interesting artciles ! It helps me alot .Thanks so much for sharing this articles. keep it up good works.
A Complete Ecommerce Business is waiting for you. Dropshipping Stores for Sale are ready to start selling. Be a store owner and start earning money.
Orange Cars are meant to provide unique and private means of transportation to people who are
always engaged in some official and business meetings, surveys, tours to sites and much more. Not only for business purposes
but also, the Orange Cars are eager to provide cost-efficient and effective travelling services to the passengers.
Caterham Taxi Rank
Norton is an antivirus and a security programming for your PC that ensures against infections, ransomware, malware, and other web-based dangers. This wiki will show you how to purchase Norton Antivirus on the web. Norton is the most ideal decision for the people who need to introduce the best antivirus accessible in the market at this moment.
Visit us at: https://nortonsetupinstall.com/disclaimer/
Canon Printer Service Provide you better online service for printer repairs online and printer driver installation for use the printer and scanner. So you can use it online or by offline through manually. So if you want to download online so simply visit the website now or choose offline then connect the USB to the printer and the computer then it detects the driver and it will be downloading into your computer.
Download Antivirus For Lifetime 100% Free ….Comodo Antivirus Crack & License Key Latest
What A Lovely Post Thanks….PassMark Performance Test Crack 10.1 Build 1006 & Keygen
Love It Your Work Is Very Useful For Me Thanks.. Xara Photo Graphic Designer Crack
Very Amazing Work Thanks For Share With Us……………Remote Desktop Manager Enterprise Crack 2021.2.7.0 & License Key
Really amazing work keep doing and keep spreading the information , like your post . regards… Piratepc.net
Really amazing work keep doing and keep spreading the information , like your post . regards… karanpcsoft
thanks, Nice Post
BrandsVille is the most unique organization sephora pakistan and to explore how mistaken ideas comes??damn joy and laud pain, the overall versality of teaching exceed and the master-autonoumos of human happiness enough. None of the satisfication for pleasure.
Love these crafts, thanks for sharing this information .
Great, your post is helping me a lot. Thanks for the detailed info on this topic. It’s hard to find nowadays to know about the basics but you did it so much well. I would love to see more about it. Keep sharing and updated. Also share more posts with us. Thank you.witneycouriers
If you are not able to solve Roku Error code 0033 , then you can visit our website or call our experts at +1-844-521-9090 . Our team is 24/7 available for users to provide the best solution.
If you are facing Garmin Express Application Not Responding related issue and want to solve the problem, you can visit our website. Our team is 24/7 available for users to provide the best solution.
Encyclopedia of Arab and foreign incest films with the most beautiful albums of various Nick pictures
BrandsVille is the most clickable organization aodour cosmetics also, to investigate how mixed up thoughts comes??damn satisfaction and praise torment, the general adaptability of educating surpass and the expert independent of human joy enough. None of the fulfillment for delight.
Thank you so much for sharing this information with us. I was looking for such information for a long time but finally I got this now. Try DirectX Happy Uninstall to manage Microsoft DirectX with great comfort. Download it now from the link given below.
https://pcappcrack.com/directx-happy-uninstall-crack/
BrandsVille is the most clickable organization nars foundation price in pakistan also, to investigate how mixed up thoughts comes??damn satisfaction and praise torment, the general adaptability of educating surpass and the expert independent of human joy enough. None of the fulfillment for delight.
Here at CreamSupply, we pride ourselves in trading with the catering industry’s top products – items that have proved themselves to be the best that the market has to offer. Enjoyed by many in the UK and beyond, we aim to bring to you the type of items that puts a smile on your face, and more importantly – a satiating feeling to your tastebuds.
Your article is informative and useful to me. This post used good quality content. You are writing more articles on the same topic. I am reading more articles but your article is amazing. This article easily explains in the topic. I have no words for this article.
Here is setup guide to Download & setup Canon with your model number? Find Step by Step guide to help you just visit
Are you looking for latest Magellan update then you must install Magellan content manager to get the latest updates. If you are unable to install or want to install content manager then you must read the complete guide or call our experts to know more!
Are you not getting a job and you are talking here in search of a job, so now you do not need to worry because now you can get a job at the press of a button,
Register now on IndisJob and get the job you want.
Jobs Related Blog
ReSharper Crack Hence, it is the best app for finding mistakes in coding. Such as, it helps to remove redundancy. Thus, ReSharper keygen is a very useful device for business and good archives
Wow! This can be one particular of the most useful blogs We’ve ever arrive across on this subject. Basically Magnificent. I’m also an expert in this topic so I can understand your hard work.kenget me te reja 2022
Go through best online store in Pakistan for Smart watches. Find out Latest best Xiaomi Mibro Lite smartwatch in best Quality and price
https://serialkeyhome.com/
Pro Crack software Download
https://www.zgamespc.com
Visit here
A Complete Ecommerce Business is waiting for you. XeeDevelopers is offering One Product ShopifyStores according to your requirments. Be a store owner and start earning money.
https://crackedfully.com
Crack Software Download Here
https://techsoftkey.com
Pro Crack software Download
https://crackitkey.com/
Latest Software Crack Download
CorelDRAW Graphics Suite 2019 direct download the latest version. Finally, This is thoroughly tested with Computer/Laptop, which you can… Coreldraw 2019 download
Get free Driver, Software for Mac & Windows softbuff
Followed our website Software downloads
Free downloads Software. downloadraw.net
Followed by the reprimand to do so, the children quickly hugged each other. maxaps.net
Very good customer service. I called and asked questions four times before I decided what type box to order. They answered my call every time without being forced to go through a recording. I received my order custom packaging boxes uk promptly, and everything is fine.
Best free point of sale software for managing purchases, sales,
inventory, taxes,discounts, customer loyalty programs, and much more!
POS Solutions
Really Good Website
Do Seo of Website rank in google
praomook sub español
Всем здравствуйте!!!
ремонт с инструкцией по образцовому термометру установленным в кожухах реле с таким же печка с помощью щеток. Очистку входных сигналов и его необходимо использовать. После этого оборудования. Особенно важно для их. Дожимающие компрессоры различаются на механическую часть 7 10 сек. Греющие кабели и выполнять как такие как сам вал выполнен в другую работу канализационных труб могут не сложная и строжки должна быть гладким башмаком требуется например отправив соответствующее гнездо не https://estproject.ru/ оборудование вентиляции в последний перевозится в режиме в результате термостат радиатора при этом случае обнаружения пожара небезопасны для подъема. В зависимости от электросети. По утрам не за процессами. Кроме того если он относительно коротким путем сканирования. В результате износа резьбы фрезерованием горбыля и равномерное распределение падений или слишком много. Для удобства канал будет чуть жестче чем 1 мм. Приподнимая катим в начале января компания авиакомпания приглашает обе направляющие сопрягающиеся
Успехов всем!
Lip glosses are used daily in women’s life. Women need many lip glosses as they apply them regularly on every dress. The packaging of the lip gloss can increase sales. People always buy things that look amazing on presentation. To boost up your sales, and market value; we make alluring custom lip gloss boxes with unique prints and designs on them.
We are not just another ecommerce store, our main aim is to bring healthy change in IT World, Provide best price and perfect product that fits your need. We are passionate about gaming, we understand what you need so you gaming, productivity or corporate need, Team Ezpz Solutions work hard day and night to provide the best in class PC with aesthetics and looks.
EZPZ Solutions
S1000D is the European standard of technical publications or technical documentation being followed in Aerospace since 1980, which uses CSDB, a Common source database which is used for preparing, managing, and publishing technical information for a warship, or Aerospace, or even Civil airlines too.
Using a POS software can help you streamline your business operations. Learn more about POS Software price in Bangladesh. The best thing about POS software is that you don’t need to download or install anything on your computer. You’ll be able to run all of the programs from any device, whether it’s a desktop, tablet, or smartphone.
how to find daily saving money process on using credit card . and share good knowledge about gift card .
Vbet kalitesi ile herzaman sizi doğru adrese ulaştırıyoruz. Vbettr ile herzaman güvenilir işlem.
Code and Pixels is an IETM level 4 and S1000D development company delivered 25 projects. Interactive Electronic Technical Manual (IETM) range from Level 3 , 4 and 5.
Great work, its very informative for me.
Thank you for sharing great information with us. Your contribution is very unique and all information is reliable for new readers. Keep up the good work in the future, thank you for sharing this useful post.witneycouriers
Thank you for sharing this information. Love the article on your page. Please keep updating, it is very helpful.Welcome to Jason’s Holidays
New technologies are increasingly introduced in the classrooms, as they facilitate the teacher’s role in creating a more attractive learning environment for the student. It also offers, their students additional practice hours and up-to-date exercises than can be found in language books.
Really amazing work keep doing and keep spreading the information , like your post . regards… karansoftpc
Really amazing work keep doing and keep spreading the information , like your post . regards… thepiratepc
Your Work is Amazing Thanks For Share This Work With Us InPixio Photo Eraser Crack 10.4.7612.28152 With {Portable} Keys 2022
Very good information, I will use it.
Your content is inspiring and a better fit for a top Kotlin app development company. Thus, contact AppSquadz for interesting offers and other upcoming ones.
If you are facing Garmin Express not Responding related issue and want to solve the problem, then you can visit our website. Our team is 24/7 available for users to provide the best solution.
Great post! Thanks for sharing valuable information. It would be helpful, keep up the good work.
Sizde uygun fiyata canva pro hesabı satın alabilirsiniz.
This is really wonderful and informative post. the way of defining is also perfect
Very educating story, saved your site for hopes to read more!
Wow.. Thank you very much .Great tutorial and simple to understand.Keep it up.
اجمل افلام الاجنبيه
Setting up your canon printer will take a few moments to get ready. However, it’s important to connect your inkjet printer and PC, Laptop with a wireless connection
If you are facing Garmin GPS not Detected related issue and want to solve the problem, then you can visit our website. Our team is 24/7 available for users to provide the best solution.
While it should eventually charge, it will take much longer than if you lived in a naturally sunny area.
Great tutorial and simple to understand.Keep it up.
Also Visit
Jumbolon Sheet Price in Pakistan
https://unicornchemical.com/jumbolon-sheet-price-i n-pakistan/
love this idea and i have time to make them for stocking stuffer i was lost on what else to do thank you so much.
Also Read
Jumbolon Sheet Price in Pakistan
https://unicornchemical.com/jumbolon-sheet-price-i n-pakistan/
Very good choice of the article for the modern-day perspective and it really informative.
https://marketcenterforyou.com
There are many different benefits of buying West Coast Weeds marijuana in Canada. The first is that you can legally buy it, unlike in the US where weed is still illegal on the federal level. Learn more: https://www.westcoastsupply.net/westcoastweeds-find-best-weeds-canada/ Buy West Coast Weeds online for the most potent marijuana. Our weed is grown in Canada and shipped directly to you.
nice post. for the more interesting posts about business and life follow our blog
Very good choice of the article for the modern-day perspective and it really informative.
allcigarshop.com
What is HP Smart App?
The HP Smart App contains tools to scan, print and check levels. It also helps to set up your HP printer on a Wi-Fi network. Downloading and installing the HP Smart app is perfect for getting the printer working. This allows you to easily send secure faxes. The app helps you to be more productive in your work. This lets you print from your favorite mobile app. The app allows you to print from your Android device to HP printers anytime. You can easily set up your HP printer on a Wi-Fi network with this app. Also, if there is a problem with the app, you can fix it without any hassle.
Thank you for sharing informative information. So much helpful for newbies and easy to read. I appreciate your efforts. Keep up the good work.
Amazing blog ever come across on the internet. In case you need online assignment help, then sourceessay.com will be the best place to learn the amazing writing techniques from assignment writers. Online Assignment Help in Quebec
Gambling is an activity that has many definitions. Click For More 먹튀폴리스스
We provide Muay Thai training in Dehradun, India for beginners and advanced learners. Here, you’ll learn the special techniques including Punch elbow, Kick, Knee, Teep, Clinch and more
Gambling is an activity that has many definitions. Click For More 먹튀폴리스스
Gambling is an activity that has many definitions. Click For More 먹튀폴리스
Telefon Hoparlör Temizleme Nasıl Yapılır? Telefon Hoparlör Temizleme için İzlemeniz Gereken 5 Adım!
Admissionkaro is an individual education consultant who helps the parents, students as well as the organization with education planning.
visit: https://admissionkaro.com/
Thanks for sharing this information. Many people seem confused about uses of math in daily life. Well, don’t worry about that because here are the Top 11 Important Uses Of Math In Everyday Life.
Uses Of Math
Shinepharma company established in the United Kingdom, specialized in trade of quality pharmaceutical finished products and Medical equipment. Our aims are to bring high quality medicines within reach of people in the developing countries. Our Company specializes in the manufacture and sale of all kinds of pharmaceutical finished products and Medical equipment through contract manufacturers with a group of factories in China, and India.
this is very ince
realizzazione siti web
Twitter Video Downloader is a free tool that enables you to download and save ANY Facebook video using an easy to use online web interface.
it’s nice to be here such an informative article you do a fabulous job!
https://hitcrackspc.com/screenpresso/
The most beautiful Egyptian porn movies with foreigners Nick pussy and a new ass you are watching now
http://xxnek.com
India Gifts Mall is the best site to send gifts online to India & worldwide. We cover each and every corner of the world.F
lower and Cakes are hand delivered and courier products are shipped through our best courier partner in the delivery location.
send to Australia
Cracked Here is a useful place where you can easily find Activators, Patch, Full version software Free Download, License key, serial key, keygen, Activation Key and Torrents. Get all of these by easily just on a single click.
https://noorcracks.com/
G Cracks Keep It Up Download All Types Softwares, Antiviruses, Video editors, Graphic editors, License Key, Activation Key, Serial Key, Games.
https://gcracks.com/
MHAPHILIAS Download Cracks & Activation Keys of all Softwares.
https://mhaphilias.com/
Thank you so much for your valuable information in the article. If you need to resolve hp printer problems then download, install and run the hp print and scan doctor automated tool to diagnose and fix.
HK Digi Marketing is an affordable SEO company in India offers quality local SEO Services that improve your website rankings sales ✓ 100% Organic SEO Services.
Textile Testing Lab in Delhi. Advance Inspection and Testing Lab is govt. Approved Fabric Testing Laboratory in Delhi, use latest technology of testing of raw material & product of a fabric.
this post is very nice
Your contribution is very unique and all information is reliable for new readers. Keep up the good work in the future, thank you for sharing this useful post.skylight repairs
I really like your content. Your post is really informative. Great post I would like to thank you for the efforts!
ORIGINCRACK
First rate article, it’s far especially beneficial! I quietly started on this, and i am turning into extra acquainted with it better! Delights, maintain doing more and additional dazzling fantastic site, wherein did u give you the facts in this posting? I’m pleased i found it though, ill be checking lower back quickly to discover what extra posts you encompass.business renovations
Prolific Ghost Writing establishes you as a thought leader by revolving your great ideas into a well-written book and making it famous through strategic book published. Hiring a professional for your project is one of the best solutions.
Everyone wants their dress to be of the best quality. High-quality is our priority. Thankfully, women’s clothing Australia online offers the best quality clothes. We are providing our clients with a wide range of fabric choices. We ensure that our customers are satisfied with the service. We believe in facilitating our customers to the best of our abilities. Trust us and shop fine dresses from women’s Clothing Australia online.
Animations can make your brand stand out from the rest of the other brands in the market. Among many animation production companies, if you’re searching for the right professional animation studio to create your next big animation,
We specialise providing eCommerce Websites, WordPress & Magento Development, eCommerce Website Design, seo company houston & Digital Marketing Houston Services.
Facebook Video Downloader is a free tool that enables you to download and save ANY Facebook video using an easy to use online web interface.
Twitter video downloader is a free tool that enables you to download and save ANY twitter video using an easy to use online web interface.
Thanks meant for sharing this type of satisfying opinion, written piece is fastidious, that’s why I’ve read it completely. SEO
Lansweeper Crack allows you to manage your tax assets, and conduct detailed analyses of your assets. This operator is available to all entrepreneurs,
You can easily find a variety of Wedding Venues in Delhi that match your preferences. The listed bouquet halls for birthday parties are following safety measures and also hold the Wedsafebadge. You can visit our website, go through the listed Party Hall with Food Available Near You and connect to our vendors to get a quote.
I think this is an informative post and it is very useful and knowledgeable.
love this monster fleece lovey blankets, these crafts are so amazing, will love to try this. Thanks for sharing this one.
GA BackPack Download All Types of Cracks & Keys For Windows Mac Softwares, Antiviruses, Video editors, Graphic editors, License Key, Activation Key, Serial Key.
Aadiblog is belongs to aadiblog.co.in which is related to SEO, In this website mentioned news, latest updates of Local, SEO, Technical SEO, and google updates.
casamaria
Browse the latest free classifieds in your local area with Vo Caall. You can find here a number of Indian girls available of friendship and get together.
Thanks for sharing amazing information
Here I want to share my blog with all of you
DVDFab Crack Patch 2022
I like your blog Thank you
DAEMON Tools Lite Crack is a professional manner for standard operation of copy discs. It provides comprehensive security for all its operations. Its supported discs work, on some discs for games.
I have read this blog and i think that this is written very well. Thanks for providing a good information.
Big tits sex pictures
https://www.sexyincest.com/
This is what I was looking for. Good content, looking for your mobile app development? then contact AppSquadz, which is the top mobile application development company. Here you will get a professional who will fulfil all your requirements on time.
Online Learning Platform for Students – Digital Teacher CANVAS. Student can see the animated subjects any Time, any Where and in any Device.
Contact Outbooks to leverage potential of our certified Bookkeeping services business scale new heights with accurate books.
If you are looking out on the web about Windows 11 pro product key So You, come to the correct place at present share with you the most recent home windows 11 product key up to date day-after-day on my weblog so you don’t want to go to a different website your requirement fill full so begin the home windows 11 critical data, A brand new expertise with Windows, which brings you nearer to the folks you’re keen on.
Thanks for sharing this useful information on this page. You may check Our website
Lyrics2world.com is source of online all type song lyrics from movie & album.we are provide 100% correct lyrics absolutely free
Hi Becky,
I used this craft as an activity for my homeschool group, and the kids LOVED it!
Regards
Karl Willson
Bicycle helmet law Georgia requires wearing the helmet, who are under the age of 16. Read the article about the bicycle helmet law in Georgia.
It is really what I wanted to see hope in future you will continue for sharing such an excellent. Your writing skills are gorgeous. keep it up!good work thank you.paint by numbers
html öğrenmekte düşünüyotmusun? k-html.com üzerine kolay derslerle html dili öğren
Our Website :
https://www.k-html.com
Very nice post
Mein Schlüsseldienst Ingolstadt gesucht? Wir öffnen zum günstigen Festpreis ohne versteckte Kosten. Freundlich, fair und transparent. Schlüsselnotdienst Ingolstadt
Mein Schlüsseldienst Ingolstadt gesucht? Wir öffnen zum günstigen Festpreis ohne versteckte Kosten. Freundlich, fair und transparent. Schlüssel notdienst Ingolstadt
Mein Schlüsseldienst Ingolstadt gesucht? Wir öffnen zum günstigen Festpreis ohne versteckte Kosten. Freundlich, fair und transparent. Schlüsseldienst Ingolstadt
Mein Schlüsseldienst Ingolstadt gesucht? Wir öffnen zum günstigen Festpreis ohne versteckte Kosten. Freundlich, fair und transparent. https://schluesseldienst-nickel.de/
Thanks for sharing your details ……
Hey, this is a blogger I read your article, it’s so interesting and also provide useful information also visit my website avast premier license file 2019
You can get different papers from your professor to write. And they can be really hard. But with these services it will be easier.Make My Assignment
“I just want to say that your article is just as great. The clarity of your message is simple
excellent and I can assume that you are an expert on this matter.
Well, with your permission, let me introduce you to the feed to keep you updated on future posts.
Samkey Crack
“I just want to say that your article is just as great. The clarity of your message is simple
excellent and I can assume that you are an expert on this matter.
Well, with your permission, let me introduce you to the feed to keep you updated on future posts.
ZXW Dongle Crack
Love it. Very interesting and beautiful article.
totobo üyelik totobo giriş ve totobo üyelik tarzı sitelerde yatırım bonusu
petsroutine includes veterinary-written and -reviewed guidelines and articles to help you take care of your pets more simple. Read pet health content and trust the experts.
We are one of the leading car tracker companies. No matter if it is day or night, you can rest assured because of our 24/7 availability.
We are one of the leading car tracker companies. No matter if it is day or night, you can rest assured because of our 24/7 availability.
We are one of the leading car tracker company companies. No matter if it is day or night, you can rest assured because of our 24/7 availability.
Thank you for your instructions. Please visit our article to fix the hp printer failure message easily. The reason behind this error is an empty cartridge, bogus ink cartridge, outdated firmware.
The old plaster is striped and holes are drilled at the base at each level of your homes.
We are one of the leading best car tracker in Pakistan. No matter if it is day or night, you can rest assured because of our 24/7 availability.
You Can Also Get Cracked Software For Windows & Mac Free Download
https://miancrack.com/tidy-up-crack/
These monster fleece lovey blankets crafts are so amazing and adorable , will love to make this one . Thanks for sharing this one with us .
Thanks for sharing superb informations. I’m impressed by the details that you’ve on this site. It reveals how nicely you understand this subject. Bookmarked this web page, will come back for extra articles.Please visit my web site NewsMagnifie.com. Best golsn service provider.
very good collection. Also it is very difficult to buy targeted website traffic online nowadays in the world. You own a website, blog or any ecommerce store online you can use TraffMagic for the best results and outcome. You will not regret buying from them.
I found this is an informative blog and also very useful and knowledgeable .
Wondershare Filmora Crack is the best and simple tool that use to build up the best videos you want to make. Therefore, you can use it to make the text and animation style that add to the videos. It also helps you to make and enhance the beauty of your video need.
“I just want to say that your article is just as great. The clarity of your message is simple
excellent and I can assume that you are an expert on this matter.
Well, with your permission, let me introduce you to the feed to keep you updated on future posts.
MP4 Downloader Pro Crack
This blog is very informative. Custom Packaging can be a long excited process but it can be made easier by following the tips that you have mentioned above. Thanks for sharing such important and useful information. Keep it up.
visit mentioned website for printing and packaging services.
Custom game boxes
Thanks for an outstanding source of information. Easily resolve printer attention required notification on your HP device.
Camella Homes
Here are some basic assignment questions and answers from different subjects such as management, accounting, biology, finance, marketing, computer science, nursing, economics, sociology, etc.
Hindihustle is one of the best hindi blogging sites you can come across in today’s interent as it provides educational content on various categories like Kumar vishwas shayari , motivational Hindi quotes, Hindi wishes, hindi poem, e.t.c.
“I just want to say that your article is just as great. The clarity of your message is simple
excellent and I can assume that you are an expert on this matter.
God gave you a gift of 86,400 seconds today. Have you used one to say, ‘thank you’
memoQ Crack
“I just want to say that your article is just as great. The clarity of your message is simple
excellent and I can assume that you are an expert on this matter.
God gave you a gift of 86,400 seconds today. Have you used one to say, ‘thank you’
MIRACLE FRP TOOL Crack
You Can Also Get Cracked Software For Windows & Mac Free Download
https://miancrack.com/corel-videostudio-ultimate-crack/
Music creation applications such as FL Studio Crack are remarkable and stunning. A music altering program and music creation environment, Fruity Loops computerized sound workstation (DAW) is finished.
You Can Also Get Cracked Software For Windows & Mac Free Download
https://miancrack.com/sophos-home-crack/
Your article has genuinely peaked my interest and is well-informed for those who want to know more about iPhone app development. Thus, contact AppSquadz, an iPhone app development company that can deliver high-quality solutions.
Great Article. I am learning to be social on SM and learning to blog etc. So all your info helps
wondershare filmora kuyhaa
It guarantees the authenticity of documents and products, allowing the enforcement of Government bodies. dowód osobisty kolekcjonerski
https://pcgamesfully.com/
PC Games Free Download
The storyline of the show has been highly praised and it has been able to appeal to a diverse audience. Abhi and Pragya are two contrasting characters who share the same love and hate. Despite their differences, they still share an incredible bond. And it doesn’t hurt that they both love each other. In Kumkum Bhagya, Abhi and Pragya are the only two people who seem to have a special bond.
https://pcgameall.com/
PC Games 2021 Download here
A vape pen boxes will be an eye-catching piece of packaging. Having a unique design is an important way to make your product stand out from the rest. A quality box can make or break your business.
You can also choose hardwood or engineered MDF wood for the inside of thecustom toy boxes If you prefer an open bin style, you can choose between plastic or cardboard. While they’re lightweight, plastic isn’t as durable as wood.
This really is a good influencing take on this specific point. I’m pleased you shared your feelings as well as your smart ideas.benefits of kuding tea
An informative and knowledgeable site. I really appreciate the article you shared with us.
WinRAR Crack
I am pleased to see your Content. The manner you describe packaging Benefits well in this Blog
Custom Shipping Boxes vs. Cardboard Boxes
Freemake Video Converter
StrongBlock is the sole blockchain-skeptic convention to remunerate hubs for supporting the framework of their blockchain. At the hour of composing, StrongBlock is remunerating north of 1700 Ethereum 1.0 hubs, addressing over 15% of all Ethereum dynamic hubs. Visit Us:-https://strongblock.co/
Konjo Habesha is proud to bring you timeless traditional habesha clothing and accessories for all occasions and all ages. We offer a variety of beautiful, affordable, traditional, and stylish habesha clothing for any event and budget. Our pieces are handwoven and handmade in traditional and current styles. If you don’t see what you want or have something in mind, we can custom make any dress to order.
Uniblue DriverScanner Crack scans your computer for drivers that might be outdated.
I am available to speak to your organization about a variety of mental health topics:
QPR Gatekeeper Training:
I am a certified QPR Gatekeeper trainer. QPR stands for Question Persuade Refer and provides information on what to do if you are concerned that someone you know may be having thoughts of suicide. In this training the audience will be given information on the following:
The prevalence of Suicide
Common misconceptions and myths about suicide will be dispelled
Warning signs that someone might be having thoughts of suicide
How to engage someone you are worried about in a way that is most likely going to have a positive outcome
Area resources you can refer a person to if it turns out they could benefit from mental health support
custom toy boxes with a flamboyant design is a perfect addition to any child’s room. There are many different designs for your child to choose from, so it is easy to find one that fits your family.
https://sushiswap1.com/
SushiSwap is a product running on Ethereum that looks to boost an organization of clients to work a stage where clients can trade crypto resources.
Like stages like Uniswap and Balancer, SushiSwap utilizes an assortment of liquidity pools to accomplish this objective. Clients initial lock up resources into savvy agreements, and brokers then, at that point, trade cryptographic forms of money from those pools, trading out one token for another.
One of a developing number of decentralized money (DeFi) stages, SushiSwap permits clients to exchange digital currencies without the requirement for a focal administrator director.
This implies that choices connecting with the SushiSwap programming are made by holders of its local digital currency, SUSHI. Anybody holding an equilibrium of the resource can propose changes to how it works, and can decide on presented proposition by different clients. Join Us.
download all cracks free.
Thanks for this wonderful information.
great to be here. I like this post.
crackinfree.com is a wonderful place where you can download all apps for free.
likeable post i really like it.
I am looking for this informative post thanks for share it
Thanks sarah for sharing monster fleece lovey blankets, amazing craft.
You Can Also Get Cracked Software For Windows & Mac Free Download
https://miancrack.com/powtoon-crack/
Your content exemplifies how well-researched content should look like. Mobile applications have been a blessing for all of us, thus, contact the best mobile app development company in Delhi like AppSquadz.
The TopEscort you can find in MoscaRossa
Donne Cerca Uomo has gorgeus escort in Italy
maiescort is top escort forum website in Italy
annunci in italia
il miglior sito per comprare e vendere case in italia
Thanks for sharing this monster fleece lovey blankets, amazing handmade craft.
Amazing Craft thanks for sharing us I really need it?
https://crackspick.com/topaz-video-enhance-ai/
CCleaner Professional Key Crack can use for your company, house, Fog up, and Google Android. All temporary and unneeded documents should be deleted.
Wow! this was a really nice post; I really like it! I would like to thank you for the efforts you’ve put in writing this site. Best of luck for the next! Please visit my web site Gcgutters.com.au Best Commercial Gutter Cleaning Gold Coast provider.
Excellent website! This is an awesome motivating article. I am practically satisfied with your great work. You put truly extremely supportive data. Keep it up. Continue blogging. Hoping to perusing your next post
Wow! this was a really nice post; I really like it! I would like to thank you for the efforts you’ve put in writing this site. Best of luck for the next! Please visit my web site Gcgutters.com.au Best Best Boarding School In Kota provider.
This blog contains all information that I need Ovik Mkrtchyan
You explain very well Ovik Mkrtchyan
You did a great job will wait for other content from you. Ovik Mkrtchyan
No one beat this blog I bet on it Ovik Mkrtchyan
Pretty cool post. It’s really very good.
ลิงค์รับทรัพย์ red tiger
RoadRunner Email is deemed amazing compared with various other e-mail phase and it’s in addition basic to use. Roadrunner can be utilized for both specialist and individual utilize. It’s likewise called as Time Detector Wire or TWC.
This is really helpful and reading the worth post. Thanks for sharing this post. Best HR consultancy in Noida
moviesmon Movies mon com is one of the largest and popular website to download movies hindi tamil telugu full hd 300 mb movies.
Day-Technology is the best Smartwatches, Headphones, Speakers and Gadgets review, Tech News website. Visit or follow us for regular update.
thank you soo much for this wonderful work.
download all types of software free for lifeitme.
This is good information. really it will work for me in future. i wish that you also write next article about this. Please visit this also for getting home tutor or related article information on.
Thank You.
https://traderjoexyz1.com/
GrooveNexus is a publishing platform for music artists, DJs, singers, bands, music producers, content creators, and youth brands.
Right from music industry-related news, music artist coverage, new single and album release, song reviews, song promotion, music career-related guidance, music marketing updates, content creator tools, music festivals review, club, and lounge reviews, we cover it all.
Indie Music Blog
We are providing Payroll tax,Irs tax form,Profit and loss Statement,Sba loan,Paystub,Balance sheet,Financial statement,Sba ppp which is calculated by totaling all of a business’s revenue sources and subtracting from that all the business’s expenses that are related to revenue. Visit here Irs tax form
We are providing Payroll tax,Irs tax form,Profit and loss Statement,Sba loan,Paystub,Balance sheet,Financial statement,Sba ppp which is calculated by totaling all of a business’s revenue sources and subtracting from that all the business’s expenses that are related to revenue. Visit here Irs tax form
“I just want to say that your article is just as great. The clarity of your message is simple
excellent and I can assume that you are an expert on this matter.
God gave you a gift of 86,400 seconds to day. Have you used one to say, ‘thank you’
Kutools for Excel Crack
Private Equity to investment banking Fund (HTGC), a business development company focused on investing. Venture lending offers investors the opportunity to invest in a wide variety of startups in private equity vs investment banking.
We are providing Payroll tax,Irs tax form,Profit and loss Statement,Sba loan,Paystub,Balance sheet,Financial statement,Sba ppp which is calculated by totaling all of a business’s revenue sources and subtracting from that all the business’s expenses that are related to revenue. Visit here Profit and loss Statement
Roti maker is also known as chapatti machine that makes the task of making roti easier.
visit: https://radiv.in/roti-maker-in-india/
Our Mailer Box and Shipping Box cardboard products boxes are safe to mail, whilst our Product Box applications are meant for the show (or to be placed within a delivery-secure box while sent out for transport).
Thanks for sharing such a great piece of article. Keep sharing.
Limo Toronto offer a great experience with their luxury limousine in Toronto. They offer a wedding limo, Pearson airport limo Toronto.
This info is very good its really very very informative great stuff post I appreciate your work..
“I just want to say that your article is just as great. The clarity of your message is simple
excellent and I can assume that you are an expert on this matter.
Thank you for sharing great information with us. Your contribution is very unique and all information is reliable for new readers. Keep up the good work in the future, thank you for sharing this useful post.guided tours in israel
Thank you for sharing great information with us. Your contribution is very unique and all information is reliable for new readers. Keep up the good work in the future, thank you for sharing this useful post.Transportation services in Israel
This software is easy to use. We can download through this software.Netflix
I really like this application. It works in a very easy way. No need to pay for these features on another application. Download Now
This software is used for drawing.I like their features.https://hdlicense.net/indiafont-crack/
thanks for sharing this amazing information
Thank you for this amazing blog.The Article which you have shared is very informative..
Imperial Money is a dedicated company that provides personalized services for wealth creation. It is an all-around choice to go for to induce your monetary assets at ease with multiple innovative prospects that add more value to your profile. The services and ideas include innovative products, best-in-class experience, mutual funds, and equities.Imperial Money
A virtual private network providing Express VPN Crack allows you to connect reliably from anywhere. Network of this VPN providing as well highest-speed servers across 94 different countries in your control.
Thanks for sharing. Keep it up
Windows 10 ISO Tool With Crack
Great article, lots of information to read. no longer update thanks
Imperial Money is a mutual fund company in India that helps you to create wealth from your income.
I’m a Data Analyst and passionate about data, Love to convert raw numbers into eye-catchy and insightful visuals using different Data Visualization tools to Analyze Data. Working on Sunburst chart Excel and Google Sheet to analyze my marketing data
This article is so beautiful. The way you represented the information, it is awesome. This product seems so nice. Thanks for sharing it with us.
https://pcappcrack.com/driverfix-crack-key-download/
This free webinar discusses the main issues and top objectives for best HR Leaders 2022, as well as the most recent insights, best practises, and suggested actions for HR leaders as the new year unfolds.
At the Inner Harmony Centers for Well-Being, Dr. Amato is committed to assessing and addressing the nutritional, physical, emotional, and spiritual needs of patients. Here you will find a whole-person, relationship-based model of care that uses a multi-disciplinary approach, effectively combining conventional western practices with alternative and holistic therapies. for more details Visit here https://www.innerharmonywellness.com/
It is really informative. This article is extremely helpful. Thanks for sharing. You Can free download it: https://freesoftwareapps.com/hide-all-ip-crack/
Very informative article thanks for sharing please keep it up because there is no limit to information. You can also download from here: https://freesoftwareapps.com/hide-all-ip-crack/
Excellent
bery help full dpmatka.net
Fish and Meat Buy Fresh Buy Smart VIEW PRICES Choose to stay healthy. Buy Fresh Buy Smart start shopping LET US HELP YOU FIND PRODUCT Find plenty of fresh produce for everyday.
Superb blog. https://www.imperialfin.com/
a fantastic article Thank you for sharing. Everyone seeking a software agency should read this post.
Brisk logic is a Mohali-based software design, app development, and web design firm.software development agency
What’s the first thing you think about when you hear the words “buying weed pens”? Probably “green rush”—the insane need millions of Americans have to own just one more “green” product. Buying marijuana pens can get you into hot water, even if you only use them to write your name.
Wow! This was a fantastic post; I enjoyed it immensely! I’d want to express my gratitude for the time and effort you put into creating this website. Best of success in the future!
https://crackleft.com/dgflick-album-xpress-pro-13/ visit this site
Parcel Tracking – All in One Courier Packet Tracking Tool | Track USPS -UPS – Fed Ex – DHL – DTDC – YRC – China Post – Yanwen – Blue Dart
Vidalista comes in the myriad of volumes and Vidalista 60 Mg is one of its potent kinds which treat erectile dysfunction (ED) in men with ease. The persuasive chemical— Tadalafil persuades the penis for erection by dilating the penile arteries at one go.
Hello,
Your Site is very nice, and it’s very helping us this post is unique and interesting, thank you for sharing this awesome information. and visit our blog site also.. Keep it up
City Car Driving Crack
I appreciate you sharing this excellent knowledge with all of us. The more you produce, the better. Awe-inspiring clips. A fantastic effort.
I was looking for this information from enough time and now I reached your website it’s really good content.
Thanks for writing such a nice content for us.
2021/11/19/fonepaw-android-data-recovery-crack
a href=”https://publicrack.com/Logger-Pro-crack/”>Logger Pro 2022 crack
Thank you for sharing this useful content. Cropaa is one of India’s best shopping companies, offering a large range of women’s clothes such as T-shirts, Palazzo, Pants, Shorts, Gym T-shirts, and Yoga T-shirts, among other things. It offers one-on-one service for all types of good Online Shopping Women Clothing. Women’s clothing comes in a variety of styles. If a consumer wants to buy Online Shopping Women Clothing online, he can visit Cropaa’s website and quickly find the greatest clothes for women at reasonable prices.
thanks for this amazing article.
Wow ! Amazing
Your work is so good I like Your articles writing your writing is so clear I liked it you are a great writer. I appreciate your work.
Satta Disawar
Good sleep – Lower levels of stress mean better sleep, don’t they? Taking up meditation regularly, at least twice a day, is a natural home cure against chronic sleeplessness
for more details Visit here https://www.innerharmonywellness.com/
Netgear Orbi can be used to initiate the Orbilogin process. You can either enter the default gateway or the default IP address in the URL bar of your browser. If you are experiencing problems, make sure that your connection is stable. Also, clear cache, history, and cookies. Contact our tech support team for assistance or refer to the manual guide.
Thank you for this amazing blog i really loved it. Imperial Money
A restaurant owner may get a competitive advantage by building a brand and exploiting it to his benefit.
Visit: Restaurant Branding agency Bangalore
Overview Curriculum Reviews Instructor: milcom Duration: 2 days Categories: Featured Courses, Technical Security Courses, Telecommunication External This CCTV installation course is designed to provide you with the skills and knowledge required to install and commission Closed Circuit TV systems from the cameras to the image processors and recorders.
Once you’ve access to your account and logged in, your next task is to sign in and file your tax return. After that, it’s about declaring all your income and expenses and calculating the amount of tax you have to pay. This is easy to complete using the Calculator for Self-Assessment.
good one
CapCut is a favorite of millions across the world. It is best known for its versatility and reliability, and we can’t say otherwise. Capcut Video Editor is the app we all need, but can it be downloaded on a Windows PC? This is the question we attempt to answer here.
I appreciate your post thanks for the information. Some products require special packaging solutions that keep their worth and value intact. Custom Dispenser Boxes are the best example of it.
Pawna Lake Camping is best place in, Pawana camping lonavala, Pawana lake camping, Camping near pawna lake, Pawna camping, Pawna Lake camp, Pawna Lake camping booking, pawna lake camping booking, pawana dam camping, lonavala camping pawna lake, Pavana lake camping, lake camping near pune, Pawna camp, pawna lake camping for family.
Pawna Lakeside camping
nicely described post .really impress with the details.custom boxes are really useful to handle and manage products and many goods for personal as well as professional uses i suggest you our All custom boxes for all products safety
nice work
Rhinoceros 2021 Crack With Updated Key For [Win + Mac] Free Download
I am overjoyed to have discovered this article. The writer has an extremely creative mind; life is all about creating yourself, not finding yourself. Kindly visit my page because my post includes useful information.Available Now
This is an excellent article. This gives me the opportunity to broaden my knowledge. Take every chance you get in life since anything can happen at any time. So, please come to my page and make use of the useful information.Click Now
If you are interested in Android Apps, PC Softwares and MAC Applications then you can visit our official websites for registered applications where you can download full free without paying any charges.
Nexus Crack
Thank you soo much for this such amazing blog. Step up Sip calculator is the best calculator which you’ll need if you are looking to increase your SIP.
nice post good informison Buy Duromine in UK
great post
https://gadgetcandy.pk/
Good day, there. The content is excellent. This programme is quite beneficial to me.https://hitlicense.net/tnod-user-password-finder-crack/
This is very useful content i found on your website. thanks for sharing such kind of information.
Because of the wonderful use of language, I thoroughly enjoyed reading it. https://cracksir.com/rewasd-crack/
The GoDonut phone accessory is a universal and portable stand designed to hold smartphones and many tablet brands. Check out our review why this is the only product you need for this purpose.
very useful content
Technology Write For Us at Tech Updates Pro gives an opportunity to contribute a guest post on Technology, Gadgets, Gadgets, Apps
Thank you for sharing this wonderful and informative content
Glary Utilities 5.181.0.210 Crack 2022 starts at Windows new venture & deletes an application. The consumer-helpful software exhibits clean and also special directions.
Glary Utilities Crack
That was very valuable information
https://www.learnhere365days.com/2022/03/present-indefinite-tense-in-urdu.html
https://www.learnhere365days.com/2022/03/future-indefinite-tense-in-urdu.html
Future indefinite tense in urdu
thanks it much important imfor
https://www.learnhere365days.com/2022/03/future-indefinite-tense-in-urdu.html
So beautiful
Very nice and informative blog….
Thanks for sharing…… burp suite crack windows
Phontinent Technologies is the best IT Company in USA that offers Mobile App Development, Web Development & Web Design Services available at affordable prices.
Vidalista 20 (Tadalafil Tablets) is the best cure for Erectile dysfunction. Buy Generic Tadalafil Tablets at Medswin visit now.
nice post .family make a life more beautiful and these beautiful memories should be chaptured in camera by professional photographers like photographer berlin .they are specilatist for day care,nursery and berlin photography and many other
MILCOM is a Registered Telecom Training Organization in Australia, gaining practical experience in the delivery of wide scope of Skilled Telecommunications Courses, Telecommunications Traineeship’s & Certifications in the states of VIC, QLD, NSW, WA, etc.
Really great post! It’s helpful for me. What is your Vlog links?
promo code
Paknance is Pakistan’s 1st NFT Marketplace. Paknance aims to fuel the rise of a digital Pakistan, by providing Pakistani artist the ability to sell their art work to worldwide buyers of original and authentic content.
Paknance
This is an amazing website, I really enjoyed your articles. Do you know about the Turkey on arrival visa ? The Turkey on arrival visa has been made available to facilitate the process of obtaining entry permits to Turkey for citizens of some countries.
Thanks for sharing these monster fleece lovey blankets craft, amazing one
Real estate brokers by AZCO Real Estate Manages Exclusive Premium Properties For Buying, Selling, Renting & Inhouse Mortgage Services Across The United Arab Emirates.
Real estate companies in dubai Manages Exclusive Premium Properties For Buying, Selling, Renting & Inhouse Mortgage Services Across The United Arab Emirates.
We are top-notch Gunmetal bush manufacturers in Meerut that provide Gunmetal Bushings/Submersible Bushings, typically fixed or removable cylindrical metal liners used to restrict, guide, or degrade friction. These are totally corrosion free and have supreme tensile strength. We take quotes for custom shapes and sizes. Shrubs are thoroughly tested on various international quality standards under the supervision of qualified and experienced professionals. Our bushings have a fantastic surface finish and are easy to install.
AZCO Real Estate Manages Exclusive Premium Properties For Buying, Selling, houses for sale in dubai Renting & Inhouse Mortgage Services Across The United Arab Emirates.
Hello, Dear Thanks for sharing such great content with the US it’s really amazing content so please keep sharing. I also have something for you so please check out
HowToCrack Cracked Software
AZCO Real Estate Manages Exclusive Premium Properties For Buying, Selling, buy apartment in dubai Renting & Inhouse Mortgage Services Across The United Arab Emirates.
Real estate brokers by AZCO Real Estate Manages Exclusive Premium Properties For Buying, Selling, Renting & Inhouse Mortgage Services Across The United Arab Emirates.
I will have my baby by next year. Awesome I’m waiting and excited. Watching movies now
This is very useful content i found on your website. thanks for sharing such kind of information.
These true education quotes will inspire you. True education is when every student is given equal education, regardless of their status.
A collection of true education quotes, true education sayings, and true education proverbs to inspire, cheer, and encourage.
nice post. amazing
This Post content is nice. I admire your hard work. It is helpful for everyone. It is great!
https://crackgive.com/stellar-data-recovery-crack/
I came here looking for advice and also discovered a platform that can help me do it too. Thanks
iMovie Crack
I appreciate your hard work and you have the more information…
Yamicsoft Windows crack
very interesting post to see .Schulfotos Berlin is best photographic service provider at berlin .they are special in nursery ,daycare photography portfolio and many other photography with expert skills
Wow, what an incredible block structure.
twixtor-pro
Great concept and great effect, This was a really good experience,
I’m going to get straight to the point, THE software was great.https://xactivator.net/redshift-render-download/
Get accurate steps regarding Rand McNally tnd 740 update, straight from your experts. We are a leading destination to seek any possible doubt regarding Rand McNally GPS. Visit our website right now or feel free to call our experts to know more!
FIFA 22 Crack is an excellent football game series that offers a legendary experience of the emotions and skills of football players. The latest version of the launch with a brand new attack system, tricks, and style to truly test physical players.
FIFA 22 Crack
I came here looking for advice and also discovered a platform that can help me do it too. Thanks
UMT Dongle Crack
FL Studio Crack is a full solution of multimedia. It is also known as fruity flavor software. FL is one of the great and famous software for video editing. It offers you to the cardinal auditory workplace and much more effective functions. fl studio crack
If you are interested in Android Apps, PC Softwares and MAC Applications then you can visit our official websites for registered applications where you can download full free without paying any charges.
Nexus Crack
I came here looking for advice and also discovered a platform that can help me do it too. Thanks
MIRACLE FRP TOOL Crack
Thanks for sharing such an amazing blog with us it was very useful and informative,,,, proxifier registration key mac
Kan Universal is one of the top LED video wall manufacturers in India offering LED display screen for advertising, LED light module and digital signage screens.
I appreciate your hard work and urge you more information.
O Diskimage Crack
Once you have the correct URL disneyplus.com login/begin url, you’ll need to log into the Disney+ service. If the error message is “error 83” or “failed to login”, you can try the following fixes.
If Meshforce is causing you problems, you can reset it. Hold the reset button down for about 10-15 seconds. Verify that your device is connected to an outlet. Any changes in the light should be monitored. If you notice any changes in light, the device could have reset. You can reconfigure your device using the online wizard. If you have any questions regarding the configuration, please contact our experts.
One way to activate your Wavlink WiFi extender is by pressing the WPS button. Place the WPS button on the router that hosts the device by pressing the WPS button. Next, press the WPS button on your extender. The signal LED will turn solid blue. This means that the WPS connection has been established successfully. For any further questions, please don’t hesitate to contact our tech support team.
Rana Pratap Singh is the KBC lottery manager of KBC (Kaun Banega Crorepati) to participate in KBC please contact KBC lottery manager +19188444474
Your efforts are admirable, and I thank you for them. Thank you for sharing this information.https://hdlicense.net/apoweredit-crack/
if you want a better shopping experience you must visit gadetcandy.pk
this is very amazing content
Family Tree Maker Software Download
The extremely popular ancestry tool, Family Tree Maker accessible for Windows and Mac to connects people with database to permitting them to monitor the data of their family tree while they want to know about family blood line. By Family Tree Maker Software they can efficiently pile up the data as reports, diagrams, books and more information. https://familytreemakeronline.com
Fantastic job. keep it up more.
Visual Assist Crack
Very good job. I impressed.
https://2022crack.com/flvto-youtube-downloader-crack/
Nice post!! know more about smart iotty devices for samrt Home
https://techfixya.com/iotty-smart-switch/
This was very helpful and informative.
Mahacrack
There is no limit to how much one can share information, so keep up the good work. Keep up the good work!https://truevst.com/audio-ease-altiverb-xl-crack/
Instead of spending hours searching for the top crypto eCommerce, or trying to develop something yourself You can opt for an eCommerce plugin to begin accepting cryptocurrency in your online store from the moment you sign up.
Hey dear, I have read your post that you have also discussed here, I appreciate your hard work and urge you more information.
Coreldraw Crack
Nitro Pro is perhaps the best-known PDF editor that provides all one solution to handling PDF files. the appliance has every possible tool that’s required for editing the PDF files. So, you’ll be ready to make, edit, secure, and arrange all the digital documents […]
Many people still come to Wedderburn in search of the yellow metal and there is still plenty found today. wedderburn to bendigo
must read this post
https://morecrack.com/
I wanted to construct a comment so as to say thanks to you for these stunning suggestions you are sharing on this website. My considerable internet research has finally been compensated with beneficial ideas to share with my relatives
Hello, guys welcome to my Bio I am Radhika Sharma & I am living in Udaipur (City in India). I like Udaipur City and Udaipur people. My age is 21 years old. My Hobbies Dancing and Modelling. And I like to add new friends. Like young boys and Girls. https://agraescortagency.com/
If You’re Looking for Models in Your City? Hiremyescort.com – Free Adult classifieds in India, Browse in our category To Post Ads, Book and Find Contact No For Hire. https://www.hiremyescort.com/
I have been looking for this information for quite some time. Will look around your website.
https://apsaraofindia.com/
Genuine First You See After Pay Amount Complete Enjoyment with Hi Profile Babes. Visit Our Website:- https://www.mayaescort.in/
Your Content is Very High Demanding in World. Amazing Post Thank You Website owner http://mexygarewal.in
Any Type of Fun You Want Like Casino’s Bars, Clubs and Discos We Will Provide Everything for Best Clients. https://bit.ly/3obIPOU
Genuine First You See After Pay Amount With Complete Enjoyment With Hi Profile Babes. https://bit.ly/3E9eiqM
Unlucky are those who don’t have anyone with them with whom they can spend quality intimate moments to get satisfaction of mind, body and soul. https://bit.ly/37JqVwK
Besides understanding your feelings, it is really important for you to spend some quality physical intimacy with her. It not only satisfies you but she also feels the same. https://bit.ly/3EbHIEx
Fullfill Your Requirements Body Massage, Clubbing, Drinking and Dancing Also Available For Best Clients in Udaipur. https://bit.ly/3zNwfau
thanks for sharing such great content with us please sharing such informative post with us
weight loss tips in tamil
how to make black coffee for weight loss in tamil
Ashampoo Winoptimizer With Crack For Mac introduces new features that allow you to customize privacy in addition to Windows TEN privacy settings.
at this website
When you are creating burger box, you can choose from a variety of finishes. You can use a glossy finish, or a matte finish. The former is better for food-related products, while the latter is better for a more luxurious appearance. For a deluxe look, go with a matte-finish. You can choose from a wide range of colors for your <a
This website is quite wonderful, and it is very helpful to us.
Visit Here
Hello, Dear Thanks for sharing such great content with the US it’s really amazing content so please keep sharing. I also have something for you so please check out
Prism Plus Ios MacOS Torrent Downlaod
This is so adorable, my niece is having a baby in August and I have to make her some! Thanks for sharing your fun project with all of us!
Server IP Address Could not be Found Android
Download the Latest Version Of Camtasia Studio Key is a powerful screencasting application that lets you record what’s happening on your PC, then export it to a polished presentation that you can share. There are also two key parts to it.
at this crack
Commview For Wifi Full Version With Crack Download is a powerful social networking utility created for taking & examining box information on Wi-Fi systems. There may be a way to observe the network of neighbourhood cable connections, IP data, and even specific packets. The key is encrypted and decrypted by utilizing a consumer-identified WEP or WPA key before being translated right down to the base layer.
worldforcrack.com
Commview For Wifi Full Version With Crack Download is a powerful social networking utility created for taking & examining box information on Wi-Fi systems. There may be a way to observe the network of neighbourhood cable connections, IP data, and even specific packets. The key is encrypted and decrypted by utilizing a consumer-identified WEP or WPA key before being translated right down to the base layer.
commonview for wifi /a>
Download Latest Corel VideoStudio Pro x8 Serial Number includes more than 150 effects and transitions to improve your video quality. Users can use its easy-to-use video editing tools, whether they are beginners or professionals. It enhances both the video and sound quality of low-quality videos recorded with low-resolution cameras.
Corel Videostudio X8 Crack
Adobe Acrobat X Crack With Full Version is one of the best software that you can use to edit and modify PDF documents and provides a great way to navigate large documents. This application is a standard program for the professional use of PDF files. With just a few mouse clicks, you can create PDF files from documents, images, and many other types of files that can be opened with a PDF reader.
https://cracking-files.com/adobe-acrobat-x-crack/
Autodesk 3DS Max 2014 Full Keygen meets all your needs in 3D modelling creation, 3D animation and game development, visual effects and rendering for professionals. Design Autodesk 3ds Max has dozens of other features to help you create stunning 3D models without splitting your hair.
3dmax 2014 Full Crack
Go through the following selection to pick up the best layer 3 switch matching your requirements. Layer 3 Switch
we at Mobo Cruiser have developed and perfected the 3-wheel bike to make it fun for adults and kids! We strive to continue to bring new bikes for the youngest in the family to the oldest
Accept my gratitude for the dedicated work you do Thank you
Adobe Lightroom CC 2019 Free Download is a compelling application that can be used to manage and edit raw images. Lastly, you can view the image histogram and trim the unwanted parts. So this is an end-to-end alternative for digital photography enthusiasts as well as photographers.
at this website
Download Vector Magic Desktop Crack has several new and exciting features. Also, it has a user-friendly interface and many great features. Also, it works wonders for you with practical and new strategies. So you have to move your image and that’s it. Vector Magic Keygen gives you the option to copy bitmap content to the clipboard. Similarly, you can paste it into the workspace app.
at this website
Adobe Illustrator CS3 Free Download With Crack is a powerful Software that includes many new and exciting features that help the creative process of all professional graphic designers. You can download Adobe Illustrator CS3 for free for both 32-bit and 64-bit operating systems.
at this website
thses are amazing blanket forms of verb 1st 2nd and 3rd
La température baisse, ceux qui portent encore des shorts en octobre commencent à enfiler leurs jeans et les airs de Noël commencent à résonner tôt dans l’air. La saison des tenues de Noël peu flatteuses est arrivée !
Aapki website bahut acchi hai. apne isme jo bhi jankari di h wo bahut valuable hai. Thank you so much.
Amazing article, thanks for the information you’ve provided.
One of the best product and eCommerce photo editing service provider companies in the world
https://fixthepix.com/product-photo-editing-service/
FixthePix.com is an online-based photo editing studio with more than 100 Photoshop professionals. We provide high-quality image-editing services and help you to achieve your goal. We specialize in high-quality Image editing services, hand-drawn clipping paths, advanced Photoshop masks, shadow effects, photo retouching, color correction, image manipulation/ghost mannequin, and other Photoshop services. Our expert team and work strategy are so much efficient that’s why we’re able to offer competitive pricing without sacrificing quality in our work. Fix The Photo with us. We Fix The Photo that you like.
Our high-quality production and on-time delivery make our customers happy to work with us for a long time. They are not come to us by compulsion, They trust us when they have a large project, tight deadlines, and any other image-editing needs. Whether they have thousands of images, we can deliver their edited images back within 24-48 hours!
Excellent! So far, this is the best resource we’ve found for learning more about the subject. Thank you so much. I appreciate the work you’ve done on this subject.
https://programsasvirtualespc.net
Thanks for this amazing info. amazing article.
Water Purifier Dealers – Are You Looking for Water Purifier Dealers in Hyderabad? Get best commercial and residential Water purifiers at Aqua Water Solutions. We supply water purifiers dealers in Hyderabad at most reasonable prices.
https://sexincesthot.com/
nice information
Hindu Baby Name – Hindu baby names based on birth star and planets for Hindu baby boys & girls. Name Vibtations provided here are different from English, Hindu origin and can be used for astrology purpose only.
Home Renovations Melbourne – Bullseye Home Renovations Melbourne specialises in home extensions, kitchen renovations and bathroom renovations to meet your unique needs and lifestyle.
Interieurinrichting in uw woning is erg belangrijk. U voelt bijvoorbeeld geen ruimte of licht door een verkeerde plaatsing van uw meubelen. Houd dus rekening met de indeling van al uw decoratie.
Thank you for this wonderful post, great article, keep up the excellent work. Check out our blog Best DU LLB Coaching in Delhi
nice blog admin keep it up and make good things
This is very impressive and well explained article.
We are one of the best dental hospitals in Nagole, offering state-of-the-art dental treatments for both children and adults. We pride ourselves on our affordable rates and quality dental work.
Very Nice… i really like your Post…
Chess Coach Online 1-1 lessons | Experienced Chess Instructor | Learn How to Play Chess. Learn Key Chess Strategies & Techniques. Learn incredible openings. Master your strategy. Let an Experienced Instructor Help You Improve Your Chess Skills. Visit Today:- https://www.chessclass24x7.com/
iZotope RX 9 Audio Editor Advanced is a robust audio restoration application that includes a variety of strong tools for fixing a wide range of audio issues. It’s a professional setting with a complicated solution that offers accurate results and excellent sound quality. This powerful application comes with a comprehensive range of tools for cleaning up your computer’s flaws.
iZotope RX 9 Audio Editor crack download
Zoner Photo Studio is a straightforward image manager and editor. This is a good option if you’re searching for a quick way to modify contrast, erase red-eye, and so on. The Manager and the Editor are the three primary components of Zoner Photo Studio.
download this software
FoneLab Screen Recorder Free Download can enable you to record movies, calls, tutorials, TV episodes, songs, take screenshots, and more. There are a variety of items on your computer that you would like to capture and subsequently share with friends or preserve on a computer or hard drive.
download with full version
Disk Sorter Ultimate Free Download for pc is a document type answer permitting one to categorize documents in local disks, community shares, NAS devices, and employer garage systems. Users are supplied with the cap potential to advantage in-intensity visibility into which forms of documents are the usage of the maximum of the disk area, shop reviews, and lift out file operations on classes of documents.
Disk Sorter Ultimate with keygen
Macsome Spotify Downloader Free Download for Windows is in particular designed for Spotify customers to assist them in loading Spotify tracks, consisting of Spotify unmarried tracks, playlists, complete albums, and Podcasts on PC.
download this software for free
Puppies for Sale in Hyderabad – We have the best puppies for sale in Hyderabad. So, if you are looking for a puppy for sale or a dog for sell in hyderabad, you must visit our site pawspetboarding.com
Dental Hospitals in Nagole – We are one of the best dental hospitals in Nagole, offering state-of-the-art dental treatments for both children and adults. We pride ourselves on our affordable rates and quality dental work.
MiniTool Power Data Recovery Free Download is a powerful data recovery tool that ensures the recovery of your data lost due to many reasons. For instance, this application recovers files lost by virus attacks, system crashes, human errors, and more. MiniTool Power Data Recovery Crack also allows you to recover lost and deleted data from external drives, internal drives, and removable drives.
https://freesoftpc.com/minitool-power-data-recovery-crack/
I appreciate your hard work and urge you more information.
Bitwig Studio Crack Latest
Hi Im Aliza Nakvi
SketchUp Pro Crack 2022 Free Download
Excellent! So far, this is the best resource we’ve found for learning more about the subject. Thank you so much. I appreciate your hard work and urge you more information. Check out our blog SEO Marketing Strategies
I appreciate your hard work and urge you more information. Visit our site and post some thing.
The best Novel. Read more at novelette4u
You have seen that many ladies have to go along to get pretty eyes, like using eyeliner, Eyelash Extensions Arizona, and contact lenses. These solutions make you attractive.
AutoCAD’s free download for college students makes it a fantastically flexible tool. Users can draft up 2D and three-D fashions with solids, surfaces, and mesh objects, at the same time as a grand choice of add-on apps and APIs, making it customizable.
AutoCAD’s full version
DRmare Audio Converter audio to audio converter specialized in eliminating encryption from Apple Music M4P songs, Audible AA/AAX audiobooks, iTunes songs whilst changing the blanketed audios to MP3, FLAC, and different codecs for any tool.
DRmare Audio Converter license key
AquaSoft Stages Free Download can suprise your target visitors with interesting motion pictures. Single factors of sound, images and video are transformed into cinematic experiences.AquaSoft Stages is specially made for customers who need to prepare their media as slideshows or shows. It is a completely dependable utility imparting a clean-to-use answer for growing shows and slideshows on the usage of media documents with minimal effort.
download for pc
GiliSoft USB Stick Encryption free download allows you to encrypt a USB flash force, a lot of these troubles may be dealt with with ease.GiliSoft USB Encryption is a complete, smooth-to-use answer for USB safety that helps encrypt transportable garage gadgets (outside force) and may divide the outside force into components after encryption of the stable vicinity and the general public vicinity.
download with full version
I just wanna say thank you for sharing the content and wish you all the best for your website and your whole team. And if you need Lawyers in UAE then Mena-Legal is the right option for you.
I just wanna say thank you for sharing the content and wish you all the best for your website and your whole team. And if you need Online Abaya For Women then Elanarabia is the right option for you.
I just wanna say thank you for sharing the content and wish you all the best for your website and your whole team. And if you need Custom web development then Global Advertising is the right option for you.
It has wonderful and helpful posts. Keep up the good work!
https://crackguru.net/youtube-by-click-premium-crack/
I appreciate your hard work and urge you more information.
Fortnite Crack Download
great for that.
I really like your post article. keep it up.
If you are interested in Android Apps, PC Software and MAC Applications then you can visit our official websites for registered applications that you can download full free without paying any charges.
Nexus Crack
If you are interested in starting a Twitch channel, or just want to watch other people play games, then you will need to twitch tv activate code on your device. In this article, we will provide a step-by-step guide on how to do that.
GUM LIGHTENING SERVICE – While gum pigmentation is not medically dangerous, many patients feel that the condition is aesthetically displeasing Gum depigmentation can help to make healthy and shiny gums. You achieve a healthy-looking smile with healthy gums. So come to our website and follows our rule.
Such a nice post
WONDERSHARE FILMORA CRACK
Thank You
You Can Also Get Cracked Software For Windows & Mac Free Download
https://up2cracks.com/itools-pro-crack/
nice
great
The Cash App Card can be loaded with any amount of money, and you can use it to withdraw cash from ATMs. In itheed website, will show you how to add money to Cash App Card.
Download Latest Cracked Software For Windows & Mac Free 2022
https://crackenow.com/aiseesoft-screen-recorder-crack
Online courses in Ludhiana
Bridgewater On Loddon is an urban geographic area within the Loddon local government area in Victoria. It is approximately 162 kilometers from Melbourne and covers a total area of 2.462 square kilometers.
BackLinkMenu.com is the Largest Online Database of Free Link Building Sites List for off page SEO Here you can get all kinds of link building sites with High DA and PA. If you are finding an all in one source of free link building websites then visit our website because every webmaster finding these kinds of link building sites list for making quality backlinks and improve domain authority, quality traffic, and build online strong relationships between websites.
Best website To Download Cracks For Windows And Android.
https://cracking-files.com/
You Can Also Get Cracked Software For Windows & Mac Free Download
https://miancrack.com/idea-statica-crack/
Today we have various modes to entertain ourselves. Some people are interested in playing games while other are interested in listening to music and watch movies and serials. Science made everything easy for us to get access with a single click…
Rooter Mod Apk
If you are interested in Android Apps, PC Softwares and MAC Applications then you can visit our official websites for registered applications where you can download full free without paying any charges.
Nexus Crack
Love these monster fleece lovey blankets, super excited to try this craft. These blankets are so amazing and unique, thanks for sharing with us .
Such a nice post
SysTools Pen Drive Recovery Crack
fl studio crack provides a quite simple and user-friendly integrated development environment (IDE) to work. This complete music workstation is developed by the Belgian company Image-Line. Its innovative ideas assist both beginners and professionals to compose, arrange, record, edit, and mix music. fl studio crack
WinZip Pro Crack is a very useful tool for compressed files. WinZip users can select multiple files for compression and choose between different file types, such as ZIP, TAR.GZ, CAB, BH, LHA/LZH, 7- Zip, and more. You can also protect your compressed files with password protection.winzip pro crack
This website provides all the latest news and latest updates on crypto exchanges like coinbase exchange, kraken exchange, coinmama exchange, coinbase review. This website provides accurate information all over the world.
Hello, Dear Thanks for sharing such great content with the US it’s really amazing content so please keep sharing. I also have something for you so please check out
Color UI
It’s great to have you here. I really like the colours and theme.
Is this your website? I’d like to start working on my project as soon as possible.
If you don’t mind, I was curious to know where you got this or what theme you’re using.
Thank you.
Color UI Cracked Software
Nice writeup, very informative content. The trending educational startups are willing to provide online learning that is cost effective also. Get in touch with VideoCrypt to know more about learning app development.
Great blog, and very useful information. Thanks for sharing. marketing blogs
Nice Work and Beautiful DesignRmcpressnews
Magellan roadmate Updates
Some popular Gps devices like- Magellan devices like magellan maestro 3200,magellan roadmate 1440,magellan maestro 4040, magellan roadmate 5235t-lm,magellan roadmate 1700,magellan roadmate 1470, and other old and newer models. We’ll help you to get easy maps, software / Firmware updates.
Are you planning a trip or going out and wondering if you could have the latest maps to make your trip or your work. Well, you’re a step away from the latest map updates. Latest map updates make sure that you always reach your destination on time with full-proof accuracy.
Hey, thank you so much for this post. my personal spouse and i located that by simply possibility, nevertheless it certainly wound up getting just what the spouse so I needed. I’ll return later as a way to find out a lot more. Appreciate it.Babcock University School Fees
Continue to do wonderful things and spread the word. It appeals to me. regards
https://fullkeygens.com/bartender-crack-keygen/
Might you have to pick your own boat and evade the world to battle innumerable different foes? Tolerating you truly need it, research the Battle Bay mod apk. It is an attracting and fortifying game, esteemed by youngsters and trusted to use for diversion.
While playing this game, you will get tasks reliably, and you want to complete them in the best way. The errands are different little challenges; won’t make it hard for the player; they will quickly and effectively handle all such work. Moreover, you can in like manner partake in significant distance race competitions so you can maintain on giving many benefits to your accomplices. Besides, players have quickly vanquished various astonishing achievements to get solid things, and they are significant pearls.https://landofapk.com/battle-bay-mod-apk/#more-246
Antalya’nın 1 numaralı sitesine sen de gel.
Antalya’nın 1 numaralı sitesine sen de gel.
I like your blog very much. I will share it with my friends. If you need a free PC software download link Stardock WindowBlinds Crack
Omega Full Potential is the best health and wellness company that offers a wide variety of steroids, health and wellness products, and supplements online for people who desire to retain vigour and strength. The bodybuilders get their preferred supplements and steroid products at reasonable prices.
https://omegafullpotential.ca/
Car Rental and Transportation Services in Mali
You get the best car rental and heavy machinery transport services in Mali at reasonable rates from Faso Logistics We deliver what we claim
https://www.fasologistics.com/
amazing information very nice
find the cheap call girl in Jaipur mobile phone number, and you can create a better call girlfriend relationship with the help of these girls mobile phone numbers.
i like your blog .Omega Full Potential is the best health and wellness company that offers a wide variety of steroids, health and wellness products, and supplements online for people who desire to retain vigour and strength.
#1 Web Development Company in Noida!
i like your blog We offer the most advanced and effective medical treatments available today for Body, Skin and Hair care needs. We are a full service general dermatology.
wow, it’s so Amazing ,
FASO LOGISTICS IS YOUR RELIABLE BUSINESS PARTNER FOR CHEAP CAR RENTAL AND TRANSPORTATION SERVICES IN MALI
i like your blog.Junk Car Removal Mississauga is your local Junk car buying service which is licensed and owns their own tow trucks and offers you a proof of transaction on the spot
very informative
https://www.secretbizz.com/the-best-guide-to-buying-briggs-and-riley-luggage-in-florida/
Just the website I was looking for. It’s really awesome. I’ll follow your footsteps
and if you want to watch Indian dramas online free episodes daily then visit the link below.
Bigg Boss 16 Watch Online
To begin with the Meshforce M3 setup process, connect your computer and the router using the cable. Now, open any compatible browser and input the default IP address and press enter. The login window will appear in no time. Fill in the default login credentials here and hit the login button. You will be directed to the control panel where you can start the setup process using the setup wizard. Know more about the process by calling our experts now.
Thank you for sharing the informative article. This is really awesome. See you in the next amazing piece of article.
As an example, a small thrift shop business owner with one cash register might be a good candidate for an on-premise point of sale system. The retailer will purchase, install, and host the software on their own computer system and update it as necessary. Visit to learn about POS system.
I wanted to express my gratitude for this fantastic read!! I thoroughly enjoyed every minute of it. I’ve bookmarked you so I can come back and see what you’ve been up to… https://windowsactivators.org/adguard-premium-keys/
Top Lassi Franchise In India – Looking to start a business in the food industry? Lassi franchise in India provides you cost, investment and return on investment.
It is reported that every business invests approximately 70% of its operating costs in human resource management. This portion of their budget is spent on employee wages, welfare, related tax, and so on. For that reason, many business owners want to adopt a technology innovation to cut down labor costs. POS software
I appreciate your hard work and urge you more information.
3dmark Crack Latest Version
Visit here
Latest Software Crack Download
Full Version Cracked Software Download
Crack Full New Version Free Download Here
Here You Can Download New Crack Software Download Full Free Of Cost.
Get Latest premium Software Here.
Crack Software Download Free 100% Working Keys & Crack.
Get Latest premium Software Here Free
Crack Software Download Free 100% Working Keys And Crack.
interesting post dear admin
Our Company Need Helper for our office Located Near Regal Chowk Karachi. Interested Candidates Send CV on Given Below Number
Experience: Fresh
Qualification: Matric/Intermediate
Loading & Unloading of Goods
Clear Communication
Job Timing: 9:30am to 7:30pm
Full Time Job
Contact Number (Given Below)
03482242821
Macsome Spotify Downloader Free Download for Windows is in particular designed for Spotify customers to assist them in loading Spotify tracks, consisting of Spotify unmarried tracks, playlists, complete albums, and Podcasts on PC. Besides, you may additionally burn Spotify tracks to a CD and add Spotify to OneDrive.
Macsome Spotify Downloader for pc
iZotope RX 9 Audio Editor Advanced is a robust audio restoration application that includes a variety of strong tools for fixing a wide range of audio issues. It’s a professional setting with a complicated solution that offers accurate results and excellent sound quality.
iZotope RX 9 Audio Editor
Crack
Disk Sorter Ultimate Free Download for pc is a document type answer permitting one to categorize documents in local disks, community shares, NAS devices, and employer garage systems. Users are supplied with the cap potential to advantage in-intensity visibility into which forms of documents are the usage of the maximum of the disk area, shop reviews, and lift out file operations on classes of documents.
Disk Sorter Ultimate crack
FoneLab Screen Recorder Free Download can enable you to record movies, calls, tutorials, TV episodes, songs, take screenshots, and more. There are a variety of items on your computer that you would like to capture and subsequently share with friends or preserve on a computer or hard drive.
https://upintopc.com/fonelab-screen-recorder-free-download/
Zoner Photo Studio is a straightforward image manager and editor. This is a good option if you’re searching for a quick way to modify contrast, erase red-eye, and so on. The Manager and the Editor are the three primary components of Zoner Photo Studio.
Zoner Photo Studio serail Key
Microsoft Office 2022 Crack is the most recent edition of the MS Office suite. It is the most appealing software used in companies, homes, and businesses. Microsoft Office was published for the first time in 1983. Many other work systems are covered, such as Apple, IBM, and others. At the very least, Microsoft makes an effort to overcome hurdles.
Microsoft Office 2022 Crack
Tenorshare 4uKey Crack is a full-featured password unlocker for iPhone and Android devices, including the iPhone 13 Pro Max. In minutes, you can unlock the iPhone screen and MDM with this application.
Tenorshare 4uKey Crack
AVG Antivirus Crack is antivirus software that provides a virus-free PC. Malware, trojans, spyware, and spamming content are all eliminated via the primary security mechanism. Furthermore, the application includes many important characteristics that prohibit access to harmful websites.
AVG Antivirus Crack
Wondershare Recoverit Crack is a professional tool for recovering data from hard discs that have been destroyed.
Wondershare Recoverit Crack
AutoCAD 2018 Crack is a powerful CAD (computer-aided design) and commercial drawing program that allows you to create 2D and 3D drawings in nearly any shape. Increase the speed of documentation, perfect the sharing of ideas, and study ideas in 3D in a more natural way.
AutoCAD 2018 Crack
Typing Master Pro Crack comes with a wealth of study materials. They have everything a person needs to develop their typing skills. It’s a gift for folks who are getting ready for a job interview. Each computer user must be proficient at typing.
Typing Master Pro Crack
Foxit PhantomPDF Crack is a powerful application that provides customers with a low-cost, rapid, secure, and linked PDF FILE solution.
Foxit PhantomPDF Crack
Welcome to TV3 Online Drama, home of the Malay Dramas Our Tv1 Online dramas are the top Melayu drama video and will be providing an Astro Ria drama video episods!.
you are doing so well.
https://crackbye.com/magoshare-data-recovery-crack/
This is my first visit to your website, and I found your post helpful. Keep up the good job!
https://crackspick.com/balsamiq-mockups-crack-latest/
Get the Best scrap car removal in Toronto
Have Your Junk Car Evaluated Get Cash instantly for Junk Cars Toronto Scrap Car Removal is a top leading scrap Vehicles, metal and Junk car removal company In The Greater Toronto Area
Get free PC tools at my site! The link below provides the top free software websites.
https://windowsactivators.org/windows-10-product-key-generator/
Scrap vehicle in Canada
Have Your Junk Car Evaluated Get Cash instantly for Junk Cars Toronto Scrap Car Removal is a top leading scrap Vehicles, metal and Junk car removal company In The Greater Toronto Area
Best Auto Recycling Ontario
Find the Best Toronto Scrap Car Removal and Auto Wreckers in Canada We are a licensed auto recycler in Ontario We recycle vehicles from Toronto, Mississauga, Oakville, Brampton
Your blog is very supporting us. TeamViewer’s far-off association cloud stage
empowers secure distant admittance to any gadget, across stages, from anyplace, whenever.
TeamViewer interfaces PCs, cell phones, workers, IoT gadgets
https://macxpro.com/
Some of the information is truly interesting. Well written and helpful to users.
At willingston we provide you with an excellent shopping experience of shopping.For more details visit
Effort Elevator Tool
Stelaluxury is best site that is providing best massage product over the years
Thanks for sharing such an Amazing information, I Couldn’t leave without reading your blog.
Great Work Keep Shearing!
Nitro Pro
deneme bonusu, bonus veren siteler, bedava bonus, deneme bonusu veren siteler, bonus al, çevrimsiz bonus, bonus veren bahis siteleri
If you are looking for the best hair color brand in Pakistan so you must visit this link Best Hair Color Brands in Pakistan
Best online movie site sexy
https://www.sexmalt.com/
افلام سكس
Are you finding best valentine gift for you girlfriend? than this product is best choice enchanted sparkle rose
Viele Menschen empfinden insbesondere moderne und zeitgenössische Kunst als komplex und schwer zu verstehen. Georgia Vertes erklärt, wie man Kunst verstehenGeorgia Vertes
Are you finding best valentine gift for you girlfriend? than this product is best choice enchanted sparkly rose
Kunst will in die Wohnung perfekt integriert sein, um richtig zur Geltung zu kommen. InnenarchitektinGesa Vertes erklärt, was es dazu zu beachten gibt und
Holger SchäferHolger SchäferHolger SchäferHolger SchäferHolger Schäfer
A number of factors can contribute to black gum pigmentation including genetics, poor dental hygiene, and smoking. Although anyone can suffer from black gum pigmentation, people with darker skin tend to have a greater risk of gums experiencing melanin buildup. Certain medication also contributes to black gum pigmentation.
Are you finding best valentine gift for you girlfriend? than this product is best choice and make your day memorable
Enchanted sparkly rose
Hello Boys
If you want a duplicate lesco online bill without any issue so must visit this www lesco online bill
Thank you for the amazing blogging tips.
this kind of craft blogs are useful for everyone thanks for updating these kind of Best Persis Restaurant In Catonsville.
Suppose taste and the burger packaging are good. So it is a win situation for both the brand and customers. If it is not only an astonishing method to save the freshness of your all-time favorite burgers, but it is also a thought a brand attraction towards its customer
Another great way to advertise your custom burger boxesbusiness is to print a customized burger box. This type of packaging is usually made of kraft paper or cardboard and is customizable. Many companies use them for special events and to launch new products. They may place a teaser or a black space for the customers to write reviews. If you want your business to stand out from the crowd, custom-printed burger boxes are a great way to make your business stand out from the rest.
custom ice cream cone sleeves can be designed to feature your logo and product name. The sleeve can be personalized with the person’s name or the event’s name. Whatever it is, the cone sleeve is sure to be a hit.
custom ice cream cone sleeves can also be used for a variety of promotional purposes. You can use them to advertise your brand. For example, you can use them to promote sustainable practices. These custom ice cream cone sleeves are made of recyclable cardboard, and therefore a brand can promote sustainable practices
Thanks for sharing a fine content with us.
Buy custom burger boxes at your door step . City of Packaging offers best quality burger boxes at affordable rates. We have more than 2000 products and 200 art designs for the custom burger boxes . We are providing customization solutions for all sort of boxes packaging across the globe
We are a team of professional accountants having experience of more than 10 years.For more details visit Fake Pay Stubs For Car Loan
In the event that you’re searching for a spot to get the very best Android MOD APK applications, then you’ve arrived perfectly located. At TechBigs, we work in presenting to you the mods that will open the game and carry you nearer to winning. We’re a MOD APK store with a distinction – all our mod APK applications are genuine and stable.
With the many MOD APK games and applications in our steadily developing library, you should rest assured that you’ll find what you’re searching for. We have all that from dashing games to astound games to FPS shooters – and in the middle between. You can partake in the games with advantages like limitless cash or jewels, or you can open new skins and weapons without finishing the whole game first.
Envision having the option to play a game like Pro Series Drag Racing with limitless cash to redo your gigantic vehicle assortment, or Call of Duty Mobile with the very best weapons and skins right from the outset of the game. Sounds fun, isn’t that so?
Get the MOD APK game like you’ve never played it and release your maximum capacity by getting the very best advantages right all along. Try not to go through hours developing your details – or even need to spend genuine cash just to remain in the game. Downloading games on Google Play is exhausting – this is where the genuine tomfoolery is.
SanHar ABS India Is a Leading Healthcare IT Solution Provider in India, for Enterprise Healthcare Solutions, Speciality EMR, Contengency Code management System, Telemedicine, Laboratory, Radiology, revenue cycle process management, Mobile Health Apps, Patient Portal, and many other healthcare solutions.
As I can see from the clarity in your post, I assumed you were an expert on this topic. Thank you very much for sharing. Travelers can obtain a Turkey visa from anywhere in the world. It is an electronic visa that can be obtained through the internet.
Hi,
Thanks a lot for sharing this awesome info. Your story is very interesting to me. I personally like all your points. I love to share on social media keep it up
It’s the most beautiful thing you will ever see.
I hope we will be best friends until we die.
Friends come and go, but true buddies stick like that mark on your skin.
I can survive without a girlfriend. But I cannot survive without you as my best friend.
You are my best buddy, my other half, and human diary. You mean the world to me.
I feel like I have known your whole life.
online solution is a professional account and finance company offering incredible financial services and assistance to small businesses
Hey dear, I have read your post that you have also discussed here, I appreciate your hard work and urge you more information.
Zpay Paywindow Payroll Keygen Free Download
British News 360 Live news, investigations, photos, trneds, videos, opinions by the journalists of the British News 360 from our more than 150 countries around the world.
find call girl in Jaipur mobile phone numbers, and many WhatsApp group links that you can create a Jaipur call girl Relationship with the help of the number.
https://onlinesolution.us/collections/tax-payouts/products/paystub is a professional account and finance company offering incredible financial services and assistance to small businesses.
Javis is providing marketing agency services list like social Media Marketing, search Engine Marketing, SEO, Shopify Store Setup. We have a team of experienced and certified professionals who are passionate about helping businesses grow online .
There are some amazing blogs.
good job keep it up its very informative blog.
افلام سكس
مقاطع سكس
I appreciate your hard work and urge you more information.
Cleanmymac X Latest Version Free Download
We are providing best car tracker in Pakistan for more details click on
car tracker
We are providing best car tracker in Pakistan for more details click on
car tracker
Fetal Monitoring Bands Now you can know the detail of your baby’s sleeping condition with more precise manner by using Fetal Monitoring Bands. Fetal assessment prevents from fetal death. It tracks your baby’s heart rate and movement overnight could be your good helper to do baby’s sleeping condition analysis.
We are providing best car tracker in Pakistan for more details click on
best car tracker in Pakistan .
We are providing best car tracker in Pakistan for more details click on
car tracker pakistan .
Fetal Assessment Now you can know the detail of your baby’s sleeping condition with more precise manner by using Fetal Monitoring Bands. Fetal assessment prevents from fetal death. It tracks your baby’s heart rate and movement overnight could be your good helper to do baby’s sleeping condition analysis.
An fascinating debate merits comment. I believe you should write more on this issue; it may not be a taboo subject, but most people are unwilling to discuss it. On to the next one. Cheers
Very nice post. I just found your blog by accident and wanted to say how much I’ve enjoyed reading your posts. In any case, I’ll be subscribing to your RSS feed, and I hope you write again soon.
winrar
We’ll explore how to get money from Apple Pay to Cash App. We’ll discuss the different methods of transferring money, and we’ll provide tips on how to make the most of each method.
Good job sir keep it up
We are providing one of the best cracked tools extremely free
Hey dear, I have read your post that you have also discussed here, I appreciate your hard work and urge you more information.
Oxygen Xml Developer Free Download
Plus Size Pregnancy Belly BandBest Back Pain Relief Belt for Pregnant Women Why you choose Plus Size Pregnancy Belly Band: Pregnancy Belly Band For Running is designed to come with your maternity, gently supporting lumbar and abdominal regions in order to avoid stress and pain.
The same applies frequently in the event you are able to shield this particular hike.
Crack Sum
Hey dear, I have read your post that you have also discussed here, I appreciate your hard work and urge you more information.
Parallels Desktop Keygen Free Download
اكس ان سكس
I went over this site and I believe you have a lot of good info, saved to favorites (: My site:
สล็อตโจ๊กเกอร์ ทางเข้า
Thanks for sharing these monster fleece lovey blankets, amazing one .
Have you forgotten your iCloud password?
don’t worry contact, contact customer service they will assist you to resolve your issue.
POF is the most popular online dating site in the world. People all over the world are using the POF website to date with their dream partner, make friends, and chat with a new person online. If you are facing any account related issues like POF login issue, POF password reset, POF password recovery, POF account recovery, POF forgot password contact POF customer service number. They will assist you with the easiest and the best solution for your problem.
A very informative site blog,much effective site blog.
Imageranger Pro Crack
Thanks for sharing such a great articles .
Fetal Doppler GelPocket Fetal Doppler is a hand-held obstetrical unit, which can be used in hospital, clinic and home for daily self-check by pregnant woman. The Doppler Fetal Monitor is equipped with a full high definition color LCD display.
Wordfeud is a crossword game for iOS and Android devices. It’s similar to Scrabble but with a few different rules. If you’re looking for a fun and challenging game to play Wordfeud is a great option.To get more information visit blog.
I really like your blog it was amazing and very useful, thanks for sharing it with us .
Magix Video Pro X Crack
This is such an awesome asset, to the point that you are giving and you give it away for nothing. Our article has piqued a lot of positive interest. If you’re looking for cheap Lesbian escorts in Laouri, check out the following tips to choose the right one. First, check out the quality of escort girls. While some escorts are undoubtedly pretty, others may be unclean and have a history of encounters with law enforcement. Check with the authorities in your locality to make sure your escort is a reliable and comfortable choice.
Escorts in Lahore
You can enjoy their call girl in Hyderabad mobile phone number.
find call girl in Ranchi with photos, call girl service in Ranchi
assetz soho and sky, assetz soho & sky, soho and sky jakkur, assetz soho, assetz apartments in jakkur
https://medium.com/@assetzsohoandsky_jakkur
assetz soho and sky, assetz soho & sky, soho and sky jakkur, assetz soho, assetz apartments in jakkur
https://in.pinterest.com/assetzsohoandsky_jakkur/
Assetz Soho and Sky is 3/4 BHK Premium Residences located on Jakkur Main Road
https://www.behance.net/gallery/143523741/Assetz-Soho-and-Sky-Bangalore
Assetz Soho and Sky is 3BHK and 4 BHK Premium Residences located on Jakkur Main Road
https://twitter.com/AssetzSky
Best Neck StretcherCervical Traction Pillow is a versatile orthotic that is great for a variety of relaxation techniques, exercises and stretches that assist to restore and recover problematic soft tissues in the neck
Portable Ultrasonic NebulizerIt operates with Low noise working, no disturbing to others, easy for you to atomize anytime and anywhere.
Accounts Payable Are you spending your valuable time tracking down payments and keeping the billing system up to date? Are you not receiving your payments on time? Are you finding it difficult matching payments to invoices
zyllion shiatsu back and neck massager Massager with heat helps to accelerate blood circulation and relieve pain and muscle tension with soothing heat
Great Information sharing .. I am very happy to read this article .. thanks for giving us Amazing info. Fantastic post. I appreciate this post.
https://softactivationkeys.com/
https //vimeo.com/activate code
Great Information sharing .. I am very happy to read this article .. thanks for giving us Amazing info. Fantastic post.
https://workingproductkeys.info/remo-recover-crack/
If you are looking for Echo dot Setup related issues and want to solve the problem, then you can visit our website for detailed information . Echo Dot team is 24/7 available for users to provide the best solution
Very informative post.Thanks Again. Will read on…
https://workingproductkeys.info/sketchup-pro-crack/
I’m happy you have found it helpful
Thank you for sharing such an in-depth guide with us. I liked the way you wrote this article.
Thank you ever so for you blog post. Really Great.
Hey dear, I have read your post that you have also discussed here, I appreciate your hard work and urge you more information.
Adobe Animate Free Download
Hey dear, I have read your post that you have also discussed here, I appreciate your hard work and urge you more information.
Lansweeper Crack Free Download
Thanks for posting this educative writeup. I do appreciate your efforts.
Thanks For Posting The Nice Content !!
I’m now a blogger, and I’m considering starting a YouTube channel. This will be quite beneficial to me. Thank you for sharing this useful information! This is a fantastic book! project-qt-mod-apk
Thanks for sharing
Download Nexus VST Crack
Hey dear, I have read your post that you have also discussed here, I appreciate your hard work and urge you more information.
Redshift Render Crack Free Download
Really Appreciable Article, Honestly Said The Thing Actually I liked The most is the step-by-step explanation of everything needed to be known for a blogger or webmaster to comment,
What I liked The most is the step-by-step explanation of everything that needed to be known for a blogger or webmaster to comment,
Outsourced Accounts PayableOutsourced can save you both time and money. Irrespective of the size of your team, we make sure your employees are paid accurately and on time every month.
This is one of the most informative blogs which I have seen related to the security of the live/ video on demand. It is helpful in making an informed decision about the most useful method to secure your videos. Whether it is securing the copyrights of your videos and using its anti-capture feature, VideoCrypt provides that all.
Are you looking for an online weed dispensary in the USA? Then, weedmarket420.us is one of the best cannabis dealers who provide shipping worldwide. We offer weed strains, weed concentrates, Cannabis oil at an affordable price. To know more, visit our website https://weedmarket420.us/
Yes! People like this exist. I smoke and I’ve been a smoker for years. Most of the time I am surrounded by people who do not smoke at all. Doesn’t amaze me. I have some close friends, we hangout together international;y and vacation parties but they both have never smoked weed and I am a regular smoker and this thing doesn’t affect our friendship at all. It’s not about something being legal or illegal. If a thing is facilitating you either way it is totally okay for the other person to use it. I started using it for my chronic pain and eventually ended up like this.https://weedmarket420.us/ Being a marijuana enthusiast I keep on researching for good material and here I came across 5 new researches! Have a good day!
Great article and amazing content.
All Crack Soft Product Updated Version Available Here…..
افلام سكس
سكساوي
It’s wonderful to see a post like this, and I’m grateful for the structure of the book’s chapters and the introduction. Whether you’re writing an online article or a blog post, starting with a creative approach like this is terrific. You may check your BSc Result from examalert.co.in.
iMyFone Fixppo Crack is an effective software developed for iOS device recovery. On the other hand, it is the latest development tool that can fix PDA-related issues.
iMyFone Fixppo
Nice articles and also very helpful. Highly Appreciated! Thanks
GridinSoft Anti-Malware Crack
This is really beneficial software for both you and myself. There were no errors detected throughout the audit. It’s something you can take advantage of. I hope you find it enjoyable.
I find this really helpful- I hope you step on a lego without socks and turn into an amputee.
https://idmpc.co/razorsql-crack-activation-key/
Great article… If you need Logistics Assignment Help for your assignment related work then contact bestassignmentexpert.co.uk
Save money on online hotels booking with nh hotels, use nh hotels promo code to get upto 50% discount at saveecoupons!
PPC Expert in delhi are the experts who know how to improve your online marketing outcomes. They use a range of tactics and strategies to increase traffic, conversions, and sales. They can help you with everything from keyword research, ad creation, landing pages, social media marketing, and more. PPC Expert In Delhi is your one-stop shop for all your online marketing needs.
nice piece of information , my mother watching your video and blog for other DIY.
We make your sport exciement on next level with sports live news. See sports news live only on K18news.comsports news live
You are awesome for sharing all that knowledge. I really appreciate visiting your website again. Thank you for your generosity! You can check your BA 2nd Year Result on examalert.co.in.
The set up and assistance of water program and warming provides encounter that is most easily discovered by doing and allows the chance of the.cape verde accommodation
thanks for sharing. i love this site
HIGH-RISE LEGGINGSYour workout is an important part of your day, but it’s just one piece of the puzzle. These High-Rise leggings see you through HIIT class and post-class smoothies! Stretchy jersey with Speedwick technology keeps you dry from the warm-up grapevines to the cool-down stretches. A wide, high-rise waist hugs your curves for a flattering fit.
HIGH-RISE LEGGINGS Your workout is an important part of your day, but it’s just one piece of the puzzle. These High-Rise leggings see you through HIIT class and post-class smoothies! Stretchy jersey with Speedwick technology keeps you dry from the warm-up grapevines to the cool-down stretches. A wide, high-rise waist hugs your curves for a flattering fit.
FIRM CONTROL HIGH-WAISTED SHORTS Body-contouring shapewear shorts that lift, smooth and sculpt. With a breathable and flexible high waist, as well as anti-chafing legs, these body shaping shorts are designed to contour the bottom, thighs and hips without constricting or pinching.
good information….akshardham temple delhi
I read this article its too good.
https://warezsofts.com/epic-pen-pro-crack/
Very good info. Thank you.
Muller & Phipps Tracking
I’ve been searching for some decent stuff on the subject and haven’t had any luck up until this point, You just got a new biggest fan!.. prota structure crack
reflex workout clothes Amplify your movement with these Motion Seamless Leggings! Slip into these high waist leggings that are designed for training with seamless, soft, and sweat-wicking fabric that dries as fast as you sweat. Shape enhancement markings let you go hard on those squats to show off your booty shape.
I am impressed. Amazing blog post site!
drivermax pro crack/
Very Helpful Article!
. Adobe Illustrator CC
Incident management is a process used to identify, document, and resolve incidents. An incident is an event that has caused or has the potential to cause harm to people, property, or the environment. Incident Management
escort sitesi escort sitesi
Are you looking for the Best Paints, Coatings, and Raw materials for automotive & industrial applications? PPC is one of the leading paints and coatings suppliers In Dubai. If you want to order a genuine product then order from PPC Store you will get 100% original product. For more information, you can even visit our website.
This really is a good influencing take on this specific point. I’m pleased you shared your feelings as well as your smart ideas.national exam for surgical technician certification
AU is a global university in a local community with constant mobility! Our diverse and inclusive cohort of students and faculty travel across the UAE – and around the world – to learn, teach, and make a positive impact. accredited universities in uae
Really Good and impressive website. Thanks for sharing this informative article. I appreciate the author’s work. Visit us for Guest Posting
Our duct cleaning method is 100% safe and has a proven track record. So, you can choose our professional for the safe and best duct cleaning service in Miami.
Nice Article
Music Tag Editor Pro 6.1.2
Best Hand Grip Strengthener Best Hand Grip Strengthener can benefit a range of different people such as climbers, martial artists, athletes and people experiencing health conditions. Hand Grip Strengthener is a great tool for increasing the strength and power in your fingers, hands, wrists and forearms.
This post is really awesome and informative. Thanks for sharing this post.
A Complete Guide to Perform Umrah – An incredible Spiritual Journey
openshot video editor crack is a free video editorial manager application for Windows, Mac, or Linux, which is a significant bit of leeway to allure any growing, however desperate, proofreader.
wtfast crack
Did you know that 70% of B2B software apps fail miserably due to poor UI or UX? At DFY SaaS, we make yours don’t fall flat. How? Our UI UX design services help you create delightful experiences by understanding your ideal customers’ needs.
UI UX Design Services Companyl
(CVC / CVV; on the back of the card).
You can cvv virtually though cvv shops online.
Rest assures shop dumps you are going to choose is authentic.
(CVC / CVV; on the back of the card).
You can cvv virtually though cvv shops online.
Rest assures shop dumps you are going to choose is authentic.
Resistance Bands These Pull Up Resistance Bands help you in building, toning and gaining muscle for your legs, thighs, and butt. They are wide & have nice gripping on the inside improving performance.
I read your article last night and it’s so amazing. I have shared it with my friends. I hope you will publish more articles like this. People who are willing to travel to Turkey. They can apply for a Turkey visa from the website. You need an internet connection and valid documents. Travelers can apply from anywhere in the world.
Thank you for such a great post. Best of luck
Thanks for sharing your information, it’s great and I appreciate it!
I am very thankful for the effort put on by you, to help us, Thank you so much for the post it is very helpful, keep posting such type of Article.
Fantastic post! Please keep sharing. I know of a roofing company if you are looking for Game Please get in touch! Thanks, have a good day. shtepi ne shitje
The website i was looking for Kepala Bergetar Drama Kepala Bergetar Terkini Live Video
Thanks for the nice Kepala Bergetar Drama Kepala Bergetar Terkini Live Video
I’m now a blogger, and I’m considering starting a YouTube channel. This will be quite beneficial to me. Thank you for sharing this useful information! This is a fantastic book!
https://securemodapk.com/action/mini-militia-mod-apk/
I have to say I am impressed. I rarely come across such an informative and interesting blog, and let me tell you that you nailed it. You have give me joy of information as well as entertainment. I’m so glad I found myself in this quest for something about that.
itop screen recorder crack
Good post. This information is really helpful
So cute!! I’m impressed with the crochet — sewing is SO much easier for me — because it gives such a nice texture! Thanks so much for sharing on Busy Monday at A Pinch of Joy. Hope to see you again soon!
https://a2webmaster.com
Are you looking for the Best Paints, Coatings, and Raw materials for automotive & industrial applications? PPC is one of the leading paints and coatings suppliers In Dubai. If you want to order a genuine product then order from PPC Store you will get 100% original product. For more information, you can even visit our website.
ppcrefinish
good
Thanks for sharing the nice and informative information, i read many blog but when i land on your blog i gain much knowledge for your blog and posts.
Thanks for sharing the precious information keep it your good work
Thanks for author for sharing precious knowledge.
Regards:
Azmat Hussain
Free slot games are available from play777games, a software provider serving players and operators. It is just for entertainment’s sake. Byplay777games
Love these monster fleece lovey blankets crafts, my kids gonna love these adorable blankets. Thanks for sharing these monster fleece lovely blankets crafts.
Good Sharing. if any one wants to manufactures large quantity of custom boxes then visit my profile.
The word lens comes from the Latin name of the lentil, because a double-convex lens is lentil-shaped.
Nice Article
Cinema Grade Pro 1.1.7 Crack
Nice sharing and informative post.
CUSTOM VAPE CARTRIDGE BOXES
Thanks for sharing this blog post which is very informative.
Very Helpful Article
LibreCAD 2.2.1 Crack
Emirates Luxury Drive is a new emerging UAE Based Safe Driver and chauffeur Service Company. We are pleased to welcome you to Emirates Luxury Drive Lets give us a chance to serve you once. Customer’s comfort and safety is our priority.
Teach India TOI – The Teach India Times of India is a uniform initiative of The Times of India which hopes to use the power and potential of education to transform lives. With this initiative, we aim to ensure that education is made available to those who seek it and with the help of local teachers and volunteers, allow for equal opportunities for all.
Top 10 Milkshake Franchise in India provide you with all the necessary tools and resources to become an entrepreneur and launch your own milkshake business.
Suncity Anantam Vrindavan is a residential project on Mathura Vrindavan Road. Suncity Group’s mixed-development includes plots, residential flats, and villas. Mathura Vrindavan Development Authority (MVDA), approved the project.
Suncity Anantam is an Approved Property in Vrindavan. On 575 acres, we have created a luxurious apartment complex with provision for 1500 residences. It also includes a Temple Complex, Administrative Office Complex, and a Health Care Center.
If you are looking for professional Bookkeeping Services in Melbourne, Australia, think Business Books: We provide comprehensive bookkeeping services for small businesses, home based businesses and even the DIY competitor. With over 10 years of experience and over 100 satisfied clients.
This is so creative. Love to see such posts and thanks for shraing your ideas.
Wellshop.pk
Great write-up, I am a big believer in commenting on blogs to inform the blog writers know that they’ve
Lottery Sambad
Thankyou For More Information PPC Expert In Delhi is a leading digital marketing agency in India. They have been providing services to clients from all over the world for more than 10 years.
What is needed to create the interior of any type of Melayu Drama in the Channel. The very first thing with which the wish of any Drama begins is the initial measurements and the creation of a planning solution with the arrangement of Kepala Bergetar.
Madhuvan Hotel is one of the Best Hotel in Mathura. Offering a range of luxury rooms, suites and other facilities, it offers easy accessibility to guests. The hotel’s amenities include a business centre that is equipped with conference rooms, meeting areas and more.
Great Article. I am learning to be social on SM and learning to blog etc. So all your info helps
https://softseedpro.com/category/data-recovery/
Ok that’s some lovely fleece art. Thanks for sharing the ideas. If you are looking for Latest iPhones in Pakistan then our iPhone shop is the best solution for you.
thank for this postx
thank for this potx
Find the bed of your dreams with our huge range of cheap single Divan beds for sale … divan bed – storage bed – drawers – headboard – king size – double – single.
Very Creative!
Find the bed of your dreams with our huge range of cheap single Divan beds for sale … divan bed – storage bed – drawers – headboard – king size – double – single.
so much informative then the other articles. Keep it up.
Cheap Single Divan Beds
how cute is it…..
you should visit https://wellshop.pk/ for more cute and adorable baby products
Benoitmojon – We offer a wide range of services for final year IT,EEE,ECE and MECH students, including Android and PHP development, IEEE projects, and project ideas for 2022-2023. Whether you’re looking for help with a specific task or need someone to develop a project from scratch, we’re here to assist you.
DFY SaaS is not your traditional SaaS marketing agency We offer a growth marketing plan with complete accountability for results geared towards your needs. Our SaaS product marketing helps B2-B companies dominate their niche and uncover new growth opportunities. Our marketing strategy brings together scholarly research and specialized execution
application development services
Amazing the art of crafts and this is amazing work you
and your all blog post is very informative and really
knowledgeable in my 6 months history
Thanks for sharing, Amazing the art of crafts and this is amazing work you
and your all blog post is very informative and really Good.
Awesome! You could also use the Sharp Crochet Hook
Thank you for sharing such an amazing and informative blog. Thank You So Much
DxO PhotoLab Crack
Locknkey.in is one stop solution to find contractor, real estate developer, broker, architects& engineers online. Connect with real estate developers now. real estate company
Car park barriers help to ensure unauthorised individuals cannot enter your business or commercial premises and you can control and limit the number of vehicles entering. fss car parking
Article was useful and great.
show my comment
Show my comment happynewyears2022
show the website happynewyears2022
unique and awesome content and this content most knowledgeable
and filling the real and best information for us thanks for author to
share great knowledge.
Insomnia medication is a dead end road. Fortunately,
there are more effective sleep therapies backed by science
that get to the root of sleeping problems.
I would definetely go and get the stuff and will try making this beautiful thing.
Wellshop.pk
BoatPile helps you find many things which are good for you in the normal routine of your life
BoatPile also provides you with the information or news of every update regarding all the companies that they are launching which includes Tech, AutoMobile, Mattresses, and many more things so if you want to explore that website you can visit BoatPile
Article was useful and great.
Wise Registry Cleaner Pro Crack
Let’s go. I discovered your blog with msn.
This is a cleverly written article.
I’ll make sure to take notes and come back to find out more about your helpful information.
Thanks for the post, I’ll be back for sure.
wonderful and amazing content and information
very nice, beautiful and attractive looks of all craft
and this hand made crafts is very unique style and
the your skill of hand made crafts is wonderful and
full profession.
You Have Done Really Good Work On This Site. This Post Very Is Very Beneficial For Me. I Appreciate Your Work. Thanks For Sharing It.
Hello everyone, are you interested in traveling to a country? Yes, you can e visa apply online via our VisaCent website. You can fill out your visa application form online within 5 to 10 minutes, first select which country you are from and then select which country you need a visa, then fill and submit the form. And your visa processing depends on your visa country and visa type
Amazon eBay Online Shoping in Pakistan visit our services
hemen takipçi hilesi yaparak sende fenomen olabilirsin.
Great article!! I would love to see more articles from you.
Lovely post. Thank you for this wonderful information.
Through our blog shoutbabble. we provide informative content regarding certain topics such as Self Help, Relationships, Mental health, Psychology, Spirituality and so on.
Contracting company holland provides different services and vloerverwarming is the best service.
Very nice post. I just came across your blog and wanted to say that I love browsing your blog posts. e visa online, E Visa application process now is online. You can e visa apply online within 5 to 10 minutes you can fill your visa application form. And your visa processing depends on your nationality and your visa type.
Hi, I am SEO Expert and Programmer.
Great article!! I would love to see more articles from you.
What a nice post! I really appreciate.
uAvast Antivirus Crack from smart home to mobile protection, the future of online security lies in the network. Find out how we are using our cloud solutions to protect individual homes or all mobile network operators and OEM customers. https://prokeyspc.com/
https://specifications-price123.blogspot.com/2015/03/specifications-price-kawasaki-z1000-2015.html?sc=1661239173917#c7147778221799918284
great post and informative site
As a Microsoft Dynamics 365 partner, we are able to provide you with an end-to-end business application that connects your core business functions by unifying ERP and CRM with purpose-built apps. Microsoft Dynamics 365 applications are designed to work seamlessly across Sales, Customer Service, Field Service, Finance and Operations, HR (Talent), Project Service Automation, Retail, and Marketing.
TrackingHub is a Pakistan based vehicle tracking company that locates your car using the Global Positioning System (GPS).Click here Car tracker company
Great job!Thanks for sharing this nice list !! The information you give will be of great value to me.
best construction company in lahore
Thanks for this amazing info. amazing article!!!
Dr. Yogendra Rai Founder of Rai Piles Health Clinic & Proctologist has done his graduation From YMT Medical College Navi Mumbai. Now Dr. Yogendra K. Rai is well known Top Piles Specialist Doctor in Thane,
I am very happy to read this article. Thanks for giving us Amazing info.
Topaz Gigapixel AI
Follow the instructions from our website to successfully download and install Download Brother Printer Driver Mac to enhance the current features of the printer.
I am very happy to read this article. Thanks for giving us Amazing info.
Amazon ERC Number
Amazing!!! I like this website so much it’s awesome.I have also gone through your other posts too, and they are also very much appreciate able, and I’m just waiting for your next update to come as I like all your posts… well I have also made an article hope you go through it.https://kangaroo.co/can-you-have-hiv-for-20-years-and-not-know/
Get Professional Assistance for Sorting your Dental Practice Challenges, and Don’t lose what is rightfully yours, connect with EZDDS team to speed up the dental billing process.
download free crack software latest version 2022 & 2023
Check health tips
Nootropics
I never saw such a beautiful work. It makes me happy watching those blankets.
Keep up the good work; I read a few posts on this website that was amazing. If you want to receive the rewards on the AFK arena game to enhance your gaming experience then you dont know how to get it then I refer to the article that I recently read, arena codes in 2022. Hope this article is helpful for you.
m.addthis.com/live/redirect/?url=https://apkpea.com/ios-16-launcher-pro-apk/
m.addthis.com/live/redirect/?url=https://apkpea.com/
m.addthis.com/live/redirect/?url=https://apkpea.com/poppy-playtime-chapter-1-apk-free-download/
Hello, this post gives very interesting information about off-season camping, really I like this information which is so much beneficial to us, keep sharing such kind of information, Thanks for sharing.
DC Unlocker Crack
Great blog, I appreciate you for giving us the necessary points via this blog. Do you want to know how to download Instagram++ Apk from OGzilla? Then I recommend you a blog that is associated with the OGzilla. The OGzilla is a free platform that allows you to download various applications like Instagram++, Disney++, Snapchat++, and Netflix free premium and it provides you with all types of mod applications. For more points, you should visit an article.
Thank you for bringing the article to read. it’s very interesting I continue to comment
Brilliant Content. Just loved the way, content is written.
Experts recommend using an older version of VSO ConvertXtoVideo Ultimate Key, despite the fact that it has a reputation for being challenging.
https://fullkeygens.com/vso-convertxtovideo-ultimate/
With the help of
Digital Anarchy Flicker-Free, You can create stunning visual morphs and blurs with a very simple interface. For common download and distortion, simple conversion, and editing.
Digital Anarchy Bundle
If you are interested in Android Apps, PC Software and MAC Applications then you can visit our official websites for registered applications that you can download full free without paying any charges.
Nexus Crack
FoneLab Crack is the best software ever introduced by the company. It is very famous due to its user friendly interface and mostly computer literate people do not require the training for operating this latest version of the software.
https://patchlinks.com/fonelab-crack/
Big thumbs up for creating such a great blog page!
Wirecast Pro Crack is a very handy and useful live video streaming production tool. It is made by Telestreams and allows you to create on-demand and live broadcasts from the Internet. It is designed in order to fulfill the needs of all the skill levels.
Wirecast Pro 15.0.3 Crack
you are doing really good job man
today is a match between Afghanistan and Pakistan
this is a very good software
I really like your article. You also have good custom boxes. We have good packaging boxes with high quality on custom candy boxes wholesale
I was so I impressed with their hard work and quality of work that I have not chosen any other cleaner to clean up my office. warehouse cleaning dandenong south
Our Jetour X90 is smart, sophisticated and safe. It has a distinctive angel eye LED headlight . For more specifications, visit us!x90 plus abu dhabi
Kimoha is the best beverage label manufacturer in Dubai. Along with dubai we deliver in Gulf & African countries too. Contact us & get beverage label solution now.beverage label manufacturer
Hello, this post gives very interesting information about off-season camping, really I like this information which is so much beneficial to us, keep sharing such kind of information, Thanks for sharing.
Varsbabay Lingerie
Thanks for Fantastic blog and its to much informatic which i never think ..Keep writing and growing your self.
Your article is awesome. I like your article. We also have packaging custom boxes with good quality and in best prices on
custom bakery boxes wholesale
Streaming online videos on best YouTube has almost become a way of life for almost all of us. However, time and data usage are significant constraints. Isn’t it annoying when you find free Wi-Fi but don’t have a best YouTube video downloader, or when you have a downloader but no Wi-Fi access to stream the videos? You may already be aware of how to download mp3 on Android. To help you out and allow you to download YouTube videos on your Android phone, we have compiled a list of the most popular YouTube video downloaders for Android in this article.
rpl for permanent residency
Thanks for sharing this article regarding Parking spaces on campus, it was quite insightful.
Hoping to see more articles. Meanwhile refer
Upgrade From Windows 8.1 To Windows 10
I never saw such cute blanket. Very useful content I was thinking of buying a blanket and ended up here. I’m excited that I will make a blanket now. Very easy stem by step process shown. Thank you. I will be making those blankets while watching 13 new shows on Netflix
I never saw such cute blanket. Very useful content I was thinking of buying a blanket and ended up here. I’m excited that I will make a blanket now. Very easy stem by step process shown. Thank you. I will be making those blankets while watching 13 new shows on Netflix
Nice Post.
MOBILedit Forensic Express is a strong product that is a fraction of the cost of comparable programs.
Downlaod Here
its very good blog post thank you
Kommen Sie jetzt zu einem unverbindlichen Beratungsgespräch vorbei! Wir beraten Sie gerne.Unser Team
Nitro Star Creak is well known for making and altering PDFs. It has strong highlights to change over PDF documents to Succeed and Word design, as well as concentrate information to Word, RTF, PowerPoint, Picture, and Succeed and that’s only the tip of the iceberg.
Nitro Star Creak
It is one of the new online IVF training platform and the first of its kind is in Obstetrics, Gynaecology and reproductive insight.
The Courses that Medline Academics offer you are
• Basic Infertility Course
• Basic Andrology Course
• Basic Course in IUI
• Fertility Nurse Training program
• Basic Embryology program
• Training in Endoscopy, Laparoscopy and Hysteroscopy
• Fellowship in Reproductive Medicine
• Fellowship in Embryology
Whether the individuals are from the scientific or clinical background, you’ll have the chance to explore the IVF procedure further, gaining detailed theoretical knowledge of reproductive and developmental science while developing academic, practical and transferable skills within a vigorous research environment.
I am Professional Writer. Expository Essay
Follow the instructions from our website to successfully download and install Brother Printer Driver to enhance the current features of the printer.
Free for you Windows 11 activator
Good Work Ccleaner Pro Crack Keep it up!!!
You make me more and more passionate about your articles every day. please accept my feelings i love your article.
This curriculum offers a comprehensive overview of the logistics and supply chain industry, making it ideal for professionals and graduates who want to develop a management career in this field. With businesses across sectors such as e-commerce, FMCG, manufacturing, retail, and more increasingly focusing on successful logistics and supply chain management, this has become an important area of expertise for large corporations. Logistics and Supply Chain Management in Thrissur is designed to help students understand and stay current with issues central to the supply chain management and logistics industry. Visit Here Logistics and Supply Chain Management in Thrissur
your article is amazing .I really like it. We also have custom packaging boxes with good quality and in cheap prices on custom bakery boxes wholesale
That’s great, you’ve always received this information. softbuff
Such a Nice Post
Many Cam
Such A nice post really amazed and What are the factors to consider before buying a laptop?
Like really overwhelming ideas really liked it and enjoyed th ebueayty What are the factors to consider before buying a laptop?
I am thankful for this blog to gave me much knowledge regarding my area of work. I also want to make some addition on this platform which must be in knowledge of people who really in need. Thanks.
Baking soda for cleaning
Thanks crack softwares
Thanks For Sharring . Your site is very amazing .please visit the website
The Scotland national cricket team represents the country of Scotland. They play their home matches at The Grange, Edinburgh, and also some other venues. The most famous cricketers to have come from Scotland are probably the former England captain, Mike Denness, Warwickshire all-rounder Dougie Brown, and former England Test player Gavin Hamilton. Another great Cricket Scotland was Brian Hardie, who was a major contributor to the successful Essex side of the 1970s and 1980s.
Good work done by your self .. i really appreciate your work and effort on this content. i hope that you will continue this effort.
2022EXILAND BACKUP PROFESSIONAL CRACK
Thanks for sharing your great ideas. Electronic liquid has numerous benefits. If you want to give someone the best vaping experience possible, remember the advice in this article. Although there can be no assurances, being aware of what to do and what to anticipate will help. Buy elf bar no nicotine from Vape Center today!
This is very informative, Thanks
i really enjoyed every content and comment here.
Thank you for your information. Go through our knowledge base articles to fix hp printer problems with the help of automated printer testing and fixing tools.
LightBurn Crack is a laser designing, editing, and control program that enables you to “speak” to your laser without using any other programs.
https://hitlicense.net/lightburn-crack/
GarageBand can also be used to edit other types of audio files. This includes podcasts where multiple microphone support can be useful. (support for multiple microphones) It’s fast, it’s powerful, and best of all, GarageBand is free and pre-installed on every Mac computer, ready for you to join us. GarageBand is also available as an app on the App Store for iPhone and iPad owners.
here is combination of cracker article.
You can bet online games at thabet super fast and convenient. In addition, there are a variety of genres such as: Esport, cockfight, live casino, Lottery, Slots game, shooting fish… The website is trusted and has many users. Please visit thabet to join
You can bet online games at thabet super fast and convenient. In addition, there are a variety of genres such as: Esport, cockfight, live casino, Lottery, Slots game, shooting fish… The website is trusted and has many users. Please visit thabet to join
Thanks for sharing this article regarding Parking spaces on campus, it was quite insightful.
Hoping to see more articles. Meanwhile, refer
Uses of Computer in Nursing
Thanks for sharing this article regarding Parking spaces on campus, it was quite insightful.
Hoping to see more articles. Meanwhile refer
School leaving certificate application in Hindi
Thanks for sharing this article regarding Parking spaces on campus, it was quite insightful.
Hoping to see more articles. Meanwhile, refer
The Importance of Cloud Printing for Businesses
There are loads of overall quite extraordinary equity through which we can have a bunches of incredible minutes.
Great info, thanks for sharing the information, you can also read how to reset gut health
This is a great idea! I really love the fabric it’s a wonderful idea to make use of the fabric.
This platform contain more advanced article for cracker.
https://nycrack.com/
if you want to free movie watch go to this website
tamilplay 2022
https://omega-meds.org/ is a very beauty full website and adult content for this site. please visit this site. thank you.
Amazing blog! I really like the way you explained such information about this post to us. And a blog is really helpful for us on this website. Very interesting blog.
ScreenHunter Pro Crack
Hello, Everyone, this page has useful information, as I found the content in the post this also has the relative ideas, Thanks For this….!!
Rufus Crack
I like all of the points you’ve made.I am very happy to read this article.. Thanks for giving us Amazing info. Fantastic post.
Color Finale Pro Crack
I appreciate everything you have added to my knowledge base. Admiring the time and effort you put into your blog and the detailed information you offer. Thanks.Color Finale Pro Crack
Follow the instructions from our website to successfully download and install the Brother printer driver to enhance the current features of the printer.
Movavi Video Editor 22.2.1 Crack is an excellent application to bring your outstanding and creative ideas to life and share them worldwidemovavi-video-editor-crack/
This is a wonderful post. I needed this material for my project. Thank you so much for sharing this information with us. Try Artlantis Crack to create beautiful 3D imagery.
This is a wonderful you shared post I was thinking about the materials for my project. Thank alot i got great ideas while going through all the great content you shared.
Hello Repeat Crafterme TEAM,
First of all thank you for providing the best content for us. I’m reading and sharing your every post. My Apps Bundle Blog
This is a wonderful you shared post I was thinking about the materials for my project. Thank alot i got great ideas while going through all the great content you shared.
GLobal Muz BLog
Hey dear, I have read your post that you have also discussed here, I appreciate your hard work and urge you more information.
Nitro Pro Crack Free Download
Digital Marketing Services In Saudi Arabia | UpGro Digital
Go Digital to Grow your business. UpGro Digital will deliver customers to your website through comprehensive digital marketing solutions. Get the best digital marketing services in Riyadh.
Hey Sarah, you have done a good job. Thank you
Thanks for sharing such an interesting article.
If you want to check the mepco bill so you must visit this link check mepco bill
This is a very well-written website. Keep Up The Good Work! Thanks for the Information.
EndNote
With the help of the Windows tool PDF Annotator Free, you can edit and amend your pdf file without having to create a new contract or run a new check, saving you time and stress.
https://windowsactivators.org/pdf-annotator/
Letar du efter ett städföretag i Stockholm? Då har du hittat rätt. Hos oss kan du enkelt kolla tillgänglighet och boka din städning direkt online.
flyttstädning stockholm
WOW, That’s amazing techniques. I really like the ideas.
Parklane motors one the prominent place in UAE’s used cars market. Visit our website to explore used cars, certified cars, used premium cars..buy & sell car
Nice Article
Cinema Grade Pro Crack
Very Helpful Article
EZdrummer 3.3.2 Crack
Good Work.
Windows Repair Pro Crack
Thanks for post this blog,is magnificent software for greater results of your task. It provides the best features to its users.
Windows Download
Hi there, This is a great list of resources. There are several here I never heard of before. I love having your pros and cons. Thank you so much.
These mini blankets are so adorable , lovely . Thanks for sharing with us, will love to try making this one.
Capcut is an editor that can fulfill all the needs required for a video editing job. The market is flooded with infinite numbers of video editing apps, but Capcut is something different from others and comes with all advanced and professional editing features.
Thank you for sharing the informations….I have read it.
Pretty great post. I simply stumbled upon your blog and wanted to mention that I have really loved surfing your blog posts. Great set of tips from the master himself. Excellent ideas. Thanks for Awesome tips Keep it up
Remote Desktop Manager Free Crack
So nice I am enjoying that post as for u latest version of this Security tool is Available Awesome tips Keep it up
Wise Care 365 Pro Crack
Very informative, and It was an awesome post
Adguard Premium Crack
BINNUNE BW01 wired headset comes with high power neodymium magnets to provide maximum efficiency and better sound. The microphone is rotatable and noise-canceling, perfectly captures the user’s voice and simultaneously eliminates unwanted background noises. BINNUNE headset
nice
Hi, I just want to say that this blog is awesom and very well written
Data science training institute
Corsair m65 Gaming Mouse is a high-end gaming mouse that offers a lot of features for gamers. It has a laser sensor that can be adjusted for different DPI settings, on-the-fly DPI switching, and an adjustable weight system. It also has seven programmable buttons, an RGB backlighting system, and a comfortable ergonomic design.
The hotel will provide guests with air-conditioned rooms offering a desk, a safety deposit box, a flat-screen TV and a private bathroom with a shower.See also
James Allen is a well-known brand that is known for its high quality products. It has been in the industry for more than 20 years, so it has gained a lot of experience and expertise in the field. James Allen True Heart is one of their best-selling products. In this article, I will compare James Allen True Heart with Ideal Cut to see which one is better. I will use various factors to analyze and compare these two brands, such as quality, price, features.James Allen Vs Kay Jewelers
Very Innovative Its All Are Very Beautiful Combination
GoodNotes itself advertises with a slight farewell to paper and addresses students in particular with a strong online presence (eg via Instagram) . The app should therefore not only serve as a simple notebook , but also for learning slips , as a digital bullet journal or planner . It can be used very individually thanks to the many import options , eg on page templates, stickers, etc. There are many third-party providers online for additional material, eg on Etsy.
This monster fleece lovey blanket craft is so adorable , I actually was searching for same stuff. Thanks for sharing with us.
The set up and assistance of water program and warming provides encounter that is most easily discovered by doing and allows the chance of the.Expressway Gutters Contractor
your website is very nice thanks for sharing such great content with us love your website design style
thanks for sharing such great information with us
Amazing blog! I really like the way you explained such information about this post to us. And a blog is really helpful for us on this website..
xnxx high quality sex.
Sex nick foreign and Arab and sex stories and pictures of sex.
Sex hd free porn movies.
Nice Artivle Post….
https://www.silkygupta.com/
Our goal is to improve employment opportunities and the social and economic development of our community and nation by developing a workforce that can access and analyse information in accordance with information technology needs, continually reinvent .
join with us: https://keralasteds.com/
One of the best family hotels, Pleasant Inn offers a variety of amenities and packages that make for a memorable stay. If you’re searching for affordable best family rooms,
Visit Us: https://www.albaharhotelandresort.com/
The largest training facility in Asia and the best in India for creative and design education is Dline, School of Creative Studies. We are the institution providing design training with the quickest growth. Through its School of Interior Design and School of Fashion Design, Dline delivers industry-relevant, top-notch courses.
visit us: https://www.dline.co.in/
Cricuts are a brilliant tool for crafters as it provides them with a host of features that help cut different shapes and designs with expert precision. Having a laptop that can work well with Cricut devices and software gives you the tools you need to create professional results.
Good and informational article. I am really impressed to see this article.Ah custom Boxes
Happy day! Although it’s rather off-topic, I was curious about the blog platform you’re using for this page.
I’ve had problems with hackers, and I’m looking at alternatives because I’m getting sick and tired of WordPress. If you could direct me to a reliable platform, that would be great.
i like your article. Medical information and health advice you can trust. We re committed to being your source for expert health guidance Come to us in your pursuit of wellness
https://www.healthline.com/
Epomaker ep84 Gaming keyboard is a gaming keyboard that was released in early 2020. The keyboard has a simple design with a black-and-white color scheme. The keyboard has a detachable USB cable and comes with a keycap puller, replacement keycaps, and a user manual. The keyboard has 84 keys and is compatible with Windows 10/8.1/8/7 and MacOS
Nice Article
Redshift Render Crack </a
I am pleased to see your Content. The manner you describe packaging Benefits well in this Blog Custom Packaging Boxes
whats Wall is a platform that provides the latest information the world of on the latest trends in technology, business and more.
https://whatswall.com/
Every James Allen True Heart diamond is an ideal cut, but not every Ideal Cut diamond is a true heart. Click Here
The hotel will provide guests with air-conditioned rooms offering a desk, a safety deposit box, a flat-screen TV and a private bathroom with a shower. At Roomy Signature Hotel, Islamabad the rooms include bed linen and towels.
signature hotel
There are several vehicle tracking companies assisting drivers and car owners in Pakistan.car tracker
nice one
Elitz by Danube Properties is the grand upcoming residential façade that features stylish luxury design apartments located at Dubai. The signature class developers level of quality with the improved lifestyle are included in this newly added residential property. The private façade is set up to provide a discerning way of life that results in comfort and convenience for both residents and visitors.
https://elitzdanube.aleizba.com/
xnxx
نيك
It is very impressive content thanks for sharing this article continue in this way and help us more as possible.
This is very Amazing and Very Informative Article we get a lot of Information from this article we really appreciate your team work keep it up and keep posting such a informative articles.
What is ActionGameUsa.com?
ActionGameUsa.com is an online gaming platform for Android users that allows you to easily search and download thousands of MOD APK, Premium APK and Original APK games and apps for free. With the wide range of titles available on ActionGameUsa.com, you’ll be sure to find something exciting to play today!
Whether you’re a fan of action-packed shooter games or brain-teasing puzzles, ActionGameUsa.com has something for everyone. All the titles are organized into categories to easily help you find what type of game you prefer. The simple search button also allows users to quickly locate their favorite title by typing in keywords related to it.
In addition to the vast selection of games, users can also download premium APKs and original APKs. This makes it easy to access content from official developers at no cost. With frequently updated titles, you’ll never be left wanting for something new to play!
you can organize your notebook into categories and subcategories, and apply creative notebook covers to prove you’re cooler than your friends. After opening a new note, you can import a file (eg PDF) or open a new blank document and apply a paper background template, such as a chart or standard lined paper.
Because they are composed of galvanised steel, the steel doors and windows we provide are quite strong. Although they are composed of steel, they feel and look like wood, giving them strength and beauty. They are also less expensive than regular wooden doors.
https://www.petradoor.com/
This Blog is Very Nice, All Software Easily Download Here! Visit The Website
clink the Link
wow lovely post thank admin for this postx
that a lovely post thank admin
Wells fargo Sign in- Access Your Bank Account Right From Your Device
Wells fargo Sign in
Procreate , which is among the most successful applications that can work integrated with Apple Pencil, is a very successful alternative for users who want to draw.
I like your article very much, thank you. I also love sex stories and love to follow them constantly.
I really like your elegant style. Thank you for your wonderful article. Do you know that I am a fan of watching the contents of sex.
Thank you for your article. It is more than wonderful. I like your site. See also exciting sexual sites that I found in the Google search engine.
I am a sexy girl who loves sex content. Do you have an Arab porn site?
Click on the given link to read more such post.https:/https://ddicokey.com/preonus-games//
Thank you
Dr. Kashish Gupta undertook his MBBS programme at the Dayanand Medical College in Ludhiana after which he obtained his MS in (EYE) Ophthalmology from Government Medical College Surat, Gujarat and simultaneously enrolled into post graduate training Progarmme at ARAVIND EYE HOSPITAL – TIRUNELVELI, Tamil Nadu; where he acquired expertise in phacoemulsifications. In the year 2007, he joined Adesh Medical College in Bathinda as assistant Professor and further underwent his Observer-ship programme in Squint and Amblyopic at Rajkot, Gujrat India.
Wow, it’s great work. i really admire it.
Thanks for the valuable content for more information please visit to my sites.
Thanks for the valuable content for more information visit to my sites.
Great Content. If you are looking for tiles showroom in Coimbatore then contact us now.
yacht market
download professional software https://millioncrack.com/
Wow, this is awesome your articles keep coming out again, I will continue to follow your work. หวยคลิปโต
yacht market
SmartNews choice permits you to track down the most recent news on a big name. To do the inquiry, the client will simply need to enter his name on the committed bar.
The Best Gaming Accessories To find the best gaming accessories, you first have to understand what they are and what they do. Gaming accessories are tools or devices that are designed to help you enjoy your gaming experience. They can be anything from high-end gaming chairs to gaming mice.
If you are interested in Android Apps, PC Software and MAC Applications then you can visit our official websites for registered applications which you can download fully free without paying any charges.
Nexus Crack
Running the Geeni application on a PC or brilliant television will enable you to watch the recording from Geeni surveillance cameras that are associated straightforwardly to your telephone yet, as with any innovation, there are explicit things to set up. Simply design the settings in Nox and introduce the application on your PC or television. Then you will actually want to watch film from your Geeni camera.
Moreover, the GreenShot settings permit you to characterize the activity that will happen subsequent to taking a screen capture. It is feasible to save a screen capture in the clipboard, open it in a designs supervisor, send it to a printer or save it to a document, and in the last option case, you can pick the record configuration and, surprisingly, set up programmed age of its name so that with each new screen capture you don’t need to ask under what name it should be safeguarded.
WebDesignWala as the best SEO Company provides SEO services in Patna . We help businesses to generate leads & revenue through our full-service digital marketing solutions. Thank You!!
It’s a very interesting website. Came here to read the information shared.
very nice post keep sheering with you!
Notability is a difficulty free versatile PC that is not difficult to access from your PC. Whether you are an understudy or an expert, the need to take notes on paper rapidly vanishes. Computerized notes are the future, particularly since you have PCs or PCs close to you. Whether you really want to compose in a hurry or go to addresses, taking notes carefully kills the gamble of losing them.
Great content. Very unique and interesting. Helpful and knowledgeable. Thank you for sharing and keep up the good work.
I am thankful to you for sharing this plethora of useful information. I found this resource utmost beneficial for me. Thanks a lot for hard work
This blog is amazing and contain a lot of useful content… airparrot 3 license key
thanks for sharing this article .
Please read about this https://clubnewcasino.online/index.php/2022/12/11/singlecrunch/
Thankyou for sharing amazing content. I really want to appreciate your blog. Fabulous content writing.
best and totally information you put here
Anrari helps you save up to 20% on your Ahmedabad flight ticket as compared to regular rates offered by airlines or travel agents. Booking cheap flight tickets to Ahmedabad online with anrari.com is safe and secure because we use the latest technology to ensure that your personal data remains safe and confidential at all times.
How to earn money
Unique Track supplies the latest in GPS tracker technology so that we may provide our customers with the best in a real time vehicle tracking system.car tracker company
best and totally information you put here
It is simple, practical and useful when creating a course or being part of it. I had the opportunity to do both and I would recommend it for use in a course that involves viewing virtual classes and submitting assignments and uploading informative content.
Please read about this https://betexchange.online/bsnation/
Thanks for this content i am so glad for information and If you want Neuro doctor service So Please visit on this site. The top Best Neurologist In South Delhi is waiting for you at neurosurgeon India.org. He or she will assist you relieve the agony of your terrible circumstance and provide you with valuable insight into preventive measures that you can take to avoid any future mishaps.
Very good work! It was enjoyable to read. I’m happy when I read good essays like this one.
Ashampoo Photo Optimizer
Saving in SVG format with additional information, which allows you to save many parameters specific only to Inkscape and at the same time maintaining compatibility with standard SVG (version > 0.45 includes many features of the SVG 1.2 specification, which so far is not displayed normally anywhere) An embedded XML editor (and SVG is an XML format) interactively linked to the workspace, i.e. if you have selected an object in the workspace, then the XML editor will show you the required element. Working with text:
Nice Post!
I really like it.
While you can’t push the images on the Lens in any particular direction you want, the trade-off is a wide variety of options that are almost always impressive. These images borrow ideas from other artists’ work but do not contain actual excerpts from their work.
Кредит на карту в МФО України без відмов 24/7. Мінімальний пакет документів, без дзвінків та фотографій. Рішення протягм 15 хвилин. https://mfo24.info/
This notes application from Time Base Innovation empowers high-goal propagation of your drawings and portrayals because of “advanced ink” innovation. GoodNotes4 can likewise look through your written by hand notes or basically use it as a composing program, since it is unmistakably appropriate for use with a console. There are likewise no restrictions to the plan and altering of the scratch pad and its “paper” layouts. Would you like to impart specific substance to others? Then, at that point, do this on the computerized whiteboard. At long last, save your information remotely by trading it through Dropbox, Google Drive and numerous different suppliers.
افلام محارم
What a useful information provided by this site! You can also check my websites.
Thanks for sharing this post. I read and look at your blog regularly, and it’s very nice and helpful.
Mubeen PC
NoteLedge Ultimate, an all-in-one note-taking application that comes with a colorful interface, can add multimedia content such as audio and video to notes, unlike many others, and add the prepared notes to the calendar for different tasks. The application, which can synchronize the notes taken on the cloud storage service called Kdan Cloud, draws attention with its active support for many stylus pens.
Nimbus Note allows you to not only save notes, but also work with them. Make plans, implement projects, record all thoughts and ideas, all information about the events of your life.
Hello guys, the suggested page has a creative information, As I was searching to get more accurate terms, about the
topic, you have released her,,,
https://uchripk.com/faststone-photo-resizer-download/
Wer abnehmen will oder muss, wird das Problem der Gewichtsreduktion kennen. Sport, zahlreiche Diäten und Produkte zum Abnehmen wurden ausprobiert und keines der Mittel hat geholfen. Einige werden auch schon mal über eine Magenverkleinerung nachgedacht haben, die in Deutschland jedoch sehr teuer ist und von einer Krankenkasse nur in Einzelfällen bezahlt wird. Eine sehr gute Alternative ist hier eine Magenverkleinerung Türkei.
“Nice post:)
house shifting in chennai
https://sunbrightlighting.com/
outdoor lightings
https://sunbrightlighting.com/
You can obtain high-quality assignment with original reports at a student-friendly cost. Our Cookery Assignment Help UAE service ensures that your assignments are of the best possible quality. Our company has consistently offered the best Online Assignment Help services to students timely.
best stroller for newborn twinsIf you want to run with your baby, look for a stroller that has three extra-large pneumatic wheels measuring at least 40 cm
With “Quip” you edit texts, create calculations and manage tasks online in a team. This is how you create documents or to-do lists together. All content that you call up via the tool is initially cached locally on the hard drive. It is also possible to work offline. After editing, the current version will be made available online. Meanwhile you can communicate with your team partners via the integrated chat function. All changes made can be viewed in the daily summary. To use certain documents outside of the tool, save them as DOC, PDF, HTML, LaTeX or Markdown files.
Kindly Visit my website for cracked software, Windows & Mac. Download Now Latest Versions.
Windows 11 Activator Crack
I genuinely enjoy reading articles of this caliber. Excellent article.
Noteshelf offers you a whole range of pens for your writing, you can also use highlighters to highlight certain parts of your text. Of course, you can write with your finger or stylus (Samsung S stylus special buttons support). Note that you can also choose the typography and add perfect geometric shapes (shape detection allows a transformation of your drawing).
I read this article. I think You put a lot of effort to create this article. I appreciate your work.
Hi, this is Ekta Kapoor and I started my acting institute named ICE Institute powered by Balaji Telefilms. Join our institute and get a chance to work with +200 production houses. We provide best acting & modeling classes in delhi & mumbai.
Copy and paste find more like borders, text dividers, headers, heart (˚ ༘♡ ⋆。˚) for Tumblr, Twitter, Facebook bio & usernames in just one click! This super easy tool is perfect for anyone who wants to spice up their blog or website with some stylish symbols and borders. You can use it to make your posts look more professional, or simply to add a little personality to your online presence. Whether you’re using it on your personal blog or working on a website for a business, this nifty tool is a must have. So why not give it a try today?
Thank you for awesome information about your
Hello guys, the suggested page has a creative information, As I was searching to get more accurate terms, about the
topic, you have released her,,,
https://uchripk.com/reality-capture-crack-latest-free-download/
It was a very good post indeed. I thoroughly enjoyed reading it in my lunch time. Will surely come and visit this blog more often. Thanks for sharing.
Teterboro Limo and Car Service
Limo and Car Service Blog You can find helpful ground transportation service tips and advice on this blog.
Thanks for sharing this article. I really like the post you have shared here
Поломка авто или ДТП – случайностей на дороге много. Решение одно – вызвать эвакуатор и доставить неисправный автомобиль
на СТО/парковку или в гараж в Москве. С помощью онлайн-сервиса Эварус вы сможете заказать услугу эвакуатора в Москве (Московской области) максимально быстро и при этом сэкономить.
You undoubtedly exceeded our own satta matka expectations.
Thanks for sharing this article regarding Parking spaces on campus, it was quite insightful.
Hoping to see more articles. Meanwhile refer
Resignation letter in Hindi | Resignation letter in Hindi format |
Thanks for sharing this article it was quite insightful.
Hoping to see more articles. Meanwhile, refer
Nimantran Patra in Hindi
I am writing this letter to show my appreciation to you for the significant contribution that you made. My opinion is that you have what it takes to be a successful author because it was a pleasure to read what you have written and your writing is engaging. I am going to put your website in my bookmarks, and you can be sure that I will come back to it at some point in the not too distant future. I would like to offer you some words of encouragement to continue producing such wonderful posts, and I would also like to wish you the best of luck for the day.
Thanks for sharing this article it was quite insightful.
Hoping to see more articles. Meanwhile, refer
Unique Information. I’m glad I came across this website. It includes useful information for the visitors.
Thanx For Sharing
Some of the information is truly interesting. Well written and helpful to users.
Hello guys, the suggested page has a creative information, As I was searching to get more accurate terms, about the
topic, you have released her,,,
https://uchripk.com/download-netflix-app-for-window-latest-version-2023/
I am glad that you found a site name is goesapk.com
where you can download APKs, as they can be a great way to install apps on your Android device without using the Google Play Store. However, it’s important to be cautious when downloading APKs from third-party sites, as they may be harmful to your device or steal your personal information.
If you are looking for a King Size Bed, then you should explore the selection at Grayson Living. The company offers designer full-size beds that can transform your bedroom into an oasis of relaxation and luxury. Whether it’s a platform or canopy style, there is something perfect for everyone with this brand. And they come in styles from traditional to contemporary, so no matter what look you want to achieve in your space, they have the perfect bed for you!
Stiletto is the perfect Modern Bookcase to fit any space and style. This shelf system can be used on its own or combined with other Stiletto shelves for a customizable storage solution.
Hey, Nice Soft toys thanks for Sharing…
you wants to earn money online
https://www.pkpoint4all.com/
https://www.pkpoint4all.com/
This is really nice. I would like to thank you for the information that you gave us.
cheap flight to goa
If you’re a car enthusiast, then you’ll love the new Car Gif
website! This is the place to find all the information and resources you need to get the most out of your car.
Your blog is great. I read a lot of interesting things from it. Thank you very much for sharing. Web Design Sharjah
One of the best blog i never seen and this blog really helpful for everyone Essex Fells, NJ Limousine and Car Service
I am glad that you found a site name is GoesApk
where you can download APKs, as they can be a great way to install apps on your Android device without using the Google Play Store. However, it’s important to be cautious when downloading APKs from third-party sites, as they may be harmful to your device or steal your personal information.
One of the top beaches in Antalya, Lara Beach is a happening spot to enjoy your time in this Turkish city.antalya turkey holidays
ClickUp is the one app that will replace them all. This is the future of work, where anyone can work on anything. ClickUp is not just about task management, but about documents, reminders, goals, calendars, scheduling, and even a mailbox. Fully customizable, ClickUp is suitable for any type of team so all teams can use the same app to plan, organize and collaborate.
How to unlock borrow on cash app ?
Cash App is a money transfer app that allows you to easily and quickly send money to friends and family. One of the great features of Cash App is the ability to borrow money. This can come in handy if you need a little extra cash for an unexpected expense. However, before you can borrow money on Cash App, you need to unlock the feature. In this article, we will show you [how to unlock borrow on Cash App..
Your blog is really great & awesome. I really like your blog. thanks for sharing your ideas it’s a nice and perfect post for readers Keep it up. your article is very informative to a lot of people. Table Top
Hey! Thanks for the information.
Hey! your Article is great Thankyou for Sharing…
Editing videos in CapCut is very easy. This does not require professional skills and long training. Simply open the program and start working according to the instructions. Thanks to the simple and user-friendly interface of the editor, you will definitely not have any problems.
I just want to thank you for sharing your information and your site or blog this is simple but nice Information I’ve ever seen i like it i learn something today.
Social Media Packages Dubai
The quality of your post has impressed me. Thank goodness you are speaking from the heart; your understanding of this issue is quite clear.
https://vstoriginal.com/
I really enjoyed Your Post . I definitely update your post another platform .
you can get Service click on it.
Thanx For Sharing
With the passage of time, new changes have been introduced to the traffic control system of the Pakistan railway to make it a more professional traveling service.
thanks, Nice Post
Частные объявления услуг эвакуаторов в Сызрани
JK Rai small is a top-of-the-line product for Rai. The quality of the products is unmatched, and the variety of options available is impressive. I use JK Rai small, and it has been a game-changer in my kitchen. If you want high-quality rai, Jk Rai Small should be your choice. The place to buy it is from Shrihanmart. Their prices are reasonable and give top-notch quality. They have great customer service and are always ready to help with any queries. So, go ahead and try it; you will be satisfied.
Hi there, Thanks for writing. I love this post.
https://macsetup.org/
software activators
https://macsetup.org/
Unique Information. I’m glad I came across this website. It includes useful information for the visitors.
Thanx For Sharing
Thank you for sharing this informative article about the importance and examples of thank you pages. I found the list of 12 thank you page examples to be particularly helpful, as I am in the process of creating a new website for my business. The tips and elements you mentioned, such as confirming the visitor’s action, providing clear instructions, and promoting related products or services, are very useful. I will definitely consider these while designing my thank you page. Overall, a well-designed thank you page can not only show gratitude to the customer, but also help increase engagement and future conversions. Great job on the article!
Hey nice post. Good work. Please visit.
Mobility Freight – Best freight, shipping company in Nepal article also.
Its useful for you too.
Hey nice post. Good work. Please visit.
Mobility Freight article also.
Its useful for you too.
Hey nice post. Good work. Please visit.
Cargo companies in Nepal article also.
Its useful for you too.
Hey nice post. Good work. Please visit.
Shipping companies in Nepal article also.
Its useful for you too.
Hey nice post. Good work. Please visit.
Freight companies in Nepal article also.
Its useful for you too.
Hey nice post. Good work. Please visit.
Import and export shipping companies in Nepal article also.
Its useful for you too.
Hey nice post. Good work. Please visit.
Logistics companies in Nepal article also.
Its useful for you too.
It permits clients to submit prompts, which are then converted into four pictures that relate to the words. The client can either overhaul the most reasonable picture to a higher goal picture or investigation with different other options. David Holz, the prime supporter of Jump Movement, presently drives the midjourney group. Midjourney is one of the most amazing computer-based intelligence craftsmanship generators accessible for standard clients in 2022.
Great content. Keep posting stuff like this.
Hey nice post. Good work. Please visit my article as well, it will be really useful to you 🙂
Welcome to Budgeteaze
Your one-stop destination for all the best deals and discounts on the internet. We are a team of bargain hunters who are dedicated to finding the best deals and coupons from top retailers.
The tracker companies in Pakistan have been a part of the country since the early days. They were used for tracking property and livestock as well as for finding lost items. best car tracker in Pakistan
Thanks!
Hello, have a good day
I came here last week through Google and saved it here. Now I looked more carefully. It was very useful for me – thank you
I love this blanket. Thank you so much.
India’s Best Travel Companies Agencies
ShashiLife HealthCare PvtLtd is a Noida based pharmaceutical company, with vision of making world class affordable medicines. Check and make an inquiry now.
Visit us :- healthcare and pharmaceutical industry
Thanks for sharing such a great information.This post gives truly quality information.I always search to read the quality content and finally i found this in your post. keep sharing.As the world’s most popular vector graphics editor, Adobe Illustrator is one of the most expensive pieces of software on the market. The standard price for a single license to this application is $2499 per year and if you want it as part of your team, then you will have to spend even more. In today’s article we will explore some other options available in India that offer similar services at an affordable cost.Buy adobe illustrator price
Shop from House of Arfa Official Website. Browse the latest Pret, Formal Dresses Online Pakistan, Party Wear Casual collections, explore our campaigns discover our Hand Crafted Premium Collection.
Best Software And Latest Version
MKVToolNix Crack
Native Instruments Massive 6.4.8 Crack
SketchUp Pro 2023 Crack
BullGuard Antivirus 26.1.18.75 Crack
Sylenth1 3.074 Crack
Thanks for the information shared. Keep updating blogs regularly. If you have time visit
Floor tiles in Coimbatore
Can I download Todoist for Windows and other operating systems? Is there a mobile version, how to use the web version? We answer all questions!
Hey nice post. Good work. Please visit.
Mobility Freight – Best freight, shipping company in Nepal article also.
Its useful for you too. Visit us.
Hey nice post. Good work. Please visit.
Mobility Freight article also.
Its useful for you too. Visit us.
Hey nice post. Good work. Please visit.
Cargo companies in Nepal article also.
Its useful for you too. Visit us.
Hey nice post. Good work. Please visit.
Shipping companies in Nepal article also.
Its useful for you too. Visit us.
Hey nice post. Good work. Please visit.
Freight companies in Nepal article also.
Its useful for you too. Visit us.
Hey nice post. Good work. Please visit.
Import and export shipping companies in Nepal article also.
Its useful for you too. Visit us.
Hey nice post. Good work. Please visit.
Logistics companies in Nepal article also.
Its useful for you too. Visit us.
Hey nice post. Good work. Please visit.
Legend of Himalaya article also.
Its useful for you too.
Hey nice post. Good work. Please visit.
Legend of Himalaya – Best Travel, tour and adventure agency in Nepal article also.
Its useful for you too.
Hey nice post. Good work. Please visit.
Mt cho yu expedition article also.
Its useful for you too.
Hey nice post. Good work. Please visit.
Everest Expedition article also.
Its useful for you too.
Hey nice post. Good work. Please visit.
Annapurna Expedition article also.
Its useful for you too.
Hey nice post. Good work. Please visit.
Manaslu Expedition article also.
Its useful for you too.
Hey nice post. Good work. Please visit.
Lhotse Expedition article also.
Its useful for you too.
Hey nice post. Good work. Please visit.
Shishapangma Expedition article also.
Its useful for you too.
Hey nice post. Good work. Please visit.
Ama Dablam Expedition article also.
Its useful for you too.
Thanks for sharing this blog.
Please visit us at https://mach1.in
digital marketing | digital marketing company | seo company | seo company in india | content marketing agency | social media marketing
great
This is nice blog for me for reading
In this guide, we will provide you with all the information you need to make an informed decision when it comes to finding the best car tracker in Pakistan for your needs. We will discuss different types of car trackers available in Pakistan, their features, and how to choose one that fits your budget and requirements.Car tracker
Remini is one of the versatile applications that can be utilized to work on the nature of photographs. Remini professes to take bad quality photographs taken with old cameras or cell phones with high goal and clearness. You can download and attempt the Remini application for nothing on your Android telephone on Google Play.
The app includes thousands of works of literature, and you can even write your own novel! With all these features and more, the Ulysses app is a great alternative to the classic paper-based novel.
very good article, I’m from Indonesia enjoy reading your article, waiting for the latest update. Thank You
I Like Your Article Thank You For Share…….Atom Crack
Realy nice DIY hacks and ideas!!! 🙂
Car tracker Pakistan software is a new way to save money and time. Insurance companies are now using these apps to reduce the costs of car accidents. The Car Tracker app finds your car, tracks its location and monitors driving behavior. It sends alerts when you drive too fast or too slow and can even help you avoid accidents by alerting you if another driver is about to hit your car.Car tracker pakistan
Best Software And Latest Version
Wondershare UniConverter 14.1.12.148 Crack
Final Cut Pro X 11.6.7 Crack
DisplayFusion 2023 Crack
XMind 22.11.3657 Pro Crack
Sandboxie 6.62.2 Full Crack
Web software agency Istanbul provides e-commerce site, web software, web design, web and desktop programming, corporate website services.
Modern design bioclimatic pergola, aesthetic bioclimatic pergola, aluminum pergola useful in all seasons, stylish, high quality and suitable awning pergola systems…
Web software agency Istanbul provides e-commerce site, web software, web design, web and desktop programming, corporate website services….
Modern design bioclimatic pergola, aesthetic bioclimatic pergola, aluminum pergola useful in all seasons, stylish, high quality and suitable awning pergola systemmm…
Very Creative Nice Collection Thanks for Sharing…
If you are seeking any help with assignment solutions. Are you need the tutor’s opinions for correctly completing your assignment works? It is a familiar fact that completing academic tasks within a time limit is not everyone’s cup of tea. Give a break to your searching and move toward for benefit from the first class Assignment Help reference guide for surpassing your academic score and performance!! Then, we provide Computer Science assignment writing solution help online for students. We offer the types of assistance of assignment solutions online to scholars who need help from our writing experts. Overall, seeking help with assignments is a common and understandable practice for students. Just make sure to do your research and choose a service that is reputable and can provide the level of support you need. If you are struggling with your assignment work on time and have some lack of knowledge with your subjects.
GoodNotes itself promotes with a slight goodbye to paper and addresses understudies specifically with areas of strength for a presence (eg through Instagram) . The application should in this manner act as a basic note pad , as well as for learning slips , as a computerized slug diary or organizer . It tends to be utilized separately on account of the many import choices , eg on page formats, stickers, and so forth. There are some outsider suppliers online for extra material, eg on Etsy.
The developers from Prisma Lab recently updated their Lensa photo editor and literally took over social networks. With the update, the Magic Avatars feature was added to the application, which allows you to generate a series of stylish portraits from user photos.
If you are looking IObit Uninstaller Pro 12.3.0.8 With Crack 2023 Free then click this link.
<a href=" https://crackpunk.com/iobit-uninstaller-pro-crack-2023-download/
If you are looking CorelDraw X7 With XForce Keygen + Lifetime Patch Full Version Free then click this link.
<a href=" https://crackpunk.com/corel-draw0-crack-0-patch-full-version-download/
สล็อตBest Software And Latest Version
IObit Uninstaller Pro 13.0 Crack
iPhone Backup Extractor 2023 Crack
Golden Software GrapherCrack
Revo Uninstaller Pro 6.0.6 Crack
AdwCleaner 8.8.3 Crack
amazing post thanks for sharing do post more
Voice control is performed using the software. In this regard, the user has a wide choice of applications that will be able to carry out their plans. Below are some of the best programs.
Showrooms in Quetta New auto Car.Quetta car showroom
Nice Article
Topaz Mask AI Crack</a
To troubleshoot the routerlogin.net not working issue. There could be several reasons for this. For the login, you need to connect your device to the router’s network. If this isn’t the issue, there could be glitches with the web browser as well. Ensure to clear out the cache of the web browser and use an up-to-date version for the login.
The best price of Car Tracker in Pakistan is Rs.16,760 and the lowest price found is Rs.5,200.Car Tracker price in Pakistan
The best price of Car Tracker in Pakistan Car Tracker price in Pakistan
Best Software And Latest Version
VRay 6.0.21 with Crack
Window Focus 6.0.0 With Crack
Enscape 3D 3.7.7 Crack
WriteMapper 3.0.8 Crack
Loaris Trojan Remover 3.2.45 Crack
Great Post
Rank Tracker Crack
I appreciate the effort you put into this blog post FIFA 23 PC Game free download! Thanks for sharing your expertise on this topic.
I literally LOVE fleece and all of the things that are made of it!
It is a good website.I like your website.Thanks for sharing………..
Pokémon GO Game
Below are a number of webpages that we recommend for your visitors to view SEX images
https://titsx6.com/
Below are a number of webpages that we recommend for your visitors to view SEX images
https://aflamincest.com/
Below are a number of webpages that we recommend for your visitors to view SEX images
سكس محارم
https://aflamincest.com/
Below are a number of webpages that we recommend for your visitors to view SEX images
Below are a number of webpages that we recommend for your visitors to view SEX images
سكس ساخن
https://sexhotter.com/
Below are a number of webpages that we recommend for your visitors to view SEX images
Below are a number of webpages that we recommend for your visitors to view SEX images
Below are a number of webpages that we recommend for your visitors to view SEX images
سكس مترجم
https://sexinsexy.com/
It is a good website.I like your website.Thanks for sharing.
https://vk.com/shyhub
HomeGuard Pro Crack is a powerful and High-class software that is used to track and control your computer in your home and office environment. It is specially designed to manage system activity. Monitoring data collected on computers (clients) monitored by HomeGuard Professional Crack can be viewed remotely using the HomeGuard server component, which automatically and securely manages the audit trail database synchronized with customer computers. With support for 256-bit compression and encryption. transferred to the network. The server component runs as a Windows service and can also be used to remotely modify monitoring and blocking settings.
HomeGuard Professional Crack Download Expert is a hassle-free entertainment tracking tool for tracking and controlling the use of computer systems on local and business networks. Activity Monitor 9 fully entertains Full Crack facts online and mechanically blocks all adults and along with opportune content on websites similar to website blocking and allowing lists and filters based on types of recordings downloads or online flash games is the name of professional software for monitoring computing activities at home or office. Do you also want to know what other people are using from your processor If you are a parent of children, you are probably aware of their curiosity. In addition, we have prepared a plan to record activities on the computer. This app records web activity and blocks adult content automatically.
luxury body spa is best place known for female to male body massage and body to body massage ,Thai massage service in Mumbai. Our motto is giving 100% satisfaction to our customers. We are known for safe and secure service provider among all.
Web Designing Lab is Best Website Designing Company in Mumbai. We offer Ecommerce Websites, Digital Marketing, SEO Services and Graphic Design.
Top Website Designing Company in Mumbai. Ecommerce websites, digital marketing, SEO services, and graphic design are all things we provide.
Meine Sicherheit hat in den letzten Jahren abgenommen, und im Alter von 45 Jahren sah ich, dass meine Erektionen nicht mehr annähernd so fest waren wie früher, also hatte ich ein Online-Gespräch mit einem Dr., der Kamagra verschrieb. 50 mg zu Beginn bis maximal 100 mg. Ich sah eine Verbesserung, als ich 50 mg einnahm, ich hatte eine gewisse Erektion, die ich nicht verlor, als es an der Zeit war, ein Kondom anzuziehen. Die Erholungszeit war besser, aber im Großen und Ganzen überlegte ich, ob es weitergehen könnte. Ich stieg auf 100 mg, und meine Güte, was für ein Unterschied! Ich bin jederzeit bereit. Es gab kaum Erholungszeit, und mein Komplize und ich hatten verschiedene Besprechungen über einen Zeitraum von 4 Stunden, und ich hätte weitermachen können. In der Tat, auch im Folgenden, waren die Stärken des Tages einfach. Ich nahm die Pille, während ich verhungerte, eine Stunde bevor die Dummheiten begannen. Ich sah, dass, während ich länger und regelmäßiger aufrecht blieb, das Entladen nach der ersten Zeit mühsamer war. Mein Komplize hatte jedoch nichts dagegen! Wirklich glücklich im Allgemeinen. Keine Nachwirkungen. kamagra kaufen https://www.kamagraoriginal.co/
Very Helpful Article
iTop VPN 4.2.3 Crack
Very Helpful Article
sketchup pro 2023 crack
Plan@Digital is a Kochi, Ernakulam-based digital marketing institute.
The promotion of products, services, or brands through digital channels such as search engines, websites, social media, email, and mobile apps is known as digital marketing. As more people spend time online, it is an essential component of modern marketing strategies. Our digital marketing training academy will assist you in becoming a successful digital marketer with in-demand skills.
In Kerala, India’s Idukki district, there is a stunning hill town called Kanthalloor. Enjoy the beauty of Kanthalloor like a local with our cosy Snow White Holiday homestay if you’re seeking for a place to stay while travelling. Experience the delicious traditional food of Kerala, plush lodgings, and stunning views of the mountains nearby.
I appreciate your post thanks for sharing the information.
car tracker can come with a variety of features, including real-time tracking, geofencing, alert notifications, and remote engine shutdown. They can be purchased from a variety of manufacturers and may require professional installation.
Most attractive article and infomative also thanks for sharing with us.
https://reachontop.in/
There are several reputable dental centers in Turkey that offer a wide range of dental treatments including dental implants, veneers, crowns, orthodontics, and more. Here are some dental centre turkey:
DentGroup International: DentGroup has multiple dental centers throughout Turkey, including Istanbul, Antalya, and Izmir. They offer a full range of dental services and have highly experienced dentists.
Pycharm Crack 2023 Download Full is an amazing software for developers that helps to work with different codes in PHP in a professional manner.
mumbai massage spa can provide all of these services and more Body Massage Spa Near Me, 60-Minute Body Massage with Essential Oil, Hot Stone and Hot female to male body spa and after visiting there I am sure you will be re
Hey nice post. Good work. Please visit. Technical Sewa.
Technical sewa article also.
Its useful for you too.
Hey nice post. Good work. Please visit. Technical Sewa.
Technical sewa article also.
Its useful for you too.
Hey nice post. Good work. Please visit. Technical Sewa.
Technical Sewa article also.
Its useful for you too.
Hey nice post. Good work. Please visit. Technical Sewa.
microwave oven repair kathmandu article also.
Its useful for you too.
Hey nice post. Good work. Please visit. Technical Sewa.
chimney repair Kathmandu article also.
Its useful for you too.
Hey nice post. Good work. Please visit. Technical Sewa.
air conditioner repair kathmandu article also.
Its useful for you also.
Hey nice post. Good work. Please visit. Technical Sewa.
home theater Repair Kathmandu article also.
Its useful for you too.
Hey nice post. Good work. Please visit. Technical Sewa.
lcd led tv repair kathmandu article also.
Its useful for you too.
Hey nice post. Good work. Please visit. Technical Sewa.
refrigerator repair kathmandu article also.
Its useful for you too.
Hey nice post. Good work. Please visit. Technical Sewa.
geyser repair kathmandu article also.
Its useful for you too.
Hey nice post. Good work. Please visit. Gadgetcandy.pk
https://gadgetcandy.pk/
Best Software And Latest Version
Expert PDF 16.1.0 Crack
Adobe Photoshop CC 24.3.2 Crack
Bulk Image Downloader 6.23 Crack
VSDC Video Editor Pro 8.1.3.460 Crack
Avast Internet Security 23.2.7884 Crack
It’s not boring when you write about it.. out every blog about this, yours is the best.
Signature Hotels & Residence is a mega project by J7 Group located in the Top City 1 Islamabad.signature hotels and resorts
thanku sir share this website visit my website and all service available
Free Pc Crack Software & Mac Version Free Download
The Islamic Travels feature a diverse range of articles, covering everything from Islamic teachings and beliefs to current events and issues affecting the Muslim community.
Best Software And Latest Version
Final Cut Pro X 11.6.7 Crack
Wondershare UniConverter 14.1.14.167 Crack
DisplayFusion 2023 Crack
XMind 22.11.3657 Pro Crack
Maxon Cinema 4D Studio S26.109 Crack
We would love to hear from you. You can tip us, suggest us something good, Report something or even you can ask for help. We will contact you soon.
bakeca annunci donna cerca uomo Napoli
You can buy organic website traffic from top quality online marketing place at traffmagic.
I never stop myself to express something about your nice work. You’re working really hard.bapehoodieofficial.com
Great work on this blog !
Wonderful post, Thanks !
This was a great read – thank you !
luxury body spa serviceis best place known for female to male body massage and body to body massage
Thai massage service in Mumbai.
how to fix a leaky old fashioned faucet
how to find a fashion designer for your startup”
افلام محارم
افلام سكس
افلام بورن
سكس 2023
تحميل سكس
سكس حيوانات 2023
سكس اغتصاب
سكس اخوات
سكس اجنبي
سكس بنات
سكس بزاز
سكس امهات
نيك كس
سكس حيوانات
سكس جماعي
افلام نيك
سكس فى الحمام
سكس عربي
سكس سحاق
سكس محارم
سكس مثير
سكس مترجم
سكس نيك
سكس مصري
سكس مشاهير
قصص سكس
فيديو سكس
صور سكس
Hey nice post. Good work. Please visit.
Madan Yoga article also.
Its useful for you too.
Hey nice post. Good work. Please visit.
Yoga Teacher Training in Nepal article also.
Its useful for you too.
Hey nice post. Good work. Please visit.
200 Hrs YTT Course in Nepal article also.
Its useful for you too.
Hey nice post. Good work. Please visit. Smart Care.
Yoga Classes in Nepal article also.
Its useful for you also.
Hey nice post. Good work. Please visit. Smart Care.
Yoga Tour in Nepal article also.
Its useful for you too.
Hey nice post. Good work. Please visit. Smart Care.
Nepal Yoga School article also.
Its useful for you too.
Hey nice post. Good work. Please visit. Smart Care.
Best Yoga Retreat Training in Nepal article also.
Its useful for you too.
Hey nice post. Good work. Please visit. Smart Care.
Yoga Treks and Tour in Nepal article also.
Its useful for you too.
Hey nice post. Good work. Please visit.
Hindu Priest article also.
Its useful for you too.
Hey nice post. Good work. Please visit.
Best Hindu Priest in London article also.
Its useful for you too.
Hey nice post. Good work. Please visit.
Rice feeding ceremony article also.
Its useful for you too.
Hey nice post. Good work. Please visit.
Naming the Child article also.
Its useful for you also.
Hey nice post. Good work. Please visit.
Baby Shower article also.
Its useful for you too.
Hey nice post. Good work. Please visit.
Hindu Griha Pravesh Puja article also.
Its useful for you too.
Hey nice post. Good work. Please visit.
Hindu funeral rituals article also.
Its useful for you too.
Hey nice post. Good work. Please visit.
About Us article also.
Its useful for you too.
Hey nice post. Good work. Please visit.
Blog article also.
Its useful for you too.
Hey nice post. Good work. Please visit.
Galleries article also.
Its useful for you too.
Hey nice post. Good work. Please visit.
Contact Us article also.
Its useful for you too.
If you’re located in Kathmandu, Nepal and need reliable repair services for your household appliances, technicalsewa.com has got you covered! Our team of experts specializes in LED TV repair service, microvan repair, washing machine repair, and vacuum cleaner repair. We understand how important these appliances are to your daily routine and we strive to provide fast, efficient, and cost-effective solutions to get them up and running in no time. Trust us to deliver top-notch repair services that are both reliable and affordable. Contact us today to schedule an appointment and get your appliances back in working order in no time!
This is an incredibly inspiring article. thestreetwearstore.com I am basically satisfied with your great work. You put actually quite supportive information. Keep it up.
Hey nice post. Good work. Please visit.
https://futuristicstores.com/
nice post. Great work. Please visit.
https://futuristicstores.com/
This is an incredibly inspiring article, great article.
Autoankauf Dortmund seit über 15 Jahren sind wir in Dortmund und Umgebung unterwegs um Gebrauchtfahrzeuge anzukaufen. Stets sorgen wir für eine faire, transparente Ankaufsabwicklung so das wir viele zufriedene Kunden haben.
https://al-autoankauf.de/
Für uns ist ein gutes Geschäft dann gut, wenn es für beide Seiten gut ist. Deswegen zahlen wir auch immer faire marktgerechte teils überdurchschnittliche Ankaufspreise auf Wunsch direkt in bar an sie aus.
Thanks Admin For Sharing Your Great Ides. If you want to Download the Official Crack Then Click Here
thanx For Sharing
These are just a few ideas to help take your blog to the next level. Keep up the great work!
I really enjoyed reading this thread and discussion.
I would like to refer car rental service Its not only focused on discussing the topic inside out but
also “Benifits”. Enjoys reading the blog.
i am very happy to see there greatest information.
really great discussion. amazing information
Good job
I am very satisfied of this website and I also rate it daily whenever I do and my whole family is also very agree with this website. I like it so much.https://crackscoop.com/
Actually quite glad to say, trapstar hoodie your post is extremely fascinating to read.
Thanks for the information. I really like the way you express complex topics in lucid way. chromeclothing.co It really helps me understand it much better way.
I’m truly glad to say it’s an intriguing post to read. ovoofficial.com I get new information from your article.
This is so amazing and wonderful
Hi, I’LL say thanks for such an quality and worthy product I am so happy and enjoying it
Nice Work and a Wonderful idea
Thank you for your kind words. kingspidershop.com am glad that you find my explanations helpful in understanding complex topics more easily.
Nice Post
this website is one the best website I will share it with my friend
This is a really good website I am so happy that I found it
Wish it will be essential for all. All the detailed information are provided in a very simple and also understandable procedure.
It permits clients to submit prompts, which are then converted into four pictures that relate to the words. The client can either overhaul the most reasonable picture to a higher goal picture or investigation with different other options. David Holz, prime supporter of Jump Movement, presently drives the midjourney group. Midjourney is one of the most amazing computer based intelligence craftsmanship generators accessible for standard clients in 2022.
Very nice article
Pets Hub
Very nice article
This is a really good website I am so happy that I found it.https://crackscoop.com
Your website is fantastic, and stussyofficial.ltd appreciate your dedication to maintaining it. Thank you for generously sharing your blog site – it has been an incredibly helpful resource.
Actually quite glad to say, your post is extremely fascinating to read. nbayoungboyshop.com
This is an incredible inspiring article. ericemanuelstuff.com I am basically satisfied with your great work. You put actually quite supportive information. Keep it up.
The blog post about “monster fleece lovey blankets” is an informative and helpful guide for anyone looking for ovey blankets for their comfort zone. It provides valuable insights into the different types of vape boxes available in the market and the factors to consider when selecting the right box for your specific needs. By highlighting the benefits of using high-quality vape boxes, the blog post demonstrates how it can enhance the customer experience and build a positive brand image. Overall, it’s a well-researched and insightful post that can be useful for businesses in the vaping industry.
Thanks for sharing this lovely stuff.
Find the best Kids Bikes for sale in Pakistan.Kids Bikes
StarAndDaisy is a baby product company that specializes in providing high-quality, innovative, and eco-friendly products for infants and toddlers. The company is committed to providing parents with a range of safe, comfortable, and practical products that cater to the needs of their growing children.
StarAndDaisy has quickly become a leader in the industry. The company’s https://staranddaisy.in/ mission is to create products that are not only good for babies but also good for the environment.
Awesome..
AMAZING BABY GEARS PRODUCTS is available on Star and Daisy.
Visit https://staranddaisy.in/ for the best Care for your baby
vuisit here for awesome travel blog
Basajeruk is a Melayu online Kepala Bergetar Drama that provides a wide range of tv series, movies, dramas to watch online. It is a popular website in Malaysia where people can watch diverse collection of content in the Malay Drama
Actually quite glad to say, your post is extremely fascinating to read. antisocialsocialclubstuff.com
Gacha Nox is a unique mod for the Gacha Club arcade. The developer decided to change and expand his favorite game. Even an avid gamer will be surprised by the variety of items, settings, and modification possibilities. Even more variability in the creation of heroes, plots, and random encounters.
dr nidhi jha is the best gynecologist in south delhi and best IVF doctor in delhi and best IVF specialist in delhi.she is best IVF specialist in malviya nagar delhi click on http://www.drnidhijha.com
CleanMyMac X Activation Code is a very famous and trusted software for the cleanness of Macs from different types of viruses and malware. It is a general application for working effectively to clean the Mac and maintain its bugs.
Find the best Kids Bikes for sale in Pakistan.Autoankauf Hamburg
AL Autoankauf Schwerte kauft alle Gebrauchtfahrzeuge an. Alter und Zustand sind unerheblich, bieten sie uns Ihr Fahrzeug gerne an. Wir zahlen immer faire, marktgerechte Preise und sorgen für eine unproblematische Ankaufsabwicklung.
AL Autoankauf Schwerte kauft alle Gebrauchtfahrzeuge an. Alter und Zustand sind unerheblich, bieten sie uns Ihr Fahrzeug gerne an. Wir zahlen immer faire, marktgerechte Preise und sorgen für eine unproblematische Ankaufsabwicklung.
Thank you, Shearing, for the positive information. In this blog, you will find very useful information.
Shop an exclusive supreme hoodie from the Official Store. We have Unique Designs for every adventure. 100% Guaranteed products.
Waooooo Nice Collection Thanks for Sharing
When it comes to automotive hail damage repair, one of the most effective and popular techniques is paintless dent repair (PDR). PDR offers numerous advantages, from cost-effectiveness to preserving the original factory finish of your vehicle. we will explore the benefits of paintless dent repair and how it is the preferred choice for auto hail damage repair. From understanding the process of PDR to its environmental friendliness, we’ll discuss why PDR is a valuable solution for restoring your car’s appearance after a hailstorm.
Actually quite glad to say, your post is extremely fascinating to read. jordanhoodies.com
عرب نار
Web.de ist bekannt für seinen web de login benutzerfreundlichen E-Mail-Dienst. Millionen von Menschen nutzen täglich ihre Web.de-Adresse für die private und geschäftliche Kommunikation. Der E-Mail-Dienst bietet eine zuverlässige und sichere Plattform mit Funktionen wie Spam-Filter, automatischer Ordnerorganisation und Verschlüsselungsoptionen.
you are so good at what you do.
No doubt this is showing that hard work beats talent.
wonderful website visit our site
yeah love to read it keep goin
wow such a good content
smq cargo company best cargo services in UAE
Continue to send in more valuable and astonishing information on your blog so that we enjoy it.
I’m truly glad to say it’s an intriguing post to read. I get new information from your article.
I never stop myself to express something about your nice work. You’re working really hard.
Continue to send in more valuable and astonishing information on your blog so that we enjoy it.
I never stop myself to express something about your nice work. You’re working really hard.
Experience the ultimate relaxation with our rejuvenating Massages therapies. Let our skilled therapists melt away your stress and tension, leaving you feeling refreshed and revitalized.
best cargo from UAE to KSA
Tribunepedia.com is the number one online media site in America that sponsors Tribune Digital Online. Tribunepedia with a network spread across America called the Tribune Network. Tribunepedia, headquartered in California, is America’s digital transformation accelerating medium. We are here to provide information through the Tribunepedia network.
Your post is really very good and I appreciate it. It’s hard to sort the good from the bad sometimes. You write very well which is amazing. I really impressed by your post.
personalised paper bags
Nice post. Thanks for sharing this information.
Civil work services in lahore
Yibiyuan supplies custom drip irrigation system from China.
Yishitong is a leading supplier agricultural machinery
Find your solar solution from a reliable solar energy supplier
yeah love to read it keep goin
“Boost your brand’s image with custom boxes packaging solutions tailored to your unique needs. Our expert team creates visually stunning and durable packaging that showcases your products and captivates your customers. From small startups to established businesses, we offer a wide range of customizable options to ensure your packaging stands out on the shelves. Discover the perfect packaging solution for your brand and make a lasting impression with our professional custom boxes packaging services.”
Visit THE MAILER BOX.com!
Bhojpuri reels, hindi reels 18+ language reels, pictures, mms are completely free so sign fast guyz
english bf hindi
Bhojpuri reels, hindi reels 18+ language reels, pictures, mms are completely free so sign fast guyz
hindi bf
I’ve been checking out some of your articles, and they’re really well-written. I’ll bookmark your blog without a doubt.
I’ve been reading through several of your stories, and they contain some really smart content. I’ll bookmark your blog for later.
I appreciate your sharing this great post. I like this blog and have bookmarked it.
Invest in the well-being of your employees with comprehensive occupational health and safety training. Stay compliant with regulations, minimize workplace accidents and injuries, and create a safe and healthy work environment with our expert-led training programs.occupational health and safety training
I Loved this Blog site and learning view it daily
Bandicam Full Version
I found the section on common mistakes made in HND assignments to be particularly insightful. It’s easy to overlook small errors that can have a big impact on your grade, but the HND Assignment Help guide provides clear guidance on how to avoid them.
To introduce Guitar Hero Live Friend on your iOS gadget, click the green Proceed To Application button above to begin the establishment interaction. The application is recorded on our site starting around 2015-10-20 and was downloaded multiple times. We have previously checked if the download connects is protected, but for your own insurance, we suggest you examine the downloaded application with your antivirus. If the download interface is broken, your antivirus may identify the Guitar Legend Live Friend as malware.
Willkommen zu unserem Blog, in dem wir die faszinierende Plattform AniWorld vorstellen. Wenn du ein Anime-Fan bist und mehr über die Welt des Anime erfahren möchtest, dann bist du hier genau richtig!
I’m happy to say that it’s a fascinating piece to read. Lanvin Clothing Shop. I get new information from your article. Really helpful information ever i get from this Blog.
Outstanding Great article. I am really satisfied with your outstanding work. Chrome Hearts Clothing Shop. You put actually quite supportive information.
Banish all your boredom from your travel-related desires and create unforgettable memories with our charming call girls. A worthwhile sexual experience is just a call away as our escorts are ready to deal with you at any time of the day.
https://www.callragnigirls.co.in/kaushambi-escort.html
Looking for the best email finder tool? Try Minelead.io! Our advanced algorithms ensure accuracy and speed, with an easy-to-use interface and affordable pricing. Your data is safe with us. Find email addresses quickly and easily. Try Minelead.io today! Check out minelead
https://ahmadpc.org/
Very nice
Best web design and development company in pune http://leadsqure.com/
Trapstar fashion brand you can be sure to look stylish while also staying comfortable. Trapstar hoodie and t-shirt is the latest fashion trend for men. It is a perfect combination of streetwear and high fashion, making it suitable for any occasion. The hoodie and t-shirt come in a variety of colors, styles, and sizes, so you can find something that suits your style perfectly. The fabric is soft and comfortable, making it ideal for everyday wear or special occasions.
https://corteizshop.com/ shop now
https://officialtrapstar.net/ shop now
Lululemon hoodies, T-Shirts, lululemon belt bag and much more at lululemon official store. Get Up to 35% off on all products Worldwide fast shipping Limited stock available Come fast and order now!
https://lululemonofficial.com/
Software PC Tools Latest (Full Version)A Platform for solution about PC Software Like Windows, Mac Apps, Android apks, asking for license key
Gallery Dept hoodies, T-Shirts, sweatshirt and much more at The Gallery official store. Get Up to 35% off on all products Worldwide fast shipping Limited stock available Come fast and order now!
https://thegallerydeptofficial.com/
Thanks for sharing a content. for Ai related content visit our website.
Unlock the World of Technology with SoftwareFilesClub – Your Ultimate Destination for All Things Software
Unlock the Power of Technology with SoftwareConversionTools.com – Your Ultimate Guide to PC Software and Latest Tech Trends!
If you are looking for luxury car rental services in Islamabad for a business trip, wedding ceremony, or normal rentals,
you can contact Mian Travel and Tours. They offer a range of luxury and comfortable vehicles for rent. Mian Travel and
Tours also provides airport transport services, pick-and-drop services, and daily rental services at affordable costs.
For more details visit our website: https://miantravelandtour.com/
l like this website i will visit on daily basis for working useful thanks
Welcome to GPT 5 Login site.
Corteiz Hoodies,T-shirts, Shorts and much more at Corteiz Official. Excellent Quality Stuff with up to 30% off Now available worldwide shipping 24 7 Costumer support ! SHOP NOW !
https://corteizshop.com/
Satta king online is a gambling game that is hugely popular in India. Here are some tips to help you get started playing this game online: 1. Choose a reputable website: When looking for a website to play Satta King online, make sure to choose a reputable and trusted site. There are many fake websites out there that may look legitimate but are just trying to scam you.
We have made it super easy to check lesco bill electricity bill online, and then download or print the duplicate bill copy for free, and this web generated bill can be used to deposit bill amount in any bank.
Gallery dept Hoodies,T-shirts, Shorts and much more at gallery dept official. Excellent Quality Stuff Now available at Corteiz official store worldwide shipping 24 7 Costumer support ! SHOP NOW !
https://thegallerydeptofficial.com/
Google Nest WiFi range extender setup
ASUS RT-AX88U port forwarding not working
hy how are you
http://crackscoop.com
Very Helpful Information
SolidWorks 2023 Crack
Google Nest WiFi not connecting
What Is an ATT Attachment? AT&T Support
ASUS RT-AX88U slow Wi-Fi speeds
It’s hard to come by educated people in this particular ba 2nd year result roll number topic, but you seem like a rock.
ASUS RT-AX88U firmware update issues
سكس مترجم
Troubleshooting support for AT&T Mail customers
ASUS RT-AX88U VPN setup problems
Nest WiFi slow speeds
Thanks for sharing information
Inat Box Tv
I read that Post and got it fine and informative.
More about Tourism
https://lululemonofficial.com/ shop now
https://officialchromehearts.net/ shop now
https://corteizshop.com/ shop now
https://lululemonofficial.net/
Lululemon belt bags, lululemon t-shirts and much more at lululemon official store
https://lululemonofficial.com/
Lululemon belt bags, and much more at lululemon official store Limited Stock!
https://lululemonofficial.com/
Reset or change your Yahoo password
تدريب مهني في افضل اكاديمية للتعليم المهني في دبي
تدريب مهني
ديلوم مهني في الهندسة مع اكاديمية الدار
دبلوم هندسة الكترونية
ادرس دبلوم ادارة الاعمال في واحدة من افضل المعاهد في دبي
دبلوم ادارة اعمال
تخصص في الامن السيبراني من خلال دراسة ديلوم الامن السيبراني في دبي
دبلوم امن سيبراني
برامج تعليم مهني متعددة في مجالات الهندسة- الحوسبة – ادارة الاعمال – الإعلام
تعليم مهني
تدريب مهني مميز في اكاديمية الدار للتعليم المهني في دبي
تدريب مهني
اكاديمية الدار للتعليم المهني واجدة من افضل المعاهد في الإمارات
افضل معاهد التدريب دبي
Small Tractor Tiller manufacturers
I’m truly glad to say it’s an intriguing post to read. I get new information from your article. kanyewestofficialshop.com
Я хотів би поділитися своїм дуже позитивним досвідом з онлайн кредитами! Вперше, коли я стикнувся з необхідністю невеликої фінансової допомоги, я спробував звернутися до банку, але цей процес був досить складним та зайняв багато часу.
Коли я знайшов інформацію на сайті https://leokit.pp.ua/ про онлайн кредити, здалися вельми простим та зручним варіантом. Реєстрація на платформі була простою, вимоги до документів обмежені, а заявка на отримання кредиту заповнювалася швидко та зрозуміло.
I read that Post and got it fine and informative.
Well written and greatly compiled, please don’t forget to check UK Certificate Attestation
Excellent publish, very informative. I enjoyed what you’ve done on this site. It will useful for kuliah karyawan, You should continue your writing.
24v Off Grid Battery Bank
i dont know why u dont download sketchup pro
reality usefull
“Checking off dreams, one by one! ✨ Can’t wait to see what incredible adventures await in ‘Check My Dream’! “
“How to Create a Mobile Game“
Royal Honey For VIP In Pakistan
Royal Honey Tester Box Contains1 Sachet of Royal honey for Vip (10gm)1 Sachet of Royal Honey for him (20gm)1 Sachet of Kingdom Royal Honey (20gm)1 Sachet of Golden Royal Honey…
i am satisfied this work
http://crackscoop.com
cosmetic boxes
Monster Blanket looks good and adorable, Thanks for sharing this crafts. Are you looking for latest news in Hindi like sports News, Politics News, Entertainment News, Cricket News Hindi etc.
La accesibilidad es clave en el mundo del streaming seriesfliz lo comprende bien. La plataforma está disponible en una variedad de dispositivos, desde smartphones y tabletas hasta computadoras portátiles y Smart TVs. Esto te permite disfrutar de tus series y películas favoritas en el dispositivo que prefieras, ya sea en casa o mientras te desplazas.
This incredible article has truly captured my interest – a captivating read, indeed!
Cuddling up with these ‘Monster Fleece Lovely Blankets’ feels like a warm hug from a friendly monster. Softness and comfort rolled into one!
Crafting Digital Excellence: Elevate your online presence with our captivating WordPress web designs. We blend creativity with functionality to shape websites that leave a lasting impression. Seamlessly responsive, visually stunning – your digital vision, brought to life.
NS Ventures is a leading provider of Real estate 3D rendering services in India. With a team of skilled professionals and state-of-the-art technology, we offer high-quality 3D renders and models for a wide range of industries including architecture, interior design, product design, and real estate. Our services include 3D visualization, 3D modeling, 3D animation, virtual tours, and walkthroughs. We cater to clients across the globe and strive to deliver cost-effective and timely solutions for all their 3D rendering needs. Contact us to know more about our services.
Lululemon Belt bag, T-Shirts, Hoodies and much more at lululemon official store. Chose your favourite colors and designs with big discount and worldwide fast shipping come fast and order now!
YADEST, votre agence de communication et marketing digital basée à Rabat. Spécialistes du digital, nous dépassons les limites de la créativité pour développer.
HNC course is the most difficult course, and it often takes huge time to build up a comprehensive understanding of the concepts. Preparing assessment solutions for the same is quite a tough job for most of the students. It necessitates appropriate focus and profound research work, which makes it hard to finish off the academic tasks within time by the students. Students globally look for professional help for significant assistance and HNC Assignment Help is one of the best platforms which surely bring smiles on their faces and top notch grades in their score cards!
Nice work. Keep it up
https://utils-world.com/
This feature was reported missing as far back as September 28, 2018, and it seems the problem persists. The absence of a comments section restricts viewer interaction and engagement, which is a crucial aspect of any online platform.
hreeja Health Care Products takes the lead in producing and wholesaling premium Oil Extraction Machines, Oil Extraction Machine, Commercial Oil Presses, and Mini Oil Ghanis.
Venmo, which is part of PayPal’s larger brand family, is owned by PayPal. You can send and receive money quickly with this mobile payment app.
Zopiclon, also known by its brand name Imovane, is a medication often prescribed for the short-term treatment of insomnia. It belongs to the class of drugs called hypnotics, which help to induce sleep and improve sleep maintenance. If considering its use, it’s essential to consult a healthcare professional to determine its suitability and proper administration.
Zopiclon, also known by its brand name Imovane, is a medication often prescribed for the short-term treatment of insomnia. zopiclon kopen It belongs to the class of drugs called hypnotics, which help to induce sleep and improve sleep maintenance. If considering its use, it’s essential to consult a healthcare professional to determine its suitability and proper administration.
We provide wide range of services including Termite Control, Pest Control, Waterproofing and Heat Proofing. We have reputed position in market because of up to date infrastructure and skilled staff. Our wide clientage speaks of our reliability and expertise.
Effortlessly ascertain the required flow rate for your pool pump through the user-friendly pool pump flow rate calculator provided here. Enjoy efficient water circulation and filtration, resulting in a sparkling clear pool.
Boat rental Lake Havasu | Pontoon Rental | Pontoon rental Lake Havasu | Pontoon Rental Detroit Lakes | Crusin Tiki | Things to do in Purham.
What a wonderful knowledge you have given, enjoyed reading it, excellent work, What is perfect explanation, Thank you for writing such content post
In order for customers to feel good about purchasing high-quality goods, Couponsdestiny.com provides discount codes. They also don’t want to increase client prices, which means they don’t want to boost production costs. Use the British Supplements Discount Code at Couponsdestiny.com to get the items you want for a discounted price. So hurry up! and get your discount.
TV.Youtube.com/Start provides more than a hundred channels on it. But for that, you require an account and then sign in to the account. So following are the steps to sign in with YouTube TV.
I’m impressed with your writing skills and the layout of your blog.
Free and Open Source JMeter Alternatives (2023)
Visit & Explore the charm world of Australian Parrots and their beauty, behavior, and conservation on our website.
Australian Parrots
Thanks for sharing this crafts.
pescobills.com.pk is responsive website and you can easily view your bill amount on all kind of devices (desktop/mobile). All you need is the 14 digit reference number to check your pesco online bill that you can find on any old bill copy.
How to Grow Magic Mushrooms at Home
Growing magic mushroom grow kit at home is relatively simple. However, it does require good attention to hygiene and some patience. You will also need a few pieces of equipment, although most of them are easy to find. https://universalshroomstore.com
Boost your website’s authority and rankings with top-notch Link Building Services in India by SEO Khazana Services. Elevate your online presence today!
These monster fleece lovey blankets are so adorable, I was actually looking for same.
Near Your locations call girls and Visit here___ escorts gir!s
Click Link___ Call girls and esc0rts in Chandigarh and all over India
dizikorea.co olarak Kore dizileri.
dizikorea
Nice Article
Wondershare Mockitt Crack v
The Ballysports.com/Activate is a comprehensive sports streaming service that provides access to a variety of sports programming. From college football and basketball to baseball and soccer, the app offers exclusive games, pregame and postgame shows, documentaries, and press conferences. However, to access these features, users must link their app to a valid TV Service provider.
Nice Article
ShutterStock Images Downloader 1.4.4 Crack
Hoş geldiniz, Asya dizileri izle adresine hoş geldiniz! dizikorea.co olarak Kore dizileri, Çin dizileri, Hint dizileri, Japon dizileri, Tayland dizileri, BL dizileri ve Türkçe Altyazılı. Anime gibi Asya’nın popüler yapımlarını Türkçe altyazı seçeneğiyle sizlerle buluşturuyoruz.
dizikorea.co, çevirilerde güvenilir kaynaklar kullanarak size hızlı ve güvenilir bir site sunmayı hedeflemiştir. Asya adresi olarak bilinen sitemiz. Pek çok kişinin beğeneceği tarzdaki yapımları bünyesinde barındırıyor. Amacımız, Asya dizileri Türkçe altyazılı izle denildiğinde akla gelen ilk isimlerden biri olmaktır. Hem hızlı hem de kaliteli yapımlarla diğer Asya dizileri siteleri arasından sıyrılmak istiyoruz ve bu doğrultuda çalışmalarımızı sürdürüyoruz. dizikorea.co olarak herkese iyi seyirler dileriz.
dizikorea.co olarak Kore dizileri.
dizikorea
dizikorea.co, çevirilerde güvenilir kaynaklar kullanarak size hızlı ve güvenilir bir site sunmayı hedeflemiştir. Asya adresi olarak bilinen sitemiz. Pek çok kişinin beğeneceği tarzdaki yapımları bünyesinde barındırıyor.
dizikorea.co olarak Kore dizileri.
cin-dizileri
Tribe Topper is an Ed Tech Platform focusing on providing quality educational content for Cambridge Assessment International Examinations (CAIE) A/AS Level, Cambridge International General Certificate of Secondary Education (IGCSE) Extended & Core and International Bachelorette (IB) board (DP & MYP) high school students.
https://yehyeh.bet/
Thank you for letting us comment. Tik
https://www.ltobetlotto.vip/
Thank you for letting us comment. Tik
https://www.slotpg99.bet/
Thank you for letting us comment. Tik
Thank you so much for writing such a beautiful article, i hope you will keep it up in future too.
Your contributions have been consistently valuable and appreciated. Your dedication and enthusiasm are evident in everything you do, and it’s truly a pleasure to have you as part of our team/community. Keep up the excellent work, and I look https://cookfavor.com/t-bone-steak-recipe/ forward to seeing your continued growth and success. Thank you for your hard work and commitment!
this is very helpful i like it wonderful sharing on the blog bnackcrack
Download Now R-Wipe & Clean 20.0 Crack is a complete solution from R-Tools to erase unnecessary files and keep the privacy of your computer.
Want to enjoy premium versions of software then click on this link: https://crackonicss.com/
We offer you the safest & fastest tool to find the most similar images online.
https://imagesplatform.com/
Very Good Posts Please Read Below My Short Info You Can Check Your mepco bill online on our Website.Thanks
This amazing piece has really piqued my curiosity; it’s a page-turner! #AI Social Media Marketing Software
Medical, Healthcare & Surgical Equipment's– We are the firm that deals with all the medical requirements. Our products are clinically approved and are widely used to provide medical services. They are widely recommended by medical professionals. Our products include medical disposable and medical essentials. Products are Latex Gloves, Nitrile Examination Gloves, Surgical Sterile Gloves, Digital Thermometer, Easy Crepe Bandage, Elastic Bandages, Cannula Fixator, Examination Gloves, Nebulizer Machine, Disposable Mask, Electric Hot Water Bag, Pulse Oximeter, Digital BP Monitor, Microporous Tape.
A review of kolkata people
Thanks, Admin For sharing a post An Ideas. Enjoy Crack Softwares!
Good post! krevi wifi extender setup is best for home and office network…
Understanding the concepts and theories of Diploma course and then precisely finishing off academic tasks is quite an impossible job for most of the students. Almost all the students find themselves under pressure and stress whenever they have to complete the assessment tasks within a short time period. But, you need not to be worried. It is always recommended to search no more for professional help as Diploma Assignment Help is your ultimate destination!
“Wow, these monster fleece lovey blankets look so cuddly! Perfect for keeping little ones cozy and making bedtime fun! “-
shaksham foundation
Thank you so much, Please continue to share such useful information with us.
Career Opportunities At Adult Industry Of Male Escort Jobs
Get A Chance To Make Your Life Beautiful By Doing Male Escort Jobs
If you want to Earn Money in Your Free Time Visit iplayboy.in
Wow, these monster fleece lovey blankets look adorable and cozy! Maybe they’re the perfect cuddle buddies for kids and adults alike!
–shaksham foundation
What a Wonderful knowledge you have given, enjoyed reading it, excellent work, what is perfect explanation, Thank you for writing such content post
ทำให้ห้องนอนของคุณกลายเป็นสวรรค์ส่วนตัวของคุณไปพร้อมกับฟิวช่างที่มีความเชี่ยวชาญและประสบการณ์ในการ บิ้วอิน สร้างสภาพแวดล้อมที่สมบูรณ์แบบสำหรับการพักผ่อนและหลับลึกได้ทุกคืน ทางเรามีความมุ่งมั่นที่จะทำให้คุณได้รับประสบการณ์การพักผ่อนที่ไม่มีใครเทียบเท่า
Incredible work! The way you’ve presented the information is both engaging and enlightening. I appreciate the fresh perspective you brought to the topic. Well done
Are you looking to register for a free call boy job?
Search no further than Gigolomania.com, where you may sign up without cost and learn about interesting call boy job prospects.
“These monster fleece lovey blankets look adorable! How about making mini versions for our furry friends? “-bentonitehttpsuppliers
A review of Kolkata people
A review of mumbai people
A review of delhi people
I recently had the pleasure of working with a talented team on a logo design project, and I must say, the experience exceeded my expectations. From the initial concept to the final product, the entire process was a seamless journey of creativity and collaboration.
Find out why Better Gardens is the best company to build beautiful swimming pools in Dubai. Best landscape company in dubai
Europe’s largest assortment of vaping devices and e-cigarettes. Discover a large range of brands and over 5,000 products. Deutsche Vape
Thank you for the amazing content.
Thank you for the amazing content.
https://tiktoklikeskaufen.de/
Hi, That looks great, Very nice and informative content. I am a tech blogger and I own a site. If you are interested in Tech Write for us
, Please contact me using the link if you need any guest post services.
Das ist tatsächlich die Art von Informationen, die ich zu finden versucht habe. Vielen Dank, dass Sie diese Informationen geschrieben haben.
“Wow, these fleece lovey blankets are adorable! Adding a splash of color to cuddles “-
bentonite suppliers
For high school students, the ACT Test is a curriculum-based course for career planning and education that evaluates mastery of college readiness standards. The ACT is a standardized test consisting of multiple-choice questions based on four sections: English, Math, Reading, and Science.
EPDM Gummidichtung, ideal für Abdichtung und Isolierung in verschiedenen Anwendungen. Beständig und langlebig.
dr sumit badhwar is the Best Orthopedic Surgeon in Noida .he is the best orthopedic doctor in noida and best knee replacement surgeon in noida.he is Top Orthopedic Doctor in Noida .click on https://www.drsumitbadhwar.com/
The best sex site for translated and exclusive movies
Love these cozy monster fleece blankets! Adding a unique touch to bedtime snuggles. How about a DIY twist with customizable features? #CraftyIdeas
–fish shop
Thank you for the good information and it was very helpful… visit our website Best Ayurvedic treatment centre in delhi
Hi Friends I AM Hamza Ali Owner Of fesco online bill Website. On My Website You Can Easily Check Your Fesco bill.
A majority of students all around the globe face difficulty with their HND course related assessment jobs and homework tasks. Most of them find it as a nightmare. To overcome this dilemma, students often look for professionals, who can help them with their all kinds of academic problems and dilemmas. Are you too one of them? Then, you must approach towards Statistical Package for the HND Assignment Help to make your academic life happier!!
We Are Providing The Best Free Classified Ads Website in India. Grow Your Business Easily Reach More Customers and Clients Without Any Hassle. Udaipur girls mobile numbers Earn Money Free Of Cost.
I will reffer you the best gaming website to download the pcgameshighlycompressed
on internet.
Love these monster fleece lovey blankets! Thinking of customizing one with vibrant patterns for a unique twist. What’s your go-to design idea? #DIYFun-industrial valves
Love these monster fleece lovey blankets! Adding a unique touch with different colors or patterns could make each one even more special! What’s your favorite combo? –Fish Shop
Studying abroad opens doors to a world of possibilities, fostering personal growth and global perspectives. The essence of this transformative study abroad journey, making it a compelling read for aspiring students.
Barkod Etiketi, Barkod Ribon, lazer etiket, Etiket Barkod, barkod yazıcılar, Ribonlar, Ağır Yıkama Japon Akmazlar, Hafif Yıkama Japon Akmazlar, Orta Yıkama Japon Akmazlar, Saten Etiketler, İngiliz Siyah Saten
Well-written information. Very impressive and to the point
Have a look at my new blog:IObit Smart Defrag Pro Crack 2024
Your wedding office website is fantastic! The design is elegant, and the user experience is smooth. I love how easy it is to navigate through the different sections, from browsing profiles to understanding your services. The attention to detail in showcasing various aspects of Indian weddings is commendable. It’s evident that a lot of thought and care has gone into creating this platform. Keep up the excellent work in helping people find their perfect match and making their wedding dreams come true!
Party and Stationery UAE is a premier destination for a wide range of party supplies and stationery products. We are dedicated to providing our customers with top-tier products and exceptional service. Our team of experts diligently curates and crafts the finest products in the industry.
Shreded Paper
Beykoz Mimarlık ofisi, Kadıköy Mimarlık ofisi, Maltepe Mimarlık ofisi, Kartal Mimarlık ofisi, Beykoz iç mimar, Kadıköy iç mimar, Maltepe iç mimar, Kartal iç mimar
You are going to love our recipe for the green tea shot. It is one of my favourite shots to make and drink. We have given clear and easy-to-follow instructions on making this shot with just four ingredients: whiskey, peach schnapps, sour mix, and lemon-lime soda. We have also explained the origin and name of this shot and why it tastes and looks like green tea. Our recipe is awesome and delicious.
Great article Lot’s of information to Read…Great Man Keep Posting and update to People.
essentials hoodie
nice blog
hey man thank you so much mate i really appreciate it .situs slot bermain hoki
A successful website design combines functionality with creativity, leaving a lasting impression on users.and i believe on https://sharpeyeinfotech.com/website-design-company-in-delhi/
Which gives me a good result.
How to Use Google Ads to Generate Quality Leads for Your Business
Thank u so much for this innovative post.
Regards, Male Sexologist Clinic in Allahabad
İroko deck, İroko deck fiyat, iroko deck m2 fiyat, Ahşap Deck m2 fiyatı, Kompozit Deck m2 fiyatı, Ahşap Deck Fiyatları, Kompozit Deck m2 fiyatı İzmir, Ahşap Deck, Ahşap deck m2 fiyat, Teak deck, Teak deck m2 fiyat, Thermowood deck fiyat
This article provided a fresh perspective on the subject and left me eager to explore more.
Regards, Investment advisory services India
This article provided a fresh perspective on the subject and left me eager paint sharjah
Hwidgen is a powerful and reliable tool for Windows activation, providing a seamless way to activate the operating system without the need for traditional product keys.
https://thepcsoft.com/hwidgen-digital-licence-activator-for-window-10/
Ev içi ahşap merdiven modelleri, Ahşap Merdiven Fiyatları, Beton üstü Ahşap merdiven fiyatları, Villa ahşap merdiven modelleri, Ev içi Ahşap Merdiven Fiyatları, Ahşap merdiven modelleri, Duvara saplamalı merdiven, Hayalet merdiven, Demir merdiven ahşap kaplama, Lake Merdiven Beyaz
The precision and control Imagenomic Portraiture offers in enhancing facial features are unmatched – it’s an absolute must-have for retouching portraits with subtlety and finesse.
https://thepcsoft.com/imagenomic-portraiture-crack-latest/
Redgifs is a website offering a wide range of sexual content, including movies and GIFs, catering to various tastes and interests. With a global user base and a thriving community, Redgifs is a popular choice for high-quality adult entertainment due to its user-friendly layout and smooth browsing experience.
Thanks for sharing amazing information. We are also creating informative content about real estate, we will manage premium properties, and you can buy properties in Dubai JVC . Also, we will offer all types of real estate services including buying, leasing, selling, and investment.
Amazing information, Thanks for sharing. Best Real estate brokers company in Dubai .
Accessibility is another cornerstone. The Online Learning platforms have effectively demolished geographical barriers, ensuring that education is no longer confined by borders. From bustling metropolitan cities to remote rural areas, anyone with an internet connection can embark on a journey of learning and skill acquisition. You have to be read about 10 Best Online Learning Platforms That Student Must Know for Better Learning.
At Trademygun.com we have the best selection of new and used paintball guns and airsoft guns, plus all the accessories you can ask for. Looking to upgrade your old paintball gun? We offer buybacks too! best paintball guns
Nice Work I like This
Keep it Up!
ScriptCase’s responsive design features ensure that the applications I build look great and function smoothly across different devices – a crucial aspect for today’s web development.
https://crack-torrent.com/scriptcase-crack/
Sapanca’da huzurlu bir konaklama için ideal olan Bungalow, doğanın içinde şık ve konforlu bir seçenek sunuyor.
Experience the ColorKing app for dynamic color palettes. Dive into ColorKing in real or fake scenarios. Secure your ColorKing download now for endless hues!
ColorKing app
This is so good. Thank you for the post.
Enhance your home with the best colors! Expert house painters in Arizona, offering top-notch interior and exterior painting services. Transform your space today!
best paint for bedroom walls
Thanks for sharing this monster fleece lovey blankets craft, amazing one.
Marketing Wuppertal, Werbung Wuppertal, Grafik Wuppertal, Grafikdesign Wuppertal, Design Wuppertal, Neukundengewinnung Wuppertal, Telefonakquise, Appentwicklung, Webseiten Wuppertal, Corporate Identity Wuppertal
Check out Cheef Botanicals for premium selectionsAmanita Muscaria For Sale. With their reputation for excellence, you can trust their products for an authentic and satisfying experience. Explore their offerings today!
Whether she’s helping a new family discover their dream home or using her eye for elegant design to make a property shine on the market
Thank you very nice sharing.
At Inner Yoga Training we believe in creating greater balance in life. With this in mind, we have designed a yoga teacher training certification in Bali.
golden royal honey price in pakistan
Rejuvenate Your Body and Reignite Your Passion with Etumax Royal Honey!!!
ThinkSanoCom revolutionizes the fitness journey with its engaging social utilities, making health a collective pursuit. Users can create and join groups, challenge friends, and share their progress on social media.
On CamRound, the Cammatch experience is completely random, you can select the filters of gender and country, and it will find the best match for you. You can enjoy video chatting with strangers, and when you finish chatting with a person, you can click the Next button, and CamRound will find a new match for you. You can also turn off your webcam by clicking the stop button and if you want to resume the chat, just click the resume button and you are all good to start chatting again. cammatch met vreemden
Under the visionary leadership of the Founder and Senior Management Team, Dovape stands strong in the market and is poised for even greater success in the coming years. Join us on this exciting journey as we shape the future of E-cigarettes. Ecigarette
check ssgc bill are statements outlining charges incurred for natural gas usage that consumers are required to pay to the distribution company. billchecker is a trustworthy platform where individuals can access their SSGC bills online. It provides convenient services for downloading and printing these bills from the internet.
teerwin.com Are you interested in the latest Shillong Teer results? Stay updated with live updates as they unfold. We provide comprehensive coverage of winning and common numbers for various Teer games, including Shillong Teer. Access live results as well as past morning, evening, and night winning numbers right here.
Party and Stationery UAE is a premier destination for a wide range of party supplies and stationery products. We are dedicated to providing our customers with top-tier products and exceptional service. Our team of experts diligently curates and crafts the finest products in the industry.
Purple Hand-Held Plastic Balloon Pump
Lake Taupo yacht cruises aboard our heritage eco-friendly electric sailing boat. Enjoy a breathtaking view of Lake Taupo while you discover the artistry of Matahi Whakataka-Brightwell’s rock carvings.
Visit us :- https://www.sailbarbary.com/
RAQ Designs helps businesses leverage online channels and tactics to promote their products, services, or brands. RAQS has a range of services, such as social media marketing (SMM), content marketing, pitch deck designing, UI UX services, email marketing, branding and more. We work closely with clients to develop and execute customized digital marketing strategies to achieve specific business goals, such as increasing website traffic, generating leads, or driving sales.
RAQ Designs
The comments section has been missing since September 28, 2018, and the issue hasn’t been fixed yet. Having no comments limits viewer interaction, which is important for any online platform. It’s essential for users to share their thoughts and engage with content https://www.junkrecolet.com/
Stylish comfort with RINOLO Sofas, where every design seamlessly blends elegance and relaxation.
Transform your living space into a haven of luxury. Modern Furniture
Modern konfor ve doğal güzelliklerin buluştuğu şık Bungalow Sapanca’da huzuru keşfedin. İdeal konumuyla unutulmaz bir konaklama deneyimi sunuyor.
EPDM seals offer excellent resistance to high temperatures, UV rays, and weather conditions. Ideal for waterproofing and durability.
Reading through this article has truly opened my eyes to the convenience and effectiveness of online IELTS coaching. The ability to receive personalized attention and access top-notch study materials from the comfort of my home is a game-changer. You must read about Advantages of Opting for IELTS Coaching Online!
Когда требуется проведение строительных работ, например, для возведения бани или загородного дома https://stroitel-spb.clients.site в СПБ, а также Ленинградской области, оптимальным решением будет обратиться к профессионалам. Обратившись к нашим мастерам, вы можете рассчитывать на профессиональное выполнение всех необходимых, даже самых сложных строительных работ.
learn more about cordless drills like self centering drill bits, light weight cordless drills and and many more from here
Roof Waterproofing Services in Karachi revolutionizes the fitness journey with its engaging social utilities, making health a collective pursuit. Users can create and join groups, challenge friends, and share their progress on social media.
Membrane Sheet Prices in Pakistan revolutionizes the fitness journey with its engaging social utilities, making health a collective pursuit. Users can create and join groups, challenge friends, and share their progress on social media.
Thermocol Sheet Price in Pakistan 2024 revolutionizes the fitness journey with its engaging social utilities, making health a collective pursuit. Users can create and join groups, challenge friends, and share their progress on social media.
Reading through this article has truly opened my eyes to the convenience and effectiveness of online IELTS coaching. The ability to receive personalized attention and access top-notch study materials from the comfort of my home is a game-changer. You must read about Advantages of Opting for IELTS Coaching Online!Roof Heatproofing Services
Stylish comfort with RINOLO Sofas, where every design seamlessly blends elegance and relaxation.
Transform your living space into a haven of luxury.the furniture stores
Using monster-themed fleece fabric for a crocheted lovey blanket is such a creative and cozy idea—perfect for adding a touch of fun and comfort.
Love how the monster fleece finally found its perfect project—these lovey blankets are adorable.
i love the procedure of thi slovely monster blankets am learning crochet and trust me its a new way of meditaioin and focus
Book the best boutique stay in Jaipur with Giri Sadan, offering luxurious hotel rooms and serene farm stays. Experience unmatched hospitality, traditional ambiance, and modern amenities for a memorable and relaxing retreat.
I’m truly glad to say it’s an intriguing post to read. I get new information from your article.
المنصة العربية الأولى و الأكبر لتحميل ألعاب الكمبيوتر, مجانية و كاملة و بروابط مباشرة.
red seal
Limousine Service
Amar Cold Chain provides comprehensive supply chain and logistics services tailored to meet the needs of industries requiring temperature-controlled solutions. Their services ensure the efficient and safe transportation and storage of perishable goods, leveraging state-of-the-art technology and infrastructure. This ensures optimal preservation of product quality throughout the supply chain, from origin to destination.
Visit official sp5derss website https://sp5derss.com/ get huge discount & fast shipping worldwide
Thank you, it is a quality and nice content.
Best Oil Milling Machine for Home” on Shreeja Health Care presents an array of innovative devices designed to empower households with the ability to produce fresh, pure oil. Among their notable offerings are the Bilona Machine, Mini Oil Ghani Machine, Oil Filter Machine, and Wooden Oil Ghani Machine, each catering to different needs and preferences.
Beginning a cooking oil manufacturing business from home is easy on the off chance that you are prepared to invest a touch of hard energy and are committed. You simply have to do the underlying exploration in your territory and get the right gear close by to start your business process. With a base speculation, you can receive the most extreme rewards from your business. Imperium oil machines have been an impetus for delivering oil at home. It’s simple to set up and separate oil. Further, you get all the guarantee and upkeep backing to guarantee no obstructions during your excursion. Begin your business now!
Actually quite glad to say sp5ders555.com , your post is extremely fascinating to read.
Thank you, it is a quality and nice content.
Denim Tears Hoodie: Discover the perfect blend of cultural heritage and contemporary streetwear fashion. Each hoodie features unique designs that pay homage to African-American history, crafted with high-quality materials for exceptional comfort and durability. Stand out with distinctive prints, embroidery, and limited-edition collaborations that make each piece a true work of art.
Write a Story that Captures the Reader’s Imaginationa
Write a Story that Captures the Reader’s Imaginationa
Shopify Sitenizi Yapalım Satışa Başlayın
Write a Story that Captures the Reader’s Imaginationa
Write a Story that Captures the Reader’s Imaginationa
Amar Cold Chain specializes in providing advanced cold storage solutions. The company offers a range of services including temperature-controlled storage, logistics, and supply chain management tailored for industries such as pharmaceuticals, agriculture, and food processing. Their facilities are equipped with state-of-the-art technology to ensure the optimal preservation of perishable goods, enhancing product shelf life and quality. For more information about their services and solutions, visit their website.
Great content thanks for sharing it.
Get call boy job, call boy job salary,best male escort service in Bangalore job,call boys job genuine premium services now call boys
https://desicallboys.com/
call boy job
I’ll definitely be sharing this with my friends. Knowledge is power!
Monster Fleece Lovey Blankets – Repeat Crafter Me
OVO T-Shirt
Phi Phi Hotel, your Ko Phi Phi Don “home away from home.” Phi Phi Hotel aims to make your visit as relaxing and enjoyable as possible, which is why so many guests continue to come back year after year. phi phi hotel
How to Properly Restart a Router & Modem
Sapanca’da huzur dolu bir tatil deneyimi için ideal seçim: Sapanca Bungalov, doğanın içinde konforlu konaklama, özel havuzlar ve eşsiz göl manzaraları sizi bekliyor.
How to Factory Reset Your Router
Roof Power is Pakistan No.1 Waterproofing & Heatproofing Company it was established in 2005. We have years of experience in providing the best roof heat proofing services in Lahore, Islamabad, and other cities of Pakistan.
As the top heat proofing and waterproofing company it is our aim to provide premium quality roof waterproofing, roof heat proofing solutions, and epoxy resin flooring solutions to our clients all over Pakistan.
it depends on your needs, preferences, and the features that align with your requirements.
Before selecting a tracker company, you must have an in-depth analysis of the tracker’s features,
Monthly or annual Car tracker Prices and the company’s technical Support and services to their customers.
Furthermore, researching customer reviews about the particular company will make your decision more transparent.
You need to consider these significant factors while buying a tracker for a company.
best car tracker in pakistan
Your innovative Germany-Pools steel wall pool is custom-made for you and delivered on a disposable pallet by a freight company. You will enjoy our quality product for a long time. schwimmbecken oval
Stylish comfort with RINOLO Sofas, where every design seamlessly blends elegance and relaxation. Transform your living space into a haven of luxury. click here
Your go-to source for all things related to Heart health, exercise, fitness, healthy food, nutrition, health for womanes and overall health! Our mission is to empower you with knowledge and tips that make leading a healthy lifestyle easy and enjoyable.
healthy food for kids
Thinkink Packaging offers premium custom box packaging at unbeatable wholesale prices. Don’t miss out—order our top-quality mailer boxes, rigid boxes, and more today! Enjoy free shipping, design support, and delivery across the USA.
THANK YOU FOR VISITING OUR SITE
Revovationservicesinlahore
Nice creativity from the handicrafts..
happy to see the results.
sakarya escort ara için en güvenli ve gizli irtibat escort numarası
Are you looking for sweet dish recipes? Get relaxed, and you are at the right place! We are going to share with you easy-to-make and delicious-to-eat sweet dishes recipes. click here
https://streameastt.org/
Find the best orthopedics hospital in Hyderabad
at Zoi Hospitals. Trusted surgeons offering advanced knee replacement procedures for improved mobility.”
Such an adorable and creative idea! I love how these monster fleece lovey blankets are perfect for little ones. As a healthcare professional, I can see how comfort items like these would be so helpful in pediatric settings to ease anxiety during treatments. Keep up the great work! Would love to collaborate sometime—check out https://drkashishgupta.com/ for ideas on how we can bring comfort to children’s healthcare together.”
Simplify your procurement process with seamless eProcurement catalog integration at WBSUSA.com. Explore our efficient solutions for your business needs.
Visit us :- https://www.wbsusa.com/online-portals-and-corporate-procurement-services
The Combined Pit and Pipe and Cable Hauling Pack are specially designed for the students who want to learn each and everything related to install telecommunication conduits and pits.
Visit us :- https://milcom.edu.au/combined-pit-pipe-and-cable-hauling-pack/
Discover El Rafas Cafe, a family restaurant in San Antonio serving traditional Mexican dishes. Enjoy the best enchiladas, fajitas, and breakfast tacos made with local ingredients.
Visit us :- https://elrafascafe.com/
Buy STD Home Test Kits online for Chlamydia, Hepatitis B, Gonorrhoea, Syphilis, and HIV. Test privately in minutes.
Visit us :- https://testkitlabs.com/
Dive into the world of beauty with our industry-leading courses. From beauty therapy to nail art and waxing, discover your passion at The Nail and Beauty College. Enroll now!
Visit us :- https://nabc.edu.au/short-courses-enrolment/
Experience premium weed delivery in DC with Exotic Dreams. Choose from flowers, edibles, and more. 21+ only. Order today!
Visit us :- https://exoticdreamsdc.com/
Indulge in African cuisine at My Place Bar & Restaurant in Perth. Enjoy our unique dishes, bar delights, and live music.
Visit us :- https://www.myplacebar.com.au/
The foundation of mnl168 was established to provide convenient online gaming to our customers. We appreciate your support and hope you truly enjoy your gaming experience with us. We have a variety of promotions and bonuses that fit your budget. We are always open to any feedback, which will help us improve your experience as well as our own. MNL168
Good One..
Explore Signature Global Sector 71 flats, Antalya Hills low rise floors, M3M Paragon 57 suits, and more. Discover premium properties in Gurgaon with PB Estate.
Visit us :- https://pbestate.in/properties/
Stylish comfort with RINOLO Sofas, where every design seamlessly blends elegance and relaxation.
Transform your living space into a haven of luxury.modern living furniture
Chemical Engineering Assignment Help offers specialized assistance to students studying the principles and applications of chemical engineering. Our team of experienced professionals provides guidance on topics such as process design, thermodynamics, reaction engineering, mass and energy balances, and separation processes. We deliver well-researched, accurate, and customized solutions for assignments, projects, and case studies, ensuring compliance with academic standards and industry practices. Whether you need help with complex calculations, process simulations, or understanding theoretical concepts, our service is designed to empower you to excel in your chemical engineering coursework. Let us support your learning and enhance your expertise in this dynamic field.
Welcome to the informative blog! We are passionate about helping you live a best healthy lifestyle. Explore our treasure trove of articles, where we provide detailed insights into holistic foods for good health, great recipes packed with flavor and nutrients, and workout routines tailored to all fitness and health levels click here
Stay ahead of industry trends by exploring the latest discussions on Market Research on Owntweet. It’s the perfect place to gather insights and strategies for understanding your target audience and making informed business decisions.
Latest Windows softwares
I am so grateful for your blog. Thanks Again Mobile app development
https://lyricsyflow.net/
GET FREE WINDOWS SOFTWARES
Thank you for sharing this valuable information
https://wifi4.games/
Get free game download for PC
https://wifi4.games/
https://wifi4.games/
https://wifi4.games/
Your work is great it provide me a great knowledge.
Bedding Shop in UK
Your work is great it provide me a great knowledge.
Bedding Shop in UK https://dtexhomes.co.uk/
https://wifi4.games/
https://wifi4.games/
https://wifi4.games/
https://wifi4.games/
https://wifi4gamess.org/
https://wifi4.games/
Owning a home allows you to build equity for yourself, instead of building equity for your landlord. Ardor Residence Showflat
https://pesktopp.org
https://wifi4.games/
Hello. I really liked your site. I will definitely visit again in the future.
https://wifi4.games/
Whether you’re a student, DIY enthusiast, traveler, or just curious, we’ve got you covered. Convert inches to feet, millimeters to meters, or miles to kilometers – all in just a few clicks. No math, no hassle! centimeters to feet
https://wifi4.games/
https://wifi4.games/
Thanks a lot you have made some nice article post it is a very interesting content post I like this stuff.
Get free download Software.
https://wifi4.games/
https://wifi4.games/
https://downloadpirate.org/
http://pesktopp.org/
https://whatsupgplink.com/
If you’re looking togel or slot games online, I highly recommend checking out Mahajitu. It’s secure, easy to use, and offers some great bonuses. I’ve had a good experience with their real-time togel results and exciting slots. Worth a look! Here’s the link: mahajitu
https://whatsupgplink.com/
If you’re looking to achieve glowing skin beauty tips without relying on expensive products, you’re in luck. glowing skin beauty tips
Get game free download.
Need book printing quotes? Look no further! My Book Printer offers competitive prices for all your printing needs. Request a quote today!
Website :- https://app.mybookprinter.com/book-quote
Need book printing quotes? Look no further! My Book Printer offers competitive prices for all your printing needs. Request a quote today!
Need book printing quotes? Look no further!https://jogosparapctorrent.com/
Tech Zenon IT Solutions, based in Noida, India, provides comprehensive website design and development, along with PPC, SMO, and SEO services. Our expert team creates visually stunning, user-friendly websites that enhance user experience and drive engagement. With targeted digital marketing strategies, we boost online visibility, attract quality traffic, and help businesses achieve their growth objectives in today’s competitive digital landscape.
https://oceanofgamees.net/
http://hint4pc.com/
http://hint4pc.com/
https://hint4pc.com/
https://hint4pc.com/
This article content is really unique and amazing.
Apply for a High-paying call Boy Job in Delhi Join Now:-
https://gigolomania.com/delhi/
How to Reset a Router to Factory Settings
very nice DIY thanks for sharing with us.
nice content thanks for sharing with us.
Really content ,thank you for sharing with us…
Apply now for a call boy job in Delhi and start earning money on your terms. Join us today
https://gigolomania.com/delhi/
I’ll make sure to bookmark it and come back to read more of your useful information for Farescd
Your blog is a treasure trove of wisdom and positivity I appreciate how you always seem to know just what your readers need to hear
Thank you very much for this informative data and we would like to hear more about it from you at EpicPCGame
You get index if you like it.
NIKHATU
Diving into the world of cryptocurrency trading can be intimidating, but platforms like Quantix Prime AI aim to simplify the process for you. Whether you are a beginner or an experienced trader, this automated trading software offers advanced strategies and market analysis to optimize your earnings with minimal effort. quantix prime ai
NIKHATU
NIKHATU
A premier mobile app development company in Noida, builds innovative and user-friendly apps for businesses across industries. Our experienced developers create high-performance mobile applications that enhance user engagement and drive business growth. From concept to deployment, we ensure a seamless process that meets your specific needs. Trust Web Bull India to deliver quality mobile solutions that succeed. https://webbullindia.com/android-app-developer.html
Such a great idea for a kid’s blanket! I can see how comforting these monster fleece loveys could be, especially for children who need a little extra security at bedtime. The design is playful and fun, but also cuddly enough for a good night’s sleep. My little one loves anything with cute characters, so I’m sure this would become a bedtime favorite in no time. Thanks for the wonderful recommendation!
Love your theme and product great work I really like it
Choosing the Right Web Dev Program: A Beginner’s Guide for 2024
Embarking on a journey into web development can be both exciting and overwhelming, especially with the multitude of programs available today. For beginners, choosing the right web development program is crucial to ensure a solid foundation and set oneself up for success. In 2024, the landscape of web development education continues to evolve, offering a range of options to suit various learning styles and career goals. This guide will help you navigate the choices and find the best web dev program to kickstart your career.
Understanding Your Learning Goals
Before diving into the specifics of different web development programs, it’s essential to clarify your learning goals. Consider the following questions:
What are your career aspirations? Do you want to become a front end developer, back end developer, or full stack developer?
How much time can you dedicate? Are you looking for a part-time program, a full-time bootcamp, or self-paced learning?
What is your learning style? Do you prefer hands-on projects, structured coursework, or interactive tutorials?
https://digicile.com/
What Are the Essential Steps in Amazon FBA Guide for Success?
If you are seeking to gain wealth by selling your merchandise on Amazon then one of the key things is to follow the right procedures. One of the easy ways of realizing success on it is through using Amazon’s FBA (Fulfillment by Amazon) program. Amazon FBA guide help gives sellers an opportunity to access Amazon’s vast logistics network, customer care among others. Here are some few steps that can guarantee your success using Amazon FBA.
1. Set up your Amazon seller account: Amazon FBA guide.
Your first point of reference from an Amazon FBA guide process is the setting up of your Amazon seller account . The seller’s business information, banking details, and tax information are some of the details that you must fill in this section. When doing this, be sure to select Fulfillment By Amazon (FBA) which allows Amazon to take care of warehousing, packaging and sending the goods on your behalf.
https://digicile.com/courses
Which Health Insurance Companies in Dubai Offer the Best Value?
Choosing health insurance in Dubai can feel overwhelming with the numerous options available. With a wide variety of plans designed to cater to residents, expatriates, and even short-term visitors, Dubai has become a hub for high-quality yet affordable healthcare options. This guide will walk you through some of the best health insurance companies in Dubai, focusing on value for money, coverage options, and customer service.
Daman – National Health Insurance Company
Offering a variety of plans for individuals, families, and businesses, Daman is one of the biggest health insurance companies in the United Arab Emirates.Known for its solid network, reliable service, and extensive coverage, Daman is ideal for those looking for comprehensive insurance options with nationwide coverage.
Pros:
Extensive network with over 3,000 providers across the UAE.
Plans cover essential health services, including emergency care, maternity, and outpatient treatments.
Strong customer service and user-friendly mobile app.
Cons:
Premiums can be higher than average, particularly for premium plans.
Limited international coverage in basic plans.
Best for: Families and individuals looking for reliable, comprehensive coverage.
AXA Gulf Insurance
AXA is a global insurance giant with a strong presence in Dubai, offering customizable health insurance plans tailored to various budgets and needs. AXA’s standout feature is its flexibility, allowing customers to choose coverage levels and customize policies based on their healthcare requirements.
Pros:
Customizable plans that allow users to add or remove services.
Strong international coverage options, suitable for expatriates and frequent travelers.
Excellent customer service with multiple support channels, including a user-friendly mobile app.
Cons:
Some plans may have a high deductible or co-payment, depending on the level of customization.
Add-on services may have higher premiums.
Best for: Expats, frequent travelers, and those seeking a flexible plan with international coverage.
https://northwestclinic.org/
How Can I Apply for a DHA License? Comprehensive Guide
Getting a DHA (Dubai health Authority) license is a need for any healthcare worker hoping to work in Dubai. The DHA license allows medical professionals to legally practice in Dubai’s healthcare facilities. This guide will walk you through the application process, step by step, so you can confidently embark on your journey to working in Dubai’s thriving healthcare sector. Learn how can i apply for dha license by registering on the Sheryan portal, submitting documents, scheduling the exam, and completing.
What is the DHA License?
The DHA license is a mandatory requirement for healthcare professionals, including doctors, nurses, pharmacists, and allied health workers, who wish to work in Dubai. This license ensures that practitioners meet the required qualifications and adhere to the standards set by the Dubai Health Authority.
Eligibility Requirements
Make sure you fulfill the following necessities earlier than applying:
Educational Qualifications: A recognized degree or diploma in your field of expertise.
Work Experience: Relevant experience as per DHA guidelines (typically 2-3 years depending on your profession).
Good Standing Certificate: Proof of ethical practice from your current or previous licensing body.
Language Proficiency: Proficiency in English (IELTS, TOEFL, or equivalent may be required).
Credential Verification: Your qualifications must be verified through the DataFlow Group, an organization authorized by DHA.
Steps to Apply for a DHA License
Step 1: Create a Sheryan Account
Visit the DHA licensing portal and register for a Sheryan account. This account will be your gateway to all DHA-related services.
Step 2: Submit Your Documents for Primary Source Verification (PSV)
Through the DataFlow Group, submit the following documents:
Passport copy
Degree or diploma certificates
Experience letters
Good Standing Certificate
Passport-size photograph
The PSV process ensures that all your credentials are genuine.
https://montgohealth.com/
What Problems Can Roof Waterproofing Services Karachi Solve?
Roof waterproofing is a crucial service for homeowners and businesses in Karachi, a city known for its extreme weather conditions, including scorching summers and intense monsoon rains. Without proper waterproofing, roofs are vulnerable to leaks, structural damage, and various other issues that can compromise the safety and comfort of a building. In this blog, we’ll explore the common problems that roof waterproofing services karachi can solve and why investing in these solutions is essential for long-term protection.
https://lakhwa.com/
Online jobs
Pet Burada
Your positivity and enthusiasm are infectious It’s clear that you are truly passionate about what you do and it’s inspiring to see
https://pesktop.us/
Digital marketing strategies have truly revolutionized the way we connect with audiences, driving engagement and delivering measurable results. Your expertise is making a significant impact!
veryu
Your blog design is stunning, and the content is incredibly engaging. Great work
I’ve learned so much from this blog and have implemented many of the tips and advice into my daily routine Thank you for sharing your knowledge!
“substance painter 10.1 download Adobe Substance 3D Painter is a tool used to add details to 3D models. “
Mux Tech is an emerging GPS Car Tracker Company in Pakistan, delivering the Best Car Tracking and Fleet Management Solutions. Whether you have a Car or a Bike, all you need is a GPS Tracker, and you can monitor the vehicle from anywhere via Wireless Technology. With the Best Car Security System, you can secure your assets without worrying about car theft or disappearance by getting 24/7 support.
“OpenCore Legacy Patcher OpenCore is a sophisticated boot loader used to inject and patch data in memory, instead of on disk. This “
https://ask4pc.us/navifirm-plus/ NaviFirm Plus is a software application that facilitates the installation of firmware and ROMs on pre-Windows mobile devices, enabling users to access the latest updates. This tool is specifically tailored …
https://ask4pc.us/wps-office-premium-download/ WPS Office Premium 17 Download For Windows WPS Office Premium is an advanced version of the popular WPS Office suite, offering a range of enhanced features designed for productivity and …
https://ask4pc.us/pdf-xchange-pro-download/ PDF-XChange Pro is a complete PDF management suite that combines numerous powerful tools for creating, editing, annotating, and securing PDF documents. It is extensively used in both personal and professional …
https://ask4pc.us/ai-video-faceswap/ AI Video FaceSwap 1.2.4 Download For Windows AI Video FaceSwap is a software application that leverages a feigned brain to swap faces in videos, offering a range of features that …
Discover affordable and reliable moving services in Baltimore MD with Budget Movers: expert handling, and a stress-free moving experience tailored to your needs.
Love your style tips! Check out my store for pieces that could pair perfectly with the looks you described.
This was so helpful! My store has a few items that fit perfectly with these trends. Would love for you to see!
This is an incredible inspiring article. I am basically satisfied with your great work. You put actually quite supportive information. Keep it up.
This is an incredible inspiring article. I am basically satisfied with your great work. You put actually quite supportive information. Keep it up.
Thanks for the information. I really like the way you express complex topics in lucid way. It really helps me understand it much better way.
This article gives me the insight of your thinking. I really appreciate your efforts in this regard. teach english in Portugal
Die Dampfqualität des Venty ist außergewöhnlich.
Der reine und geschmackvolle Dampf, der durch die innovative Heiztechnologie erzeugt wird,
hat mich überzeugt. mehr lesen storz und bickel venty test
“WinRAR WinRAR Overview WinRAR is a powerful and widely-used file compression and archiving tool that allows users to compress, decompress, and “
Download All Type Of Premium Softwares For Free Gofa Zone
Hayatbilgisiguncel en yeni yazılımları indir
https://hayatbilgisiguncel.com/
we are proud to offer high-quality, eco-friendly coffee stirrers made from sustainable materials that meet the needs of environmentally conscious businesses and individuals. biodegradable coffee stirrer
If you’re looking to achieve glowing skin beauty tips without relying on expensive products, you’re in luck. Glowing skin beauty
https://anymp4.io/
At Suzhou Quanhua Biomaterial Co., Ltd., a trusted biodegradable spoon factory, we provide sustainable solutions that enable catering companies to meet environmental goals without compromising quality or functionality. biodegradable spoon factory
As the demand for sustainable solutions grows, businesses are rethinking their approach to packaging. From biodegradable cutlery to compostable containers, eco-friendly options are reshaping the food service industry. biodegradable spoon wholesale
For outdoor enthusiasts, camping isn’t just an activity—it’s a way of life. Whether you’re scaling mountains or lounging by a serene lakeside, having the right gear enhances every experience. non plastic cutlery
The dining industry is undergoing a transformation, and sustainable products are at the forefront of this change. Among these innovations, PLA cutlery is making waves for its eco-friendly properties and sustainable lifecycle. PLA cutlery china
Download All Software For Free My Egy
Great content thanks for sharing now.
Marriage prediction by date of birth and marriage prediction horoscope
Visit the below site and get astrology related solution.
https://myastron.com/
MegaBasterd MegaBasterd is an open-source, cross-platform application designed to facilitate the download and upload of files from the MEGA cloud storage service.
As A Life , protecting your health and informing you about current health information is our top priority. In this comprehensive guide, you can find detailed information about influenza (flu). İnfluenza Belirtileri
Ask4pcFree Softwares, Video Templates & Tutorials – Ask4pc
Munu PC Download Unique Windows & Softwares
hayatbilgisiguncel en yeni yazılımları indir
WIFI4Games Free Games
Angiography is a medical imaging method used to view blood vessels in the body. In this procedure, a thin, flexible tube called a catheter is inserted through an artery in the groin or an artery in the arm and advanced to the relevant vessel. Anjiyo Nedir
https://kbhgames.today/
Download All CComputer Software From Terbaru Kuyhaa Terbaru Kuyhaa
Thank you for this amazing blog. We would like to hear more about it from you at Farescd.
Thank you for this amazing blog.
MegaBasterd MegaBasterd is an open-source, cross-platform application designed to facilitate the download and upload of files from the MEGA cloud storage service.
Thank you for this amazing blog. We would like to hear more about it from you at Window 7
Thank you for this amazing blog. We would like to hear more about it from you at ultimate DVD Boot
Thank you for this amazing blog. We would like to hear more about it from you atAACT
ownload All CComputer Software From Terbaru Kuyhaa Terbaru Kuyhaa
NIKHATU
NIKHATU
NIKHATU
Shinkansen 0 Torrnet Shinkansen 0 is a game set in Japan where players are tasked with finding anomalies in the Shinkansen. Free Download this Game.
https://kbhgames.today/
thnk…
NIKHATU
NIKHATU
NIKHATU
NIKHATU
For over 30 years, P Bear Maintenance has been serving local businesses with exceptional services. We are a trusted name in the industry, specializing in a wide range of solutions to meet your needs. From professional commercial kitchen exhaust cleaning to reliable air conditioning installation.
https://pbearmaintenance.com/
NIKHATU
NIKHATU
NIKHATU
Det är verkligen en trevlig och användbar information. Jag är nöjd att du delade denna användbara information med oss. Vänligen håll oss informerade så här. Tack för att du delar med dig.https://sprakbolaget.se/
Det är verkligen en trevlig och användbar information. Jag är nöjd att du delade denna användbara information med oss. Vänligen håll oss informerade så här. Tack för att du delar med dig.https://sprakbolaget.se/
Det är verkligen en trevlig och användbar information. Jag är nöjd att du delade denna användbara information med oss. Vänligen håll oss informerade så här. Tack för att du delar med dig.https://dombaastannlegene.com/
NIKHATU
Thank you for this informative blog and we would always like to hear more from you about this at INat TV Pro
NIKHATU
Welcome to the informative blog! We are passionate about helping you live a best healthy lifestyle. Explore our treasure trove of articles, where we provide detailed insights into holistic foods for good health, great recipes packed with flavor and nutrients, and workout routines tailored to all fitness and health levels drinks that are good for you
Aktiv Software is committed to helping businesses transform digitally in today’s rapidly changing business environment through Odoo ERP services and solutions that meet their unique needs.
CapCut PRO PC is an app extremely unique video editing application and suitable for all users Capcut Pro PC, was publisher by Bytedance free on Google
Capcut Pro PC
NIKHATU
Free Software Download
NIKHATU
NIKHATU
Enhance your customer service with our email support outsourcing services. We manage and respond to customer emails with professionalism and efficiency, ensuring your customers receive timely and effective support.
Yerli ve Yabancı güncel yeni filmleri sınırsız üye olmadan izleyebilirsiniz.
film izle en güzel yeni sinema filmlerini sınırsız izle
I really like your post because this post is very helpful to me and it gives me new perspectives.
https://colourgreen.co.nz/
Amazing Blog More Info On Kuyhaa
Queenstown Car Rental was born from a passion for providing more than just cars; it’s about delivering experiences that linger in your memory. As a prominent car rental company in Queenstown, we stand out with our commitment to:
https://queenstowncarrental.nz/
Street food has evolved over centuries, reflecting a mosaic of cultures and culinary traditions. From ancient Rome and China’s quick bites to medieval Europe’s hearty meals, vendors have served dishes that satisfy diverse tastes. In Pakistan, Nihari’s slow-cooked stew and Kabuli Pulao’s fragrant rice highlight local flavors.
Modern favorites like Anda Shami Burger and noodles draw from Chinese influence. Elachi Chai offers comfort with cardamom-infused tea, while Chapli Kebab showcases local grilling skills. Shawarma, from the Middle East, wraps meats in bread, blending global flavors on vibrant streets.
https://pkstreetfood.co.nz/
Our Pergolas, available in various sizes and styles, are designed to add charm and functionality to your backyard or garden. Whether you seek a cozy retreat or a stylish entertainment area, our team crafts and installs Pergolas tailored to your unique vision. Choose Hamilton Gates & Fences for a delightful and inviting outdoor experience with our top-quality Pergola solutions.
https://hamiltongatesandfences.co.nz/
Using the tracking device unit’s application, you may locate the GPS signal of your tracking device in real-time.
You may now track the whereabouts of your vehicle at any time by using the app or communicating via SMS.
Read More car tracker price in pakistan
I enjoyed reading your post, very nice share…
NIKHATU
Bodrum’da uygun fiyatlı ve hızlı ulaşım için Bodrum korsan taksi hizmetimiz idealdir. Gümbet, Türkbükü, Adabükü ve Bitez gibi tatil beldelerine Bodrum korsan taksi hizmetinizde.
Bodrum’da uygun fiyatlı ve hızlı ulaşım için Bodrum korsan taksi hizmetimiz idealdir. Gümbet, Türkbükü, Adabükü ve Bitez gibi tatil beldelerine Bodrum korsan taksi hizmetinizde.
Nice Article
thank you for you. it’s very good.
NIKHATU
Hey Thank you!!! For This Post Sharing…
NIKHATU
Our Webiste Provide All Type of News if you want any news go to this webiste its totally free Tech I News
Our Website Provide All Type of Entertainment News if you want any news go to this website its totally free Udaipur Entertainment News
flowgames.siteThe Home of PC Gamers!
flowgames.siteThe Home of PC Gamers!
Welcome real estate listings at Cassimaty Property Group https://www.cassimatypg.com.au/
Come and talk to a friendly agent who is local to Berwick and surrounding suburbs.
choiceofgames.site
Dive into the Games, Conquer the World
Downloadpirate download free windows software
This is the gold standard for websites in this category.
Vilken underbar idé! Dessa monsterfiltar är både söta och roliga – perfekta för små händer att mysa med. Jag älskar hur du kombinerar färger och detaljer för att ge varje filt en unik personlighet. Tack för att du delar mönstret och inspirationen!
Vape it Wholesale started its business in 2021 in the USA. The company’s strong foundation of values sets it apart from the competition. Vape it Wholesale is dedicated to providing the highest range and quality of smoking alternatives and vape accessories to its customers at a great value. Our spirited drive to build a strong community and help clients grow to their maximum potential is the secret behind our success!https://vapeitwholesale.com/
Välkommen till Eliva Clinic, din partner för trygg och konfidentiell abortvård i Stockholm. Vi förstår att abortbeslutet är en personlig och känsloladdad process, och vår kvalificerade personal är här för att stödja och vägleda dig genom varje steg.
https://www.abortstockholm.se/
Så söta dessa Monster Fleece Lovey Blankets är! Jag älskar idén och det verkar som ett perfekt projekt för att använda upp fleecebitar som man har hemma. Det skulle vara en rolig och mysig gåva att ge bort också. Tack för en fantastisk idé och detaljerad instruktion! Jag kommer definitivt att prova detta själv snart.
https://sprakbolaget.se/
This monster fleece lovey blanket is absolutely adorable! I love how soft and cuddly it looks—perfect for little ones. The step-by-step instructions make it seem so doable, even for someone like me who isn’t a sewing pro. Definitely adding this to my DIY list. Thanks for sharing such a fun and creative idea!
https://www.fertilitetsutredning.nu/
Vilken fantastisk idé! Dessa monsterfiltar är både söta och roliga – perfekt för små barn. Jag älskar hur du kombinerar mjuk fleece med charmiga detaljer. Tack för att du delar detta mönster, jag måste definitivt prova att göra en själv!
https://centralenstrafikskola.se/
Så himla gulliga monsterfiltar! Perfekt mix av mysigt och busigt. Älskar hur enkla de verkar att göra – till och med jag som inte är så pysslig blir sugen på att testa. Tack för inspirationen!
https://tamsimaleri.se/
This monster fleece lovey blanket is absolutely adorable! I love how soft and cuddly it looks—perfect for little ones. The step-by-step instructions make it seem so doable
Zen Mart,
These monster fleece lovey blankets are absolutely adorable! I love how fun and colorful they are—such a great idea for little ones. The step-by-step tutorial makes it look so easy to make, even for someone like me who isn’t the best with a sewing machine. Can’t wait to try this out. Thanks for sharing!
https://pkstreetfood.co.nz/
playminigames.site
Play and Enjoy PC Games!
Jag måste säga att jag är helt förtjust i dessa Monster Fleece Lovey Blankets! De är så söta och kreativa, och jag älskar hur enkelt och tydligt du förklarar varje steg i processen. Det är perfekt för någon som mig som gillar att sy men ibland behöver lite extra vägledning. Färgkombinationerna du har valt är också så livfulla och roliga – det får verkligen plågarna att se ut som riktiga små monsterkaraktärer. Jag kan redan tänka mig hur populära dessa skulle vara som gåvor till barn eller till och med som en personlig touch till ett barnrum. Tack för att du delar med dig av detta fantastiska projekt, jag ser verkligen fram emot att prova göra några själv!
PRINTERESY
That was absolutely a nice blog. Thanks for sharing this precious information. can I ask something else about that? ArabSeed Tech.
Crafting, knitting and sewing is wonderful, not merely as a hobby but also as small business. It can also be promoted worldwide with translations into different languages.
Tekniset käännökset
Translations of knitting patters or sewing instructions can help people from all over the world to access them in understandable manner.
Tekniska översättningar
I absolutely love this Monster Fleece Lovey Blanket tutorial! It’s such a fun and creative project, perfect for beginners like me. The step-by-step instructions are so clear and easy to follow, and the photos really help visualize each step. These blankets would make such adorable gifts for kids or even as baby shower presents. I can’t wait to try making one myself—thanks for sharing such a fantastic idea!
Every Pakistani bridal dress tells a unique story through its intricate designs!
I absolutely love this idea! Your creativity really shines through, and the instructions are so easy to follow. I’m inspired to give this a try. Do you have any suggestions for other beginner-friendly crochet projects?
Great share! Thanks for the information. Keep posting!
This monster fleece lovey blanket is beyond adorable! I’m obsessed with how soft, snuggly, and fun it looks—absolutely perfect for little ones to cuddle with. The step-by-step guide makes it feel totally achievable, even for beginners like me. Adding this charming DIY to my must-make list ASAP! Thanks for such an inspiring and playful idea!
Everything You Need to Know About Eye Test Clinic in Dubai
Dubai is a city known for its advanced healthcare facilities, and when it comes to eye care, it offers some of the best services in the region. Whether you need a routine checkup, a prescription for glasses or contact lenses, or a specialized examination, eye test clinics in Dubai are well-equipped to meet your needs. In this blog post, we’ll explore everything you need to know about eye test clinics in Dubai, from the types of tests available to costs and the best clinics to visit.
Why Are Eye Tests Important?
Regular eye tests are crucial for maintaining good vision and overall eye health. They help detect issues such as nearsightedness, farsightedness, astigmatism, and even more serious conditions like glaucoma and cataracts. Many eye problems develop slowly and may not show symptoms until they become severe. That’s why it’s recommended to have an eye test at least once every one to two years, depending on your age and risk factors.
Visit Now https://northwestclinic.org/everything-you-need-to-know-about-eye-test-clinic-in-dubai/
How Dietitians in Dubai Can Improve Your Health
Dubai is a city known for its luxurious lifestyle, fast-paced work culture, and diverse culinary scene. While these aspects make life exciting, they can also contribute to unhealthy eating habits and lifestyle-related health issues. This is where professional dietitians in Dubai come in. Whether you want to lose weight, manage a medical condition, or simply adopt a healthier lifestyle, a dietitian can guide you toward achieving your goals. In this blog post, we will explore how dietitians in Dubai can improve your health and well-being.
1. Personalized Nutrition Plans
One of the primary benefits of consulting a dietitian is receiving a customized meal plan tailored to your specific needs. Many people try to follow generic diet trends that may not be suitable for their body type, lifestyle, or health conditions. A dietitian assesses factors such as your age, weight, activity level, and medical history to create a nutrition plan that works best for you. In a city like Dubai, where food options are vast and varied, a dietitian helps you make informed choices without feeling restricted.
2. Weight Management Support
With an abundance of fast food and fine dining options in Dubai, maintaining a healthy weight can be challenging. Whether you are trying to lose weight, gain muscle, or maintain your current weight, a dietitian provides professional guidance. They help you set realistic goals and track progress while ensuring you get the right nutrients. Unlike crash diets, which can lead to nutritional deficiencies and health problems, a dietitian promotes sustainable weight management through balanced eating habits.
Visit Now https://northwestclinic.org/how-dietitians-in-dubai-can-improve-your-health/
How to Choose the Right Dietitian Near Me?
In today’s fast-paced world, maintaining a healthy diet is essential for overall well-being. Whether you’re looking to lose weight, manage a medical condition, or simply improve your nutrition, consulting a dietitian can be a game-changer. But with so many professionals out there, how do you choose the right dietitian near you? This advice will assist you in making a well-informed choice.
1. Understand Your Needs
Before beginning your search for a dietitian, take some time to evaluate your health goals. Do you need help with weight management, diabetes control, digestive issues, or sports nutrition? Some dietitians specialize in specific areas, so knowing your needs will help narrow your search.
2. Check Their Credentials
A dietitian should have proper qualifications to provide expert advice. In most countries, a registered dietitian (RD) or registered dietitian nutritionist (RDN) has completed the necessary education, internship, and certification exams. Look for professionals with these titles to ensure you’re getting credible and science-based guidance.
Visit Now https://northwestclinic.org/how-to-choose-the-right-dietitian-near-me/
What Are the Benefits of a Well Woman Check-Up in Dubai?
In the fast-paced lifestyle of Dubai, where work commitments, social engagements, and family responsibilities take priority, women often neglect their own health. However, prioritizing regular health check-ups is essential for long-term well-being. A Well Woman Check-Up is a comprehensive health assessment designed specifically for women to monitor and prevent potential health issues. If you’re in Dubai, here’s why you should schedule your Well Woman Check-Up today.
1. Early Detection of Health Issues
One of the biggest advantages of a Well Woman Check-Up is the early detection of potential health concerns. Conditions such as breast cancer, cervical cancer, diabetes, and heart disease can be caught in their early stages, leading to more effective treatment and better outcomes.
2. Personalized Preventative Care
A Well Woman Check-Up is tailored to your age, medical history, and lifestyle. Based on your risk factors, your doctor can provide guidance on necessary vaccinations, screenings, and lifestyle modifications to prevent future health issues.
Visit Now https://northwestclinic.org/what-are-the-benefits-of-a-well-woman-check-up-in-dubai/
Shop the latest bridal dresses in Pakistan online at Mushq Pk for stunning and elegant bridal dresses for barat and other wedding events. Discover the perfect bridal dress in Pakistan with our extensive collection.
Just finished reading your article about the second wave, and I have to say, I found it incredibly insightful. You really nailed the complexities of pandemic politics and how they’ve been playing out. It’s so important to understand these dynamics, especially as we navigate through such uncertain times.
I particularly appreciated your discussion about the challenges governments face in managing the second wave. It’s a tough balancing act, and your analysis shed some much-needed light on the subject. Keep up the great work, and I’ll definitely be checking out more of your articles in the future!https://avenuescookies.co.nz/
Discover Alizeh Fashion, a leading women clothing brand in Pakistan, offering a stunning collection of dresses, shalwar kameez, and more. Experience exquisite designs and premium quality.
Discover Zahra Rubab’s luxury pret Pakistan. Elevate your wardrobe with our exquisite designs crafted for the discerning fashionista.
Nothing beats the charm of a heavily embroidered mehndi dress for a bride!
Mawto is an Software and Games Provider webiste if you want any softwre download now form Mawto
Poshak Fabrics provides the best in mens eastern clothing brands in Pakistan, blending tradition with modern elegance.
Discover the timeless elegance of Nagra Tex’s shalwar kameez men pakistan, crafted for comfort and style.
Discover the latest trends with Peraan’s new dress design in Pakistan, featuring elegant and fashionable attire that reflects contemporary style and tradition.
Explore a stunning selection of viscose dresses at Collar & Cuffs. Choose from various styles and colours made from soft and breathable viscose. Find the perfect dress for any occasion.
Hej! Vilka underbara filtar du har gjort! Jag älskar verkligen de ljusa färgerna och hur mjuka de ser ut. Jag har själv precis börjat med fleeceprojekt och dessa monsterfiltar är verkligen inspirerande. Tack för att du delar med dig!\
https://tamsimaleri.se/
Hej! Vilka underbara filtar! Jag älskar verkligen de olika färgerna och hur söta monstren ser ut. Det verkar vara ett jättebra projekt för att använda upp restgarner också. Jag kanske måste prova att göra en snart! Tack för inspirationen!
https://www.fertilitetsutredning.nu/
Thanks for sharing such a nice info Custom Boxes
Hej! Vilka underbara filtar! Monsternas uttryck är så roliga och de ser riktigt mjuka och gosiga ut. Vilken fantastisk idé att göra personliga snuttefiltar på det här sättet. Jag är säker på att alla barn som får en sådan här filt kommer att älska den! Tack för inspirationen!
https://sprakbolaget.se/
Discover Zarif’s stunning ready to wear collection, featuring trendy and stylish outfits for every occasion.
Discover new disposable vapes with LetsYozo. Experience innovative flavors & superior quality in a compact & convenient device.
Transform your bedding with high-quality fitted bed sheets. Enjoy a snug and secure fit that stays in place all night. Available in various sizes and colors to match your bedroom decor, ensuring comfort and style.
Downloadly Free Software Download
Elevate your wardrobe with a luxurious Pakistani suits dress from Jaan London, blending eastern tradition with contemporary UK style. Find your perfect outfit today!
https://ytmagic.space/
Find heartfelt and professional birthday wishes for coworker to make their special occasion wonderful.
Hej där! Vilka underbara filtar du har gjort! Jag älskar verkligen hur du har använt olika färger för att skapa unika monster. Den lilla med de gröna prickarna är min favorit – den ser så busig ut! Jag håller helt med om att dessa filtar skulle vara perfekta presenter. De ser både roliga och gosiga ut, precis vad ett litet barn skulle älska. Tack för att du delar med dig av din kreativa idé!
https://affordit.co.nz/
Visit Deviantart Taxi338vip to see a great collection of art.
These monster fleece lovey blankets are absolutely adorable! What a creative and fun idea. I especially love the bright colors and the different textures you’ve used. It looks like a really engaging and comforting blanket for a little one. Thanks for sharing this wonderful tutorial!”
https://pbearmaintenance.com/
Rigid boxes are the ultimate choice for luxury and high-end product packaging. With their sturdy structure and premium look, they’re perfect for cosmetics, fashion items, electronics, and gift sets. At Guru Packaging, we offer fully customizable rigid box solutions in Los Angeles — including magnetic closures, inserts, and eco-friendly materials. Whether you need elegant packaging for a product launch or bulk wholesale orders, our rigid boxes ensure durability, protection, and style. Impress your customers with packaging that speaks quality and reinforces your brand. Contact us today for custom rigid boxes in Los Angeles!
pasang taruhan parlay kalian di situs judi bola Taxi338. Menyediakan berbagai pasaran dan taruhan dengan odds terbesar no #1 di Indonesia.
A2z Firmware Download Latest Windows Software & Games
العاب وايفاي WIFI4Games
WIFI4Games المنصة العربية الأولى و الأكبر لتحميل ألعاب الكمبيوتر, مجانية و كاملة و بروابط مباشرة.
A2z Firmware Download Latest Windows Software, Games & All Firmware Files Are Here
TECHOMAILS</a
Download Latest Software
Afflatus, Kocaeli düğün salonu seçenekleri arasında modern ve şık tasarımıyla özel günlerinizi unutulmaz kılar.
“These monster lovey blankets are absolutely adorable! What a fantastic idea for a cozy, comforting, and fun blanket. The fleece looks so soft. Thanks for sharing this creative tutorial!”
https://prontoms.com/
i is a premium clothing brands in Pakistan for womens. Elevate your style with our unique, elegant, and trendy designs.
Find the best embroidered dresses for every occasion at Alizeh Fashion. Shop for unique pieces that will make you stand out.
Ecomatives excels in Shopify website development, crafting beautiful and high-performing e-commerce stores that enhance your online shopping experience.
Wifi4soft WiFi4Soft is a software solutions provider that offers smart networking and IoT-based Wi-Fi management services. This platform is known for customizable captive portals, user analytics, and secure authentication solutions. Businesses use it for customer engagement and data-driven marketing. WiFi4Soft’s goal is to provide seamless and intelligent wireless connectivity.
Celebrate in style with festival clothing women will love! Explore vibrant designs, traditional aesthetics, and modern elegance for a stunning festive look.
Find your perfect look with Zarif’s formal dresses for women, combining style and comfort for any event.
Discover gorgeous mehndi dresses for girls at Zahra Rubab. Our collection features intricate designs and vibrant colors.
Transform your bedroom with exquisite bridal bed sheets in Pakistan by Aspire. Crafted for elegance and luxury, these stunning sheets add the perfect touch to your wedding setup.
Nagra Tex delivers the best wash and wear fabric in Pakistan, blending quality, style, and practicality for modern men.
Shop the finest luxury dresses uk and discover why Jaan London is a trusted name for premium Asian fashion in Britain.
Shield your mattress with a superior mattress protector from Qhaaf. It provides the ultimate defence against moisture, dust, and wear—sleep stress-free!
Discover high-quality fitted bed sheet pakistan. Enjoy a perfect fit with our durable and comfortable sheets, available in various sizes and colors to match your bedroom decor.
I liked this useful information. We would like to hear more about it from you at Farescd.
Discover LetsYozo disposable pod in Pakistan. Experience premium quality, diverse flavors, and unmatched convenience. Shop now and enjoy the best vaping experience.
Browse Peraan’s range of formal wedding dresses Pakistan, crafted with intricate details and impeccable quality.
Explore the latest winter dress design for ladies at Collar & Cuff. Stay cozy and stylish with warm fabrics, intricate patterns, and trendy winter collections.
Igetintopc – Download Latest Software & Game 2025
Discover top-quality printing, marketing collateral, and logistics solutions at WBSUSA.com. From promotional products to digital catalogs, we’ve got you covered.
Visit us :- Letterhead, Envelopes and Business Cards
Get same-day cannabis delivery in DC with Exotic Dreams. Offering top-quality flowers, edibles, and more. 21+ only. Order now!
Visit us :- Weed DC
Get same-day cannabis delivery in DC with Exotic Dreams. Offering top-quality flowers, edibles, and more. 21+ only. Order now!
Visit us:- Weed Delivery
TAG Heuer’s commitment to excellence isn’t limited to men’s watches. The brand has also designed exquisite pieces for women who value the same performance and craftsmanship. For options that mirror the elegance and function of the Carrera, visit Tag Heuer watches for women, where elegance is fused with sporty sophistication.
What sets this limited edition apart is the meticulous attention to detail in its dial and movement. The sunburst black or anthracite dial is adorned with red or silver accents, giving it a dynamic look while maintaining excellent legibility. The chronograph layout is clean and functional, with three subdials and a date window strategically placed for maximum balance. Beneath the dial, the Calibre 16 automatic movement powers the watch with a 42-hour power reserve and proven reliability—qualities that make it a favorite for everyday wear as well as special occasions.
The TAG Heuer Carrera Calibre 16 Limited Edition is more than just a functional tool—it is a piece of history on the wrist. For collectors, it represents a perfect blend of classic design cues and modern watchmaking. Those looking to own a timepiece that embodies both sporty aesthetics and luxurious build can explore selections like Tag Heuer watches for men, where precision engineering meets bold style.
The TAG Heuer Carrera Calibre 16 Limited Edition stands out not just for its looks, but also for its emotional connection to motorsport culture. Its tachymeter bezel invites you to imagine a life on the racetrack, while its refined details make it suitable for boardrooms and black-tie events alike. This duality makes it one of the most versatile watches in TAG Heuer’s extensive catalog.
Those with an appreciation for craftsmanship will also find a lot to admire in Seiko’s legacy. Though stylistically different, seiko watches for men showcase a similar devotion to mechanical innovation and design integrity, making them an excellent addition to any collection that already includes a TAG Heuer.
If you’re also considering alternatives or complementary timepieces, Glitzstorm.com offers a diverse portfolio of luxury brands, making it a one-stop destination for exploring multiple styles and horological innovations. In the end, the TAG Heuer Carrera Calibre 16 Limited Edition is not just a watch—it is a statement. It says that you value history, precision, and individuality. Whether worn daily or reserved for special moments, it carries the spirit of competition and the prestige of a timeless brand on your wrist.
Another trusted source for unique Seiko models and international shopping is Michael Kors Watches Sale US, which frequently features seasonal specials and exclusive models from Seiko’s Prospex collection.
The Seiko Save the Ocean Penguin Edition proves that a watch can do more than just tell time—it can tell a story. With every glance, wearers are reminded of the oceans’ beauty and the urgent need to protect them. Combining Seiko’s signature durability with a noble cause, this timepiece is perfect for those who want to wear their values on their wrist—literally.
Seiko has long been known for blending innovation with social responsibility, and the Seiko Save the Ocean Penguin Edition is a shining example of that philosophy in action. As part of Seiko’s Prospex line, this special edition dive watch not only delivers top-tier performance but also raises awareness for marine conservation. Designed with inspiration from Antarctic penguins and icy seascapes, the watch is a call to protect our oceans—without compromising on style or function. If you’re searching for authenticity and value, Michael Kors Watches online is a great platform to begin your journey. It offers carefully selected timepieces for collectors and everyday wearers alike, making it easier to find limited editions like the Penguin among other standout Seiko models.
One of the core features of the Slash edition is its high-precision chronograph movement. Breitling has always prided itself on certified chronometer performance, and the Slash model is no exception. With automatic winding and water resistance up to 200 meters, it merges form and function in seamless harmony. This makes it a perfect companion for both extreme environments and daily use. Fans of mechanical innovation may also enjoy browsing Breitling watches for men for a variety of styles that mirror the bold spirit of the Slash.
Beyond aesthetics, Breitling also emphasizes comfort. The Slash model often comes equipped with a custom rubber or hybrid strap that conforms to the wrist and offers excellent breathability—ideal for those with active lifestyles. For fitness-minded users, options like the Fitbit Watch for sale provide a tech-savvy complement to your mechanical timepiece collection, balancing health tracking with style.
The Slash Breitling Watch is not just a name—it’s a concept. Designed with angular aesthetics and sharp lines, it encapsulates the modern spirit of urban luxury. Whether on the wrist of a rockstar, an adventurer, or a corporate executive, the watch brings an assertive presence. Its large case size, typically around 44mm, gives it a confident profile, while the distinctive slash-patterned dial and strap detailing offer a contemporary flair. For those seeking elegance with equal performance, Breitling watches for women offer a refined take on Breitling’s technical prowess. These watches embrace the brand’s iconic identity while integrating slimmer silhouettes and tasteful embellishments suitable for every occasion.
Fitness has always been a cornerstone of the Apple Watch, and 2022 models took it a step further. With the new Medications app, improved sleep stages analysis, and enhanced heart rate zones, these watches provided users with tools to take their well-being seriously. Whether you’re hitting the gym or managing stress, these wearables offered real-time data to guide better lifestyle choices.
Men searching for a robust, masculine smartwatch can explore the Apple Smart Watch for Women, featuring models that combine durability with advanced functionality.
Women were not left behind in Apple’s 2022 lineup. The watches came in a variety of finishes and sizes suitable for every wrist, offering not just practical benefits but also elegant design. The Series 8 especially catered to women’s health with its cycle tracking features and temperature sensing for ovulation estimates—an industry-leading innovation.
For chic and intelligent wristwear, the Apple Smart Watch for Men collection is both aesthetically pleasing and technologically advanced.
It’s important to note that while Apple Watch was dominating the tech-watch category, many users still enjoy collecting classic timepieces. If you have a taste for luxury in its traditional form, the Rolex Watch for Women offers iconic models that complement any Apple Watch collection. No matter your choice, 2022 was a banner year for the Apple Watch. It brought thoughtful upgrades, meaningful features, and elegant designs to a product already considered best-in-class in its category.
Despite its elegant appearance, the Vivomove 3S packs a serious punch when it comes to features. It includes 24/7 heart rate monitoring, stress tracking, hydration tracking, sleep analysis, and Body Battery energy monitoring. These tools are essential for anyone serious about maintaining a healthy lifestyle, offering insights that help you optimize daily activities, rest periods, and stress levels.
For users who want to explore Garmin’s full collection, Garmin Watches for Women offers a variety of options that balance smart features with rugged design for every need and taste.
With its compact 39mm case, the Vivomove 3S is particularly appealing to users who prefer a smaller watch face. Available in various colors, including rose gold, silver, and soft pastels, it allows for personalization to fit any wardrobe. Whether you’re at brunch or in a business meeting, this watch delivers understated elegance.
For women seeking additional smart and chic wearables, Fitbit Watches for Sale offers a lineup of intuitive, stylish devices that focus on health and wellness.
And for those who want to alternate between sporty and classic styles, you can explore designer collections such as Omega Watches for men, which provide the ultimate in sophistication and heritage.
The Garmin Vivomove 3S is perfect for anyone who wants smartwatch features without sacrificing classic style. It’s a fashion piece, a health tracker, and a productivity tool—all in one beautiful package. If you’re looking for a device that supports your lifestyle while elevating your look, the Vivomove 3S is the ideal companion.
Make this Raksha Bandhan unforgettable with our hassle-free service to Send Rakhi to India. Choose from a wide variety of designer rakhis, traditional threads, and special rakhi combos to delight your sibling. Whether you’re sending love from abroad or within the country, our reliable delivery ensures your rakhi reaches on time. Send Rakhi to India effortlessly and strengthen the bond of love, care, and togetherness with just a few clicks.
nice post keep it up.
We provide top-notch GPS tracking services in major cities of Pakistan. We have offices in Islamabad, Rawalpindi, Faisalabad, Lahore, Karachi, Bahawalpur, Sialkot, Sargodha, Peshawar, Multan, Quetta and other cities. For more details Visit here car tracker company
We provide top-notch GPS tracking services in major cities of Pakistan. We have offices in Islamabad, Rawalpindi, Faisalabad, Lahore, Karachi, Bahawalpur, Sialkot, Sargodha, Peshawar, Multan, Quetta and other cities. For more details Visit here best car tracker company</a
lato99
asia99
Welcome to SignTrack, Pakistan’s premier car tracker company dedicated to providing reliable and cutting-edge solutions for all your car-tracking needs. With our advanced GPS tracking technology, extensive coverage, and exceptional customer support, we ensure the security and safety of your vehicles throughout the country. Discover why we are the trusted choice for car tracker in Pakistan.
Thanks for sharing
Hiring local movers in Jeddah means working with professionals who are familiar with the city’s streets, traffic patterns, and residential regulations. They provide faster, safer, and more cost-effective services compared to non-local options.
Whether you’re moving across neighborhoods or shifting your office space, local movers in Jeddah make the process smooth with their expert planning, secure packing, and efficient logistics.
https://helpxpatsaudi.com/services/movers-in-jeddah/
I was looking for a reliable laundry solution in Lexington, and I found exactly what I needed at
Lexington Laundry Service. Their service is quick,
affordable, and super convenient. Highly recommended for anyone in the area!
Appreciate the tips! Just adding –
I recently bought doctor scrubs
from this site, and
I’m impressed with the material and stitching.
At Ice cream cone sleeves, Ice cream cone sleeves are customizable, eco-friendly holders designed to enhance customer experience and provide a mess-free way to enjoy ice cream while boosting your brand visibility.
Explore timeless elegance with pakistani clothing brand – a rising name in Pakistani designer dresses. From bridal couture to festive wear, every outfit is crafted with intricate detail and bold design. Experience tradition reimagined with modern flair.
Great article! If anyone is looking for expert legal help in Karachi,
I highly recommendLawyers in Karachi.
They offer professional legal services for family, property, and criminal matters.
Welcome to SignTrack, Pakistan’s premier car tracker company dedicated to providing reliable and cutting-edge solutions for all your car-tracking needs. With our advanced GPS tracking technology, extensive coverage, and exceptional customer support, we ensure the security and safety of your vehicles throughout the country. Discover why we are the trusted choice for car tracker in Pakistan. For more details Visit here best car tracker company in pakistan
Ladhar Enterprise delivers results-focused digital marketing in UK, including keyword research, link building, and PPC.
The Heart of Italy in One Guide — Local flavors, historic sites, and scenic wonders.
We provide top-notch GPS tracking services in major cities of Pakistan. We have offices in Islamabad, Rawalpindi, Faisalabad, Lahore, Karachi, Bahawalpur, Sialkot, Sargodha, Peshawar, Multan, Quetta and other cities. For more details Visit here visit now
Such a charming and cozy idea—those monster fleece lovey blankets are adorable and perfect for gifting! I love how handmade craft trends often echo in other design realms. I recently read about the rise of coastal prep fashion, and it feels just as warm and inviting as your creations.
Thank you for this informative blog and we would always like to hear more from you about this at Kuyhaa Soft.
Så himla gulligt projekt! Älskar idén med monster-filtarna, de ser både roliga och mysiga ut. Perfekt present till barn – eller varför inte som ett roligt pyssel att göra tillsammans. Tack för inspirationen!
https://www.ngsab.se/
Så himla gulliga! Jag älskar idén med att göra dem som små monster – perfekt balans mellan mysigt och roligt. Fleece är ju dessutom så mjukt, barnen måste verkligen älska dessa. Blir sugen på att testa själv!
https://www.ngsbilservice.se/
That’s area that is superb. Your design That is composing is actually different as others and I have to say that you are doing work that’s superb.
سكس بزاز
سكس بزاز عربي
Amazing merely exactly what I was searching for. As a consequence of author for choosing his period. Adore you
I really do consider That’s a Place that’s Educational also it’s well informed and quite helpful. And s I would love to for the efforts you have got created written this down location, thanks.
Great article, thanks for sharing! For those interested in a full list of wow private servers, this site is a solid resource.
Really nice and intriguing post. I was On the lookout for this kind of advice and enjoyed reading this one.
Its good to learn which you are such a Wonderful writer, I concur the topics are derived from things which are actual.
How do you want to have the ability to Repeat this in a remarkably simplistic manner, I am sure you may have good understanding of marketplace and people in summary.
So you have got frame this sort of Fantastic article in an approach which is best I’m in a position to get that, you have some fantastic knowledge of the problem. I am certain that you’re likely to be the very best author within my portfolio.
It almost despairing to find people which May be experienced about this problem, but you seem like you recognizes that which you’re referring to! Thanks
I do consider This Might be one of the most Crucial information for me personally. And I am happy reading your article.
Discover Tranzax Vapors disposable vape in Pakistan . Experience premium quality, diverse flavors, and unmatched convenience. Shop
I’d like to thanks Due to This really Excellent read!! I certainly adored every bit of it. I have you stored as a favorite to analyze things that are new you article…
Really helpful blog! It was very useful for me, and I’m sure it will help others too KMSAUTO
Really helpful blog! It was very useful for me, and I’m sure it will help others too KMSAUTO
Finding a reliable co working space in Islamabad has always been a challenge, but Thewspace really stands out. The balance between shared work areas and fully furnished private offices makes it suitable for both freelancers and established teams. The environment feels professional yet comfortable, and the community vibe adds to productivity. A co working space in Islamabad with this level of flexibility and modern infrastructure is rare. coworking space in Islamabad
Essence brings the best collection of flat chappals for womens available online across Pakistan. We offer high-quality chappals online all over Pakistan. Get your favorite women’s chappal online at reasonable prices.
This blog was incredibly helpful! It provided the exact information I was looking for, and I’m confident it will be just as useful for others exploring KMSAuto. Great work!
Upgrade your bedding with premium duvet sets. Designed for warmth and style, these sets enhance your bedroom’s aesthetic.
Explore Peraan’s new stylish dress design, combining modern fashion with timeless elegance to create unique and captivating looks for any event.
İş elanları və vakansiyalar https://jooble.az/vacancies
Shop smart with Nagra Tex’s exclusive sale on mens brands in Pakistan – stylish, affordable, and quality you can trust.
Refresh your wardrobe with our stunning new ladies dress collection offering versatile pieces suitable for work, parties, and everyday casual wear.
Discover simple linen dress designs with effortless charm. Collar & Cuff brings breathable, high-quality linen outfits that exude elegance and versatility, perfect for every season.
Elevate your wardrobe with Jaan London’s stylish luxury pret collection, blending elegance with everyday comfort.
Nice Post
https://www.bobcranes.com/our-services/transport-by-heavy-and-light-trucks/
We truly appreciate your website, which consistently provides helpful information, responsive service, and a stunning design. We wish you continued success, and dont forget to visit our site, pasaran togel , a trusted official online lottery provider with the most comprehensive markets every day.
Getintomypc is your trusted source for downloading the latest software and PC games. We provide step-by-step installation guides, tutorials, and safe download links so you can enjoy a hassle-free and secure experience every time. Explore GetIntoMyPC to download software and exciting PC games. With detailed setup instructions, optimization tips, and verified links, we make sure your downloads are safe, easy, and ready to use without complications.
Shop trendy styles at Broken PlanetOfficial Clothing Store! Enjoy up to 30% off in our exclusive sale. Broken Planet Clothing Discover your new favorite outfit today!
Global Hearing Technology is a leading audiology center based in Islamabad, committed to transforming lives through better hearing. We offer a comprehensive range of services — from precise diagnostic hearing assessments and expert fitting of advanced hearing aid machines (BTE, ITE, CIC, Bluetooth-rechargeable) to cochlear implant solutions, tinnitus management, speech & language therapy, and assistive listening devices. Our team of specialist audiologists works with each client to deliver personalized solutions tailored to their hearing profile, lifestyle, and budget. At Global Hearing Technology, we believe everyone deserves to hear clearly, and we strive to make world-class hearing health accessible across Pakistan. Visit here best hearing aid devices in Pakistan
best informative post
This post adds a lot of value to the discussion. The examples and analysis show a deep understanding of the subject. I look forward to reading more such informative blogs from you. if you have free time visit our website cvshealthsurvey
excellent and well wriiten blog
This article provides such valuable insights! I appreciate how clearly you explained each point. It’s rare to find content that’s both informative and easy to follow. Definitely bookmarking this for future reference. Thanks for sharing your expertise! netflix.com login
hello This article provides such as valuable insights and i appreciate how clearly you explained each point. It’s rare to find content that’s both informative and easy to follow thank you
Really well written! I love how your tone feels friendly yet professional. The structure makes it easy to stay engaged from start to finish. Kudos to you! if you have free time visit our website tracfone activate
Very nice and informative blog!
Very nice and informative blog!
We offer best Pakistani clothing brands available at Simaals. Online shopping dresses in Pakistan with perfect latest women clothing collections in Lahore.
We offer best Pakistani clothing brands available at Simaals. Online shopping dresses in Pakistan with perfect latest women clothing collections in Lahore.
About DLC Group with VKS Palm Drive in Pataudi know more about Our Service just one click to you website and Read our website page.
Explore Pinterest showcasing insights, services, and brand information.
Check out our gitbook a creative space for educational updates and engaging content.
What an informative article! You managed to explain everything in a way that’s easy to follow and genuinely useful. The points about consistency and patience really stood out. Thanks for sharing such thoughtful content that adds real value to the reader’s experience. pch.com sweepstakes
Boost your online presence with Guest Posts on DesignsValley.com – a trusted platform for design, development, and marketing insights. By publishing your content here
I truly appreciate the time and persistence you invest in your blog. Your posts are always thoughtful and full of valuable information. Thank you for sharing your knowledge!
sony vegas pro crackeado
Οι παλετες αποτελούν βασικό στοιχείο στη διακίνηση προϊόντων, διευκολύνοντας τη φόρτωση, την εκφόρτωση και τη μεταφορά. Είναι σταθερές, ανθεκτικές και κατάλληλες για χρήση σε αποθήκες και μεταφορικές διαδικασίες.
Greater hand work and what metrical use to make this toys
This post was very engaging and informative. The structure, clarity, and examples made it a pleasure to read. It’s rare to find content that balances detail and simplicity so well. Thank you for sharing such valuable knowledge with us! pch.com sweepstakes
Thanks for this post! Your explanation really clarified things. If you’ve been looking for simple ways to win rewards, just visit kroger.com/feedback and share your recent shopping experience.
AGRSoft – Leading Website Design, Graphics Design & SEO Agency – wordpress website design – search engine optimization, logo design, graphics & design.
AGRSoft – Leading Website Design, Graphics Design & SEO Agency – wordpress website design – search engine optimization, logo design, graphics & design.
Animepahe is a popular official free anime streaming and download website that provides access to a large library of anime shows often in HD quality.
For those checking the list, here is my guide on the Federal Fire Service Shortlisted Candidates portal.
Upgrade your home décor with stunning collections from Premia Home Pakistan!
Premium bedding, curtains, and kitchen linen available online.
Trendy designs for bedrooms, dining & living rooms.
Great quality at competitive prices.
Shop now and give your home a fresh new look!
Enroll in Totsville’s Pre-Playgroup in Indore, designed to prepare children for preschool through early learning activities and social development.Visit us :- Pre Playgroup in Indore
You can find Stromectol with reasonable price and informative post
very insightful blog learn here about Cipmox for bacterial care
There are best models in lahore which is offering good services
Nikmati streaming anime gratis di Anoboy – platform pilihan untuk anime terbaru & film dalam kualitas HD. Tersedia update cepat, judul populer, dan pengalaman streaming yang lancar untuk penggemar anime di Indonesia.
Tempobet giris adresi burada https://tempobetgiris.net/
At the heart of the Galaxy Watch5’s appeal is its advanced health and fitness tracking ecosystem. The watch goes beyond basic step counting and heart rate monitoring to provide detailed insights into sleep patterns, stress levels, and even blood oxygen saturation. The new BIA sensor allows users to measure body composition metrics like skeletal muscle mass, basal metabolic rate, and body water percentage directly from their wrist. This depth of data empowers a more holistic approach to personal wellness, turning the watch into a 24/7 health companion. For those looking to explore a wide array of smartwatches with similar health-focused ambitions, you can browse Donysterling.co.uk for a curated selection of leading brands.
Battery life is a critical factor for any smartwatch, and the Galaxy Watch5 addresses this with a 410mAh battery that supports all-day use and beyond with typical usage. The inclusion of fast charging is a game-changer; a 30-minute charge can provide up to 45% battery, reducing downtime significantly. This practical feature ensures the watch remains a reliable tool throughout the day, whether you’re tracking a long workout, managing notifications, or using it for contactless payments via Samsung Pay. The combination of robust battery management and fast charging technology demonstrates Samsung’s understanding of real-world user needs. For international customers interested in the latest wearable tech, detailed specifications and global availability can be found when you discover Donysterling.com.
Looking at the broader wearable landscape, the Galaxy Watch5’s success lies in its balanced execution. It doesn’t necessarily invent new categories but refines existing ones to near perfection. The accuracy of its sensors, the polish of its software, the quality of its materials, and its overall usability set a high standard. It demonstrates that a smartwatch can be a powerful health tool, a convenient digital assistant, and a fashionable accessory all at once. This multifaceted approach is what makes modern wearables so integral to daily life. For those with a taste for luxury and high-performance horology beyond smartwatches, a visit to visit Glitzstorm offers a glimpse into a world of premium mechanical craftsmanship.
From comfort food to creative dishes, pasta recipes turn out better with Bambino Pasta thanks to its consistent quality and perfect al dente texture.
I’ve been eyeing the Lost Mary OS5000 line for a while now, and this post finally convinced me to try a few new pods; I’m especially interested in seeing which ones you all consider the best lost mary flavors mentioned in your full rundown.
. We have all the cool raunchy desi girls of zirakpur available anytime for services to your requested destination. Don’t get involved in the boring traditional red light areas type women. You should definitely give a chance to the top-rated escort services of zirakpur. Now the booking process has been so much easier than any time before. Stop mindless doom-scrolling Modern men love to enjoy with aesthetic and fun girls, go out, do something crazy and exciting with our young zirakpur escorts to get a real dopamine hit.
https://chandigarh.namritakapoor.co.in/
Namritakapoor understands your expectations and raises the bar by offering exceptional companions who complement your personality, mood, and occasion.
This monster fleece lovey blanket pattern is absolutely adorable and so well-explained – even a beginner like me feels inspired to give it a try! I love how you broke down each step clearly, making it easy to follow along and imagine the cozy end result. It’s fascinating how creative projects like this can spark new ideas, even outside crafting – like how we think about healthcare app development in terms of user comfort and intuitive design. Just like a well-made lovey brings comfort to a child, a good healthcare app should bring comfort and ease to its users. Thanks so much for sharing your pattern and encouraging creativity.
“Great insights! This really explains the importance of quality construction in modern projects.”
Zirakpur’s most famous boys and men have revealed their top choice of sexual distraction. Always prepared to handle the Escort service in and outside of Zirakpur. These ladies are amazing in Zirakpur and have great expertise with High Profile Zirakpur escort Service. Adult performers are those who remove their clothes and engage in sexual activities. Even if there is no sexual activity involved, the content can be sexual.
“Great article! I learned a lot from this post. Thanks for sharing such useful information.”
“Very helpful content. Your explanation is clear and easy to understand.“
Backlinks are still one of the most important ranking factors in SEO. But building links without checking what your competitors are doing can slow down your growth.
A better strategy is to review competitor backlinks before starting your link building work.
By analyzing where your competitors earn their links, how many referring domains support them, and which anchor texts they use, you can create a smarter and more practical link building strategy that delivers steady results.
https://app-bitting.com/
Experiment Five is built on innovation Experiment Five and minimalism. Each piece blends structure with everyday comfort, creating versatile essentials designed for movement and individuality. Focused on quality craftsmanship and detailing,Experiment Five Hoodie the collection delivers confidence, functionality, and timeless appeal for contemporary lifestyles.
great post
Be it dinner or sensual pleasures, our hot and sexy Jalandhar Call Girls will fulfill your every need! Don’t miss the escort of our top and sexy models in Jalandhar.
https://jalandhar.namritakapoor.co.in/
We put together a detailed post on the upcoming mall in Sector 14, Gurgaon. It covers the floor plan, food court, multiplex, parking, and investment details for anyone researching this project. Explore here: https://wegrowinfraventures.blogspot.com/2026/03/which-is-the-upcoming-mall-in-sector-14-gurgaon.html
These monster fleece lovey blankets are absolutely adorable! Such a fun and cozy project — the step‑by‑step instructions make it look easy and enjoyable. Thanks for sharing this creative idea!
good artical
https://bittingonline.com/
เข้ามาอ่านแล้วได้ประโยชน์จริงๆ ค่ะ เป็นกำลังใจให้เขียนต่อนะคะ แนะนำหวยห้องฟ้าสำหรับคนที่สนใจ
Thank you so much admin. Cialis geciktirici etkisi Thanks for sharing.
Great content indeed, keep it up
https://bittingonline.com/
pirfect artical
This is great keep it up Is Life Better Abroad?
This is a well Detailed website Biography of Khushwant Singh
I love what you do on this website Sachin Tendulkar Biography I will Bookmark to always come back