
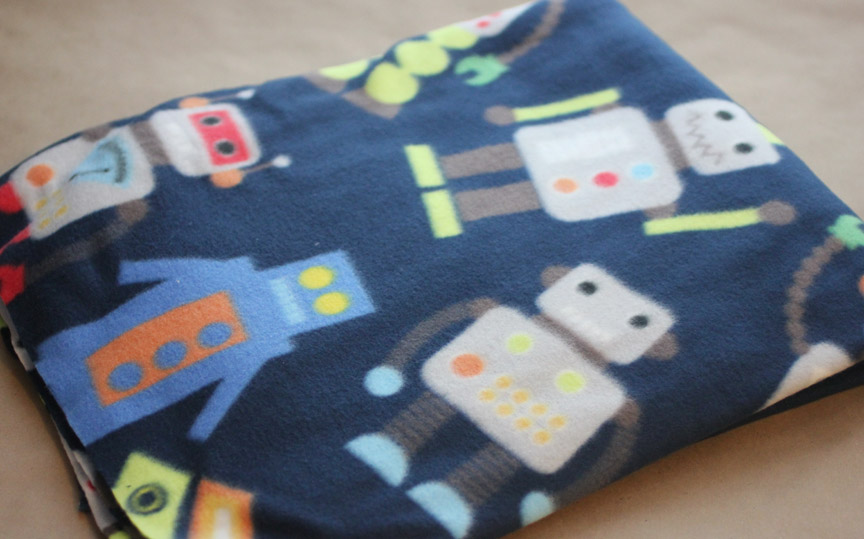
I’ve had visions of a robot lovely blanket ever since I saw this adorable robot fabric at Hobby Lobby. This will be the third lovely blanket I have designed so for a more detailed tutorial, please see the first one I created: Monster Lovey Blanket.
Materials:
-Worsted weight yarn in your choice of 2 colors
-Poly-fil
-Size H Crochet Hook
-Tapestry Needle
-Robot fleece fabric (I found mine at Hobby Lobby)
-Two 15mm black safety eyes (I purchased mine at JoAnn fabrics)
Abbreviations:
ch= chain
SC= single crochet
DC= double crochet
How to make a Magic Ring tutorial HERE
Crochet Monster Lovey Blanket Pattern:
Head:
Chain 16, SC in 2nd ch from hook and rest of way down.
Ear (make two):
Magic ring, 6 SC in ring, continue to SC in rounds.
Round 2: 2 SC in each around (12 SC)
Round 3-4: SC in each stitch around (12 SC)
Face:
Chain 11, SC in second ch from hook and rest of way down, ch 1, turn
Row 2 – 6: SC across, ch 1, turn. At end of round 6, continue to SC around sides and join to first SC.
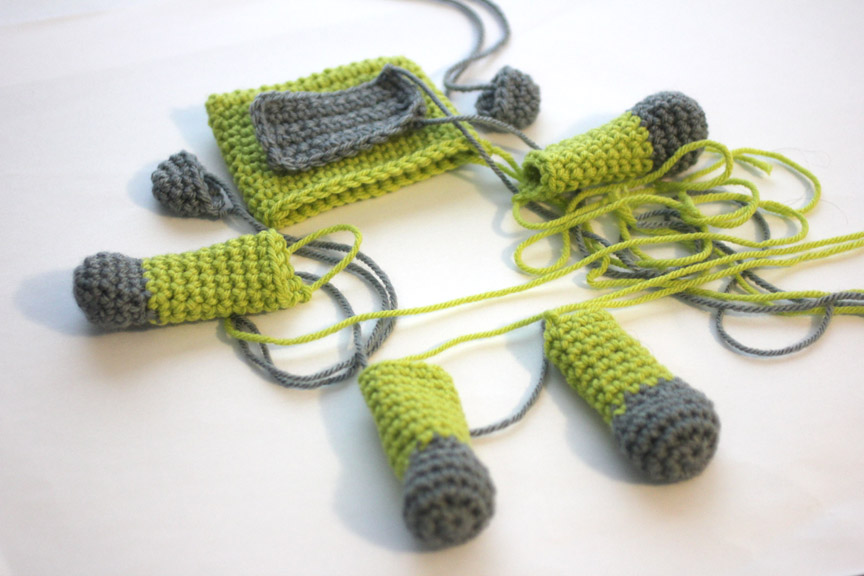
Arm:
Magic ring, SC 8 in ring, continue to SC in rounds.
Round 2: 2 SC in each stitch around (16 SC)
Round 3 – 5: SC in each stitch around (16 SC)
Round 6: SC decrease, SC in next 2 stitches, repeat around.
Change color
Round 7-14: SC in each stitch around (12 SC)
Stuff head and limbs and sew closed. Use your tapestry needle to stitch onto sides of the fleece blanket after you crochet around the edges of it.
Cut a 10.5 x 12 piece of the fleece fabric. I created holes to crochet through with a skip stitch blade and a ruler as a guide. Holes should be made about a 1/2 inch from the edge. It is also helpful to cut the corners into rounded corners so it will lay down flat when you crochet the edge.
I purchase my skip stitch blade from the Project Linus website but unfortunately it looks like it is no longer available there. You can find the same one HERE on the Skip-Stitch website. I have the “original skip stitch blade” and you will need a Fiskars 45mm Contour Rotary Cutter

*** You may make and sell products from my patterns but if you do I ask that you link back to my post. Please do not copy and post this pattern and claim it as your own. Please do not re-publish photos as your own.***
Want more free patterns? Keep in touch on my Repeat Crafter Me Facebook Page for new pattern sneak peeks and when they will be available on my blog!

 Starbucks Stitch Markers and Bottled Beverages
 Crochet Christmas Tree Pixel Square
 Crochet Santa Pixel Square
 Crochet Daisy Rug with Clover Amour Large Hooks and Giveaway!
This is really cute! I wonder if the sharp crochet hook would have worked instead of the skip stitch blade? I've still not had time to try mine!!
I was just going to ask the same thing!
Unfortunately, the crochet hook will not work. It isn't sharp enough. I had to use a pair of sharp scissors and poke the holes through.
The Sharp Crochet hook worked for me. I say give it a try.
veramente carino, ed ha anche un cuore!!
ciao Alessandra
Sooooo cute!!!! I LOVE you stuff! I can't wait to see a little girl one!
Very cute!!Would make a neat hot water bottle cover too.
I love this thank you!!
Wow. Good collection! Wow! These are nice photos! 🙂 Nature is really the best inspiration for art.
Well, that is of course my opinion. 🙂 Beautiful Wallpaper, HD Wallpaper, Computer Wallpaper
Wallpaper Background Beautiful WallpaperFree Vector Art, CSS, Fonts, Images & Graphics Download here
I love this!!! So cute!!
So freaking cute! Thanks for sharing all your wonderful, creative goodies!
Very cute. I love that he has a heart.
Wonderful work, thanks for sharing!
Awwww man! I wish you would have posted this a little sooner! I had this robot fleece from my son's fleece tie blanket that I made him and used your monster pattern to make him a little lovey! The robot one is of course so much cuter! I might have some extra fleece left over though to make one of these! 😀
oh my goodness, this is sooo cute. I saw this a craft gawker a few weeks ago and fell in love. I wish i knew how to crochet!
Loved seeing this at the special link party supporting Sandy Hook last week. Hope you'll come to The Humble Brag link party today to see some features from last week and link up some more cool projects. Happy Friday!
http://www.oneprojectcloser.com/the-humble-brag-link-party-13/
this is so cute! thanks for sharing
This is just precious! I love the colors and that it's for a boy, since we've both got boys. Hope you had a wonderful Christmas, Sarah! Thanks for sharing at Hookin On Hump Day!
Question
Is the fleece one or two ayers?
I bought one yard, and was able to make two blankets out of it
I just found your blog through Pinterest, and I love it! I can;t wait to make a few loveys!. But, I wanted to give you a little chuckle too. My 3 yr old DD saw you photo and is insisting you are Sophia the First's Mommy. I realize with two boys you may not know about Disney's newest princess, but my daughter is insisting you are Disney's newest queen!
I bought a ergonomic tapered awl to make the holes. Basically a pointy craft tool to poke holes in leather and stuff. Duo you know hire far apart the holes should be from each other?
love the creative ideas of your blog… and the recipes so easy to do…. thanks for sharing…
I just wanted to say how cute this is. I am making it right now and have a couple of questions. On the antenna it says to crochet rounds 1-3 with grey and rounds 3-6 with green. Should this read rounds 1-2 with grey and rounds 3-6 with green? Also I do not see any directions for legs so I am assuming the arms and legs are the same. I hope this is correct.
Thanks for sharing such a great pattern.
Hi! I love this pattern and just made three robot loveys for my baby. Couldn't find a nice fleecefabric in my local fabricshop so I went for a velourfabric instead. Thank you so much for this pattern and all the inspiration you share!!
http://mittlivsverk.blogg.se/2014/may/robot-snuttefiltlovey.html
I just completed a slightly different version. Love this lovey! Thanks for making this pattern free.
I am waiting for more.
question, my boyfriend was saying this really isn’t a blanket that it is just the size of a piece of paper. what would you do if you want to make this a blanket to actually cover a child how can you adapt if you want it a little bigger. I can’t wait to try and make one of these.
this design like android logo!!
film trailer
Great line up. We wFantastic website. Plenty of useful info here. I am sending it to some friends are also sharing in delicious. And naturally, thanks to your effort!ill be linking to this great article on our site. Keep up the good writing.
great work
I read this piece of writing completely concerning the comparison of most recent and preceding technologies, it’s awesome article.
thanks for post…..
มีเงินพอใช้แบบเหลือๆได้ ไม่ต้องดิ้นรนหา งานอื่นเสริม ไม่ต้องมองหางานให้เหนื่อยร่างกาย เพียงคุณลองเปิดใจให้กับ SA GAMING เกมบาคาร่าออนไลน์ ที่สารมารถสร้างกำไรให้กับคุณอย่างมหาศาล สมัครสมาชิกฟรี ที่เว็บไซต์ http://sagameherelao.com ใครที่อยากมีเงินใช้อย่ารอช้า เล่นบาคาร่าไม่ต้องเหนื่อยกายและใจ ว่าจะมีเงินพอใช้ในวันพรุ่งนี้ไหม ไม่ต้องมานั่งคิดเล็กคิดน้อยกับการซื้อของที่อยากได้ ปัญหาข้อนี้จะหมดไป เพียงคุณเปิดใจให้กับเรา เราจะพาคุณไปเป็นเศรษฐีคนต่อไป