![]()
Meet Zoe’s friend Talia! Talia has a beautiful crochet blanket that has been in the family for many many years. It is her favorite blanket and well worn because she carries it with her everywhere she goes. The blanket was unraveling in several spots so Talia’s mom asked if I could replicate the blanket and crochet her a new one – but this time with more pink added in (Talia’s request)! Of course I couldn’t let our sweet little friend down! I’m sure she will still cherish the original blanket and I hope she likes her new one!
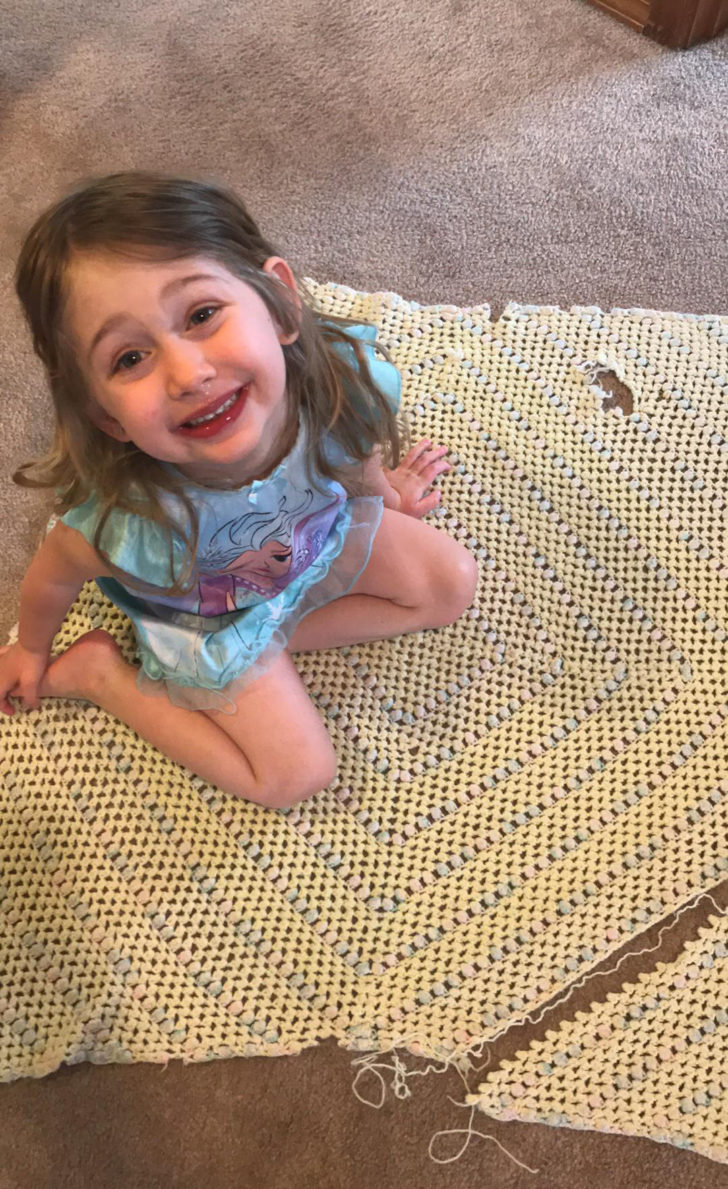
Since I wasn’t able to see the blanket in person (Talia and her family live in Oregon and we are now in California) I had to work off a few pictures. The blanket isn’t a true square granny blanket (notice the “square” stops and the corners keep going – It’s actually more of a diamond, not a square) I decided to make 4 separate pieces using the C2C Granny Stitch and sew them together to achieve the look of the original blanket. It worked perfectly! It was also nice to be able to take the 4 smaller projects with me on-the-go instead of a hauling a huge blanket around. I did some research to try and match the yarns to the original blanket and decided on Caron One Pound in Cream and Soft Pink, and Caron Jumbo in Baby Rainbow. I think I’m pretty spot on! What do you think?!
![]()
You will want to view my post on How to Crochet Corner-to-Corner Using the Granny Stitch to find a full tutorial (video too!) on how to make the 4 squares. Once you learn the technique, please refer back to the post below for sizing and finishing details.
![]()
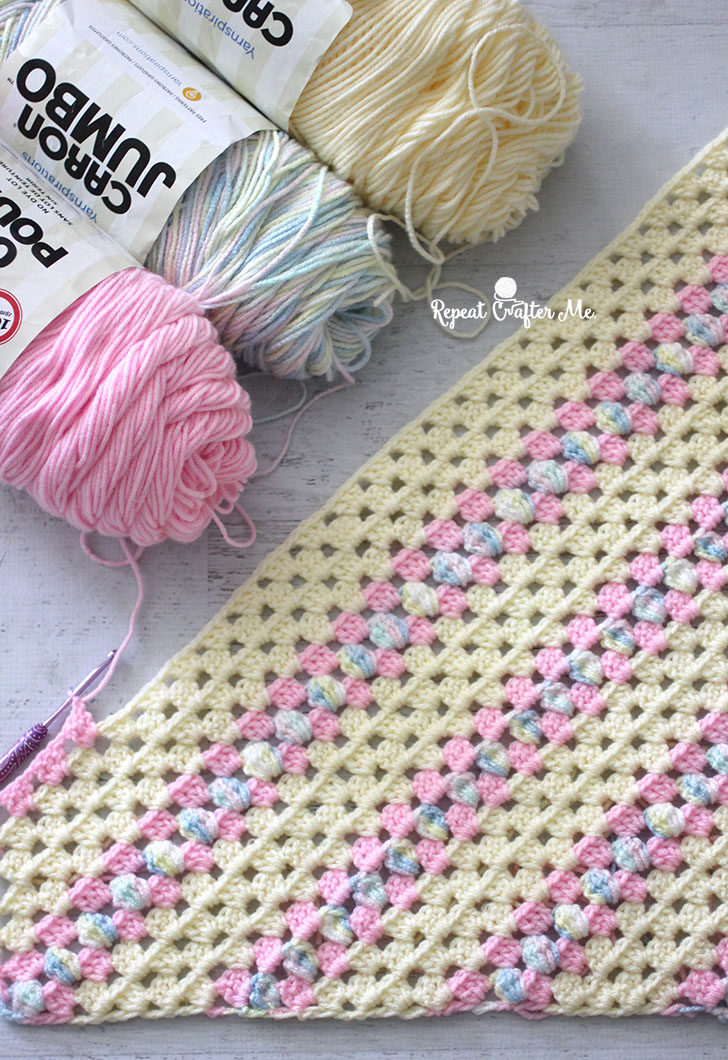
Materials:
– Caron One Pound yarn in Cream (2 skeins) and Soft Pink (1 skein)
– Caron Jumbo yarn in Baby Rainbow (1 skein)
Shop HERE at Yarnspirations.com
GET 20% OFF Caron One Pound with coupon code RCMCARON
– Size G Crochet Hook
– Tapestry Needle
Finished Size: 50 x 50 inches including the border
Granny Stitch = 3 DC + chain 1
Puff Stitch = Yarn over, insert the hook in the stitch, yarn over, draw the yarn through the stitch, yarn over, and draw the yarn through the 2 loops on the hook. In the same stitch, repeat until you have 6 loops on your hook, yarn over, and pull through all the loops.
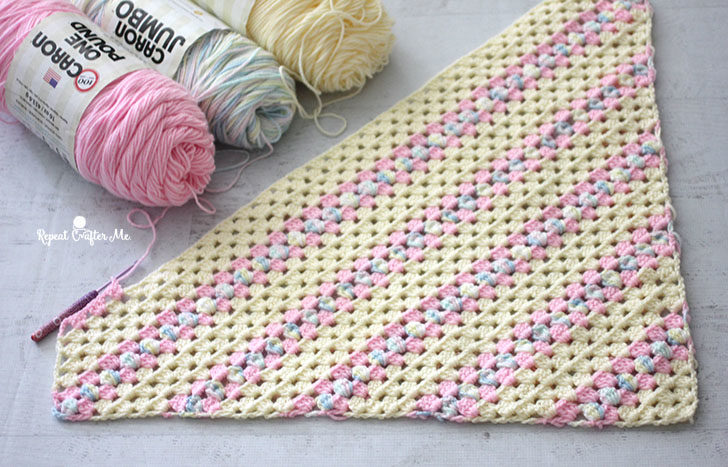
The blanket is made up of mostly the Granny Stitch except for the parts where I used the Baby Rainbow yarn with the puff stitch. Refer to my video tutorial HERE on how to make these stitches as a corner-to-corner piece. Each of my finished C2C squares (there are four) measure about 24 x 24. Below is the list of rows and color changes for each 24 x 24 square piece.
Row 1-4: cream
Row 5: pink
Row 6: rainbow (puff stitch)
Row 7: pink
Row 8-11: cream
Row 12: pink
Row 13: rainbow (puff stitch)
Row 14: pink
Row 15-18: cream
Row 19: pink
Row 20: rainbow (puff stitch)
Row 21: pink
Row 22-25: cream
Row 26: pink
Row 27: rainbow (puff stitch)
Row 28: pink
Row 29-32: cream
Row 33: pink
Row 34: rainbow (puff stitch)
Now you will start your DECREASE
Row 35-38: cream
Row 39: pink
Row 40: rainbow (puff stitch)
Row 41: pink
Row 42-45: cream
Row 46: pink
Row 47: rainbow (puff stitch)
Row 48: pink
Row 49-52: cream
Row 53: pink
Row 54: rainbow (puff stitch)
Row 55: pink
Row 56-59: cream
Row 60: pink
Row 61: rainbow (puff stitch)
Row 62: pink
Row 63-65: cream
Fasten off but leave loose ends. You will need these to stitch your pieces together!
Lay your 4 pieces together (be sure you have a diamond shape in the middle) and use your loose ends to stitch together using your tapestry needle and the whip stitch. Be sure ALL ends are woven in.
![]()
Now lets work on the border!
Starting in any space along the edge, attach your baby rainbow yarn and make a puff stitch + chain 4. Skip the next space and make another puff stitch + chain 4. Continue along all edges making a puff stitch + chain 4 in every other space along the border. When you get to the corners you will make a puff stitch directly in the corner stitch. Join to top of first puff stitch. Weave in ends.
Border Round 2: attach Pink yarn with a slip stitch to the top of one of the puff stitches. Now working in the next chain 4 space, make 5 DC stitches, join with a slip stitch to the top of the next puff stitch. Continue working around the edge making 5 DC stitches in the chain 4 spaces and slip stitching to the top of the puff stitches. When you get to the corners, make a chain 2 + 3 DC + chain 2 and slip stitch to join in all in same corner stitch. Join, fasten off and weave in ends.
![]()
![]()
![]()
I’m mailing the blanket to Taila today and her mom has promised to send pictures when she receives it!
![]()
![]()
If you make this blanket be sure to hashtag #RepeatCrafterMe on social media!
*** You may make and sell products from my patterns but if you do I ask that you link back to my post. Please do not copy and post this pattern and claim it as your own. Please do not re-publish photos as your own.***
Keep in touch on my Repeat Crafter Me Facebook Page and my Repeat Crafter Me Instagram Page for new pattern sneak peeks and when they will be available on my blog! And feel free to post pictures of your finished hats and/or links to your shops on my Facebook wall so all can see.

 Starbucks Stitch Markers and Bottled Beverages
 Crochet Christmas Tree Pixel Square
 Crochet Santa Pixel Square
 Crochet Daisy Rug with Clover Amour Large Hooks and Giveaway!
Wow its perfect! You are so talented. Thanks for sharing
I love your work!! I don’t know how you get so much don and have children also!Thank you for sharing so many wonderful patterns!! I always look forward to your emails. I’m going to have my first 2 great-grandchildren this summer and fall I think I will make this one for the boy but in different colors.
This is really cute blanket. Your girl looks so happy. I wanna start to do one for my little kids too.
The woolen blanket looks very cute, it looks light and easy to use!
Wow, the handmade products are beautiful and meticulous, I also want to try knitting wool scarves, thank you for sharing the way.
Like many other Online game this platform has no any special requirement to Download or pay for this bejeweled 3 online Single player Puzzle game. Just visit homepage and lets get set to play single.
good! post useful to return the useful for the view! 🙂
Can I please have the video of this blanked
https://ipocketmortyrecipes.com/ There are many Pocket Mortys recipe lists online, but it’s also fun to experiment within the game. One item, a VR headset used for playing Roy,
I also want to try knitting wool scarves, thank you for sharing the way. https://toptenbiz.com
I’m going to have my first 2 great-grandchildren this summer and fall I think I will make this one for the boy
Wow, this is such a nice stiching and you really made it look simple and amazing
Now Discover the latest news about freebies, games hacks & tips, gift cards and much more. Keep coming for Latest Gaming Updates, Tech news, and Guides.
I love this. Anything granny square appeals to me and this is so cute. Tons of possibilities. Thanks for sharing a great and useful pattern.
I have a question….I want to make a rectangle full size blanket. I did the pattern up to 53″ long. Now that’s my bottom. I started the decreases. So if I keep going with the pattern, will I end up with a big square? Or would it work after decreasing how many rows that I could go back and just do the pattern until I need to decrease for a corner until I finish it off?
I love the pattern and it’s so easy. Now I hope I can get it done before Christmas.
Thank you,
CarolK
I love this.
The woolen blanket looks very cute, it looks light and easy to use!
..
The woolen blanket looks very cute
Anything granny square appeals to me and this is so cute
I like this kind of content and i think that it’s very informative!
Nice to read. Thanks for sharing very good information.