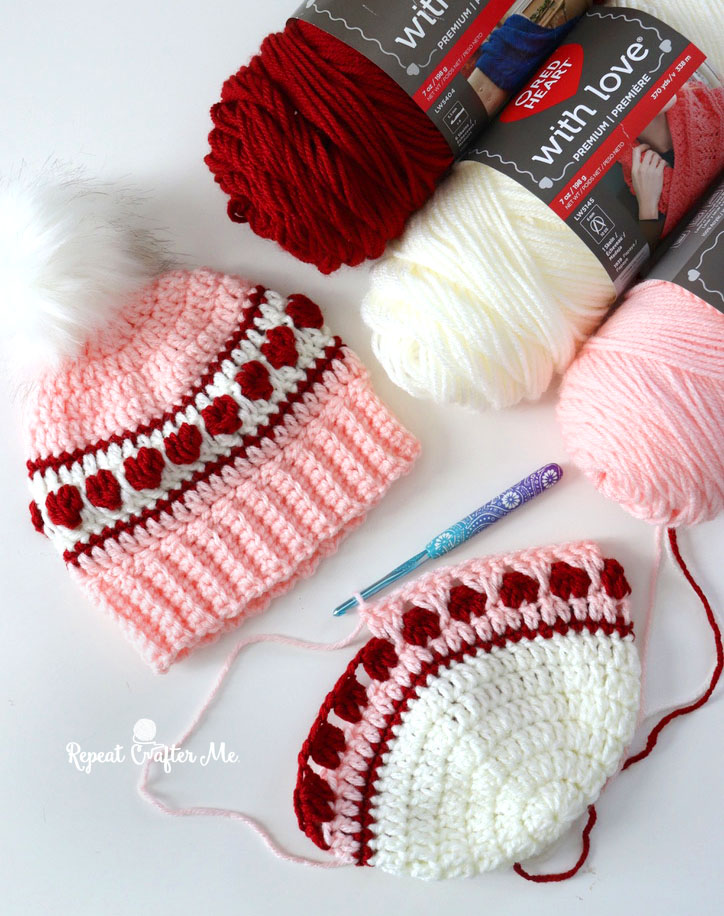
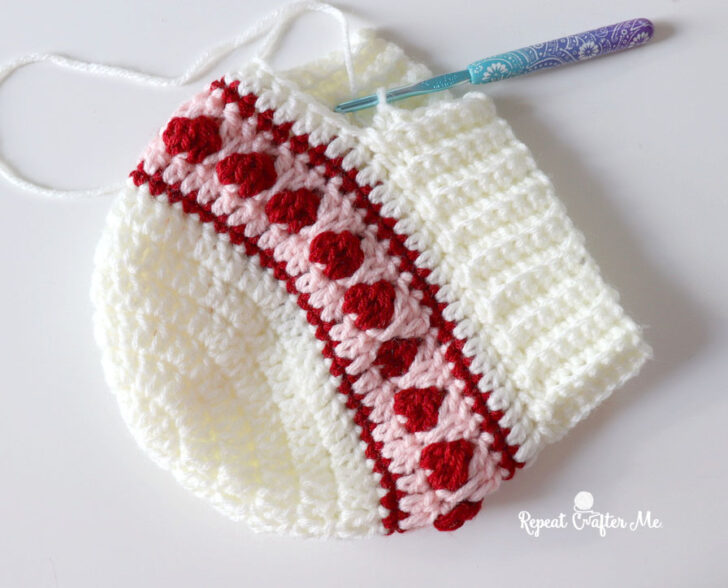
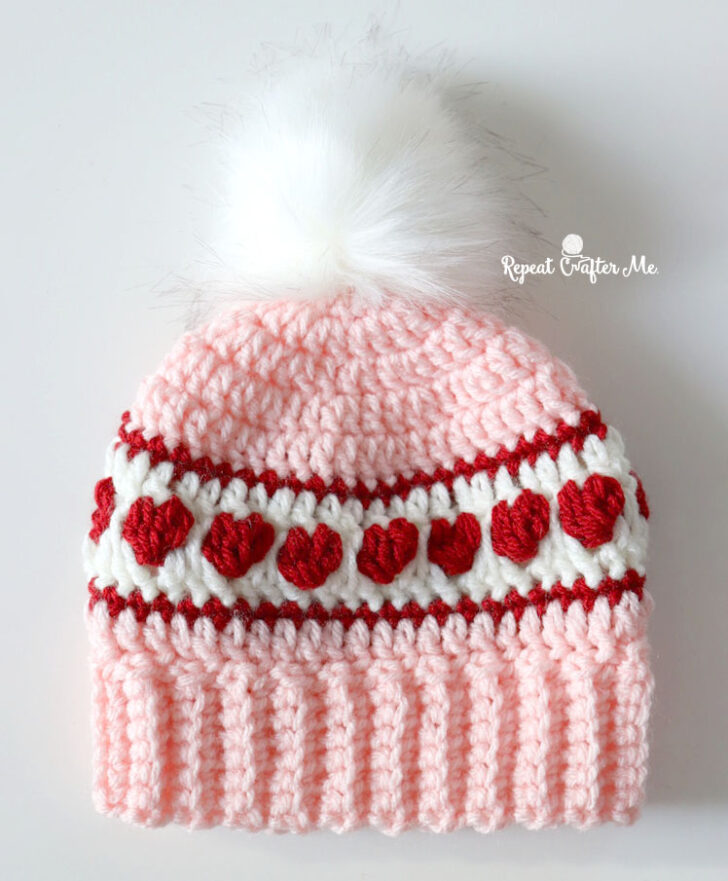
I’m on a roll with making crochet striped beanies! This time I added a round of cluster stitches to the stripe that look like sweet little hearts. I actually surprised myself with how simple this was to design and make!
Pattern below is for newborn to adult sizes and I’ve included a video tutorial for the heart stripe to clear up any confusion. It’s the season of love and you will need this pattern on your hook for all your valentines.
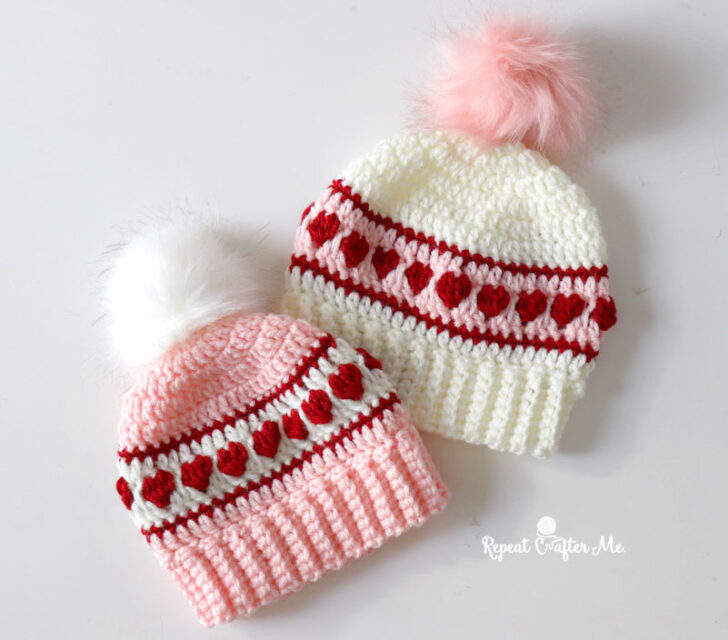
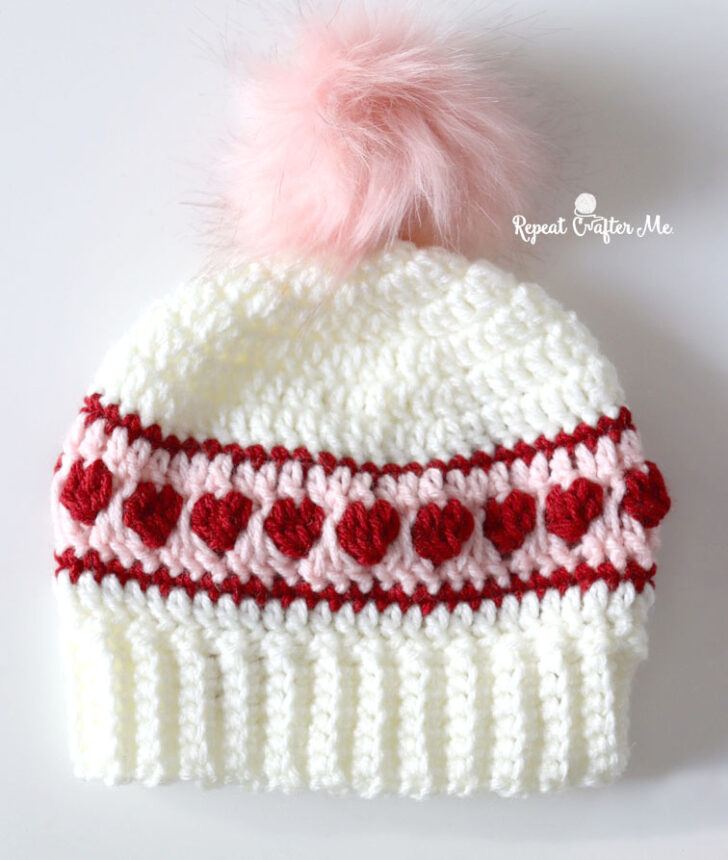
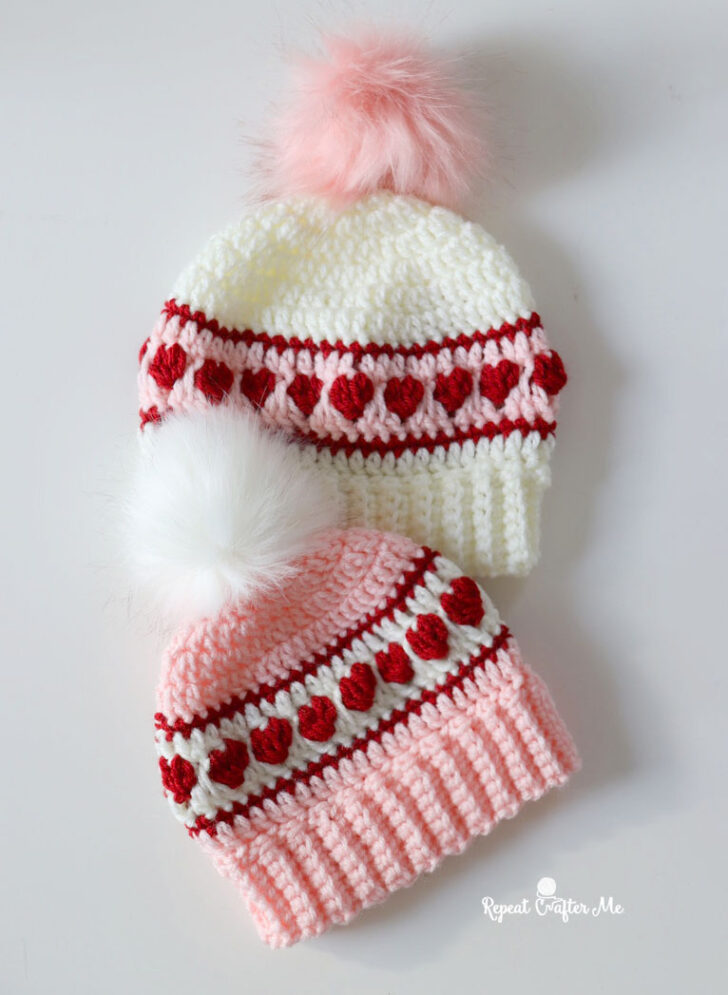
I am using Red Heart with Love Yarn in colors Berry Red, Eggshell White, and Sweet Pink. You can use these interchangeably for all the parts of the hat but the tutorial below will use the sweet pink as the main color. I’m also using these colors (plus bubble gum) for my Valentine Granny Stitch Blanket so be sure to pick up multiple skeins of this yarn! It’s super soft and snuggly.
You can shop all these colors HERE on Yarnspirations.com!
NOTE: Red Heart with Love yarn in color Sweet Pink is currently not listed on the Yarnspirations website. But it’s available in a 3-pack in the Red Heart Store on Amazon.com!
Materials:
– Red Heart with Love Yarn in Berry Red, Eggshell White, and Sweet Pink.
Shop these shades HERE on Yarnspirations.com
– Size H Crochet Hook
– Tapestry Needle
– Faux Fur Pom-Poms. Purchase them HERE on Amazon <<< this is my affiliate link
Hearts in a Stripe Hat Pattern
Note: Pattern works from the top down
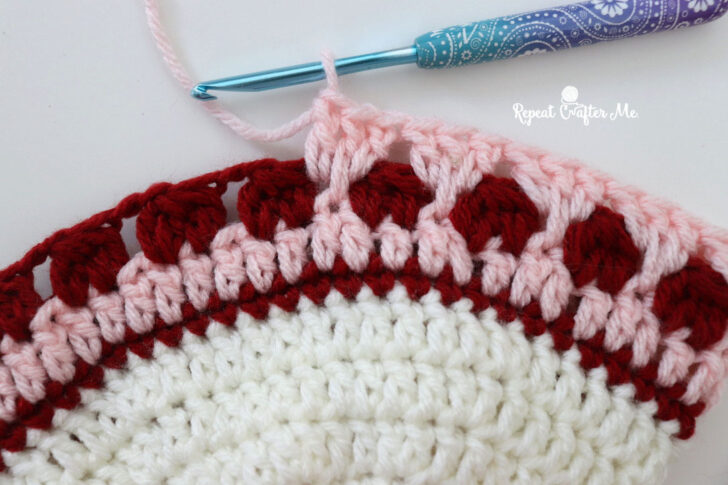
Special Stitch = Heart Cluster
Yarn over pull through first stitch, pull through 2 loops (making the first half of your DC), yarn over and pull up through same stitch, pull through 2 loops, you should now have 3 loops on your hook, working in the next stitch repeat the same 2 stitches so you have 5 loops on your hook. Yarn over and pull through all 5 stitches.
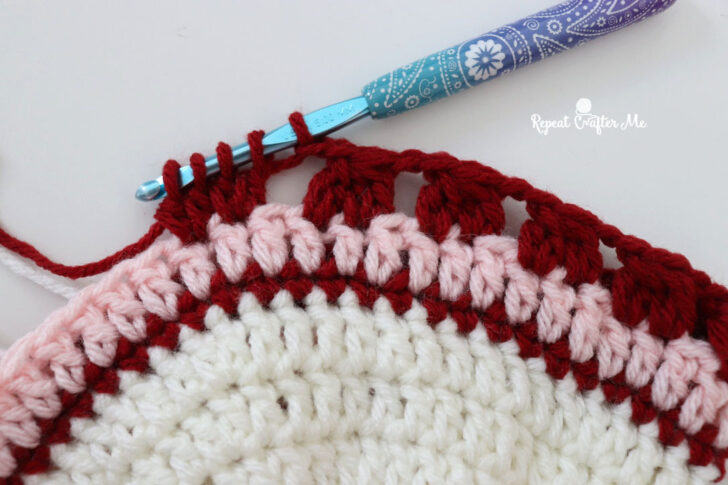
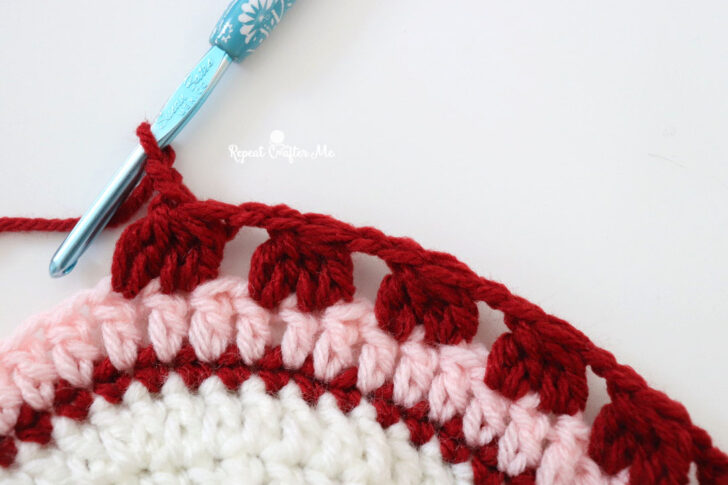
Special Stitch = Elongated Double Crochet (Long DC)
When you are working your DC stitches between the heart clusters, one of your double crochets will reach down to the previous round. Yarn over pull through bringing up that loop up to the height of the double crochet before it. Yarn over pull through two loops. Yarn over pull through last two loops.
I got over the special stitches for the row of hearts in the video tutorial below:
NOTE: When you finish the round of heart clusters and you have an extra stitch at the end without enough room to make one more heart, go ahead and make a DC to finish the round. You want to have the same amount of stitches as your last increase round.
Size: Newborn
with sweet pink yarn
Magic ring, chain 2 and make 11 DC in ring, join to first DC, chain 2
Round 2: 2 DC in each stitch around, join, chain 2 (22 DC)
Round 3: 2 DC in first, DC in next, repeat around, join, chain 2 (33 DC)
Round 4: 2 DC in first, DC in next 2, repeat around, join, chain 2 (44 DC)
Round 5: with red, SC in each stitch around, join to first SC and join in white, chain 2 (44 SC)
Round 6: DC in each stitch around, join red yarn back in, chain 2 (44 DC)
Round 7: Heart cluster over first two stitches, chain 2, skip a stitch, heart cluster over next two stitches, chain 2, skip a stitch, repeat around, join to first stitch and join back in white yarn, chain 2
Round 8: DC in first space, reach over to the first chain space, DC + Long DC + DC in chain space, reach over the next chain space and make a DC + Long DC + DC, repeat around, join to first DC and join in red yarn, chain 1 (44 DC)
Round 9: SC in each stitch around, join in pink, chain 2 (44 SC)
Round 10: DC in each stitch around, join, chain 2 (44 DC)
Continue to ribbed edge using the back loop SC ribbed border technique
Size: 3-6 Months
with sweet pink yarn
Magic ring, chain 2 and make 11 DC in magic ring, join to first DC, chain 2
Round 2: 2 DC in each around, join, chain 2 (22 DC)
Round 3: 2 DC in first, DC in next, repeat around, join, chain 2 (33 DC)
Round 4: 2 DC in first, DC in next 2, repeat around, join, chain 2 (44 DC)
Round 5: 2 DC in first, DC in next 10, repeat around, join, chain 2 (48 DC)
Round 6: with red, SC in each stitch around, join to first SC and join in white, chain 2 (48 SC)
Round 7: DC in each stitch around, join red yarn back in, chain 2 (48 DC)
Round 8: Heart cluster over first two stitches, chain 2, skip a stitch, heart cluster over next two stitches, chain 2, skip a stitch, repeat around, join to first stitch and join back in white yarn, chain 2
Round 9: DC in first space, reach over to the first chain space, DC + Long DC + DC in chain space, reach over the next chain space and make a DC + Long DC + DC, repeat around, join to first DC and join in red yarn, chain 1 (48 DC)
Round 10: SC in each stitch around, join in pink, chain 2 (48 SC)
Round 11: DC in each around, join, chain 2 (48 DC)
continue to ribbed edge using the back loop SC ribbed border technique
Size: 6-9 Months
with sweet pink yarn
Magic ring, chain 2 and make 11 DC in magic ring, join to first DC, chain 2
Round 2: 2 DC in each around, join, chain 2 (22 DC)
Round 3: 2 DC in first, DC in next, repeat around, join, chain 2 (33 DC)
Round 4: 2 DC in first, DC in next 2, repeat around, join, chain 2 (44 DC)
Round 5: 2 DC in first, DC in next 10, repeat around, join, chain 2 (48 DC)
Round 6: 2 DC in first, DC in next 11, join, chain 2 (52 DC)
Round 7: with red, SC in each stitch around, join to first SC and join in white, chain 2 (52 SC)
Round 8: DC in each stitch around, join red yarn back in, chain 2 (52 DC)
Round 9: Heart cluster over first two stitches, chain 2, skip a stitch, heart cluster over next two stitches, chain 2, skip a stitch, repeat around, join to first stitch and join back in white yarn, chain 2
Round 10: DC in first space, reach over to the first chain space, DC + Long DC + DC in chain space, reach over the next chain space and make a DC + Long DC + DC, repeat around, join to first DC and join in red yarn, chain 1 (52 DC)
Round 11: SC in each stitch around, join in pink, chain 2 (52 SC)
Round 12: DC in each around, join, chain 2 (52 DC)
continue to ribbed edge using the back loop SC ribbed border technique
Size: 9-16 Months
with pink yarn
Magic ring, chain 2 and make 11 DC in magic ring, join to first DC, chain 2
Round 2: 2 DC in each around, join, chain 2 (22 DC)
Round 3: 2 DC in first, DC in next, repeat around, join, chain 2 (33 DC)
Round 4: 2 DC in first, DC in next 2, repeat around, join, chain 2 (44 DC)
Round 5: 2 DC in first, DC in next 10, repeat around, join, chain 2 (48 DC)
Round 6: 2 DC in first, DC in next 11, join, chain 2 (52 DC)
Round 7: 2 DC in first, DC in next 12, join, chain 2 (56 DC)
Round 8: with red, SC in each stitch around, join to first SC and join in white, chain 2 (56 SC)
Round 9: DC in each stitch around, join red yarn back in, chain 2 (56 DC)
Round 10: Heart cluster over first two stitches, chain 2, skip a stitch, heart cluster over next two stitches, chain 2, skip a stitch, repeat around, join to first stitch and join back in white yarn, chain 2
Round 11: DC in first space, reach over to the first chain space, DC + Long DC + DC in chain space, reach over the next chain space and make a DC + Long DC + DC, repeat around, join to first DC and join in red yarn, chain 1 (56 DC)
Round 12: SC in each stitch around, join in pink, chain 2 (56 SC)
Round 13: DC in each around, join, chain 2 (56 DC)
continue to ribbed edge using the back loop SC ribbed border technique
Size: Toddler/Preschooler
with pink yarn
Magic ring, chain 2 and make 11 DC in magic ring, join to first DC, chain 2
Round 2: 2 DC in each around, join, chain 2 (22 DC)
Round 3: 2 DC in first, DC in next, repeat around, join, chain 2 (33 DC)
Round 4: 2 DC in first, DC in next 2, repeat around, join, chain 2 (44 DC)
Round 5: 2 DC in first, DC in next 10, repeat around, join, chain 2 (48 DC)
Round 6: 2 DC in first, DC in next 11, join, chain 2 (52 DC)
Round 7: 2 DC in first, DC in next 12, join, chain 2 (56 DC)
Round 8: 2 DC in first, DC in next 13, join, chain 2 (60 DC)
Round 9: with red, SC in each stitch around, join to first SC and join in white, chain 2 (60 SC)
Round 10: DC in each stitch around, join red yarn back in, chain 2 (60 DC)
Round 11: Heart cluster over first two stitches, chain 2, skip a stitch, heart cluster over next two stitches, chain 2, skip a stitch, repeat around, join to first stitch and join back in white yarn, chain 2
Round 12: DC in first space, reach over to the first chain space, DC + Long DC + DC in chain space, reach over the next chain space and make a DC + Long DC + DC, repeat around, join to first DC and join in red yarn, chain 1 (60 DC)
Round 13: SC in each stitch around, join in pink, chain 2 (60 SC)
Round 14: DC in each around, join, chain 2 (60 DC)
continue to ribbed edge using the back loop SC ribbed border technique
Size: Child
with pink yarn
Magic ring, chain 2 and make 11 DC in magic ring, join to first DC, chain 2
Round 2: 2 DC in each around, join, chain 2 (22 DC)
Round 3: 2 DC in first, DC in next, repeat around, join, chain 2 (33 DC)
Round 4: 2 DC in first, DC in next 2, repeat around, join, chain 2 (44 DC)
Round 5: 2 DC in first, DC in next 10, repeat around, join, chain 2 (48 DC)
Round 6: 2 DC in first, DC in next 11, join, chain 2 (52 DC)
Round 7: 2 DC in first, DC in next 12, join, chain 2 (56 DC)
Round 8: 2 DC in first, DC in next 13, join, chain 2 (60 DC)
Round 9: 2 DC in first, DC in next 14, join, chain 2 (64 DC)
Round 10: with red, SC in each stitch around, join to first SC and join in white, chain 2 (64 SC)
Round 11: DC in each stitch around, join red yarn back in, chain 2 (64 DC)
Round 12: Heart cluster over first two stitches, chain 2, skip a stitch, heart cluster over next two stitches, chain 2, skip a stitch, repeat around, join to first stitch and join back in white yarn, chain 2
Round 13: DC in first space, reach over to the first chain space, DC + Long DC + DC in chain space, reach over the next chain space and make a DC + Long DC + DC, repeat around, join to first DC and join in red yarn, chain 1 (64 DC)
Round 14: SC in each stitch around, join in pink, chain 2 (64 SC)
Round 15: DC in each around, join, chain 2 (64 DC)
continue to ribbed edge using the back loop SC ribbed border technique
Size: Teen/Adult
with pink yarn
Magic ring, chain 2 and make 11 DC in magic ring, join to first DC, chain 2
Round 2: 2 DC in each around, join, chain 2 (22 DC)
Round 3: 2 DC in first, DC in next, repeat around, join, chain 2 (33 DC)
Round 4: 2 DC in first, DC in next 2, repeat around, join, chain 2 (44 DC)
Round 5: 2 DC in first, DC in next 10, repeat around, join, chain 2 (48 DC)
Round 6: 2 DC in first, DC in next 11, join, chain 2 (52 DC)
Round 7: 2 DC in first, DC in next 12, join, chain 2 (56 DC)
Round 8: 2 DC in first, DC in next 13, join, chain 2 (60 DC)
Round 9: 2 DC in first, DC in next 14, join, chain 2 (64 DC)
Round 10: 2 DC in first, DC in next 15, join, chain 2 (68 DC)
Round 11: with red, SC in each stitch around, join to first SC and join in white, chain 2 (68 SC)
Round 12: DC in each stitch around, join red yarn back in, chain 2 (68 DC)
Round 13: Heart cluster over first two stitches, chain 2, skip a stitch, heart cluster over next two stitches, chain 2, skip a stitch, repeat around, join to first stitch and join back in white yarn, chain 2
Round 14: DC in first space, reach over to the first chain space, DC + Long DC + DC in chain space, reach over the next chain space and make a DC + Long DC + DC, repeat around, join to first DC and join in red yarn, chain 1 (68 DC)
Round 15: SC in each stitch around, join in pink, chain 2 (68 SC)
Round 16: DC in each around, join, chain 2 (68 DC)
continue to ribbed edge using the back loop SC ribbed border technique
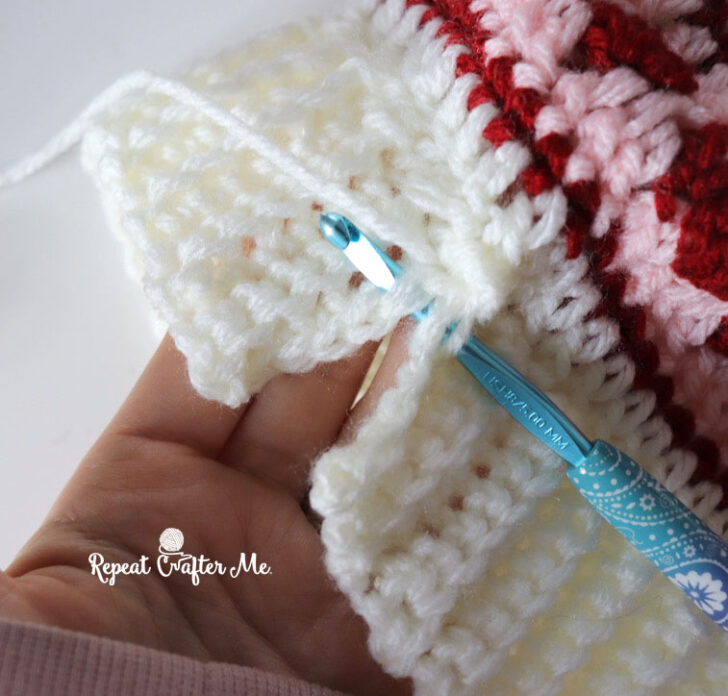
RIBBED BORDER:
Please be sure and watch THIS TUTORIAL from my friend Daisy Farm Crafts on how to make a single crochet ribbed border. I love this technique because you don’t need to sew the ribbing on separately, it is crochet right onto the edge of the hat! It’s basically a chain 7 (or however long/short your want your ribbed border), SC in each chain until you get back to the hat edge, slip stitch in two stitches along the hat edge and then SC in the back loops of the ribbing and repeat. She has a VERY easy tutorial to follow and you can use this border on many different projects.
When you’ve finished the ribbed border along the edge of the hat you can slip stitch the seam together.
Add a Pom-Pom! I love THIS multi pack of fur poms from Amazon (affiliate link). They have multiple colors and a little loop underneath that you can sew onto the top of your hat.
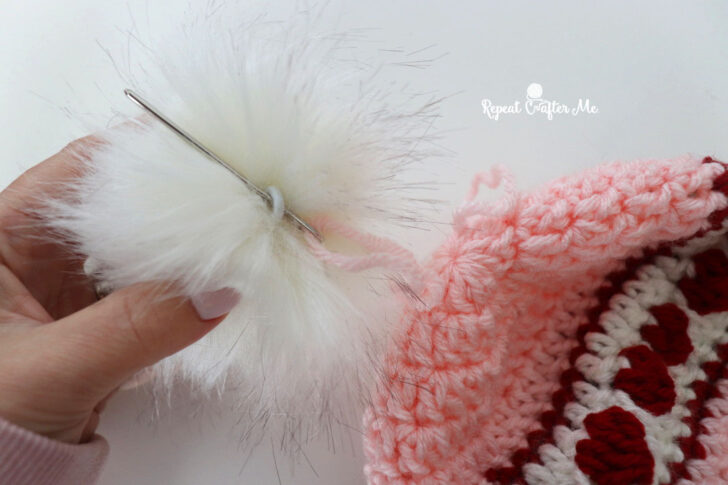
Buy these pom-poms HERE. $15 for 20 of them!
If you are on a desktop or laptop computer, you can easily print this pattern without ads (and any patterns on my website) with the “PRINT THIS” PrinterFriendly button at the bottom of this post!
Since I have had so many requests for a PDF of this pattern, I went ahead and used the Printer Friendly Button to create an >>> AD-FREE PDF OF THE HEARTS IN ROW HAT CROCHET PATTERN <<<
2024 is going to be NEW YEAR of NEW PATTERNS! Let’s stay connected!
Subscribe to my NEWSLETTER for free patterns straight to your inbox!
Repeat Crafter Me Facebook
Repeat Crafter Me Instagram
Repeat Crafter Me Pinterest
Repeat Crafter Me YOUTUBE

 Starbucks Stitch Markers and Bottled Beverages
 Crochet Christmas Tree Pixel Square
 Crochet Santa Pixel Square
 Crochet Daisy Rug with Clover Amour Large Hooks and Giveaway!
Round 10 says 68 stitches while round 11 says sc in each stitch and 64 stitches
Adult size
I’m confused as well… It also repeats round 10 (the one with 68 DC and after, it’s round 10 again with the change of colour).
Hi!
I’m having trouble with the toddler size – at the end of round 4 I have 48 stitches (pattern says I should have 44) but I ended the round at the stitch marker after doing an inc, 2 dc around. Which, in turn, messes up round 5 because I do the inc, 10 dc but I’m left with 4 un-worked stitches before I hit the stitch marker.
Thanks!
you have to many at end of round 4-you should have only 44.The counts are 11-22-33-44-Hope this helps
Nice post . Thank you for posting something like this
I did the adult pattern, well both my girlfriend and I, we did the adult teen hat and assumed the pattern should stay 68 stitches.
We followed exactly But this hat at the end of round 1-6 is already below the ears, this hat is too long.
So bummed, I wanted this work!
Sorry, rounds 15-16
The hat is too long to add the ribbed border. I made the child size and just added earflaps and braids.
Thanks for your comment! I’m dealing with the same issue for kid size kinda bummed. I’ll have to try and figure out how to add the ear flaps
Same! I think I’m going to go down on the hook size so the hat will be smaller.
Thanks for everyone’s interesting and useful sharing, I will visit often to find the necessary information.
The hat size for teen/adults is too large! I even eliminated 2 increases on the last row of increases and it was still too large. I could tell it would be too long as well. Will have to undo for the 2nd time.
Thanks for sharing your experience!
Lucky me I recently found your website
is there any kind of gauge for this> It seems I am not the only one having trouble with size-Except I’m doing child and have none to try it on so I’d like some kind of gauge. I’m getting 3 1/8 inches at end of round 3-and 13 dc to the inch-but it does look big.
Can you record a video of the band? I haven’t been successful with the tutorial you linked to the end 🙁
I really like your article. how do you think of it It must be only you.
Can you show how to start heart row end off and start the next row tutorial does not show how
I would love to have a video on the joining of rows too.
سایت پی دی اف کده کتاب قدرت شروع ناقص جیمز کلییر دانلود PDF با 188 ، برای شما آماده کرده است.
Very cute hat! I’m making the teen/adult size for myself. Since the comments above have said that it runs long, I guess I’ll have to make the rim shorter. Also, love the video on making the hearts but……can you also make a video on how to do the joins and starting of each of the heart rows? Happy Crocheting. Thank you.
I would like to make a hat like this for my grandson but I am not sure what colors to use for a boy.
Heart Cluster: YO, insert hook, YO draw up a loop, YO and pull through 2 stitches, YO, insert hook in same stitch, YO draw up a loop, YO and draw through 2 on the hook (you should now have 3 on the hook.). YO, insert hook, YO draw up a loop, YO and pull through 2 stitches (4 on hook) YO, insert hook in same stitch, YO and draw up a loop, YO and pull through 2 stitches (5 on hook.). YO and pull through all 5 stitches on hook. Chain 2 and skip 1 stitch.
This is amazing article you have shared. this useful content i shared with my friend.
I made 3 of the hearts in a row beanies in just 2 days. For the girls I made one with white & one with pink. For my nephew I made his with gray. The pattern was so easy to follow & turned out fantastic! Wish I had more recipients because I’d love to keep making more.
I made the adult size and I have a smaller head. It worked out perfectly!! Sooo cute!! (And I am not that great at reading patterns) I did it in school team colors! So cute I will be doing more 🙂
I’d like to share how I do my joins when switching color rounds. On the last stitch of the round, I join the new color on the last step of that stitch, then join to the first stitch of previous round as usual. Looks so much better than any ways I’ve seen.
I made the newborn sise and this a super cute pattern, but then I made the toddler size with the same yarn and it turned out huge, even too big for an adult.
I came across your pattern for the striped heart beanie and I absolutely fell in love with it! Your instructions were bery clear and it was easier than it looked! I will be making more!
Yolanda R.
On row 11, when I pull through all 5 loops on my hook, does that count as a stitch,? I am supposed to ch 2 before I go to the next cluster , and I don’t want to make the hat too small if I count pulling the yarn through all 5 loops.
After such creative evenings, I wanted to scale up my hobby a little and monetize it — I started posting photos of the process on social media, and then discovered push traffic and popunders to attract an audience from different countries. It turned out that Tier 1 has higher conversion rates, but the competition is fierce, while Tier 2-3 offer volume for less money — ideal for a start. Visit for more detailed analysis of the levels and how to choose the right geo for your project. Now my evenings are filled with a nice additional income, and it brings even more joy than just ready-made hats.
This blog shows a really cute crochet idea using striped beanies with heart cluster stitches, which is a clever way to mix texture and Valentine-themed colorwork in a simple top-down hat design. After reading creative patterns like this I usually relax with Idols Of Ash which is a dark fantasy action game where I explore immersive realms and upgrade heroes through combat progression.