
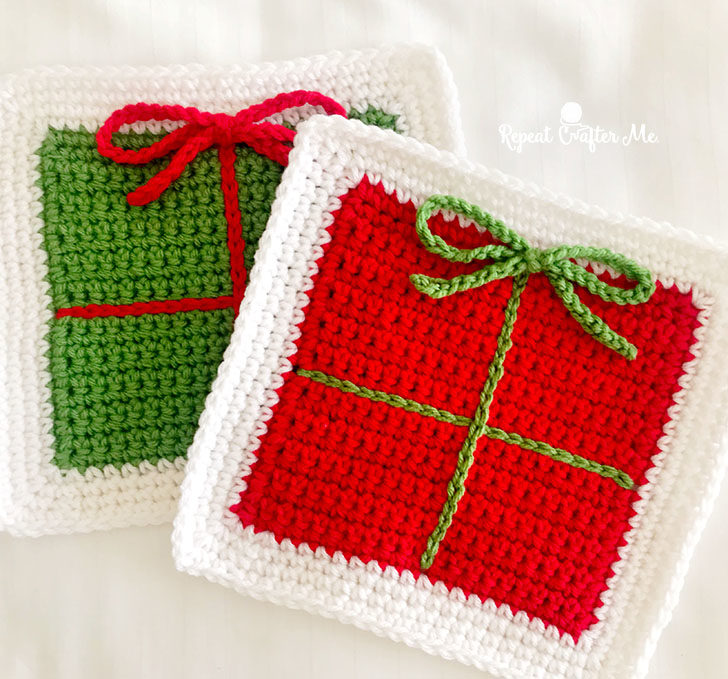
I figured that Christmas in July would be the perfect time to work on my Gift Box Granny Square blanket! Back in December I made a Gift Box Granny Square (See it HERE) but when I finally decided to pick it back up to make an entire blanket, another idea/version popped into my head so I decided to redesign the square! Of course I love both versions and now you guys can choose which one you want to use for your blanket!
Gift Box Granny Version #2 (pattern below)

I am using Bernat Super Value Yarn which has the perfect red and green Christmas shades (Berry and Lush) and I added in a turquoise that coordinates so nicely! You can purchase this worsted weight yarn directly at Yarnspirations.com!
But this project is not only great for Christmas, but also for Birthdays! Make the gift box squares any colors you’d like and you have an awesome handmade birthday present! Shop all 56 shades of Bernat Super Value HERE.
In this post I will give you the pattern for version #2 of the Gift Box Granny Square (version #1 can be found HERE) and then in a follow up post I will show you how to join the squares and add a border.
Materials:
– Bernat Super Value Yarn in Berry, Lush, Aqua, and White. You only need one skein of each. Shop colors HERE.
– Size H Crochet Hook
– Tapestry Needle
I have made a video tutorial to help with any confusion on how to switch colors around the border! Please view video tutorial in conjunction with the written pattern below.
Gift Box Granny Square Pattern:
Starting with green (or your main gift box color)
Chain 21, SC in second chain from hook and the rest of the way down chain, chain 1, turn (20 SC)
Row 2-9: SC in each stitch, chain 1, turn (20 SC)
change to red (or your ribbon color)
Row 10-12: SC in each stitch, chain 1, turn (20 SC)
change back to green (or your main gift box color)
Row 13-21: SC in each stitch, chain 1, turn (20 SC)
You now have made your main gift box square. Let’s being on the border
Border Round 1: Still with green attached, begin to SC around the edges (making a SC + chain 2 + SC in each corner). When you get to the red parts on your edge, you will switch to red yarn so the colors match up. See video tutorial above for help changing colors and tips and tricks. Join to the beginning green stitch and add in white.
Border Round 2: With white yarn SC in each stitch around (on first 3 edges) making a SC + chain 2 + SC in the corners. When you get to the last edge (where the top of your ribbon bow will be) you will stop 5 stitches before the ribbon stripe and change to red. SC 13 stitches in red, switch back to white and SC in the remaining stitches until you get back to your first SC and join, chain 1. See picture below or video tutorial for help.

Border Round 3: With white yarn SC in each stitch around (on first 3 edges) making a SC + chain 2 + SC in the corners. When you get to your red bow, switch to red and SC in next 5, switch white and SC in the next 3, switch back to red and SC in the next 5, switch back to white for the remaining stitches in round, join, chain 1.
Border Round 4: With white yarn SC in each stitch around (on first 3 edges) making a SC + chain 2 + SC in the corners. When you get to your red bow, switch to red and SC in next 4, switch white and SC in the next 5, switch back to red and SC in the next 4, switch back to white for the remaining stitches in round, join, chain 1.
Border Round 5: With white yarn SC in each stitch around (on first 3 edges) making a SC + chain 2 + SC in the corners. When you get to your red bow, switch to red and SC in next 3, switch white and SC in the next 7, switch back to red and SC in the next 3, switch back to white for the remaining stitches in round, join, chain 1.
Border Round 6-7: with white yarn only for the last two rounds, SC in each stitch around making a SC + chain 2 + SC in each of the 4 corners. join, fasten off and weave in ends.


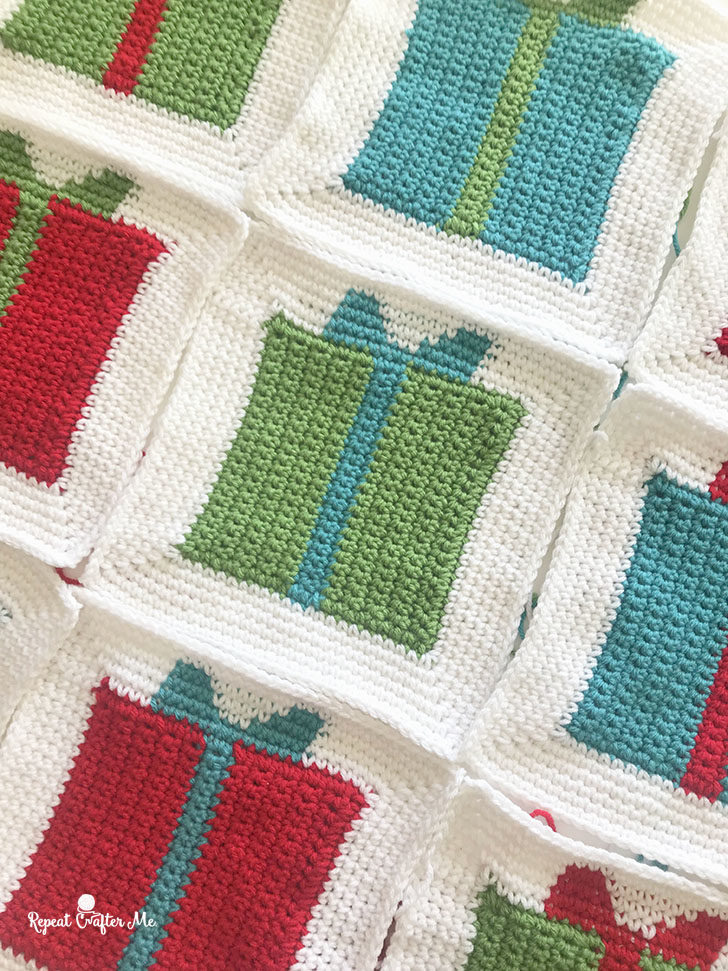
I made a total of 9 gift box granny squares and will show you how to connect them in my next blog post coming soon! In the meantime, go ahead and get started making the individual squares!
If you make these gift box granny square please be sure to tag me on social media using the hashtag #RepeatCrafterMe

 Starbucks Stitch Markers and Bottled Beverages
 Crochet Christmas Tree Pixel Square
 Crochet Santa Pixel Square
 Crochet Daisy Rug with Clover Amour Large Hooks and Giveaway!
When I saw the ad for your gift-box granny square, I thought ‘no way will I be able to do them, I’ll just look and admire and go on.’ I can ‘read’ what is done in pictures or watching someone doing crochet and knitting, but all the abbreviations leave me lost. I suppose if I applied myself, I could figure them out, but the confusion has never seemed worth the stress to me. (I get that way with numbers also, other than simple math, I need paper and pencil to figure things out.)
I looked at your post, and wow, your pictures are clear, I can see what it is you are doing, and I honestly believe I CAN do this!
With three granddaughters and two grandsons, I would have a lot of crocheting to do, but I honestly think I can make these. Your photos are amazing and really show how to do the work so clearly that I can follow them even if the instructions swim in my head. 🙂 Thank you! Thank you!
I may have a new gift for all the grand come the holidays…and something they can use well into adulthood. Thank you so very much for this post. I look forward to seeing how to join them together. Blessings!
Sarah, it was useful
Wow, how beautiful a blanket is, how much I like learning how to hook a towel
very nice, thank you the post.
These making are so cool can you upload your video for additional hints
so that every one can review it.
best vakil
This post is very beautiful. I will surely try this out and i would love to share your post on my http://onlinecasinohex.de website. I hope, more people will visit your post.
Very Cute Designs! Keep up the great work!
from where you find out these creative ideas
Hello! The first time I saw this pattern I thought of the project at our church for Operation Christmas Child. Their shoeboxes are the red and green theme, so I am going to make one out of 100% cotton for a washcloth to see if I need to change the size of the block.
As cute as these squares are, they are not granny squares.
I’m hoping to get involved with a yarn bomb Christmas tree project in my village and the gift box squares (version 2) would make a great element to the overall design. What size are the finished squares? All the squares in the project I’m hoping to get engaged in need to be 19cm so, as I’m a novice crocheter, I’d need to ask for help in scaling up/down.